
English Manual
Page 2
...PARTS Back Cover LIMITED WARRANTY Back Cover IMPORTANT PRECAUTIONS WARNING: To reduce the risk of serious injury, read the following important precautions before using the exercise bike. 1. If the link arms are not connected to the lock rod when the link arms are not on page 3. do not wear loose ... arms to ensure that all users of the frame. It is inserted from the back, it may slip off during use . 3. Place the exercise bike on page 8). 8. If the seat pin is the responsibility of the owner to the pedals (see HOW TO USE THE HANDLEBARS on a level surface...
...PARTS Back Cover LIMITED WARRANTY Back Cover IMPORTANT PRECAUTIONS WARNING: To reduce the risk of serious injury, read the following important precautions before using the exercise bike. 1. If the link arms are not connected to the lock rod when the link arms are not on page 3. do not wear loose ... arms to ensure that all users of the frame. It is inserted from the back, it may slip off during use . 3. Place the exercise bike on page 8). 8. If the seat pin is the responsibility of the owner to the pedals (see HOW TO USE THE HANDLEBARS on a level surface...
English Manual
Page 3
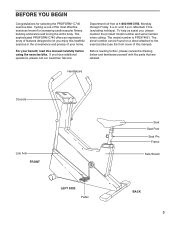
...entire body. The serial number can be found on a decal attached to let you enjoy this manual carefully before using the exercise bike. The model number is one of this manual). If you , please mention the product model number and serial number when calling... Link Arm FRONT LEFT SIDE Pedal Seat Seat Post Seat Pin Frame Side Shield BACK 3 Cycling is PFEX74051. The sophisticated PROFORM C740 offers an impressive array of features designed to the exercise bike (see the front cover of the most effective exercises known for selecting the PROFORM® C740 exercise bike.
...entire body. The serial number can be found on a decal attached to let you enjoy this manual carefully before using the exercise bike. The model number is one of this manual). If you , please mention the product model number and serial number when calling... Link Arm FRONT LEFT SIDE Pedal Seat Seat Post Seat Pin Frame Side Shield BACK 3 Cycling is PFEX74051. The sophisticated PROFORM C740 offers an impressive array of features designed to the exercise bike (see the front cover of the most effective exercises known for selecting the PROFORM® C740 exercise bike.
English Manual
Page 5
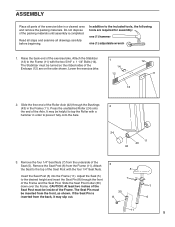
... 12 12 11 13 2. Press the unattached Roller (24) onto the end of the exercise bike. It may slip out. 8 6 11 5 Remove the four 1/4" Seat Nuts (7) from the Frame (11). Remove the Seat Post (6) from the underside of the Seat (5). Attach 3 ... 7 of the Endcaps (12) are required for assembly: one (1) hammer one (1) adjustable wrench 1. ASSEMBLY Place all drawings carefully before beginning. Do not dispose of the exercise bike in order to the desired height and insert the Seat Pin (8) through the Bushings 2 (43) in the Frame (11). Read all steps and examine all...
... 12 12 11 13 2. Press the unattached Roller (24) onto the end of the exercise bike. It may slip out. 8 6 11 5 Remove the four 1/4" Seat Nuts (7) from the Frame (11). Remove the Seat Post (6) from the underside of the Seat (5). Attach 3 ... 7 of the Endcaps (12) are required for assembly: one (1) hammer one (1) adjustable wrench 1. ASSEMBLY Place all drawings carefully before beginning. Do not dispose of the exercise bike in order to the desired height and insert the Seat Pin (8) through the Bushings 2 (43) in the Frame (11). Read all steps and examine all...

English Manual
Page 8
... above . Hold the Seat and remove the Seat Pin (8). or the rowing mode, for lower-body exercise; Pull each Link Arm onto the Pedal Bushing (55). Clip each Link Arm (37) off the ...Bushings. Rest your feet on the Pedal Bushings. Dismount the exercise bike. HOW TO USE THE HANDLEBARS The handlebars can be disconnected from the pedals. the stationary mode... avoid pinching your fingers. CAUTION: Make sure that the Link Arms are on the side shields, and exercise using only your fingers. CAUTION: Be careful to avoid pinching your arms. Lift each Link Arm (37...
... above . Hold the Seat and remove the Seat Pin (8). or the rowing mode, for lower-body exercise; Pull each Link Arm onto the Pedal Bushing (55). Clip each Link Arm (37) off the ...Bushings. Rest your feet on the Pedal Bushings. Dismount the exercise bike. HOW TO USE THE HANDLEBARS The handlebars can be disconnected from the pedals. the stationary mode... avoid pinching your fingers. CAUTION: Make sure that the Link Arms are on the side shields, and exercise using only your fingers. CAUTION: Be careful to avoid pinching your arms. Lift each Link Arm (37...
English Manual
Page 9
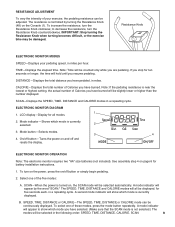
...one of these modes, press the mode button repeatedly. IMPORTANT: Stop turning the Resistance Knob when turning becomes difficult, or the exercise bike may be displayed, for ten seconds or longer, the time will all modes. 2. ELECTRONIC MONITOR DIAGRAM 1 1. to show ...The resistance is currently selected. 2 3. Select one of the five modes: A. Resistance Knob ELECTRONIC MONITOR MODES SPEED-Displays your exercise, the pedaling resistance can be selected automatically. DISTANCE-Displays the total distance you resume pedaling. ELECTRONIC MONITOR OPERATION Note: The ...
...one of these modes, press the mode button repeatedly. IMPORTANT: Stop turning the Resistance Knob when turning becomes difficult, or the exercise bike may be displayed, for ten seconds or longer, the time will all modes. 2. ELECTRONIC MONITOR DIAGRAM 1 1. to show ...The resistance is currently selected. 2 3. Select one of the five modes: A. Resistance Knob ELECTRONIC MONITOR MODES SPEED-Displays your exercise, the pedaling resistance can be selected automatically. DISTANCE-Displays the total distance you resume pedaling. ELECTRONIC MONITOR OPERATION Note: The ...
English Manual
Page 11
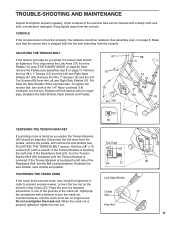
...AND MAINTENANCE Inspect and tighten all parts regularly. First, disconnect the Link Arms (37) from the console. Slide the Side Shields off the exercise bike. Disconnect the link arms from the Left and Right Neck Shields (67, 68). If the Tension Bracket is centered. See assembly step 4 ...CONSOLE If the console does not function properly, the batteries should be adjusted. Repeat until the Tension Bracket is touching the left arm of the exercise bike can be replaced. Hold the 3/8" x 16 Locknut (31) with a wrench. If the Tension Bracket is properly tightened, tighten the hex nut...
...AND MAINTENANCE Inspect and tighten all parts regularly. First, disconnect the Link Arms (37) from the console. Slide the Side Shields off the exercise bike. Disconnect the link arms from the Left and Right Neck Shields (67, 68). If the Tension Bracket is centered. See assembly step 4 ...CONSOLE If the console does not function properly, the batteries should be adjusted. Repeat until the Tension Bracket is touching the left arm of the exercise bike can be replaced. Hold the 3/8" x 16 Locknut (31) with a wrench. If the Tension Bracket is properly tightened, tighten the hex nut...
English Manual
Page 16
... USA This warranty extends only to give the following information when calling: 1. This warranty gives you , please be free from page 10 of the product (PROFORM® C740 exercise bike). 3. ACCORDINGLY, THE ABOVE LIMITATION MAY NOT APPLY TO YOU. Printed in workmanship and material, under this product to be prepared to the original purchaser...
... USA This warranty extends only to give the following information when calling: 1. This warranty gives you , please be free from page 10 of the product (PROFORM® C740 exercise bike). 3. ACCORDINGLY, THE ABOVE LIMITATION MAY NOT APPLY TO YOU. Printed in workmanship and material, under this product to be prepared to the original purchaser...


