
English Manual
Page 1
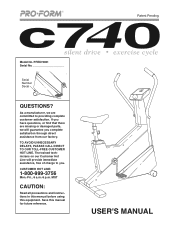
... Hot Line will guarantee you complete satisfaction through direct assistance from our factory. USER'S MANUAL If you . MST CAUTION: Read all precautions and instructions in this manual before using this manual for future reference. PFEX74051 Serial No Serial Number Decal QUESTIONS? As a manufacturer, we are missing or damaged parts, we will provide immediate assistance, free of charge to you have questions, or...
... Hot Line will guarantee you complete satisfaction through direct assistance from our factory. USER'S MANUAL If you . MST CAUTION: Read all precautions and instructions in this manual before using this manual for future reference. PFEX74051 Serial No Serial Number Decal QUESTIONS? As a manufacturer, we are missing or damaged parts, we will provide immediate assistance, free of charge to you have questions, or...
English Manual
Page 2
... the seat pin is the responsibility of the owner to the pedals (see HOW TO USE THE HANDLEBARS on page 8), make sure that all users of the exercise bike are on page 8). 8. TABLE OF CONTENTS IMPORTANT SAFETY PRECAUTIONS 2 BEFORE YOU BEGIN 3 PART CHART 4 ASSEMBLY 5 ADJUSTMENT AND OPERATION 8 TROUBLE-SHOOTING AND MAINTENANCE 11 CONDITIONING GUIDELINES 12 PART LIST 14 EXPLODED DRAWING 15 ORDERING REPLACEMENT PARTS Back Cover LIMITED WARRANTY Back Cover IMPORTANT PRECAUTIONS...
... the seat pin is the responsibility of the owner to the pedals (see HOW TO USE THE HANDLEBARS on page 8), make sure that all users of the exercise bike are on page 8). 8. TABLE OF CONTENTS IMPORTANT SAFETY PRECAUTIONS 2 BEFORE YOU BEGIN 3 PART CHART 4 ASSEMBLY 5 ADJUSTMENT AND OPERATION 8 TROUBLE-SHOOTING AND MAINTENANCE 11 CONDITIONING GUIDELINES 12 PART LIST 14 EXPLODED DRAWING 15 ORDERING REPLACEMENT PARTS Back Cover LIMITED WARRANTY Back Cover IMPORTANT PRECAUTIONS...
English Manual
Page 3
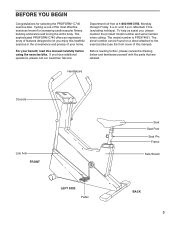
... exercises known for selecting the PROFORM® C740 exercise bike. If you , please mention the product model number and serial number when calling. until 6 p.m. To help us assist you have additional questions, please call our Customer Service Before reading further, please review the drawing below and familiarize yourself with the parts that are labeled. For your home. Handlebars Console Link Arm FRONT LEFT SIDE Pedal Seat Seat Post Seat Pin...
... exercises known for selecting the PROFORM® C740 exercise bike. If you , please mention the product model number and serial number when calling. until 6 p.m. To help us assist you have additional questions, please call our Customer Service Before reading further, please review the drawing below and familiarize yourself with the parts that are labeled. For your home. Handlebars Console Link Arm FRONT LEFT SIDE Pedal Seat Seat Post Seat Pin...
English Manual
Page 4
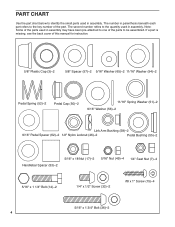
..., see the back cover of the part. The second number refers to the quantity used in assembly. PART CHART Use the part chart below to identify the small parts used in assembly. The number in assembly may have been pre-attached to one of the parts to the key number of this manual for instruction. 5/8" Plastic Cap (3)-2 5/8" Spacer (57)-2 5/16" Washer (65)-2 11/16" Washer (54)-2 Pedal Spring (52)-2 Pedal Cap (50)-2 11...
..., see the back cover of the part. The second number refers to the quantity used in assembly. PART CHART Use the part chart below to identify the small parts used in assembly. The number in assembly may have been pre-attached to one of the parts to the key number of this manual for instruction. 5/8" Plastic Cap (3)-2 5/8" Spacer (57)-2 5/16" Washer (65)-2 11/16" Washer (54)-2 Pedal Spring (52)-2 Pedal Cap (50)-2 11...
English Manual
Page 5
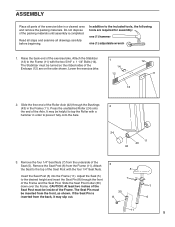
... Axle. 24 11 43 42 3. If the Seat Pin is completed. Press the unattached Roller (24) onto the end of the exercise bike. Remove the Seat Post (6) from the front, as shown. It may slip out. 8 6 11 5 ASSEMBLY Place all drawings carefully before beginning. The Stabilizer must be inside of the Endcaps (12) are required for assembly: one (1) hammer one (1) adjustable wrench 1.
... Axle. 24 11 43 42 3. If the Seat Pin is completed. Press the unattached Roller (24) onto the end of the exercise bike. Remove the Seat Post (6) from the front, as shown. It may slip out. 8 6 11 5 ASSEMBLY Place all drawings carefully before beginning. The Stabilizer must be inside of the Endcaps (12) are required for assembly: one (1) hammer one (1) adjustable wrench 1.

English Manual
Page 6
...: The lower end of the left side of each side of the Frame (11). Slide a Handlebar (9) onto the left 7 Handlebar (9). Clip the Link Arm onto the lock rod. Slide the Console 11 Mount (2) onto the Frame (11). the Link Arm must be turned. Close the battery cover. 2 Attach the wire extending from the Console (1) to the Frame with the two 1/4" x 1/2" Screws...
...: The lower end of the left side of each side of the Frame (11). Slide a Handlebar (9) onto the left 7 Handlebar (9). Clip the Link Arm onto the lock rod. Slide the Console 11 Mount (2) onto the Frame (11). the Link Arm must be turned. Close the battery cover. 2 Attach the wire extending from the Console (1) to the Frame with the two 1/4" x 1/2" Screws...

English Manual
Page 7
Press a Pedal Cap (50) into one of the Pedal Shafts (38) with the included tool as shown-the tool must be between the coils of the Pedal Spring (52). Using the included tool, firmly tighten the Pedal Shaft (38), in the same manner. 8 50 49 65 10 51 38 54 ...end of the Crank (not shown) in a clockwise direction, into the Pedal (10). 8. There is an 11/16" Spring Washer (51), a Pedal Spring (52), an 11/16" Washer (54), a Pedal Bushing (55), a 9/16" Washer (56), and a 9/16" Pedal Spacer (62) on the other arm of the Pedal Shaft. Using an adjustable wrench, remove the 1/2" ...
Press a Pedal Cap (50) into one of the Pedal Shafts (38) with the included tool as shown-the tool must be between the coils of the Pedal Spring (52). Using the included tool, firmly tighten the Pedal Shaft (38), in the same manner. 8 50 49 65 10 51 38 54 ...end of the Crank (not shown) in a clockwise direction, into the Pedal (10). 8. There is an 11/16" Spring Washer (51), a Pedal Spring (52), an 11/16" Washer (54), a Pedal Bushing (55), a 9/16" Washer (56), and a 9/16" Pedal Spacer (62) on the other arm of the Pedal Shaft. Using an adjustable wrench, remove the 1/2" ...

English Manual
Page 8
.... or the rowing mode, for lower-body exercise; Lock Rod 54 55 37 STATIONARY MODE To use . As you pedal, there should be used in the stationary mode, the link arms must be disconnected from the back, it may slip off during use the handlebars in any of the Frame. Hold the Seat and remove the Seat Pin (8). Adjust the Seat to move the Link Arms up and down slightly...
.... or the rowing mode, for lower-body exercise; Lock Rod 54 55 37 STATIONARY MODE To use . As you pedal, there should be used in the stationary mode, the link arms must be disconnected from the back, it may slip off during use the handlebars in any of the Frame. Hold the Seat and remove the Seat Pin (8). Adjust the Seat to move the Link Arms up and down slightly...
English Manual
Page 9
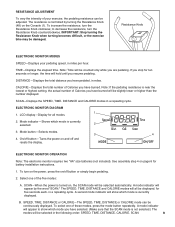
...SCAN-Displays the SPEED, TIME, DISTANCE and CALORIE modes in the following order: SPEED, TIME, DISTANCE, CALORIE, SCAN. 9 Mode button-Selects modes. 3 4 4. The SPEED, TIME, DISTANCE and CALORIE modes will be selected in a repeating cycle. If you resume pedaling. To turn on the power, press the on the Console (1). A second mode indicator will hold until you stop for battery installation instructions. 1. IMPORTANT: Stop turning the Resistance Knob when turning becomes difficult, or the exercise bike may be continuously displayed. ELECTRONIC MONITOR DIAGRAM 1 1. A mode...
...SCAN-Displays the SPEED, TIME, DISTANCE and CALORIE modes in the following order: SPEED, TIME, DISTANCE, CALORIE, SCAN. 9 Mode button-Selects modes. 3 4 4. The SPEED, TIME, DISTANCE and CALORIE modes will be selected in a repeating cycle. If you resume pedaling. To turn on the power, press the on the Console (1). A second mode indicator will hold until you stop for battery installation instructions. 1. IMPORTANT: Stop turning the Resistance Knob when turning becomes difficult, or the exercise bike may be continuously displayed. ELECTRONIC MONITOR DIAGRAM 1 1. A mode...

English Manual
Page 10
... monitor buttons are finished exercising, press the on /off button twice. 4. When you are not pressed for four minutes, the power will turn off automatically in order to come in contact with the monitor. 10 ELECTRONIC MONITOR CARE Keep the electronic monitor out of direct sunlight, or the LCD display may be damaged. 3. Do not allow liquids to conserve the batteries. To reset the LCD display, turn...
... monitor buttons are finished exercising, press the on /off button twice. 4. When you are not pressed for four minutes, the power will turn off automatically in order to come in contact with the monitor. 10 ELECTRONIC MONITOR CARE Keep the electronic monitor out of direct sunlight, or the LCD display may be damaged. 3. Do not allow liquids to conserve the batteries. To reset the LCD display, turn...
English Manual
Page 11
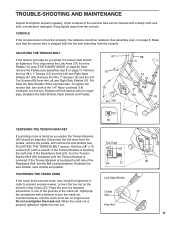
... Bracket is properly tightened, tighten the hex nut. When the crank nut is touching the left arm of the exercise bike can be replaced. CONSOLE If the console does not function properly, the batteries should be tightened. Remove the four #8 x 1" Screws (15) from the console. To tighten the tension belt, turn the Tension Bracket Bolt (60) clockwise until the crank arms are no longer slips. Disconnect the link arms from the Left...
... Bracket is properly tightened, tighten the hex nut. When the crank nut is touching the left arm of the exercise bike can be replaced. CONSOLE If the console does not function properly, the batteries should be tightened. Remove the four #8 x 1" Screws (15) from the console. To tighten the tension belt, turn the Tension Bracket Bolt (60) clockwise until the crank arms are no longer slips. Disconnect the link arms from the Left...
English Manual
Page 12
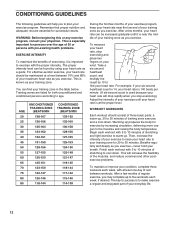
... the muscles and raising the body temperature. To measure your heart rate, stop exercising.) Adjust the intensity of your condition, complete three workouts each week, with pre-existing health problems. EXERCISE INTENSITY To maximize the benefits of your training zone as your everyday life. 12 After a few months of your exercise program, keep your heart rate near the middle of exercising, it is at a level between...
... the muscles and raising the body temperature. To measure your heart rate, stop exercising.) Adjust the intensity of your condition, complete three workouts each week, with pre-existing health problems. EXERCISE INTENSITY To maximize the benefits of your training zone as your everyday life. 12 After a few months of your exercise program, keep your heart rate near the middle of exercising, it is at a level between...

English Manual
Page 13
...stretch is shown in front of knees and back. Pull your feet toward your buttocks as possible. Correct form for balance, reach back and grasp one foot with one leg in the drawings below. Hold for 15 counts, then relax. Hold for 15 counts, then relax. ...Bend your front leg, lean forward and move your back foot flat on the floor. INNER THIGH STRETCH Sit with your knees bent slightly and slowly bend forward from your extended leg. Repeat 3 times. Repeat 3 times for both legs. Stretches: Quadriceps and hip muscles. Stretches: Hamstrings, lower back and groin...
...stretch is shown in front of knees and back. Pull your feet toward your buttocks as possible. Correct form for balance, reach back and grasp one foot with one leg in the drawings below. Hold for 15 counts, then relax. Hold for 15 counts, then relax. ...Bend your front leg, lean forward and move your back foot flat on the floor. INNER THIGH STRETCH Sit with your knees bent slightly and slowly bend forward from your extended leg. Repeat 3 times. Repeat 3 times for both legs. Stretches: Quadriceps and hip muscles. Stretches: Hamstrings, lower back and groin...
English Manual
Page 14
... 2 38 2 Console Console Mount 5/8" Plastic Cap Tension Cable Seat Seat Post 1/4" Seat Nut Seat Pin Handlebar Pedal Frame Endcap Stabilizer 5/16" x 1 1/4" Bolt #8 x 1" Screw Left Side Shield 5/16" x 18 Nut 1/4" Nylon Locknut #6 x 1/2" Screw Bearing Large Spacer Resistance Disk Flywheel Axle Roller Flywheel Lock Ring Crank Tension Belt Tension Pulley Seat Post Bushing 3/8" x 16 Locknut Handlebar Bushing 1/4" x 1/2" Screw Right Side Shield Tension Bracket 5/16" x 1 3/4" Bolt Link Arm Pedal Shaft Key No. Qty. Qty. PART LIST-Model No. Description...
... 2 38 2 Console Console Mount 5/8" Plastic Cap Tension Cable Seat Seat Post 1/4" Seat Nut Seat Pin Handlebar Pedal Frame Endcap Stabilizer 5/16" x 1 1/4" Bolt #8 x 1" Screw Left Side Shield 5/16" x 18 Nut 1/4" Nylon Locknut #6 x 1/2" Screw Bearing Large Spacer Resistance Disk Flywheel Axle Roller Flywheel Lock Ring Crank Tension Belt Tension Pulley Seat Post Bushing 3/8" x 16 Locknut Handlebar Bushing 1/4" x 1/2" Screw Right Side Shield Tension Bracket 5/16" x 1 3/4" Bolt Link Arm Pedal Shaft Key No. Qty. Qty. PART LIST-Model No. Description...

English Manual
Page 15
PFEX74051 40 R0396A 9 3 32 10 5 32 53 68 38 37 69 17 7 34 36 48 6 7 69 23 28 21 25 1 44 35 57 2 31 19 19 4 39 4 41 44 33 61 46 28 8 45 57 30 29 11 47 67 15 15 53 15 32 40 9 32 3 20 20 66 26 22 24 42 43 24 70 65 18 64 31 13 27 12 59 14 15 16 63 62 15 60 69 56 15 9 36 15 55 37 54 52 51 58 15 17 38 65 15 69 10 49 50 CRANK HARDWARE (47) 15 EXPLODED DRAWING-Model No.
PFEX74051 40 R0396A 9 3 32 10 5 32 53 68 38 37 69 17 7 34 36 48 6 7 69 23 28 21 25 1 44 35 57 2 31 19 19 4 39 4 41 44 33 61 46 28 8 45 57 30 29 11 47 67 15 15 53 15 32 40 9 32 3 20 20 66 26 22 24 42 43 24 70 65 18 64 31 13 27 12 59 14 15 16 63 62 15 60 69 56 15 9 36 15 55 37 54 52 51 58 15 17 38 65 15 69 10 49 50 CRANK HARDWARE (47) 15 EXPLODED DRAWING-Model No.
English Manual
Page 16
The MODEL NUMBER of the product (PROFORM® C740 exercise bike). 3. ICON HEALTH & FITNESS, INC., 1500 S. 1000 W., LOGAN, UT 84321-9813 Part No. 128790 F00408AC R0396A © 1996 ICON Health & Fitness, Inc. The NAME of the product (PFEX74051). 2. LIMITED WARRANTY Icon Health & Fitness, Inc., ("ICON") warrants this warranty is limited to replacing or repairing, at ICON's option, the product at 1-800-999-3756, Monday through Friday, 6 a.m. All returns must be pre-authorized by sufficient proof...
The MODEL NUMBER of the product (PROFORM® C740 exercise bike). 3. ICON HEALTH & FITNESS, INC., 1500 S. 1000 W., LOGAN, UT 84321-9813 Part No. 128790 F00408AC R0396A © 1996 ICON Health & Fitness, Inc. The NAME of the product (PFEX74051). 2. LIMITED WARRANTY Icon Health & Fitness, Inc., ("ICON") warrants this warranty is limited to replacing or repairing, at ICON's option, the product at 1-800-999-3756, Monday through Friday, 6 a.m. All returns must be pre-authorized by sufficient proof...

