
English Manual
Page 3
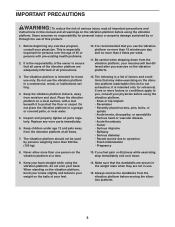
...all important precautions and instructions in this manual and all warnings on the vibration platform at all times. 7. Sears assumes no more than 3 times per day and no responsibility for persons over the age of 35 or persons with a mat beneath it is recommended that may make exercising ...on the vibration platform. 3. This is intended for reference). It is intended only for home use . 15. Do ...
...all important precautions and instructions in this manual and all warnings on the vibration platform at all times. 7. Sears assumes no more than 3 times per day and no responsibility for persons over the age of 35 or persons with a mat beneath it is recommended that may make exercising ...on the vibration platform. 3. This is intended for reference). It is intended only for home use . 15. Do ...
English Manual
Page 8
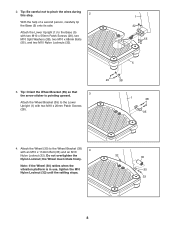
.... Do not overtighten the Nylon Locknut; Tip: Be careful not to the Lower Upright (1) with two M10 x 20mm Patch Screws (28). 20 38 1 28 35 4. Attach the Wheel (30) to the Base (5) with an M10 x 114mm Bolt (33) and an M10 Nylon Locknut (32). Tip: Orient the Wheel Bracket...arrow sticker is in use, tighten the M10 Nylon Locknut (32) until the rattling stops. 32 30 35 33 8 Note: If the Wheel (30) rattles when the vibration platform is pointing upward. 3 Attach the Wheel Bracket (35) to pinch the wires during this step. 2 With the help of a second person, carefully tip ...
.... Do not overtighten the Nylon Locknut; Tip: Be careful not to the Lower Upright (1) with two M10 x 20mm Patch Screws (28). 20 38 1 28 35 4. Attach the Wheel (30) to the Base (5) with an M10 x 114mm Bolt (33) and an M10 Nylon Locknut (32). Tip: Orient the Wheel Bracket...arrow sticker is in use, tighten the M10 Nylon Locknut (32) until the rattling stops. 32 30 35 33 8 Note: If the Wheel (30) rattles when the vibration platform is pointing upward. 3 Attach the Wheel Bracket (35) to pinch the wires during this step. 2 With the help of a second person, carefully tip ...
English Manual
Page 16
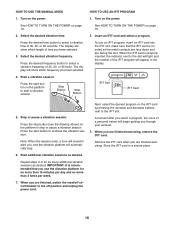
...when you are facing the slot. IMPORTANT: It is recommended that the iFIT card is properly inserted, the indicator next to continue the vibration session. When you are finished exercising, remove the iFIT card. The display will show which length of time you are finished exercising. ... finished, switch the reset/off circuit breaker to start button to the slot will light and the number of 25, 30, or 35 hertz. Press the start a vibration session. Turn on the power. The display will appear in a secure place. 6. Stop Button Start Button HOW TO USE AN ...
...when you are facing the slot. IMPORTANT: It is recommended that the iFIT card is properly inserted, the indicator next to continue the vibration session. When you are finished exercising, remove the iFIT card. The display will show which length of time you are finished exercising. ... finished, switch the reset/off circuit breaker to start button to the slot will light and the number of 25, 30, or 35 hertz. Press the start a vibration session. Turn on the power. The display will appear in a secure place. 6. Stop Button Start Button HOW TO USE AN ...
English Manual
Page 18
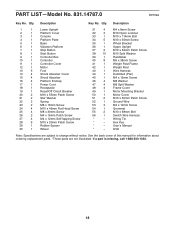
.... *These parts are subject to change without notice. Description 1 1 Lower Upright 2 1 Platform Cover 3 1 Console 4 1 Platform Plate 5 1 Base 6 1 Vibration Platform 7 1 Stop Button 8 1 Start Button 9 1 Controller Box 10 1 Controller 11 1 Controller Cover 12 1 Motor 13 5 Foot 14 4 Shock Absorber Cover...Spacer 30 1 Wheel 31 4 M4 x 8mm Screw 32 3 M10 Nylon Locknut 33 1 M10 x 114mm Bolt 34 5 M10 x 35mm Screw 35 1 Wheel Bracket 36 1 Upper Upright 37 2 M10 x 62mm Patch Screw 38 10 M10 Split Washer 39 1 Handlebar 40 8 M5 x 38mm...
.... *These parts are subject to change without notice. Description 1 1 Lower Upright 2 1 Platform Cover 3 1 Console 4 1 Platform Plate 5 1 Base 6 1 Vibration Platform 7 1 Stop Button 8 1 Start Button 9 1 Controller Box 10 1 Controller 11 1 Controller Cover 12 1 Motor 13 5 Foot 14 4 Shock Absorber Cover...Spacer 30 1 Wheel 31 4 M4 x 8mm Screw 32 3 M10 Nylon Locknut 33 1 M10 x 114mm Bolt 34 5 M10 x 35mm Screw 35 1 Wheel Bracket 36 1 Upper Upright 37 2 M10 x 62mm Patch Screw 38 10 M10 Split Washer 39 1 Handlebar 40 8 M5 x 38mm...
