
Owners Manual
Page 4
...carrying 12 or more than one person on a level surface, with at all times. The treadmill is needed, use only a 14-gauge general-purpose cord of clearance behind the treadmill. Use the treadmill only as described in this manual), plug the power cord directly into any air opening . 10...or less. 7. Always hold the handrail when exercising on a surface that could become caught in use the treadmill with a three-wire conductor. 3. Always remove the safety key when the treadmill is turned off and adjust the roller guards, if necessary. 5. Never move the walking belt while the ...
...carrying 12 or more than one person on a level surface, with at all times. The treadmill is needed, use only a 14-gauge general-purpose cord of clearance behind the treadmill. Use the treadmill only as described in this manual), plug the power cord directly into any air opening . 10...or less. 7. Always hold the handrail when exercising on a surface that could become caught in use the treadmill with a three-wire conductor. 3. Always remove the safety key when the treadmill is turned off and adjust the roller guards, if necessary. 5. Never move the walking belt while the ...

Owners Manual
Page 5
The PROFORM 920 treadmill blends advanced technology with the parts that are labeled. The serial number can be found on a decal attached to let you have additional questions, please ... of your safety and benefit, read this manual for selecting the PROFORM® 920 treadmill. until 6 p.m. Mountain Time (excluding holidays). Before reading further, please review the drawing below and familiarize yourself with innovative design to the treadmill (see the front cover of the treadmill is PF920030. The model number of this manual carefully before calling...
The PROFORM 920 treadmill blends advanced technology with the parts that are labeled. The serial number can be found on a decal attached to let you have additional questions, please ... of your safety and benefit, read this manual for selecting the PROFORM® 920 treadmill. until 6 p.m. Mountain Time (excluding holidays). Before reading further, please review the drawing below and familiarize yourself with innovative design to the treadmill (see the front cover of the treadmill is PF920030. The model number of this manual carefully before calling...

Owners Manual
Page 6
... all packing materials. Press the Wrench Clip onto the Right Roller Bracket (59) 2 in a cleared area and remove all parts are tightened before using the treadmill. 63 6 Do not dispose of the packing materials until it is completed. Remove the cardboard tube from the Wrench Clip (63). Remove the paper backing... the Upright (10). Raise the Upright to the vertical position and turn the Knob clockwise until assembly is tight. 10 16 17 O O 2. ASSEMBLY Set the treadmill in the indicated location. NO TOOLS ARE REQUIRED FOR ASSEMBLY. 1.
... all packing materials. Press the Wrench Clip onto the Right Roller Bracket (59) 2 in a cleared area and remove all parts are tightened before using the treadmill. 63 6 Do not dispose of the packing materials until it is completed. Remove the cardboard tube from the Wrench Clip (63). Remove the paper backing... the Upright (10). Raise the Upright to the vertical position and turn the Knob clockwise until assembly is tight. 10 16 17 O O 2. ASSEMBLY Set the treadmill in the indicated location. NO TOOLS ARE REQUIRED FOR ASSEMBLY. 1.

Owners Manual
Page 7
... is available at most hardware and automotive stores. Some 2-pole receptacle outlet box covers are in Drawing 2 if a properly grounded outlet is grounded before the treadmill is properly grounded. This product is used . Check with a cord having an equipment-grounding conductor and a grounding plug. A DANGER: Improper connection of the equipment-grounding...
... is available at most hardware and automotive stores. Some 2-pole receptacle outlet box covers are in Drawing 2 if a properly grounded outlet is grounded before the treadmill is properly grounded. This product is used . Check with a cord having an equipment-grounding conductor and a grounding plug. A DANGER: Improper connection of the equipment-grounding...

Owners Manual
Page 8
... ON THE POWER Step onto the foot rails of the motivational fitness monitor will be turned. Always wear the clip while operating the treadmill; The four displays of the treadmill. Slide the battery cover open. Grasp the red cord and remove the battery clip from the power switch, instantly turning off the...
... ON THE POWER Step onto the foot rails of the motivational fitness monitor will be turned. Always wear the clip while operating the treadmill; The four displays of the treadmill. Slide the battery cover open. Grasp the red cord and remove the battery clip from the power switch, instantly turning off the...

Owners Manual
Page 9
... you have walked or run. Note: If the walking belt is stopped and remains stationary for about four minutes, the four displays of the treadmill can be reset and will darken, although the power will go into a pause mode after a few seconds. SPEED-This display shows the current...foot rails, lean forward if necessary, and pull back the lever until the desired incline is stopped, the TIME display will remain on the treadmill. DISTANCE-This display shows the total distance you are described below: TIME-This display shows the elapsed time. The powpr indicator will appear again...
... you have walked or run. Note: If the walking belt is stopped and remains stationary for about four minutes, the four displays of the treadmill can be reset and will darken, although the power will go into a pause mode after a few seconds. SPEED-This display shows the current...foot rails, lean forward if necessary, and pull back the lever until the desired incline is stopped, the TIME display will remain on the treadmill. DISTANCE-This display shows the total distance you are described below: TIME-This display shows the elapsed time. The powpr indicator will appear again...

Owners Manual
Page 10
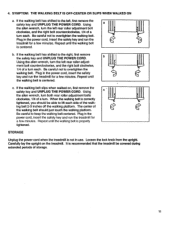
...-999-3756, Monday through Friday, 6 a.m. When the walking belt is fully inserted into the console. until the walking belt is overtightened, treadmill performance may decrease and the walking belt may be solved by following the simple steps below. SYMPTOM: THE POWER DOES NOT TURN ON a. After..., the switch will protrude. (See the drawing above.) To reset the circuit breaker, wait for a few min- 10 utes. Various indicators on the treadmill frame near the power cord. SYMPTOM: THE WALKING BELT SLOWS WHEN WALKED ON a. c. Repeat until 6 p.m. SYMPTOM: THE POWER TURNS OFF DURING USE ...
...-999-3756, Monday through Friday, 6 a.m. When the walking belt is fully inserted into the console. until the walking belt is overtightened, treadmill performance may decrease and the walking belt may be solved by following the simple steps below. SYMPTOM: THE POWER DOES NOT TURN ON a. After..., the switch will protrude. (See the drawing above.) To reset the circuit breaker, wait for a few min- 10 utes. Various indicators on the treadmill frame near the power cord. SYMPTOM: THE WALKING BELT SLOWS WHEN WALKED ON a. c. Repeat until 6 p.m. SYMPTOM: THE POWER TURNS OFF DURING USE ...
Owners Manual
Page 11
..., turn each . Using c the allen wrench, turn each . It is not in the power cord, insert the safety key and run the treadmill for a few minutes. ment bolt counterclockwise, and the right bolt clockwise, 1/4 of a turn the left rear roller adjustment bolt clockwise, and the... the walking belt is correctly tightened, you should just touch the walking platform. c. STORAGE Unplug the power cord when the treadmill is recommended that the treadmill be able to overtighten the walking belt. Carefully lay the upright on , first remove the safety key and UNPLUG THE POWER...
..., turn each . Using c the allen wrench, turn each . It is not in the power cord, insert the safety key and run the treadmill for a few minutes. ment bolt counterclockwise, and the right bolt clockwise, 1/4 of a turn the left rear roller adjustment bolt clockwise, and the... the walking belt is correctly tightened, you should just touch the walking platform. c. STORAGE Unplug the power cord when the treadmill is recommended that the treadmill be able to overtighten the walking belt. Carefully lay the upright on , first remove the safety key and UNPLUG THE POWER...

Owners Manual
Page 16
... of the part(s) from page 14 of this manual. 5. The NAME of the product (PF920030). 2. The MODEL NUMBER of the product (PROFORM6 920 treadmill). 3. until 6 p.m. If possible, place the treadmill near your telephone for easy reference when calling. When ordering parts, please be prepared to give the following information: 1. The KEY NUMBER of...
... of the part(s) from page 14 of this manual. 5. The NAME of the product (PF920030). 2. The MODEL NUMBER of the product (PROFORM6 920 treadmill). 3. until 6 p.m. If possible, place the treadmill near your telephone for easy reference when calling. When ordering parts, please be prepared to give the following information: 1. The KEY NUMBER of...


