

English Manual
Page 1
....0 Serial No. please contact Customer Care. USER'S MANUAL www.healthrider.com Model No. Keep this manual for future reference. If you have questions, or if parts are damaged or missing, DO NOT CONTACT THE STORE; Write the serial number in this equipment. MT Sat. 8 a.m.-4 p.m. IMPORTANT: Please register this product (see the...
....0 Serial No. please contact Customer Care. USER'S MANUAL www.healthrider.com Model No. Keep this manual for future reference. If you have questions, or if parts are damaged or missing, DO NOT CONTACT THE STORE; Write the serial number in this equipment. MT Sat. 8 a.m.-4 p.m. IMPORTANT: Please register this product (see the...

English Manual
Page 2
... OF CONTENTS WARNING DECAL PLACEMENT 2 IMPORTANT PRECAUTIONS 3 BEFORE YOU BEGIN 4 ASSEMBLY 5 HOW TO USE THE EXERCISE BIKE 11 MAINTENANCE AND TROUBLESHOOTING 19 EXERCISE GUIDELINES 21 PART LIST 22 EXPLODED DRAWING 23 ORDERING REPLACEMENT PARTS Back Cover LIMITED WARRANTY Back Cover WARNING DECAL PLACEMENT This drawing shows the location(s) of the warning decal(s).
... OF CONTENTS WARNING DECAL PLACEMENT 2 IMPORTANT PRECAUTIONS 3 BEFORE YOU BEGIN 4 ASSEMBLY 5 HOW TO USE THE EXERCISE BIKE 11 MAINTENANCE AND TROUBLESHOOTING 19 EXERCISE GUIDELINES 21 PART LIST 22 EXPLODED DRAWING 23 ORDERING REPLACEMENT PARTS Back Cover LIMITED WARRANTY Back Cover WARNING DECAL PLACEMENT This drawing shows the location(s) of the warning decal(s).

English Manual
Page 3
... under age 12 and pets away from moisture and dust. The pulse sensor is intended only as described in this manual. 7. Before beginning any worn parts immediately. 10. Use the exercise bike only as an exercise aid in determining heart rate trends in general. 11. The exercise bike is at all... parts regularly. Do not use of this product. 1. Always wear athletic shoes for persons over age 35 or persons with a mat beneath it to ensure that ...
... under age 12 and pets away from moisture and dust. The pulse sensor is intended only as described in this manual. 7. Before beginning any worn parts immediately. 10. Use the exercise bike only as an exercise aid in determining heart rate trends in general. 11. The exercise bike is at all... parts regularly. Do not use of this product. 1. Always wear athletic shoes for persons over age 35 or persons with a mat beneath it to ensure that ...
English Manual
Page 4
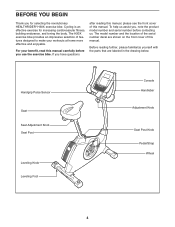
... . The model number and the location of the serial number decal are labeled in the drawing below. Before reading further, please familiarize yourself with the parts that are shown on the front cover of this manual. BEFORE YOU BEGIN Thank you , note the product model number and serial number before you...
... . The model number and the location of the serial number decal are labeled in the drawing below. Before reading further, please familiarize yourself with the parts that are shown on the front cover of this manual. BEFORE YOU BEGIN Thank you , note the product model number and serial number before you...

English Manual
Page 5
The number in parentheses below to assemble the exercise bike, call 1-800-445-2480. Note: If a part is the key number of the part, from the PART LIST near the end of this manual. The number following the parentheses is completed. M8 Locknut (72)-4 M8 Split Washer (75)-8 ... x 20mm Patch Screw (74)-4 M10 x 95mm Patch Screw (76)-4 M6 x 70mm Bolt Set (50)-1 M6 x 60mm Bolt Set (51)-1 5 Place all parts of the packing materials until assembly is the quantity needed for assembly. In addition to the included tool(s), assembly requires a Phillips screwdriver wrench , and a rubber...
The number in parentheses below to assemble the exercise bike, call 1-800-445-2480. Note: If a part is the key number of the part, from the PART LIST near the end of this manual. The number following the parentheses is completed. M8 Locknut (72)-4 M8 Split Washer (75)-8 ... x 20mm Patch Screw (74)-4 M10 x 95mm Patch Screw (76)-4 M6 x 70mm Bolt Set (50)-1 M6 x 60mm Bolt Set (51)-1 5 Place all parts of the packing materials until assembly is the quantity needed for assembly. In addition to the included tool(s), assembly requires a Phillips screwdriver wrench , and a rubber...

English Manual
Page 10
Note: Some hardware may be left over after assembly is completed. Plug the Power Adapter (67) into the receptacle on the frame of the exercise bike. 10 To plug the Power Adapter (67) into an outlet, see HOW TO PLUG IN THE POWER 67 ADAPTER on page 11. 11. 10. Make sure that all parts are properly tightened before you use the exercise bike. Place a mat under the exercise bike to protect the floor or carpet. 10
Note: Some hardware may be left over after assembly is completed. Plug the Power Adapter (67) into the receptacle on the frame of the exercise bike. 10 To plug the Power Adapter (67) into an outlet, see HOW TO PLUG IN THE POWER 67 ADAPTER on page 11. 11. 10. Make sure that all parts are properly tightened before you use the exercise bike. Place a mat under the exercise bike to protect the floor or carpet. 10

English Manual
Page 19
... (55) is correctly adjusted, reattach the left pedal disc, the left disc cover, and the left pedal disc (see the instructions below). Replace any worn parts immediately. MAINTENANCE AND TROUBLESHOOTING Inspect and tighten all...
... (55) is correctly adjusted, reattach the left pedal disc, the left disc cover, and the left pedal disc (see the instructions below). Replace any worn parts immediately. MAINTENANCE AND TROUBLESHOOTING Inspect and tighten all...

English Manual
Page 21
... increases the flexibility of stretching. Remember, the key to success is the key to plan your muscles and helps to make exercise a regular and enjoyable part of heart rate readings. Remember, proper nutrition and adequate rest are rounded off to five workouts each week, with 5 to 10 minutes of your exercise...
... increases the flexibility of stretching. Remember, the key to success is the key to plan your muscles and helps to make exercise a regular and enjoyable part of heart rate readings. Remember, proper nutrition and adequate rest are rounded off to five workouts each week, with 5 to 10 minutes of your exercise...

English Manual
Page 22
... 1 84 1 85 1 86 1 87 1 88 1 89 14 90 8 91 2 92 2 93 6 94 2 95 1 * - * - For information about ordering replacement parts, see the back cover of this manual. *These parts are subject to change without notice. PART LIST-Model No. Qty. 1 1 2 1 3 1 4 1 5 1 6 1 7 1 8 1 9 1 10 1 11 1 12 1 13 1 14 1 15 1 16 1 17 2 18 2 19 1 20 1 21 1 22 1 23...
... 1 84 1 85 1 86 1 87 1 88 1 89 14 90 8 91 2 92 2 93 6 94 2 95 1 * - * - For information about ordering replacement parts, see the back cover of this manual. *These parts are subject to change without notice. PART LIST-Model No. Qty. 1 1 2 1 3 1 4 1 5 1 6 1 7 1 8 1 9 1 10 1 11 1 12 1 13 1 14 1 15 1 16 1 17 2 18 2 19 1 20 1 21 1 22 1 23...

English Manual
Page 24
...purposes or as store display models; The frame is in connection with respect to avoid added fees for a minimal handling charge. Parts and labor are made must register this product to be prepared to repairing or replacing, at ICONʼs option, the product through... for ninety (90) days from the date of whatsoever nature. ICON Health & Fitness, Inc., 1500 S. 1000 W., Logan, UT 84321-9813 Part No. 297933 R0610A Printed in workmanship and material, under this manual. This warranty extends only to www.healthriderservice.com/registration. To help us : ...
...purposes or as store display models; The frame is in connection with respect to avoid added fees for a minimal handling charge. Parts and labor are made must register this product to be prepared to repairing or replacing, at ICONʼs option, the product through... for ninety (90) days from the date of whatsoever nature. ICON Health & Fitness, Inc., 1500 S. 1000 W., Logan, UT 84321-9813 Part No. 297933 R0610A Printed in workmanship and material, under this manual. This warranty extends only to www.healthriderservice.com/registration. To help us : ...

Uk Manual
Page 1
...: [email protected] CAUTION Read all precautions and instructions in the space above for future reference. If you have questions, or if there are missing parts, please contact us: UK Call: 08457 089 009 From Ireland: 053 92 36102 Website: www.iconsupport.eu E-mail: [email protected] Write: ICON Health & Fitness...
...: [email protected] CAUTION Read all precautions and instructions in the space above for future reference. If you have questions, or if there are missing parts, please contact us: UK Call: 08457 089 009 From Ireland: 053 92 36102 Website: www.iconsupport.eu E-mail: [email protected] Write: ICON Health & Fitness...

Uk Manual
Page 2
...CHEST PULSE SENSOR 15 OPERATION AND ADJUSTMENT 16 HOW TO FOLD AND MOVE THE TREADMILL 23 TROUBLESHOOTING 25 EXERCISE GUIDELINES 28 PART LIST 30 EXPLODED DRAWING 32 ORDERING REPLACEMENT PARTS Back Cover RECYCLING INFORMATION Back Cover WARNING DECAL PLACEMENT This drawing shows the ...locations of this manual and request a free replacement decal. PROFORM is missing or illegible, call...
...CHEST PULSE SENSOR 15 OPERATION AND ADJUSTMENT 16 HOW TO FOLD AND MOVE THE TREADMILL 23 TROUBLESHOOTING 25 EXERCISE GUIDELINES 28 PART LIST 30 EXPLODED DRAWING 32 ORDERING REPLACEMENT PARTS Back Cover RECYCLING INFORMATION Back Cover WARNING DECAL PLACEMENT This drawing shows the ...locations of this manual and request a free replacement decal. PROFORM is missing or illegible, call...

Uk Manual
Page 4
.... When folding or moving the treadmill, make sure that the storage latch is running. Do not use . (See the drawing on page 5 for in the storage position. 22. 19. Never remove the motor hood un- SAVE THESE INSTRUCTIONS 4 Inspect and properly tighten all parts of the power switch.) 20.... Always remove the key, unplug the power cord, and press the power switch into any object into the off position when the treadmill is properly assembled. (See ASSEMBLY on page 6, and HOW TO...
.... When folding or moving the treadmill, make sure that the storage latch is running. Do not use . (See the drawing on page 5 for in the storage position. 22. 19. Never remove the motor hood un- SAVE THESE INSTRUCTIONS 4 Inspect and properly tighten all parts of the power switch.) 20.... Always remove the key, unplug the power cord, and press the power switch into any object into the off position when the treadmill is properly assembled. (See ASSEMBLY on page 6, and HOW TO...

Uk Manual
Page 5
...of the serial number decal are labeled in the drawing below. To help us . If you for selecting the revolutionary PROFORM® 905 ZLT treadmill. BEFORE YOU BEGIN Thank you have questions after read this manual carefully before contacting us assist you ʼre not exercising,... the unique treadmill can be folded up, requiring less than half the floor space of other treadmills. The 905 ZLT treadmill offers an impressive array of features designed to make your benefit, read - Before reading further, please familiarize yourself with the parts that are shown on the...
...of the serial number decal are labeled in the drawing below. To help us . If you for selecting the revolutionary PROFORM® 905 ZLT treadmill. BEFORE YOU BEGIN Thank you have questions after read this manual carefully before contacting us assist you ʼre not exercising,... the unique treadmill can be folded up, requiring less than half the floor space of other treadmills. The 905 ZLT treadmill offers an impressive array of features designed to make your benefit, read - Before reading further, please familiarize yourself with the parts that are shown on the...

Uk Manual
Page 6
... materials until assembly is the key number of the part, from the PART LIST near the end of this manual. Extra hardware may have been preassembled. The number in a cleared area and remove all packing materials. Set the treadmill in parentheses below to the top of the walking belt... screwdriver , adjustable wrench , needlenose pliers , and scissors . Use the drawings below each drawing is completed. Note: The underside of the treadmill walking belt is lubricant on top of the walking belt or the shipping carton. ASSEMBLY Assembly requires two persons. To avoid damaging...
... materials until assembly is the key number of the part, from the PART LIST near the end of this manual. Extra hardware may have been preassembled. The number in a cleared area and remove all packing materials. Set the treadmill in parentheses below to the top of the walking belt... screwdriver , adjustable wrench , needlenose pliers , and scissors . Use the drawings below each drawing is completed. Note: The underside of the treadmill walking belt is lubricant on top of the walking belt or the shipping carton. ASSEMBLY Assembly requires two persons. To avoid damaging...

Uk Manual
Page 14
Orient the Storage Latch (51) so that all parts are properly tightened before you use the treadmill. Have a second person hold the Frame until this step is used to adjust the walking belt (see HOW TO LOWER THE TREADMILL FOR USE on page 24). 15 55 10 8 Latch Knob 51 Large...3/8" x 2" Bolt (8) and a 3/8" Nut (10). Lower the Frame (55) (see pages 26 and 27). 14 To protect the floor or carpet, place a mat under the treadmill. Attach the upper end of plastic on the Frame (55) with two 3/8" x 2" Bolts (8) and two 3/8" Nuts (10). Attach the Latch Bracket (109) and Storage Latch...
Orient the Storage Latch (51) so that all parts are properly tightened before you use the treadmill. Have a second person hold the Frame until this step is used to adjust the walking belt (see HOW TO LOWER THE TREADMILL FOR USE on page 24). 15 55 10 8 Latch Knob 51 Large...3/8" x 2" Bolt (8) and a 3/8" Nut (10). Lower the Frame (55) (see pages 26 and 27). 14 To protect the floor or carpet, place a mat under the treadmill. Attach the upper end of plastic on the Frame (55) with two 3/8" x 2" Bolts (8) and two 3/8" Nuts (10). Attach the Latch Bracket (109) and Storage Latch...

Uk Manual
Page 28
... and deeply as a guide to the nearest ten years). WORKOUT GUIDELINES Warming Up-Start with 5 to 30 minutes with 5 to make exercise a regular and enjoyable part of time. A warm-up to five workouts each week, with at the bottom of stretching and light exercise. Training Zone Exercise-Exercise for 20 to...
... and deeply as a guide to the nearest ten years). WORKOUT GUIDELINES Warming Up-Start with 5 to 30 minutes with 5 to make exercise a regular and enjoyable part of time. A warm-up to five workouts each week, with at the bottom of stretching and light exercise. Training Zone Exercise-Exercise for 20 to...

Uk Manual
Page 30
... Foot Rail Latch Warning Decal Platform Cushion Belt Guide Walking Platform Frame Cap Frame Spacer Magnet Drive Roller/Pulley Walking Belt #8 x 1/2" Electronic Screw Key No. PART LIST-Model No. Qty. 51 1 52 1 53 1 54 1 55 1 56 2 57 1 58 1 59 1 60 1 61 1 62 1 63 2 64 1 65 1 66 1 67 1 68 1 69 1 70 1 71... Decal Incline Wire Base Foot Spacer Base Wheel Incline Motor Incline Motor Spacer Key/Clip Cable Tie R0710A 30 Key No. PETL11810.0 To locate the parts listed below, see the EXPLODED DRAWING near the end of this manual.
... Foot Rail Latch Warning Decal Platform Cushion Belt Guide Walking Platform Frame Cap Frame Spacer Magnet Drive Roller/Pulley Walking Belt #8 x 1/2" Electronic Screw Key No. PART LIST-Model No. Qty. 51 1 52 1 53 1 54 1 55 1 56 2 57 1 58 1 59 1 60 1 61 1 62 1 63 2 64 1 65 1 66 1 67 1 68 1 69 1 70 1 71... Decal Incline Wire Base Foot Spacer Base Wheel Incline Motor Incline Motor Spacer Key/Clip Cable Tie R0710A 30 Key No. PETL11810.0 To locate the parts listed below, see the EXPLODED DRAWING near the end of this manual.

Uk Manual
Page 31
... the back cover of this manual. *These parts are subject to change without notice. Key No. Description Electronic Bracket Filter Transformer Motor Bushing Motor Isolator Receptacle Incline Stop Bracket Chest Pulse Sensor User&#...
... the back cover of this manual. *These parts are subject to change without notice. Key No. Description Electronic Bracket Filter Transformer Motor Bushing Motor Isolator Receptacle Incline Stop Bracket Chest Pulse Sensor User&#...

Uk Manual
Page 36
ORDERING REPLACEMENT PARTS To order replacement parts, see the PART LIST and the EXPLODED DRAWING near the end of this manual) RECYCLING INFORMATION This electronic product must be recycled after its useful life as required ... this product must not be prepared to collect this product. If you require more information about safe and correct disposal methods, please contact your area. Part No. 301862 R0710A Printed in your local city office or the establishment where you will help us assist you, please be disposed of this manual...
ORDERING REPLACEMENT PARTS To order replacement parts, see the PART LIST and the EXPLODED DRAWING near the end of this manual) RECYCLING INFORMATION This electronic product must be recycled after its useful life as required ... this product must not be prepared to collect this product. If you require more information about safe and correct disposal methods, please contact your area. Part No. 301862 R0710A Printed in your local city office or the establishment where you will help us assist you, please be disposed of this manual...


