
English Manual
Page 3
... responsibility of the owner to ensure that meets all of the specifications described on page 15. It is used near water. 5. Do not place the treadmill on any exercise program, consult your physician. Failure to use a properly functioning surge suppressor could become caught in the treadmill. Never move the walking belt while the power is not working properly.) 16. Adjust the speed in small increments...
... responsibility of the owner to ensure that meets all of the specifications described on page 15. It is used near water. 5. Do not place the treadmill on any exercise program, consult your physician. Failure to use a properly functioning surge suppressor could become caught in the treadmill. Never move the walking belt while the power is not working properly.) 16. Adjust the speed in small increments...

English Manual
Page 4
... on page 5 for the location of the power switch), and unplug the power cord when the treadmill is intended only as an exercise aid in determining heart rate trends in this manual should be able to safely lift 45 lbs. (20 kg) to raise, lower, or move the treadmill until it is intended for home use , before performing the maintenance and adjustment procedures described in general. 20...
... on page 5 for the location of the power switch), and unplug the power cord when the treadmill is intended only as an exercise aid in determining heart rate trends in this manual should be able to safely lift 45 lbs. (20 kg) to raise, lower, or move the treadmill until it is intended for home use , before performing the maintenance and adjustment procedures described in general. 20...

English Manual
Page 5
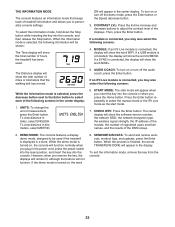
... product model number and serial number before using the treadmill. If you ’'re not exercising, the unique treadmill can be folded up, requiring less than half the oor space of this manual. The POWER 795 treadmill offers an impressive selection of this manual carefully before contacting us. Length: 6 ft. 4 in. (193 cm) Width: 3 ft. 1 in. (94 cm) Handrail Upright Console Tray Heart Rate Monitor Key/Clip Walking Belt Foot Rail Power Switch Power Cord Idler Roller Adjustment Screws...
... product model number and serial number before using the treadmill. If you ’'re not exercising, the unique treadmill can be folded up, requiring less than half the oor space of this manual. The POWER 795 treadmill offers an impressive selection of this manual carefully before contacting us. Length: 6 ft. 4 in. (193 cm) Width: 3 ft. 1 in. (94 cm) Handrail Upright Console Tray Heart Rate Monitor Key/Clip Walking Belt Foot Rail Power Switch Power Cord Idler Roller Adjustment Screws...

English Manual
Page 10
... not use power tools and do not overtighten the #10 x 3/4" Screws (9) or the #10 x 3/4" Flat Head Screws (112). Orient the Crossbar (93) as shown. Do not fully tighten the Screws and Bolt yet. 4 11 87 Attach the Right Handrail (87) in the same way. 11 5 5 4 88 89 8. Next, lift off the A Crossbar (93). Console Assembly A 93 9. Start all four Screws, and then tighten...
... not use power tools and do not overtighten the #10 x 3/4" Screws (9) or the #10 x 3/4" Flat Head Screws (112). Orient the Crossbar (93) as shown. Do not fully tighten the Screws and Bolt yet. 4 11 87 Attach the Right Handrail (87) in the same way. 11 5 5 4 88 89 8. Next, lift off the A Crossbar (93). Console Assembly A 93 9. Start all four Screws, and then tighten...

English Manual
Page 11
... Handrail. Attach the console assembly with six #8 x 1/2" Screws (1), four 5/16" x 1 1/4" Screws (4), four 5/16" Flat Washers (113), and four 5/16" Star Washers (11). Fully tighten the four 5/16" x 1" Screws (5) and the two 5/16" x 1 1/4" Bolts (4). 4 87 1 1 Console Assembly 88 11 113 4 1 1 11 With the help of a second person, hold the console assembly near the Left Handrail (88). 10 Connect the Upright Wire (81) to pinch any wires. If...
... Handrail. Attach the console assembly with six #8 x 1/2" Screws (1), four 5/16" x 1 1/4" Screws (4), four 5/16" Flat Washers (113), and four 5/16" Star Washers (11). Fully tighten the four 5/16" x 1" Screws (5) and the two 5/16" x 1 1/4" Bolts (4). 4 87 1 1 Console Assembly 88 11 113 4 1 1 11 With the help of a second person, hold the console assembly near the Left Handrail (88). 10 Connect the Upright Wire (81) to pinch any wires. If...

English Manual
Page 13
IMPORTANT: See page 15 and plug in this step 13 When the frame stops moving, remove the key from the console and unplug the power cord. IMPORTANT: Make sure to the console assembly with four #8 x 1/2" 15 Screws (1). 108 107 1 Console Assembly 1 1 16. Attach the Left Tray (107) and the Right Tray (108) to follow all instructions in the power cord. 15. Then, press the Incline increase button once. Next, see page 17 and turn on 16 the power.
IMPORTANT: See page 15 and plug in this step 13 When the frame stops moving, remove the key from the console and unplug the power cord. IMPORTANT: Make sure to the console assembly with four #8 x 1/2" 15 Screws (1). 108 107 1 Console Assembly 1 1 16. Attach the Left Tray (107) and the Right Tray (108) to follow all instructions in the power cord. 15. Then, press the Incline increase button once. Next, see page 17 and turn on 16 the power.

English Manual
Page 15
... Plug in your home’'s power. DANGER: Improper connection of the power cord increases the risk of carrying 15 or more amps. The surge suppressor must have a proper outlet installed by a qualified electrician. 15 Plug the power cord into a surge suppressor, and plug the surge suppressor into an outlet on the same circuit. OPERATION AND ADJUSTMENT HOW TO CONNECT THE POWER CORD Use a Surge Suppressor Your treadmill...
... Plug in your home’'s power. DANGER: Improper connection of the power cord increases the risk of carrying 15 or more amps. The surge suppressor must have a proper outlet installed by a qualified electrician. 15 Plug the power cord into a surge suppressor, and plug the surge suppressor into an outlet on the same circuit. OPERATION AND ADJUSTMENT HOW TO CONNECT THE POWER CORD Use a Surge Suppressor Your treadmill...

English Manual
Page 16
... developer to work with your heart rate using the treadmill. To prevent damage to www.iFit.com or call the telephone number on the power, see THE INFORMATION MODE on the console, remove the plastic. can even listen to miles. To nd which unit of tools to Nikeplus.com through an effective exercise session. You can display speed and distance in this manual refer to your workout results...
... developer to work with your heart rate using the treadmill. To prevent damage to www.iFit.com or call the telephone number on the power, see THE INFORMATION MODE on the console, remove the plastic. can even listen to miles. To nd which unit of tools to Nikeplus.com through an effective exercise session. You can display speed and distance in this manual refer to your workout results...

English Manual
Page 17
.... Next, stand on . Plug in the display. To stop . Insert the key into the reset position, the demo mode is not pulled from the console, causing the walking belt to slow to a stop the walking belt, press the Stop button. tion of the walking belt as 3.5 mph—-press two numbered buttons in the power cord and press the power switch into the console. HOW TO TURN ON THE POWER HOW TO USE THE MANUAL MODE IMPORTANT: If the treadmill has been exposed...
.... Next, stand on . Plug in the display. To stop . Insert the key into the reset position, the demo mode is not pulled from the console, causing the walking belt to slow to a stop the walking belt, press the Stop button. tion of the walking belt as 3.5 mph—-press two numbered buttons in the power cord and press the power switch into the console. HOW TO TURN ON THE POWER HOW TO USE THE MANUAL MODE IMPORTANT: If the treadmill has been exposed...

English Manual
Page 18
... 1/4 mile (400 m). The display will display a track that you have walked or run. When a PROFORM SYNC is connected to set the start mode (see step 6 on page 23 to www.iFit.com, the iFit Live symbol near the top of the display will show the approximate number of the walking belt. 4. The Distance display—-This display will show workout instructions. If necessary, press the Home button again. Follow your heart rate when you press one of the treadmill...
... 1/4 mile (400 m). The display will display a track that you have walked or run. When a PROFORM SYNC is connected to set the start mode (see step 6 on page 23 to www.iFit.com, the iFit Live symbol near the top of the display will show the approximate number of the walking belt. 4. The Distance display—-This display will show workout instructions. If necessary, press the Home button again. Follow your heart rate when you press one of the treadmill...

English Manual
Page 19
... Stop button, and adjust the incline of plas- tion, make sure that your heart rate will turn off automatically after a few minutes. Turn on the pulse Contacts bar. avoid moving your heart rate if desired. When you are nished exercising, remove the key from the console and put it to hold the pulse bar with your palms on when the walking belt is on the metal contacts; IMPORTANT: If you fold...
... Stop button, and adjust the incline of plas- tion, make sure that your heart rate will turn off automatically after a few minutes. Turn on the pulse Contacts bar. avoid moving your heart rate if desired. When you are nished exercising, remove the key from the console and put it to hold the pulse bar with your palms on when the walking belt is on the metal contacts; IMPORTANT: If you fold...
English Manual
Page 20
... setting by pressing the Speed or Incline buttons; The walking belt will be programmed for the next segment. 3. In addition, if you manually change the speed or incline of the treadmill during the workout, you burn will then slow to move at any time, press the Stop button. Hold the handrails and begin to a stop the workout at any time during the workout, the number of the workout begins, the treadmill will automatically adjust to start...
... setting by pressing the Speed or Incline buttons; The walking belt will be programmed for the next segment. 3. In addition, if you manually change the speed or incline of the treadmill during the workout, you burn will then slow to move at any time, press the Stop button. Hold the handrails and begin to a stop the workout at any time during the workout, the number of the workout begins, the treadmill will automatically adjust to start...

English Manual
Page 21
... Event Training button to any time, press the Stop button. You must also have access to a computer with SSID broadcast enabled (hidden networks are nished exercising, remove the key from all persons and must not be at the speed setting for the next segment. When you select an iFit Live workout, the display will show the duration of the workout, the distance you will walk...
... Event Training button to any time, press the Stop button. You must also have access to a computer with SSID broadcast enabled (hidden networks are nished exercising, remove the key from all persons and must not be at the speed setting for the next segment. When you select an iFit Live workout, the display will show the duration of the workout, the distance you will walk...
English Manual
Page 23
... turn off the demo mode, press the Enter button or the Speed decrease button. 3. Press the Enter button repeatedly to select the manual mode or the iFit Live mode as the start mode will show the word NIKE+. While the demo mode is connected, the display will not function. However, when you plug in the center display. CONTRAST LVL: Press the Incline increase and decrease buttons to personalize console settings. If an iFit Live module is connected, the display...
... turn off the demo mode, press the Enter button or the Speed decrease button. 3. Press the Enter button repeatedly to select the manual mode or the iFit Live mode as the start mode will show the word NIKE+. While the demo mode is connected, the display will not function. However, when you plug in the center display. CONTRAST LVL: Press the Incline increase and decrease buttons to personalize console settings. If an iFit Live module is connected, the display...

English Manual
Page 25
... Handrail Wheel 2. IMPORTANT: Do not turn the latch knob. Then, remove the key and unplug the power cord. CAUTION: Do not move the treadmill without tipping it back, do not pull on the wheels, and carefully move it to the desired location. Place one foot against a wheel, and carefully lower the treadmill. Hold the upper end of the treadmill frame with both hands, and...
... Handrail Wheel 2. IMPORTANT: Do not turn the latch knob. Then, remove the key and unplug the power cord. CAUTION: Do not move the treadmill without tipping it back, do not pull on the wheels, and carefully move it to the desired location. Place one foot against a wheel, and carefully lower the treadmill. Hold the upper end of the treadmill frame with both hands, and...

English Manual
Page 26
... the Motor Hood (65) off during use a. TROUBLESHOOTING Most treadmill problems can be comaptible with AFCI-equipped outlets. SYMPTOM: The power does not turn off the demo mode. d. Make sure that the power cord is plugged in , make sure that applies, and follow the steps listed. c Tripped Reset c. If the displays remain lit when you remove the key from the console and UNPLUG THE POWER CORD. a 65 1 2 SYMPTOM: The power turns off . Check the power switch located...
... the Motor Hood (65) off during use a. TROUBLESHOOTING Most treadmill problems can be comaptible with AFCI-equipped outlets. SYMPTOM: The power does not turn off the demo mode. d. Make sure that the power cord is plugged in , make sure that applies, and follow the steps listed. c Tripped Reset c. If the displays remain lit when you remove the key from the console and UNPLUG THE POWER CORD. a 65 1 2 SYMPTOM: The power turns off . Check the power switch located...

English Manual
Page 27
... the Motor Hood (not shown) and run the treadmill for a correct speed reading. Remove the key and UNPLUG THE POWER CORD. Idler Roller Screws c. d. SYMPTOM: The walking belt slows when walked on page 15. 27 Use only a surge suppressor that the gap between the Magnet and the Reed Switch is properly tightened, you suspect the walking belt needs more lubricant, see the front cover of this manual. Turn the Pulley until the walking belt is overtightened, treadmill performance...
... the Motor Hood (not shown) and run the treadmill for a correct speed reading. Remove the key and UNPLUG THE POWER CORD. Idler Roller Screws c. d. SYMPTOM: The walking belt slows when walked on page 15. 27 Use only a surge suppressor that the gap between the Magnet and the Reed Switch is properly tightened, you suspect the walking belt needs more lubricant, see the front cover of this manual. Turn the Pulley until the walking belt is overtightened, treadmill performance...

English Manual
Page 28
... of the walking belt 2 to turn the left idler roller screw counterclockwise 1/2 of a turn. Repeat until the walking belt is properly tightened. SYMPTOM: The walking belt is off-center or slips when walked on , rst remove the key and UNPLUG THE POWER CORD. If the walking belt has shifted to the left, use the hex key to 3 in the power cord, insert the key, and carefully walk on the treadmill for a few minutes. Then, plug in...
... of the walking belt 2 to turn the left idler roller screw counterclockwise 1/2 of a turn. Repeat until the walking belt is properly tightened. SYMPTOM: The walking belt is off-center or slips when walked on , rst remove the key and UNPLUG THE POWER CORD. If the walking belt has shifted to the left, use the hex key to 3 in the power cord, insert the key, and carefully walk on the treadmill for a few minutes. Then, plug in...

English Manual
Page 29
The heart rate monitor is not a medical device. For detailed exercise information, obtain a reputable book or consult your breath. If your goal is to five workouts each week, with pre-existing health problems. The heart rate monitor is intended only as an exercise aid in determining heart rate trends in your training zone. For aerobic exercise, adjust the intensity of your exercise until your heart rate is near the lowest number in...
The heart rate monitor is not a medical device. For detailed exercise information, obtain a reputable book or consult your breath. If your goal is to five workouts each week, with pre-existing health problems. The heart rate monitor is intended only as an exercise aid in determining heart rate trends in your training zone. For aerobic exercise, adjust the intensity of your exercise until your heart rate is near the lowest number in...
English Manual
Page 36
... the front cover of this manual) •• the key number and description of the replacement part(s) (see the front cover of this manual. ICON Health & Fitness, Inc., 1500 S. 1000 W., Logan, UT 84321-9813 Part No. 317673 R0113A Printed in connection with respect to the product. To help us assist you, be responsible for a minimal handling charge. The frame and drive motor are limited in their...
... the front cover of this manual) •• the key number and description of the replacement part(s) (see the front cover of this manual. ICON Health & Fitness, Inc., 1500 S. 1000 W., Logan, UT 84321-9813 Part No. 317673 R0113A Printed in connection with respect to the product. To help us assist you, be responsible for a minimal handling charge. The frame and drive motor are limited in their...


