
German Manual
Page 15
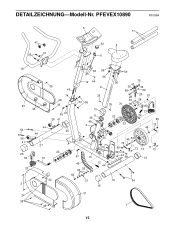
DETAILZEICHNUNG-Modell-Nr. PFEVEX10890 R1099A 5 17 47 53 8 55 61 6 7 18 23 54 26 41 25 50 20 2 7 63 59 59 35 43 74 49 35 35 55 61 26 41 44 25 44 27 22 70 56 19 64 9 75 56 42 36 36 68 69 61 55 35 28 29 67 44 38 35 70 66 45 10 21 11 35 48 4 22 33 34 46 65 72 44 57 13 56 3 35 37 46 30 72 65 71 73 39 44 58 14 71 73 15 40 60 52 12 44 62 32 51 16 54 15 31 24 35 49 1 15
DETAILZEICHNUNG-Modell-Nr. PFEVEX10890 R1099A 5 17 47 53 8 55 61 6 7 18 23 54 26 41 25 50 20 2 7 63 59 59 35 43 74 49 35 35 55 61 26 41 44 25 44 27 22 70 56 19 64 9 75 56 42 36 36 68 69 61 55 35 28 29 67 44 38 35 70 66 45 10 21 11 35 48 4 22 33 34 46 65 72 44 57 13 56 3 35 37 46 30 72 65 71 73 39 44 58 14 71 73 15 40 60 52 12 44 62 32 51 16 54 15 31 24 35 49 1 15

Uk Manual
Page 1
... or damaged parts, we will guarantee complete satisfaction through our Customer Service Department. Please CALL: 0345-089009 Or WRITE: ICON Fitness Lifestyle Ltd. Keep this equipment. Serial Number Decal QUESTIONS? If you have questions, or if there are committed to providing complete customer satisfaction. Class HC Fitness Product ® Model No. Write the serial number in this manual before using this manual for...
... or damaged parts, we will guarantee complete satisfaction through our Customer Service Department. Please CALL: 0345-089009 Or WRITE: ICON Fitness Lifestyle Ltd. Keep this equipment. Serial Number Decal QUESTIONS? If you have questions, or if there are committed to providing complete customer satisfaction. Class HC Fitness Product ® Model No. Write the serial number in this manual before using this manual for...
Uk Manual
Page 2
® TABLE OF CONTENTS IMPORTANT PRECAUTIONS 3 BEFORE YOU BEGIN 4 ASSEMBLY 5 HOW TO USE THE EXERCISE CYCLE 8 MAINTENANCE AND TROUBLE-SHOOTING 10 CONDITIONING GUIDELINES 11 PART LIST 14 EXPLODED DRAWING 15 HOW TO ORDER REPLACEMENT PARTS Back Cover PROFORM® is a registered trademark of ICON Health & Fitness, Inc. 2
® TABLE OF CONTENTS IMPORTANT PRECAUTIONS 3 BEFORE YOU BEGIN 4 ASSEMBLY 5 HOW TO USE THE EXERCISE CYCLE 8 MAINTENANCE AND TROUBLE-SHOOTING 10 CONDITIONING GUIDELINES 11 PART LIST 14 EXPLODED DRAWING 15 HOW TO ORDER REPLACEMENT PARTS Back Cover PROFORM® is a registered trademark of ICON Health & Fitness, Inc. 2
Uk Manual
Page 3
... (115 kg). 7. do not wear loose clothing that all parts regularly. Various factors, including the user's movement, may affect the accuracy of all instructions in -home use only. The pulse monitor is the responsibility of the owner to order a free replacement decal. ICON assumes no responsibility for in this manual before using the exercise cycle. IMPORTANT PRECAUTIONS WARNING: To reduce the risk of serious...
... (115 kg). 7. do not wear loose clothing that all parts regularly. Various factors, including the user's movement, may affect the accuracy of all instructions in -home use only. The pulse monitor is the responsibility of the owner to order a free replacement decal. ICON assumes no responsibility for in this manual before using the exercise cycle. IMPORTANT PRECAUTIONS WARNING: To reduce the risk of serious...

Uk Manual
Page 4
... exercises for improving cardiovascular fitness and toning the body. Before reading further, please familiarise yourself with contemporary styling to the PROFORM® 790 (see the front cover of this manual for selecting the innovative PROFORM® 790 exercise cycle. If you use the PROFORM® 790. Cycling is PFEVEX10890. Water Bottle Holder (bottle not included) Pulse Sensor Seat Seat Post Seat Knob Side Shield BACK Handlebars Console Resistance Knob FRONT Pedal Front Wheels Adjustable...
... exercises for improving cardiovascular fitness and toning the body. Before reading further, please familiarise yourself with contemporary styling to the PROFORM® 790 (see the front cover of this manual for selecting the innovative PROFORM® 790 exercise cycle. If you use the PROFORM® 790. Cycling is PFEVEX10890. Water Bottle Holder (bottle not included) Pulse Sensor Seat Seat Post Seat Knob Side Shield BACK Handlebars Console Resistance Knob FRONT Pedal Front Wheels Adjustable...

Uk Manual
Page 5
as well as a phillips Use the chart below each part refers to the key number of the part, from the PART LIST on the back of the Console. Locate and open the battery cover on page 14. Attach the Console (5) to the inset drawing. If a part is completed. M8 Nylon Locknut (56)-3 M10 Nylon Locknut (44)-4 M10 x 22mm Button Screw (55)-5 M4 x 16mm Screw (7)-4 M8 Lock Washer (59)-3 M10 Lock...
as well as a phillips Use the chart below each part refers to the key number of the part, from the PART LIST on the back of the Console. Locate and open the battery cover on page 14. Attach the Console (5) to the inset drawing. If a part is completed. M8 Nylon Locknut (56)-3 M10 Nylon Locknut (44)-4 M10 x 22mm Button Screw (55)-5 M4 x 16mm Screw (7)-4 M8 Lock Washer (59)-3 M10 Lock...
Uk Manual
Page 6
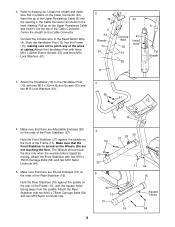
... when the exercise bike is turned so the Wheels (26) are Round Endcaps (15) on the ends of the Rear Stabiliser (16). Attach the Rear Stabiliser with two M10 x 75mm Carriage Bolts (54) and two M10 Nylon Locknuts (44). 5. Refer to the Reed Switch Wire (4). Center the sheath on the Cable Connector (43). Pull up on the rear of the Upper Resistance Cable (6) into...
... when the exercise bike is turned so the Wheels (26) are Round Endcaps (15) on the ends of the Rear Stabiliser (16). Attach the Rear Stabiliser with two M10 x 75mm Carriage Bolts (54) and two M10 Nylon Locknuts (44). 5. Refer to the Reed Switch Wire (4). Center the sheath on the Cable Connector (43). Pull up on the rear of the Upper Resistance Cable (6) into...
Uk Manual
Page 7
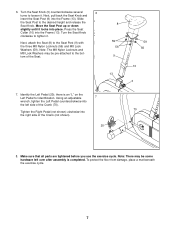
... place. Move the Seat Post up or down slightly until it . Press the Seat Collar (10) into the left over after assembly is an "L" on the Left Pedal for identification. Turn the Seat Knob clockwise to the desired height and release the Seat Knob. Tighten the Right Pedal (not shown) clockwise into the Frame (13). 6. Slide the Seat Post to tighten it. Next, attach the Seat (8) to...
... place. Move the Seat Post up or down slightly until it . Press the Seat Collar (10) into the left over after assembly is an "L" on the Left Pedal for identification. Turn the Seat Knob clockwise to the desired height and release the Seat Knob. Tighten the Right Pedal (not shown) clockwise into the Frame (13). 6. Slide the Seat Post to tighten it. Next, attach the Seat (8) to...
Uk Manual
Page 8
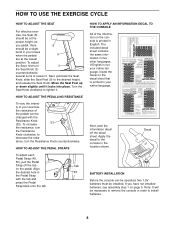
... not installed batteries, see assembly step 1 on the pedal. Decal BATTERY INSTALLATION Before the console can be necessary to the console in five other languages. Next, pull back the Seat Knob, slide the Seat Post (9) to decrease the resis- HOW TO ADJUST THE PEDAL STRAPS To adjust each Pedal Strap (45, 50), pull the Pedal Strap off the decal sheet. Apply the decal to remove the console in 45 the Pedal Strap with the Resistance Knob...
... not installed batteries, see assembly step 1 on the pedal. Decal BATTERY INSTALLATION Before the console can be necessary to the console in five other languages. Next, pull back the Seat Knob, slide the Seat Post (9) to decrease the resis- HOW TO ADJUST THE PEDAL STRAPS To adjust each Pedal Strap (45, 50), pull the Pedal Strap off the decal sheet. Apply the decal to remove the console in 45 the Pedal Strap with the Resistance Knob...

Uk Manual
Page 9
... pulse sensor is currently displayed. 3. Press down the pulse sensor. The modes are described below. Distance-This mode displays the total number of pressure to conserve the batteries. 9 To turn on the power, press the on , the console will not be restricted, and your thumb at this level. If the pedals are not moved and the console buttons are not pressed for five seconds in the display flashes steadily. When the power is used...
... pulse sensor is currently displayed. 3. Press down the pulse sensor. The modes are described below. Distance-This mode displays the total number of pressure to conserve the batteries. 9 To turn on the power, press the on , the console will not be restricted, and your thumb at this level. If the pedals are not moved and the console buttons are not pressed for five seconds in the display flashes steadily. When the power is used...
Uk Manual
Page 10
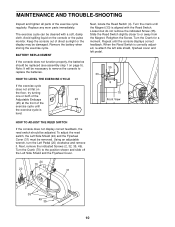
... direct sunlight or the display may be removed. Note: It will be replaced (see assembly step 1 on the floor, try turning one or both of the Adjustable Endcaps 25 (25) at the front of the exercise cycle regularly. Turn the crank until the console displays correct feedback. Turn the Crank for a moment. Using an adjustable wrench, turn the Left Pedal (20) clockwise and remove it. MAINTENANCE AND TROUBLE-SHOOTING Inspect and tighten all parts...
... direct sunlight or the display may be removed. Note: It will be replaced (see assembly step 1 on the floor, try turning one or both of the Adjustable Endcaps 25 (25) at the front of the exercise cycle regularly. Turn the crank until the console displays correct feedback. Turn the Crank for a moment. Using an adjustable wrench, turn the Left Pedal (20) clockwise and remove it. MAINTENANCE AND TROUBLE-SHOOTING Inspect and tighten all parts...
Uk Manual
Page 11
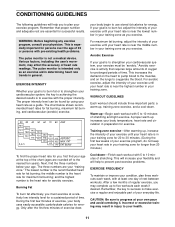
... use stored fat calories for exercise. The chart below your everyday life. A proper warm-up , increase the intensity of your exercise until your physician. b.p.m. Aerobic Exercise If your body temperature, heart rate and circulation in injury to five workouts each workout with the proper intensity. Incorrect or excessive training may complete up -Begin each week, with pre-existing health problems. The pulse monitor is the heart rate...
... use stored fat calories for exercise. The chart below your everyday life. A proper warm-up , increase the intensity of your exercise until your physician. b.p.m. Aerobic Exercise If your body temperature, heart rate and circulation in injury to five workouts each workout with the proper intensity. Incorrect or excessive training may complete up -Begin each week, with pre-existing health problems. The pulse monitor is the heart rate...
Uk Manual
Page 12
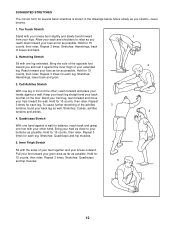
...relax. Toe Touch Stretch Stand with the soles of your hips. Stretches: Hamstrings, lower back and groin. 3. Hold for 15 counts, then relax. Repeat 3 times for 15 counts, then relax. Hold for each leg. Repeat 3 times. Inner Thigh Stretch Sit with your knees bent slightly and slowly...reach down toward your toes as far as possible. Stretches: Quadriceps and hip muscles. 5 12 SUGGESTED STRETCHES The correct form for 15 counts, then relax. Move slowly as possible. Hold for several basic stretches is shown in front of knees and back. 2. Pull your feet ...
...relax. Toe Touch Stretch Stand with the soles of your hips. Stretches: Hamstrings, lower back and groin. 3. Hold for 15 counts, then relax. Repeat 3 times for 15 counts, then relax. Hold for each leg. Repeat 3 times. Inner Thigh Stretch Sit with your knees bent slightly and slowly...reach down toward your toes as far as possible. Stretches: Quadriceps and hip muscles. 5 12 SUGGESTED STRETCHES The correct form for 15 counts, then relax. Move slowly as possible. Hold for several basic stretches is shown in front of knees and back. 2. Pull your feet ...
Uk Manual
Page 14
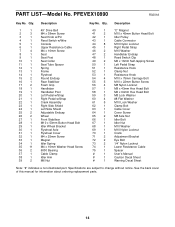
... part. Specifications are subject to change without notice. PART LIST-Model No. PFEVEX10890 R0201A Key No. Qty. 1 1 2 3 3 1 4 1 5 1 6 1 7 4 8 1 9 1 10 1 11 1 12 1 13 1 14 1 15 2 16 1 17 2 18 1 19 1 20 1 21 1 22 1 23 1 24 1 25 2 26 2 27 1 28 1 29 1 30 1 31 1 32 1 33 1 34 1 35 11 36 2 37 1 38 1 39 2 Description 49" Drive Belt M4 x 38mm Screw Seat Knob w/Pin Reed Switch w/Wire Console Upper Resistance Cable M4 x 16mm Screw Seat Seat Post Seat Collar Seat...
... part. Specifications are subject to change without notice. PART LIST-Model No. PFEVEX10890 R0201A Key No. Qty. 1 1 2 3 3 1 4 1 5 1 6 1 7 4 8 1 9 1 10 1 11 1 12 1 13 1 14 1 15 2 16 1 17 2 18 1 19 1 20 1 21 1 22 1 23 1 24 1 25 2 26 2 27 1 28 1 29 1 30 1 31 1 32 1 33 1 34 1 35 11 36 2 37 1 38 1 39 2 Description 49" Drive Belt M4 x 38mm Screw Seat Knob w/Pin Reed Switch w/Wire Console Upper Resistance Cable M4 x 16mm Screw Seat Seat Post Seat Collar Seat...
Uk Manual
Page 15
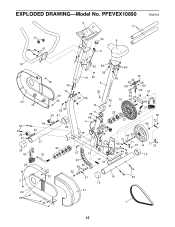
PFEVEX10890 5 17 R0201A 47 53 8 55 61 6 7 18 23 54 26 41 25 50 20 2 7 63 59 59 35 43 74 49 35 35 55 61 26 41 44 25 44 27 22 70 56 19 64 9 75 56 42 36 36 68 69 61 55 35 10 28 29 67 44 38 35 70 66 45 21 11 35 48 4 22 33 34 46 65 72 56 3 35 44 37 57 13 40 60 52 12 44 46 30 72 65 71 73 39 44 58 14 71 73 15 62 32 51 16 54 15 31 24 35 49 1 15 EXPLODED DRAWING-Model No.
PFEVEX10890 5 17 R0201A 47 53 8 55 61 6 7 18 23 54 26 41 25 50 20 2 7 63 59 59 35 43 74 49 35 35 55 61 26 41 44 25 44 27 22 70 56 19 64 9 75 56 42 36 36 68 69 61 55 35 10 28 29 67 44 38 35 70 66 45 21 11 35 48 4 22 33 34 46 65 72 56 3 35 44 37 57 13 40 60 52 12 44 46 30 72 65 71 73 39 44 58 14 71 73 15 62 32 51 16 54 15 31 24 35 49 1 15 EXPLODED DRAWING-Model No.
Uk Manual
Page 16
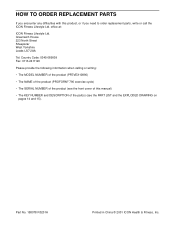
... NAME of the product (PROFORM® 790 exercise cycle) • The SERIAL NUMBER of the product (see the front cover of this product, or if you need to order replacement parts, write or call the ICON Fitness Lifestyle Ltd. HOW TO ORDER REPLACEMENT PARTS If you encounter any difficulties with this manual) • The KEY NUMBER and DESCRIPTION of the part(s) (see the PART LIST and the EXPLODED DRAWING...
... NAME of the product (PROFORM® 790 exercise cycle) • The SERIAL NUMBER of the product (see the front cover of this product, or if you need to order replacement parts, write or call the ICON Fitness Lifestyle Ltd. HOW TO ORDER REPLACEMENT PARTS If you encounter any difficulties with this manual) • The KEY NUMBER and DESCRIPTION of the part(s) (see the PART LIST and the EXPLODED DRAWING...


