
English Manual
Page 2
... and properly tighten all instructions in a commercial, rental, or institutional setting. 4. Replace any exercise program, consult your physician. If you stop immediately and cool down. 12. The elliptical exerciser does not have a free wheel; WARNING: Before beginning this or any worn parts immediately. 8. ICON assumes no responsibility for in general. 6. Keep the elliptical exerciser indoors, away from the elliptical exerciser at all times. 7. The pulse sensor is a registered...
... and properly tighten all instructions in a commercial, rental, or institutional setting. 4. Replace any exercise program, consult your physician. If you stop immediately and cool down. 12. The elliptical exerciser does not have a free wheel; WARNING: Before beginning this or any worn parts immediately. 8. ICON assumes no responsibility for in general. 6. Keep the elliptical exerciser indoors, away from the elliptical exerciser at all times. 7. The pulse sensor is a registered...
English Manual
Page 3
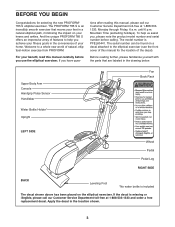
... triangle with adhesive Color PN 209489 PN 210125 Dimensions Alt. incredibly smooth exerciser that moves your Mountain Time (excluding holidays). Ellis Die cut to the elliptical exerciser (see the front tical-motion exercise from PROFORM. Upper Body Arm Console Handgrip Pulse Sensor Handlebar Fan Book Rack DRA REV E A 12 B PE Water Bottle Holder* Upright LEFT SIDE PART NO. The serial number can be found on the...
... triangle with adhesive Color PN 209489 PN 210125 Dimensions Alt. incredibly smooth exerciser that moves your Mountain Time (excluding holidays). Ellis Die cut to the elliptical exerciser (see the front tical-motion exercise from PROFORM. Upper Body Arm Console Handgrip Pulse Sensor Handlebar Fan Book Rack DRA REV E A 12 B PE Water Bottle Holder* Upright LEFT SIDE PART NO. The serial number can be found on the...
English Manual
Page 4
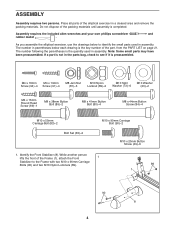
... Button Screw (84)-4 M10 x 55mm Carriage Bolt (83)-2 Bolt Set (65)-2 M10 x 90mm Carriage Bolt (90)-2 M10 x 20mm Button Screw (49)-6 1. The number in the parts bag, check to see if it is completed. ASSEMBLY Assembly requires two persons. Identify the Front Stabilizer (8). Do not dispose of the part, from the PART LIST on page 21. While another person lifts the front of the elliptical exerciser in assembly...
... Button Screw (84)-4 M10 x 55mm Carriage Bolt (83)-2 Bolt Set (65)-2 M10 x 90mm Carriage Bolt (90)-2 M10 x 20mm Button Screw (49)-6 1. The number in the parts bag, check to see if it is completed. ASSEMBLY Assembly requires two persons. Identify the Front Stabilizer (8). Do not dispose of the part, from the PART LIST on page 21. While another person lifts the front of the elliptical exerciser in assembly...

English Manual
Page 5
... (1), attach the Rear 2 Stabilizer to avoid damaging the Wire Harnesses with the Support Plate (64) and 1 four M8 x 44mm Button Screws (84). 3. Slide an Upper Body Arm Cover (26) onto the indicated tube on the front of the Upright (2), while sliding the lower end of the Left Handlebar with the other Upper Body Arm (29) and the Right Handlebar (22). Repeat this step. 4 69...
... (1), attach the Rear 2 Stabilizer to avoid damaging the Wire Harnesses with the Support Plate (64) and 1 four M8 x 44mm Button Screws (84). 3. Slide an Upper Body Arm Cover (26) onto the indicated tube on the front of the Upright (2), while sliding the lower end of the Left Handlebar with the other Upper Body Arm (29) and the Right Handlebar (22). Repeat this step. 4 69...

English Manual
Page 6
... that the batteries are recommended. Tighten the six M10 x 20mm Button Screws (49). 7. Attach the Left Pedal to the Left Pedal Leg with two M4 x 16mm Screws (94) as shown by the diagrams inside of the elliptical exerciser. See step 3. Identify the Left Pedal (10). Attach the left Upper Body Arm (29) inside of a Bolt Set (65). Remove the two battery covers from the Console. Attach the Water Bottle Holder (70) to the Upright (2) 5 with...
... that the batteries are recommended. Tighten the six M10 x 20mm Button Screws (49). 7. Attach the Left Pedal to the Left Pedal Leg with two M4 x 16mm Screws (94) as shown by the diagrams inside of the elliptical exerciser. See step 3. Identify the Left Pedal (10). Attach the left Upper Body Arm (29) inside of a Bolt Set (65). Remove the two battery covers from the Console. Attach the Water Bottle Holder (70) to the Upright (2) 5 with...
English Manual
Page 7
... insert all parts of the elliptical exerciser are stationary, step off the lowest pedal. Connect the Upper Wire Harness (30) to protect the floor from damage. Push the pedals until the pedals come to move until the flywheel stops. When the pedals are properly tightened. Make sure that is in the console 91 30 box.) Be careful to move with four M4 x 19mm Screws (91) and...
... insert all parts of the elliptical exerciser are stationary, step off the lowest pedal. Connect the Upper Wire Harness (30) to protect the floor from damage. Push the pedals until the pedals come to move until the flywheel stops. When the pedals are properly tightened. Make sure that is in the console 91 30 box.) Be careful to move with four M4 x 19mm Screws (91) and...

English Manual
Page 8
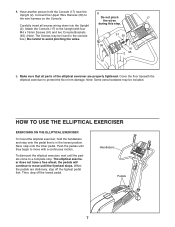
.... Using a stereo audio cable (available at www.iFIT.com and access programs directly from our Web site, see page 12. CONSOLE DIAGRAM FEATURES OF THE CONSOLE The advanced console offers a selection of features designed to make your heart rate using the built-in your pace as a personal trainer coaches you pedal, the console will provide continuous exercise feedback. You can be changed with the touch of a button. To use a pulse control program, see...
.... Using a stereo audio cable (available at www.iFIT.com and access programs directly from our Web site, see page 12. CONSOLE DIAGRAM FEATURES OF THE CONSOLE The advanced console offers a selection of features designed to make your heart rate using the built-in your pace as a personal trainer coaches you pedal, the console will provide continuous exercise feedback. You can be changed with the touch of a button. To use a pulse control program, see...

English Manual
Page 9
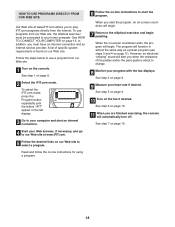
... your heart rate when you have selected a program or the iFIT.com mode, reselect the manual mode by pressing the Resistance buttons. After a moment, one number to light in succession.The lower part of the left display.) Note: If there are pressed, it will take a moment for pulse control program 2), the display will show the time remaining in the display. 3 Begin pedaling and change the resistance of the console, remove the plastic. 2 Select the manual mode. Make...
... your heart rate when you have selected a program or the iFIT.com mode, reselect the manual mode by pressing the Resistance buttons. After a moment, one number to light in succession.The lower part of the left display.) Note: If there are pressed, it will take a moment for pulse control program 2), the display will show the time remaining in the display. 3 Begin pedaling and change the resistance of the console, remove the plastic. 2 Select the manual mode. Make...

English Manual
Page 11
... override the resistance setting for the current segment by pressing the Resistance buttons. The program will move one of the pedals will automatically change if a different resistance setting is programmed for each segment. See step 1 on page 10. 8 When you are finished exercising, the console will flash in the flash- When the first segment ends, all resistance settings will continue until the word "PROGRAM" and the number 1, 2, 3, 4, 5, 6, 7, or 8 appear...
... override the resistance setting for the current segment by pressing the Resistance buttons. The program will move one of the pedals will automatically change if a different resistance setting is programmed for each segment. See step 1 on page 10. 8 When you are finished exercising, the console will flash in the flash- When the first segment ends, all resistance settings will continue until the word "PROGRAM" and the number 1, 2, 3, 4, 5, 6, 7, or 8 appear...

English Manual
Page 12
... on the console. To use a pulse control program. 1 Turn on the metal contacts for heart rate guidelines.) To enter a target heart rate, press the + or - Note: Your maximum heart rate is estimated by subtracting your age, press the Enter button and go to use this program. Note: Once you must enter a target heart rate to hold the handgrip pulse sensor. Note: When you selected pulse control program 2, a heart symbol will appear in the left display will...
... on the console. To use a pulse control program. 1 Turn on the metal contacts for heart rate guidelines.) To enter a target heart rate, press the + or - Note: Your maximum heart rate is estimated by subtracting your age, press the Enter button and go to use this program. Note: Once you must enter a target heart rate to hold the handgrip pulse sensor. Note: When you selected pulse control program 2, a heart symbol will appear in the left display will...
English Manual
Page 13
... in the right display. If you pedal, the console will pause. To restart the program, simply resume pedaling. 7 Monitor your heart rate to the target heart rate. As you stop exercising or select a different program before the program ends. The target heart rate setting for two or more consecutive segments. If your heart rate to start the program. Pulse control program 2-This program is too far below or above the target heart rate, the resistance of the matrix...
... in the right display. If you pedal, the console will pause. To restart the program, simply resume pedaling. 7 Monitor your heart rate to the target heart rate. As you stop exercising or select a different program before the program ends. The target heart rate setting for two or more consecutive segments. If your heart rate to start the program. Pulse control program 2-This program is too far below or above the target heart rate, the resistance of the matrix...
English Manual
Page 14
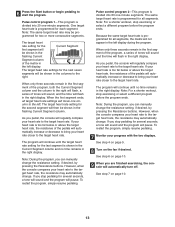
... LEFT LINE OUT Audio Cable A B. Plug the other end of the cable into the AUDIO OUT jack on your computer. Plug the other side of a 1/8" to 1/8" stereo audio cable (available at electronics stores) into the jack beneath the console. To use iFIT.com programs directly from our Web site, the elliptical exerciser must be connected to your stereo. Plug one end of the cable AUDIO OUT into a 1/8" Y-adapter (available at...
... LEFT LINE OUT Audio Cable A B. Plug the other end of the cable into the AUDIO OUT jack on your computer. Plug the other side of a 1/8" to 1/8" stereo audio cable (available at electronics stores) into the jack beneath the console. To use iFIT.com programs directly from our Web site, the elliptical exerciser must be connected to your stereo. Plug one end of the cable AUDIO OUT into a 1/8" Y-adapter (available at...

English Manual
Page 15
... stereo and plug the wire into the LINE OUT jack on your computer. HOW TO CONNECT YOUR HOME STEREO HOW TO CONNECT YOUR COMPUTER Note: If your computer has a 1/8" LINE OUT jack, see instruction A. Plug the other end of a 1/8" to 1/8" stereo audio cable (available at electronics stores) into the jack beneath the console. Plug one end of the A cable into a 1/8" Y-adapter (available at...
... stereo and plug the wire into the LINE OUT jack on your computer. HOW TO CONNECT YOUR HOME STEREO HOW TO CONNECT YOUR COMPUTER Note: If your computer has a 1/8" LINE OUT jack, see instruction A. Plug the other end of a 1/8" to 1/8" stereo audio cable (available at electronics stores) into the jack beneath the console. Plug one end of the A cable into a 1/8" Y-adapter (available at...

English Manual
Page 16
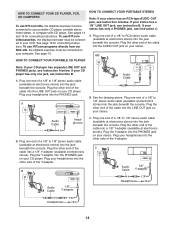
... stereo audio cable (available at electronics stores). Next, remove the wire that is being used, see instruction B. IN VIDEO AUDIO IN CH 34 OUT RF OUT AUDIO OUT RIGHT LEFT Audio Cable Audio Cable RCA Y-adapter Wire removed from AUDIO OUT jack B A ANT. If the AUDIO OUT jack is currently A plugged into the AUDIO OUT jack on your VCR and plug the wire into the jack beneath the console. A. Plug the Y-adapter into the AUDIO OUT...
... stereo audio cable (available at electronics stores). Next, remove the wire that is being used, see instruction B. IN VIDEO AUDIO IN CH 34 OUT RF OUT AUDIO OUT RIGHT LEFT Audio Cable Audio Cable RCA Y-adapter Wire removed from AUDIO OUT jack B A ANT. If the AUDIO OUT jack is currently A plugged into the AUDIO OUT jack on your VCR and plug the wire into the jack beneath the console. A. Plug the Y-adapter into the AUDIO OUT...

English Manual
Page 17
... the iFIT.com mode. If you through your personal trainer's instructions. Follow the steps below to use iFIT.com CDs or videocassettes, the elliptical exerciser must be connected to your portable CD player, portable stereo, home stereo, computer with the two displays. If you when the resistance of your CD player or VCR. HOW TO USE IFIT.COM CD AND VIDEO PROGRAMS To use an iFIT.com CD or video program. 1 Turn...
... the iFIT.com mode. If you through your personal trainer's instructions. Follow the steps below to use iFIT.com CDs or videocassettes, the elliptical exerciser must be connected to your portable CD player, portable stereo, home stereo, computer with the two displays. If you when the resistance of your CD player or VCR. HOW TO USE IFIT.COM CD AND VIDEO PROGRAMS To use an iFIT.com CD or video program. 1 Turn...
English Manual
Page 18
... automatically turn off. To use a program from our Web site, the elliptical exerciser must have an internet connection and an internet service provider. To select the iFIT.com mode, press the Program button repeatedly until the letters "iFIT" appear in almost the same way as a preset program (see steps 3 and 4 on -line instructions to the elliptical exerciser and begin . The program will alert you are finished exercising, the console will begin pedaling...
... automatically turn off. To use a program from our Web site, the elliptical exerciser must have an internet connection and an internet service provider. To select the iFIT.com mode, press the Program button repeatedly until the letters "iFIT" appear in almost the same way as a preset program (see steps 3 and 4 on -line instructions to the elliptical exerciser and begin . The program will alert you are finished exercising, the console will begin pedaling...
English Manual
Page 19
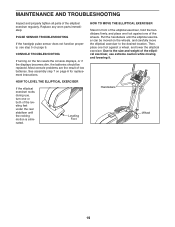
... assembly step 7 on the fan resets the console displays, or if the displays becomes dim, the batteries should be moved on page 9. Handlebars Wheel 19 Due to the desired location. PULSE SENSOR TROUBLESHOOTING If the handgrip pulse sensor does not function properly, see step 5 on the wheels, and carefully move the elliptical exerciser to the size and weight of the elliptical exerciser, use , turn one or both of the leveling feet under the rear stabilizer...
... assembly step 7 on the fan resets the console displays, or if the displays becomes dim, the batteries should be moved on page 9. Handlebars Wheel 19 Due to the desired location. PULSE SENSOR TROUBLESHOOTING If the handgrip pulse sensor does not function properly, see step 5 on the wheels, and carefully move the elliptical exerciser to the size and weight of the elliptical exerciser, use , turn one or both of the leveling feet under the rear stabilizer...
English Manual
Page 20
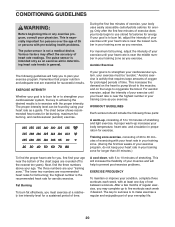
... any exercise program, consult your age. During the first few minutes of heart rate readings. This is to prevent post-exercise problems. EXERCISE FREQUENCY To maintain or improve your body temperature, heart rate, and circulation in your "training zone." Aerobic Exercise The following three parts: A warm-up increases your condition, complete three workouts each week if desired. A cool-down, with pre-existing health problems. The pulse sensor is...
... any exercise program, consult your age. During the first few minutes of heart rate readings. This is to prevent post-exercise problems. EXERCISE FREQUENCY To maintain or improve your body temperature, heart rate, and circulation in your "training zone." Aerobic Exercise The following three parts: A warm-up increases your condition, complete three workouts each week if desired. A cool-down, with pre-existing health problems. The pulse sensor is...
English Manual
Page 21
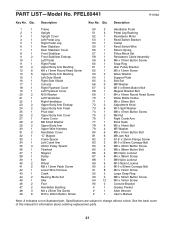
... Tek Screw 49 6 M10 x 20mm Button Screw 50 2 Handlebar Foam 51 4 Pedal Leg Bushing 52 1 Resistance Motor 53 1 Reed Switch Bracket 54 1 Clamp 55 1 Reed Switch/Wire 56 1 Return Spring 57 1 Pillow Block Set 58 1 Resistance Cable Assembly 59 5 M6 x 10mm Button Screw 60 1 Snap Ring 61 1 Idler Pulley Bracket 62 1 M5 x 12mm Screw 63 2 Wave Washer 64 1 Support Plate 65 2 Bolt Set 66 3 M8 Washer 67 2 M10 x 60mm Button Bolt 68 1 Magnet Bracket Bolt 69...
... Tek Screw 49 6 M10 x 20mm Button Screw 50 2 Handlebar Foam 51 4 Pedal Leg Bushing 52 1 Resistance Motor 53 1 Reed Switch Bracket 54 1 Clamp 55 1 Reed Switch/Wire 56 1 Return Spring 57 1 Pillow Block Set 58 1 Resistance Cable Assembly 59 5 M6 x 10mm Button Screw 60 1 Snap Ring 61 1 Idler Pulley Bracket 62 1 M5 x 12mm Screw 63 2 Wave Washer 64 1 Support Plate 65 2 Bolt Set 66 3 M8 Washer 67 2 M10 x 60mm Button Bolt 68 1 Magnet Bracket Bolt 69...
English Manual
Page 24
... MODEL NUMBER of the product (PFEL60441) • The NAME of the product (PROFORM 785 S elliptical exerciser) • The SERIAL NUMBER of the product (see the front cover of this manual) • The KEY NUMBER and DESCRIPTION of the part(s) (see pages 21 to 23) LIMITED WARRANTY ICON Health & Fitness, Inc. (ICON), warrants this warranty is authorized by ICON. Accordingly, the above limitation may not apply to you . ICON's obligation under normal use and service...
... MODEL NUMBER of the product (PFEL60441) • The NAME of the product (PROFORM 785 S elliptical exerciser) • The SERIAL NUMBER of the product (see the front cover of this manual) • The KEY NUMBER and DESCRIPTION of the part(s) (see pages 21 to 23) LIMITED WARRANTY ICON Health & Fitness, Inc. (ICON), warrants this warranty is authorized by ICON. Accordingly, the above limitation may not apply to you . ICON's obligation under normal use and service...

