
Uk Manual
Page 1
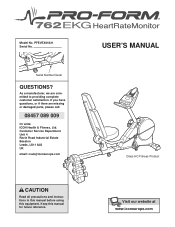
... to providing complete customer satisfaction. Keep this equipment. USER'S MANUAL Class HC Fitness Product Visit our website at www.iconeurope.com Customer Service Department Unit 4 Revie Road Industrial Estate Beeston Leeds, LS11 8JG UK email: [email protected] CAUTION Read all precautions and instructions in this manual before using this manual for future reference. PFEVEX61831 Serial No. Serial Number Decal QUESTIONS?
... to providing complete customer satisfaction. Keep this equipment. USER'S MANUAL Class HC Fitness Product Visit our website at www.iconeurope.com Customer Service Department Unit 4 Revie Road Industrial Estate Beeston Leeds, LS11 8JG UK email: [email protected] CAUTION Read all precautions and instructions in this manual before using this manual for future reference. PFEVEX61831 Serial No. Serial Number Decal QUESTIONS?
Uk Manual
Page 2
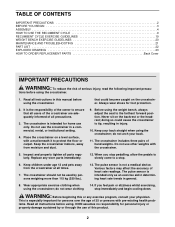
... of the owner to ensure that could cause the crosstrainer to a stop immediately and begin cooling down. TABLE OF CONTENTS IMPORTANT PRECAUTIONS 2 BEFORE YOU BEGIN 3 ASSEMBLY 4 HOW TO USE THE RECUMBENT CYCLE 9 RECUMBENT CYCLE EXERCISE GUIDELINES 19 WEIGHT BENCH EXERCISE GUIDELINES 20 MAINTENANCE AND TROUBLESHOOTING 21 PART LIST 22 EXPLODED DRAWING 23 HOW TO ORDER REPLACEMENT PARTS Back Cover IMPORTANT PRECAUTIONS WARNING: To reduce the risk of heart rate readings...
... of the owner to ensure that could cause the crosstrainer to a stop immediately and begin cooling down. TABLE OF CONTENTS IMPORTANT PRECAUTIONS 2 BEFORE YOU BEGIN 3 ASSEMBLY 4 HOW TO USE THE RECUMBENT CYCLE 9 RECUMBENT CYCLE EXERCISE GUIDELINES 19 WEIGHT BENCH EXERCISE GUIDELINES 20 MAINTENANCE AND TROUBLESHOOTING 21 PART LIST 22 EXPLODED DRAWING 23 HOW TO ORDER REPLACEMENT PARTS Back Cover IMPORTANT PRECAUTIONS WARNING: To reduce the risk of heart rate readings...
Uk Manual
Page 3
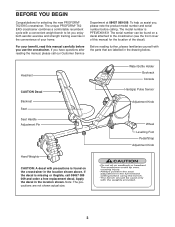
... strength training exercise in the location shown above. If you use the crosstrainer. Apply the decal in the drawing below. Headrest CAUTION Decal Backrest Seat Seat Handle Adjustment Pin Hand Weights CAUTION: A decal with a convenient weight bench to the crosstrainer (see the front cover of this manual carefully before calling. The unique PROFORM® 762 EKG crosstrainer combines a comfortable recumbent cycle with precautions is missing or illegible, call our Customer Service...
... strength training exercise in the location shown above. If you use the crosstrainer. Apply the decal in the drawing below. Headrest CAUTION Decal Backrest Seat Seat Handle Adjustment Pin Hand Weights CAUTION: A decal with a convenient weight bench to the crosstrainer (see the front cover of this manual carefully before calling. The unique PROFORM® 762 EKG crosstrainer combines a comfortable recumbent cycle with precautions is missing or illegible, call our Customer Service...

Uk Manual
Page 4
... remove the packing materials. ASSEMBLY Assembly requires two persons. As you assemble the crosstrainer, use the drawings below each drawing is not in the parts bag, check to the included hex keys, assembly requires a phillips screwdriver , an adjustable spanner , and a rubber mallet (not included). The number following the parentheses is completed. Place all parts of the packing materials until assembly is the quantity needed...
... remove the packing materials. ASSEMBLY Assembly requires two persons. As you assemble the crosstrainer, use the drawings below each drawing is not in the parts bag, check to the included hex keys, assembly requires a phillips screwdriver , an adjustable spanner , and a rubber mallet (not included). The number following the parentheses is completed. Place all parts of the packing materials until assembly is the quantity needed...

Uk Manual
Page 5
... vertical. Insert the Adjustment Pin (29) into the Stabiliser Covers (7, 8) as shown. Orient the Frame Rail (3) as shown. 4. Set the six Hand Weights (21, 22, 23) on the Stabiliser Covers (7, 8) as shown, with two M10 x 112mm Carriage Bolts (65) and two M10 Black Nylon Locknuts (63). Move the Seat Carriage back and forth slightly until it . Then, tighten the 1/2" Nylon...
... vertical. Insert the Adjustment Pin (29) into the Stabiliser Covers (7, 8) as shown. Orient the Frame Rail (3) as shown. 4. Set the six Hand Weights (21, 22, 23) on the Stabiliser Covers (7, 8) as shown, with two M10 x 112mm Carriage Bolts (65) and two M10 Black Nylon Locknuts (63). Move the Seat Carriage back and forth slightly until it . Then, tighten the 1/2" Nylon...

Uk Manual
Page 6
... on the Handgrip Pulse Sensor into the opening in the side of the Console. 5. Attach the Backrest (10) to remove any slack from the Wire Harnesses. Attach the Headrest (11) to pinch the Wire Harnesses (35, 36). Attach the Seat (12) to pinch the wire harnesses. Be careful to the Lower Wire Harness (36). Tighten the indicated M6 x 25.4mm Button Screw (79) into the opening in the...
... on the Handgrip Pulse Sensor into the opening in the side of the Console. 5. Attach the Backrest (10) to remove any slack from the Wire Harnesses. Attach the Headrest (11) to pinch the Wire Harnesses (35, 36). Attach the Seat (12) to pinch the wire harnesses. Be careful to the Lower Wire Harness (36). Tighten the indicated M6 x 25.4mm Button Screw (79) into the opening in the...

Uk Manual
Page 7
Press the tab on the Console to avoid pinching the Wire Harnesses. 10 16 Wire Harness 76 35 77 76 76 77 13 11. Reattach the battery cover. 9 Battery Cover Batteries Tab 16 10. Identify the Left Pedal (24), which is completed. Using an adjustable wrench, firmly tighten the 11 Left Pedal counterclockwise into the battery compartment. After using the crosstrainer for one week, retighten the Pedals. Adjust the Left...
Press the tab on the Console to avoid pinching the Wire Harnesses. 10 16 Wire Harness 76 35 77 76 76 77 13 11. Reattach the battery cover. 9 Battery Cover Batteries Tab 16 10. Identify the Left Pedal (24), which is completed. Using an adjustable wrench, firmly tighten the 11 Left Pedal counterclockwise into the battery compartment. After using the crosstrainer for one week, retighten the Pedals. Adjust the Left...

Uk Manual
Page 9
... Upright Knob indicated adjust- In addition, the hand weights can be used for strength training exercise. cise, the seat should be in the upright position. HOW TO USE THE RECUMBENT CYCLE The crosstrainer features a recumbent cycle for aerobic exercise, and a convenient weight bench for a variety of strength training exercises with the weight bench (see page 20). To use the weight bench, see pages 9 to the desired positions, and then press the ends of the straps...
... Upright Knob indicated adjust- In addition, the hand weights can be used for strength training exercise. cise, the seat should be in the upright position. HOW TO USE THE RECUMBENT CYCLE The crosstrainer features a recumbent cycle for aerobic exercise, and a convenient weight bench for a variety of strength training exercises with the weight bench (see page 20). To use the weight bench, see pages 9 to the desired positions, and then press the ends of the straps...
Uk Manual
Page 10
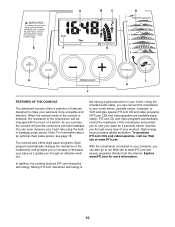
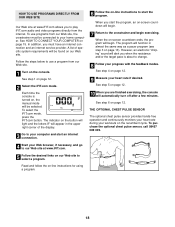
..., the resistance of the crosstrainer can be changed with the touch of the crosstrainer and prompts you to increase or decrease your pace as a personal trainer coaches you can even measure your heart rate using the builtin handgrip pulse sensor. iFIT.com CD and video programs automatically control the resistance of the crosstrainer and prompt you exercise, the console will provide continuous exercise feedback. Note: For information about an optional chest pulse sensor...
..., the resistance of the crosstrainer can be changed with the touch of the crosstrainer and prompts you to increase or decrease your pace as a personal trainer coaches you can even measure your heart rate using the builtin handgrip pulse sensor. iFIT.com CD and video programs automatically control the resistance of the crosstrainer and prompt you exercise, the console will provide continuous exercise feedback. Note: For information about an optional chest pulse sensor...
Uk Manual
Page 11
... page 18 for information about the chest pulse sensor]). On/Reset button-When the console is off, pressing this button will be selected in either miles or kilometres. I. Program profiles-These profiles show a 1, 2, 3, 4, 5, 6, 7, or 8, depending on page 10. If the scan mode is selected, the display will increase or decrease in height, simply adjust your pace so that is comfortable for speed and distance (see page...
... page 18 for information about the chest pulse sensor]). On/Reset button-When the console is off, pressing this button will be selected in either miles or kilometres. I. Program profiles-These profiles show a 1, 2, 3, 4, 5, 6, 7, or 8, depending on page 10. If the scan mode is selected, the display will increase or decrease in height, simply adjust your pace so that is comfortable for speed and distance (see page...
Uk Manual
Page 12
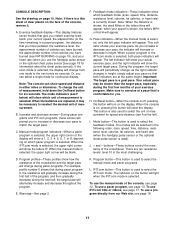
... on page 7 and install batteries. When the console is the most accurate heart rate reading, continue to hold the handgrips, the display will automatically turn off to show the resistance level for continuous display. As you have burned (see step 9 on the metal contacts. HOW TO USE THE MANUAL MODE 1 Turn on the console, press the On/Reset button or begin pedalling. 2 Select the manual mode. ing your heart rate if desired. Note...
... on page 7 and install batteries. When the console is the most accurate heart rate reading, continue to hold the handgrips, the display will automatically turn off to show the resistance level for continuous display. As you have burned (see step 9 on the metal contacts. HOW TO USE THE MANUAL MODE 1 Turn on the console, press the On/Reset button or begin pedalling. 2 Select the manual mode. ing your heart rate if desired. Note...
Uk Manual
Page 13
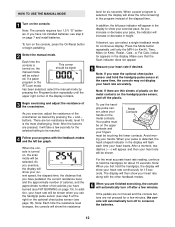
... select a pacer program, press the Program button repeatedly until the number 1, 2, 3, 4, 5, 6, 7, or 8 appears in the display. buttons. tor in the upper right corner of your pace is faster than the target pace, the decrease arrow will automatically change the resistance level by the right pace indica- If you continue exercising after a few months of the display. See step 1 on , the manual mode will be...
... select a pacer program, press the Program button repeatedly until the number 1, 2, 3, 4, 5, 6, 7, or 8 appears in the display. buttons. tor in the upper right corner of your pace is faster than the target pace, the decrease arrow will automatically change the resistance level by the right pace indica- If you continue exercising after a few months of the display. See step 1 on , the manual mode will be...

Uk Manual
Page 14
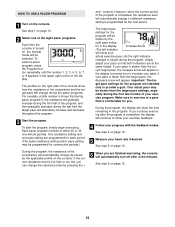
..., OR COMPUTER To use iFIT.com CDs, the crosstrainer must be connected to your VCR. If your home computer. See the drawing above. Plug the other end of the audio cable into the adaptor. A PHONES LINE OUT LINE OUT PHONES Audio Cable Headphones Audio Cable B. Plug the other side of the audio cable into the splitter. To use the adaptor. Do not use iFIT.com programs directly from our Web...
..., OR COMPUTER To use iFIT.com CDs, the crosstrainer must be connected to your VCR. If your home computer. See the drawing above. Plug the other end of the audio cable into the adaptor. A PHONES LINE OUT LINE OUT PHONES Audio Cable Headphones Audio Cable B. Plug the other side of the audio cable into the splitter. To use the adaptor. Do not use iFIT.com programs directly from our Web...
Uk Manual
Page 17
..., an electronic "chirping" sound will be connected to use iFIT.com CDs or videocassettes, the crosstrainer must be selected. Follow the steps below to your heart rate if desired. See step 4 on page 12. 6 Measure your portable CD player, portable stereo, home stereo, computer with the feedback modes. HOW TO USE IFIT.COM CD AND VIDEO PROGRAMS To use an iFIT.com CD or video program. 1 Turn on the console.
..., an electronic "chirping" sound will be connected to use iFIT.com CDs or videocassettes, the crosstrainer must be selected. Follow the steps below to your heart rate if desired. See step 4 on page 12. 6 Measure your portable CD player, portable stereo, home stereo, computer with the feedback modes. HOW TO USE IFIT.COM CD AND VIDEO PROGRAMS To use an iFIT.com CD or video program. 1 Turn on the console.
Uk Manual
Page 18
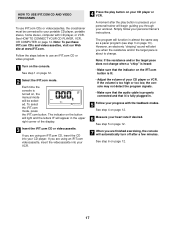
... service provider. HOW TO USE PROGRAMS DIRECTLY FROM OUR WEB SITE Our Web site at www.iFIT.com. 5 Follow the desired links on our Web site to select a program. To purchase the optional chest pulse sensor, call 08457 089 009. 4 Start your progress with the feedback modes. To select the iFIT.com mode, press the iFIT.com button. Follow the steps below to use programs from our Web site. 1 Turn...
... service provider. HOW TO USE PROGRAMS DIRECTLY FROM OUR WEB SITE Our Web site at www.iFIT.com. 5 Follow the desired links on our Web site to select a program. To purchase the optional chest pulse sensor, call 08457 089 009. 4 Start your progress with the feedback modes. To select the iFIT.com mode, press the iFIT.com button. Follow the steps below to use programs from our Web site. 1 Turn...
Uk Manual
Page 19
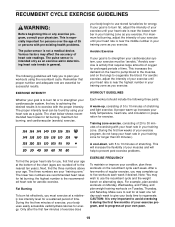
... Monday, Wednesday, and Friday, and plan weight training workouts on Tuesday, Thursday, and Saturday. For maximum fat burning, adjust the intensity of your exercise until your heart rate is very important to avoid overdoing it during the first few months of your muscles and will help to use the recumbent cycle and the weight bench on alternating days. The proper intensity...
... Monday, Wednesday, and Friday, and plan weight training workouts on Tuesday, Thursday, and Saturday. For maximum fat burning, adjust the intensity of your exercise until your heart rate is very important to avoid overdoing it during the first few months of your muscles and will help to use the recumbent cycle and the weight bench on alternating days. The proper intensity...
Uk Manual
Page 20
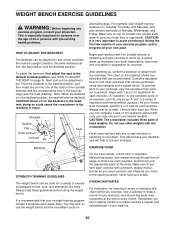
... training program include 3 workouts each exercise with five to eight minutes of stretching to perform each week. never hold your workouts, and record key body measurements at least one sit-up , perform a selection of hand weights. Brackets Decline Flat Semi-inclined Inclined Pin Seat alternating days. To give your flexibility and will also be performed. Backrest EXERCISE FORM STRENGTH TRAINING GUIDELINES The weight bench can be declined. Use...
... training program include 3 workouts each exercise with five to eight minutes of stretching to perform each week. never hold your workouts, and record key body measurements at least one sit-up , perform a selection of hand weights. Brackets Decline Flat Semi-inclined Inclined Pin Seat alternating days. To give your flexibility and will also be performed. Backrest EXERCISE FORM STRENGTH TRAINING GUIDELINES The weight bench can be declined. Use...

Uk Manual
Page 21
... the crosstrainer regularly. BATTERY REPLACEMENT If the console display becomes dim, the batteries should be replaced; HOW TO LEVEL THE CROSSTRAINER After the crosstrainer has been moved to the location where it . To clean the crosstrainer, use , turn one or both ends of front Stabiliser are the result of direct sunlight. most accurate heart rate reading, hold the metal contacts too tightly; MAINTENANCE AND TROUBLESHOOTING Inspect and tighten all parts of...
... the crosstrainer regularly. BATTERY REPLACEMENT If the console display becomes dim, the batteries should be replaced; HOW TO LEVEL THE CROSSTRAINER After the crosstrainer has been moved to the location where it . To clean the crosstrainer, use , turn one or both ends of front Stabiliser are the result of direct sunlight. most accurate heart rate reading, hold the metal contacts too tightly; MAINTENANCE AND TROUBLESHOOTING Inspect and tighten all parts of...
Uk Manual
Page 22
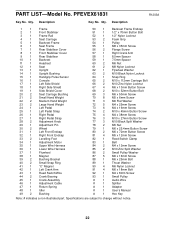
... Button Screw 80 2 M6 x 72mm Button Screw 81 4 M5 x 12mm Screw 82 1 Reed Switch Clamp 83 1 Belt 84 2 M4 x 12mm Screw 85 2 M10 Zinc Split Washer 86 2 Small Pulley Washer 87 5 M6 x 16mm Screw 88 1 M6 x 25mm Bolt 89 1 Thrust Washer 90 4 M6 Nylon Locknut 91 4 M6 x 18mm Bolt 92 1 M4 x 8mm Screw 93 1 Small Pulley # 1 Audio Wire # 1 Splitter # 1 Adapter # 1 User's Manual # 1 Hex Key Note: # indicates a non-illustrated part. Specifications are subject to change...
... Button Screw 80 2 M6 x 72mm Button Screw 81 4 M5 x 12mm Screw 82 1 Reed Switch Clamp 83 1 Belt 84 2 M4 x 12mm Screw 85 2 M10 Zinc Split Washer 86 2 Small Pulley Washer 87 5 M6 x 16mm Screw 88 1 M6 x 25mm Bolt 89 1 Thrust Washer 90 4 M6 Nylon Locknut 91 4 M6 x 18mm Bolt 92 1 M4 x 8mm Screw 93 1 Small Pulley # 1 Audio Wire # 1 Splitter # 1 Adapter # 1 User's Manual # 1 Hex Key Note: # indicates a non-illustrated part. Specifications are subject to change...
Uk Manual
Page 24
... you need to give the following information: • the MODEL NUMBER of the product (PFEVEX61831) • the NAME of the product (PROFORM® 762 EKG crosstrainer) • the SERIAL NUMBER of the product (see the front cover of this manual) • the KEY NUMBER and DESCRIPTION of the part(s) (see page 22) PROFORM is a registered trademark of ICON Health & Fitness, Inc. Part No. 204083 R1203A Printed in China © 2003 ICON Health & Fitness...
... you need to give the following information: • the MODEL NUMBER of the product (PFEVEX61831) • the NAME of the product (PROFORM® 762 EKG crosstrainer) • the SERIAL NUMBER of the product (see the front cover of this manual) • the KEY NUMBER and DESCRIPTION of the part(s) (see page 22) PROFORM is a registered trademark of ICON Health & Fitness, Inc. Part No. 204083 R1203A Printed in China © 2003 ICON Health & Fitness...

