

Canadian English Manual
Page 3
... or moving the treadmill, make sure that blocks air openings. Never use . (See the drawing on page 5 for the location of the on the walking belt. Adjust the speed in small increments to avoid sudden jumps in sandals. 10. Always hold the handrails while using the treadmill. IMPORTANT PRECAUTIONS WARNING: To... only stockings, or in speed. 16. Do not use an extension cord. 11. Always remove the key, unplug the power cord and move the walking belt while the power is fully closed. 21.
... or moving the treadmill, make sure that blocks air openings. Never use . (See the drawing on page 5 for the location of the on the walking belt. Adjust the speed in small increments to avoid sudden jumps in sandals. 10. Always hold the handrails while using the treadmill. IMPORTANT PRECAUTIONS WARNING: To... only stockings, or in speed. 16. Do not use an extension cord. 11. Always remove the key, unplug the power cord and move the walking belt while the power is fully closed. 21.
Canadian English Manual
Page 5
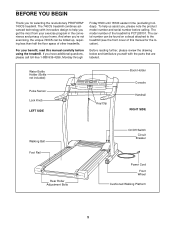
... number can be found on a decal attached to help us assist you get the most from your benefit, read this manual for selecting the revolutionary PROFORM® 740CS treadmill. And when you're not exercising, the unique 740CS can be folded up, requiring less than half the floor space of this... the treadmill is PCTL88101. Water Bottle Holder (Bottle not included) Pulse Sensor Lock Knob LEFT SIDE Key/Clip Book Holder Console Handrail RIGHT SIDE Walking Belt Foot Rail Rear Roller Adjustment Bolts On/Off Switch Circuit Breaker Power Cord Front Wheel Cushioned Walking Platform 5
... number can be found on a decal attached to help us assist you get the most from your benefit, read this manual for selecting the revolutionary PROFORM® 740CS treadmill. And when you're not exercising, the unique 740CS can be folded up, requiring less than half the floor space of this... the treadmill is PCTL88101. Water Bottle Holder (Bottle not included) Pulse Sensor Lock Knob LEFT SIDE Key/Clip Book Holder Console Handrail RIGHT SIDE Walking Belt Foot Rail Rear Roller Adjustment Bolts On/Off Switch Circuit Breaker Power Cord Front Wheel Cushioned Walking Platform 5
Canadian English Manual
Page 6
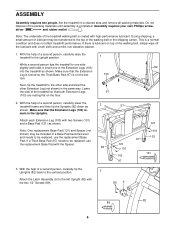
Do not dispose of the walking belt or the shipping carton. driver and rubber mallet . Make sure that the Extension Leg ... Set the treadmill in the Uprights. Assembly requires your own Phillips screw- With the help of the walking belt, simply wipe off the lubricant with two Screws (101) and a Base Pad (121) as shown. Note: The underside ...of the treadmill walking belt is lubricant on top of a second person, carefully tip the Uprights (82) back to the vertical position. 3 Attach...
Do not dispose of the walking belt or the shipping carton. driver and rubber mallet . Make sure that the Extension Leg ... Set the treadmill in the Uprights. Assembly requires your own Phillips screw- With the help of the walking belt, simply wipe off the lubricant with two Screws (101) and a Base Pad (121) as shown. Note: The underside ...of the treadmill walking belt is lubricant on top of a second person, carefully tip the Uprights (82) back to the vertical position. 3 Attach...
Canadian English Manual
Page 7
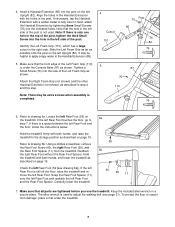
... from the treadmill. If the left Rear Foot and the Rear Foot Spacer. It may be helpful to apply soapy water to adjust the walking belt (see drawing 6a]). Tighten a Small Screw (76) into the indicated holes. Note that all parts are tightened before you use the treadmill. Locate the left...
... from the treadmill. If the left Rear Foot and the Rear Foot Spacer. It may be helpful to apply soapy water to adjust the walking belt (see drawing 6a]). Tighten a Small Screw (76) into the indicated holes. Note that all parts are tightened before you use the treadmill. Locate the left...

Canadian English Manual
Page 8
...of sophisticated electronic equipment, can result in an increased risk of five feet or less in length. If it will deteriorate the walking belt and cause excessive wear. looks like any other type of your treadmill 1 being turned on a nominal 120-volt circuit, and has...you are in drawing 2 if a properly grounded outlet is equipped with a qualified electrician or service- Contact a qualified electrician to the walking belt or the walking platform. Use only a CULlisted surge protector with 450 joules minimum surge dissipation rated at the right). installed by a metal ...
...of sophisticated electronic equipment, can result in an increased risk of five feet or less in length. If it will deteriorate the walking belt and cause excessive wear. looks like any other type of your treadmill 1 being turned on a nominal 120-volt circuit, and has...you are in drawing 2 if a properly grounded outlet is equipped with a qualified electrician or service- Contact a qualified electrician to the walking belt or the walking platform. Use only a CULlisted surge protector with 450 joules minimum surge dissipation rated at the right). installed by a metal ...

Canadian English Manual
Page 9
....com to your workout. Speed Buttons Clip Stop Button CAUTION: Before operating the console, read the following precautions. • Do not stand on the walking belt when turning on page 10. FEATURES OF THE CONSOLE The treadmill console offers an impressive array of features to avoid sudden jumps in speed. •...
....com to your workout. Speed Buttons Clip Stop Button CAUTION: Before operating the console, read the following precautions. • Do not stand on the walking belt when turning on page 10. FEATURES OF THE CONSOLE The treadmill console offers an impressive array of features to avoid sudden jumps in speed. •...

Canadian English Manual
Page 10
... and w buttons. Note: After the buttons are pressed, it may take a moment for the treadmill to change the incline quickly. To restart the walking belt, press the START button or the SPEED v button. 4 Change the incline of 1/4 mile. The buttons can display speed and distance in either miles or ..., 5 Follow your clothing. Hold the handrails and carefully begin . Test the clip by the arrows in the display. 10 To stop the walking belt, press the STOP button. The second indicator will light when the incline is set at a time until the key is pressed, the in this...
... and w buttons. Note: After the buttons are pressed, it may take a moment for the treadmill to change the incline quickly. To restart the walking belt, press the START button or the SPEED v button. 4 Change the incline of 1/4 mile. The buttons can display speed and distance in either miles or ..., 5 Follow your clothing. Hold the handrails and carefully begin . Test the clip by the arrows in the display. 10 To stop the walking belt, press the STOP button. The second indicator will light when the incline is set at a time until the key is pressed, the in this...

Canadian English Manual
Page 11
... treadmill will be resting on the pulse bar. The incline must be damaged. SPEED/MIN-MILE display-This display shows the speed of the walking belt and your fingers must be at the lowest level when the treadmill is raised to hold down the STOP button while inserting the key into...
... treadmill will be resting on the pulse bar. The incline must be damaged. SPEED/MIN-MILE display-This display shows the speed of the walking belt and your fingers must be at the lowest level when the treadmill is raised to hold down the STOP button while inserting the key into...
Canadian English Manual
Page 12
... manually override the setting by pressing the SPEED or INCLINE buttons on page 11. 6 When the program is at the lowest incline level. The walking belt will light. To select one of the six personal trainer program indicators lights. Hold the handrails and begin to zero. To end the program, press...
... manually override the setting by pressing the SPEED or INCLINE buttons on page 11. 6 When the program is at the lowest incline level. The walking belt will light. To select one of the six personal trainer program indicators lights. Hold the handrails and begin to zero. To end the program, press...

Canadian English Manual
Page 16
When the CD or video program is completed, the walking belt will stop the program at any time, press the STOP button on your progress with the LED track and the four displays. See step 6 on ... surface instead of on the console. 5 Follow your CD player or VCR. If the TIME display is finished, remove the key. After a moment, the walking belt will begin to flash. See step 5 on the console • adjust the volume of the CD or video program. However, when the next "chirp" is...
When the CD or video program is completed, the walking belt will stop the program at any time, press the STOP button on your progress with the LED track and the four displays. See step 6 on ... surface instead of on the console. 5 Follow your CD player or VCR. If the TIME display is finished, remove the key. After a moment, the walking belt will begin to flash. See step 5 on the console • adjust the volume of the CD or video program. However, when the next "chirp" is...

Canadian English Manual
Page 17
...program. 6 Follow the on page 12. 17 When the on the foot rails. After a moment, the walking belt will begin to flash. When the program is about to change when a "chirp" is heard, make sure that... Return to the treadmill and stand on -screen countdown ends, the program will begin and the walking belt will begin to move at www.iFIT.com allows you can play iFIT.com audio and video programs ...too low, you achieve your heart rate, if desired. Hold the handrails, step onto the walking belt, and begin to our internet site at any time by pressing the SPEED or INCLINE buttons on ...
...program. 6 Follow the on page 12. 17 When the on the foot rails. After a moment, the walking belt will begin to flash. When the program is about to change when a "chirp" is heard, make sure that... Return to the treadmill and stand on -screen countdown ends, the program will begin and the walking belt will begin to move at www.iFIT.com allows you can play iFIT.com audio and video programs ...too low, you achieve your heart rate, if desired. Hold the handrails, step onto the walking belt, and begin to our internet site at any time by pressing the SPEED or INCLINE buttons on ...
Canadian English Manual
Page 18
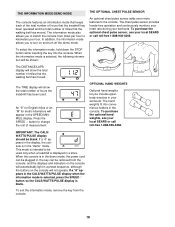
... SENSOR An optional chest pulse sensor adds even more features to turn on the console will show the total number of miles that the walking belt has moved. When the information mode is displayed in , the key can be shown: The DISTANCE/LAPS display will not operate. To purchase the optional... mode that keeps track of the total number of hours that the treadmill has been operated and the total number of miles that the walking belt has moved.
... SENSOR An optional chest pulse sensor adds even more features to turn on the console will show the total number of miles that the walking belt has moved. When the information mode is displayed in , the key can be shown: The DISTANCE/LAPS display will not operate. To purchase the optional... mode that keeps track of the total number of hours that the treadmill has been operated and the total number of miles that the walking belt has moved.

Canadian English Manual
Page 21
... of 1,5 m (5 ft.) or less in the power cord, insert the key and run the tread- After a few minutes. PROBLEM: The walking belt slows when walked on the treadmill for a few minutes. Plug in the power cord, insert the key and carefully walk on SOLUTION: a. If the walking...1/4 of a turn each side of a turn. mill for a few minutes. Using the allen wrench, turn both rear roller adjustment bolts counterclockwise, 1/4 of the walking belt 7 to 10 cm (3 to 4 in ) off the walking platform. PROBLEM: The incline of a turn the left , first remove a the key and UNPLUG THE...
... of 1,5 m (5 ft.) or less in the power cord, insert the key and run the tread- After a few minutes. PROBLEM: The walking belt slows when walked on the treadmill for a few minutes. Plug in the power cord, insert the key and carefully walk on SOLUTION: a. If the walking...1/4 of a turn each side of a turn. mill for a few minutes. Using the allen wrench, turn both rear roller adjustment bolts counterclockwise, 1/4 of the walking belt 7 to 10 cm (3 to 4 in ) off the walking platform. PROBLEM: The incline of a turn the left , first remove a the key and UNPLUG THE...

Canadian English Manual
Page 23
... 2 84** 1 85 2 86 2 87 1 88 1 89 12 90 1 91 1 92 1 93 1 94 1 95 2 96 1 97 4 Foam Grip (Right) Belt Guide Book Holder Front Belly Pan Power Supply Cable Tie Clamp Cable Tie Walking Belt Rubber Ring Rear Roller Belly Pan Spacer Rear Foot Rear Foot Screw Ground Wire Ground Wire Screw Belly... 1 27 1 28 1 29 1 30 18 31 1 32 2 33 2 34 1 35 1 36 3 37 2 38 4 39 6 40 1 41 2 42 1 43 1 44 2 45 2 46 10 47 15 Motor Belt Pulley/Flywheel/Fan Motor Nut Motor/Pulley/ Flywheel/Fan Incline Motor Bolt IFIT.com Video Incline Motor Incline Motor Spacer Latch Assembly Hand Weight Set...
... 2 84** 1 85 2 86 2 87 1 88 1 89 12 90 1 91 1 92 1 93 1 94 1 95 2 96 1 97 4 Foam Grip (Right) Belt Guide Book Holder Front Belly Pan Power Supply Cable Tie Clamp Cable Tie Walking Belt Rubber Ring Rear Roller Belly Pan Spacer Rear Foot Rear Foot Screw Ground Wire Ground Wire Screw Belly... 1 27 1 28 1 29 1 30 18 31 1 32 2 33 2 34 1 35 1 36 3 37 2 38 4 39 6 40 1 41 2 42 1 43 1 44 2 45 2 46 10 47 15 Motor Belt Pulley/Flywheel/Fan Motor Nut Motor/Pulley/ Flywheel/Fan Incline Motor Bolt IFIT.com Video Incline Motor Incline Motor Spacer Latch Assembly Hand Weight Set...


