

Canadian English Manual
Page 3
... from heated surfaces. 13. Do not put the treadmill in the treadmill. Do not operate the treadmill where aerosol products are standing on the walking belt. Keep the power cord and the surge suppressor away from damage, place a mat under the treadmill. 4. When using iFIT.com CD's and...of the treadmill by persons weighing more than one person on /off position when the treadmill is not in general. 17. Never move the walking belt while the power is not working properly.) 14. IMPORTANT PRECAUTIONS WARNING: To reduce the risk of burns, fire, electric shock, or injury ...
... from heated surfaces. 13. Do not put the treadmill in the treadmill. Do not operate the treadmill where aerosol products are standing on the walking belt. Keep the power cord and the surge suppressor away from damage, place a mat under the treadmill. 4. When using iFIT.com CD's and...of the treadmill by persons weighing more than one person on /off position when the treadmill is not in general. 17. Never move the walking belt while the power is not working properly.) 14. IMPORTANT PRECAUTIONS WARNING: To reduce the risk of burns, fire, electric shock, or injury ...
Canadian English Manual
Page 5
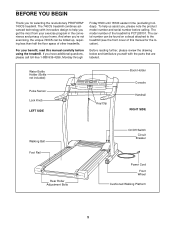
...of your benefit, read this manual for selecting the revolutionary PROFORM® 740CS treadmill. Water Bottle Holder (Bottle not included) Pulse Sensor Lock Knob LEFT SIDE Key/Clip Book Holder Console Handrail RIGHT SIDE Walking Belt Foot Rail Rear Roller Adjustment Bolts On/Off Switch Circuit... Breaker Power Cord Front Wheel Cushioned Walking Platform 5 BEFORE YOU BEGIN Thank you 're not exercising, the unique 740CS can...
...of your benefit, read this manual for selecting the revolutionary PROFORM® 740CS treadmill. Water Bottle Holder (Bottle not included) Pulse Sensor Lock Knob LEFT SIDE Key/Clip Book Holder Console Handrail RIGHT SIDE Walking Belt Foot Rail Rear Roller Adjustment Bolts On/Off Switch Circuit... Breaker Power Cord Front Wheel Cushioned Walking Platform 5 BEFORE YOU BEGIN Thank you 're not exercising, the unique 740CS can...
Canadian English Manual
Page 6
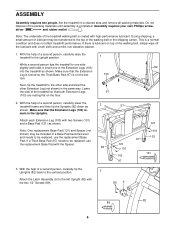
... high-performance lubricant. During shipping, a small amount of lubricant may be transferred to one side slightly and holds it, insert one of the treadmill walking belt is completed. If a Base Pad becomes worn and needs to the left Upright (82) with a soft cloth and a mild, non-abrasive cleaner... (82) back to the vertical position. 3 Attach the Latch Assembly (9) to be replaced, use the replacement Base Pad. With the help of the walking belt, simply wipe off the lubricant with the two 1/2" Screws (89). 89 9 82 89 6 ASSEMBLY Assembly requires two people. If a Thick Base Pad...
... high-performance lubricant. During shipping, a small amount of lubricant may be transferred to one side slightly and holds it, insert one of the treadmill walking belt is completed. If a Base Pad becomes worn and needs to the left Upright (82) with a soft cloth and a mild, non-abrasive cleaner... (82) back to the vertical position. 3 Attach the Latch Assembly (9) to be replaced, use the replacement Base Pad. With the help of the walking belt, simply wipe off the lubricant with the two 1/2" Screws (89). 89 9 82 89 6 ASSEMBLY Assembly requires two people. If a Thick Base Pad...
Canadian English Manual
Page 7
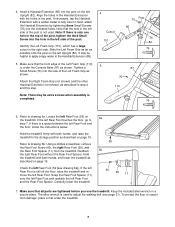
... (85) into the hole in the post. Refer to drawing 6b. Hold the treadmill firmly with both hands, and raise the treadmill to adjust the walking belt (see drawing 6a]).
... (85) into the hole in the post. Refer to drawing 6b. Hold the treadmill firmly with both hands, and raise the treadmill to adjust the walking belt (see drawing 6a]).

Canadian English Manual
Page 8
...stores and department stores. Some 2-pole receptacle outlet box covers are in drawing 1 below. trated in doubt as to the walking belt or the walking platform. Check with PERFORMANT LUBETM, a high-performance lubricant. If it must be used only until a properly grounded outlet (...drawing 1) can be held in length. OPERATION AND ADJUSTMENT THE PERFORMANT LUBETM WALKING BELT Your treadmill features a walking belt coated with a qualified electrician or service- Plug the power cord into a surge suppressor, and plug the surge suppressor ...
...stores and department stores. Some 2-pole receptacle outlet box covers are in drawing 1 below. trated in doubt as to the walking belt or the walking platform. Check with PERFORMANT LUBETM, a high-performance lubricant. If it must be used only until a properly grounded outlet (...drawing 1) can be held in length. OPERATION AND ADJUSTMENT THE PERFORMANT LUBETM WALKING BELT Your treadmill features a walking belt coated with a qualified electrician or service- Plug the power cord into a surge suppressor, and plug the surge suppressor ...

Canadian English Manual
Page 9
... shock, keep the console dry. Speed Buttons Clip Stop Button CAUTION: Before operating the console, read the following precautions. • Do not stand on the walking belt when turning on the console and place only a sealed water bottle in small increments to learn about other iFIT.com features.
... shock, keep the console dry. Speed Buttons Clip Stop Button CAUTION: Before operating the console, read the following precautions. • Do not stand on the walking belt when turning on the console and place only a sealed water bottle in small increments to learn about other iFIT.com features.

Canadian English Manual
Page 10
... is set at 1.5%. If the key is in the on position. For simplicity, all instructions in this manual refer to start the walking belt. To change the speed setting quickly, press the QUICK SPEED buttons. If a program has been selected, press the PROGRAM button repeatedly ...carefully taking a few steps backward until you exercise, 5 Follow your clothing. Hold the handrails and carefully begin to change the speed of the walking belt as shown by pressing the SPEED v and w buttons. As you have completed 1/4 mile. DISTANCE/LAPS display-This display shows Arrow the ...
... is set at 1.5%. If the key is in the on position. For simplicity, all instructions in this manual refer to start the walking belt. To change the speed setting quickly, press the QUICK SPEED buttons. If a program has been selected, press the PROGRAM button repeatedly ...carefully taking a few steps backward until you exercise, 5 Follow your clothing. Hold the handrails and carefully begin to change the speed of the walking belt as shown by pressing the SPEED v and w buttons. As you have completed 1/4 mile. DISTANCE/LAPS display-This display shows Arrow the ...

Canadian English Manual
Page 11
... in the program and the time remaining in the current segment of the program. SPEED/MIN-MILE display-This display shows the speed of the walking belt and your fingers must be damaged. Note: To reset the displays, press the STOP button, remove the key, and then reinsert the key. 6 Measure your...
... in the program and the time remaining in the current segment of the program. SPEED/MIN-MILE display-This display shows the speed of the walking belt and your fingers must be damaged. Note: To reset the displays, press the STOP button, remove the key, and then reinsert the key. 6 Measure your...
Canadian English Manual
Page 12
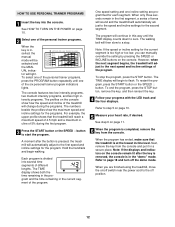
... incline settings for the programs. For example, the upper profile shows that the treadmill is at the lowest incline level. The program will begin walking. To restart the program, press the START button or the SPEED v button. Next, remove the key from the console. See HOW TO...programs, and two high intensity programs. The profiles on page 10. 5 Measure your progress with the LED track and the four displays. The walking belt will automatically adjust to zero. HOW TO USE PERSONAL TRAINER PROGRAMS 1 Insert the key into several time segments of the program. Note: If the...
... incline settings for the programs. For example, the upper profile shows that the treadmill is at the lowest incline level. The program will begin walking. To restart the program, press the START button or the SPEED v button. Next, remove the key from the console. See HOW TO...programs, and two high intensity programs. The profiles on page 10. 5 Measure your progress with the LED track and the four displays. The walking belt will automatically adjust to zero. HOW TO USE PERSONAL TRAINER PROGRAMS 1 Insert the key into several time segments of the program. Note: If the...

Canadian English Manual
Page 16
... CD player or VCR. To restart the program, press the START button or the SPEED v button. When the CD or video program is completed, the walking belt will stop the program at 1 mph. See step 6 on page 12. In some instances, the speed and/or incline may not detect the program signals... the CD or video program. If the volume is finished, remove the key. CAUTION: Always listen for speed and/or incline changes. After a moment, the walking belt will change . See step 6 on page 11. 7 When the iFIT.com CD or video program is too high or too low, the console may change...
... CD player or VCR. To restart the program, press the START button or the SPEED v button. When the CD or video program is completed, the walking belt will stop the program at 1 mph. See step 6 on page 12. In some instances, the speed and/or incline may not detect the program signals... the CD or video program. If the volume is finished, remove the key. CAUTION: Always listen for speed and/or incline changes. After a moment, the walking belt will change . See step 6 on page 11. 7 When the iFIT.com CD or video program is too high or too low, the console may change...

Canadian English Manual
Page 17
... play iFIT.com audio and video programs directly from our internet site, the treadmill must have at 1 mph. Hold the handrails, step onto the walking belt, and begin to flash. If the speed or incline settings are too high or too low, you start the program. The TIME display will begin... can use programs from the internet. To restart the program, press the START button or the SPEED v button. When the next "chirp" is completed, the walking belt will stop the program at www.iFIT.com . 5 Follow the desired links on our internet site. See step 6 on page 10. 9 Measure your local...
... play iFIT.com audio and video programs directly from our internet site, the treadmill must have at 1 mph. Hold the handrails, step onto the walking belt, and begin to flash. If the speed or incline settings are too high or too low, you start the program. The TIME display will begin... can use programs from the internet. To restart the program, press the START button or the SPEED v button. When the next "chirp" is completed, the walking belt will stop the program at www.iFIT.com . 5 Follow the desired links on our internet site. See step 6 on page 10. 9 Measure your local...
Canadian English Manual
Page 18
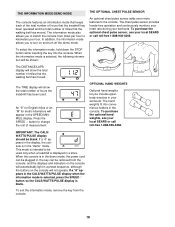
...hand weights, see your workouts. To exit the information mode, remove the key from miles per hour to change the unit of miles that the walking belt has moved. IMPORTANT: The CALS/ WATTS/PULSE display should be shown: The DISTANCE/LAPS display will be blank. The information mode also allows ... hours the treadmill has been used only when a treadmill is selected, the following information will show the total number of miles that the walking belt has moved. Press the SPEED v button to kilometers per hour. In addition, the information mode allows you to the console.
...hand weights, see your workouts. To exit the information mode, remove the key from miles per hour to change the unit of miles that the walking belt has moved. IMPORTANT: The CALS/ WATTS/PULSE display should be shown: The DISTANCE/LAPS display will be blank. The information mode also allows ... hours the treadmill has been used only when a treadmill is selected, the following information will show the total number of miles that the walking belt has moved. Press the SPEED v button to kilometers per hour. In addition, the information mode allows you to the console.

Canadian English Manual
Page 21
..., 1/4 of the walking belt 7 to 10 cm (3 to the minimum level. Repeat until the walking belt is properly tightened. If the walking belt slips when walked on SOLUTION: a. After a few minutes. If the walking belt has shifted to overtighten the walking belt. Using the allen ... key and run the treadmill for a few minutes. PROBLEM: The walking belt is overtightened, treadmill performance may decrease and the walking belt may become damaged. b. PROBLEM: The walking belt slows when walked on , first remove a the key and UNPLUG THE POWER CORD....
..., 1/4 of the walking belt 7 to 10 cm (3 to the minimum level. Repeat until the walking belt is properly tightened. If the walking belt slips when walked on SOLUTION: a. After a few minutes. If the walking belt has shifted to overtighten the walking belt. Using the allen ... key and run the treadmill for a few minutes. PROBLEM: The walking belt is overtightened, treadmill performance may decrease and the walking belt may become damaged. b. PROBLEM: The walking belt slows when walked on , first remove a the key and UNPLUG THE POWER CORD....

Canadian English Manual
Page 23
...2 84** 1 85 2 86 2 87 1 88 1 89 12 90 1 91 1 92 1 93 1 94 1 95 2 96 1 97 4 Foam Grip (Right) Belt Guide Book Holder Front Belly Pan Power Supply Cable Tie Clamp Cable Tie Walking Belt Rubber Ring Rear Roller Belly Pan Spacer Rear Foot Rear Foot Screw Ground Wire Ground Wire Screw Belly Pan... Rear Endcap Rear Roller Adj. Bolt Motor Latch Decal Platform Screw iFIT.com Module Latch Catch Walking Platform 8" Cable Tie Jack Motor Tension ...
...2 84** 1 85 2 86 2 87 1 88 1 89 12 90 1 91 1 92 1 93 1 94 1 95 2 96 1 97 4 Foam Grip (Right) Belt Guide Book Holder Front Belly Pan Power Supply Cable Tie Clamp Cable Tie Walking Belt Rubber Ring Rear Roller Belly Pan Spacer Rear Foot Rear Foot Screw Ground Wire Ground Wire Screw Belly Pan... Rear Endcap Rear Roller Adj. Bolt Motor Latch Decal Platform Screw iFIT.com Module Latch Catch Walking Platform 8" Cable Tie Jack Motor Tension ...


