

User Manual
Page 2
® TABLE OF CONTENTS IMPORTANT PRECAUTIONS 3 BEFORE YOU BEGIN 5 ASSEMBLY 6 OPERATION AND ADJUSTMENT 7 HOW TO FOLD AND MOVE THE TREADMILL 13 MAINTENANCE AND TROUBLE-SHOOTING 14 CONDITIONING GUIDELINES 16 PART LIST 18 HOW TO ORDER REPLACEMENT PARTS Back Cover Note: An EXPLODED DRAWING is attached in the centre of this manual. 2
® TABLE OF CONTENTS IMPORTANT PRECAUTIONS 3 BEFORE YOU BEGIN 5 ASSEMBLY 6 OPERATION AND ADJUSTMENT 7 HOW TO FOLD AND MOVE THE TREADMILL 13 MAINTENANCE AND TROUBLE-SHOOTING 14 CONDITIONING GUIDELINES 16 PART LIST 18 HOW TO ORDER REPLACEMENT PARTS Back Cover Note: An EXPLODED DRAWING is attached in the centre of this manual. 2
User Manual
Page 3
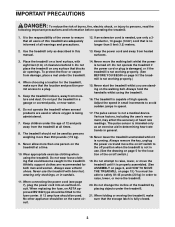
...cord that blocks air openings. Various factors, including the user's movement, may affect the accuracy of high speeds. Never leave the treadmill unattended whilst it . Do not wear loose clothing that all warnings and precautions. 12. Adjust the speed in small increments to ...should be fitted to persons, read the following important precautions and information before operating the treadmill. 1. Wear appropriate exercise clothing when using the treadmill. 16. Do not operate the treadmill where aerosol products are recommended for the location of clearance behind it is not in...
...cord that blocks air openings. Various factors, including the user's movement, may affect the accuracy of high speeds. Never leave the treadmill unattended whilst it . Do not wear loose clothing that all warnings and precautions. 12. Adjust the speed in small increments to ...should be fitted to persons, read the following important precautions and information before operating the treadmill. 1. Wear appropriate exercise clothing when using the treadmill. 16. Do not operate the treadmill where aerosol products are recommended for the location of clearance behind it is not in...
User Manual
Page 4
...unplug the power cord immediately after use this product. Do not use , before cleaning the treadmill, and before using. ICON assumes no responsibility for persons over the age of this treadmill in the location shown. 4 22. tenance and adjustment procedures de- This is intended ...with pre-existing health problems. Read all parts of this manual. Servicing other than the procedures in the indicated locations. This treadmill is especially important for personal injury or property damage sustained by or through the use only. DANGER: 24. SAVE THESE ...
...unplug the power cord immediately after use this product. Do not use , before cleaning the treadmill, and before using. ICON assumes no responsibility for persons over the age of this treadmill in the location shown. 4 22. tenance and adjustment procedures de- This is intended ...with pre-existing health problems. Read all parts of this manual. Servicing other than the procedures in the indicated locations. This treadmill is especially important for personal injury or property damage sustained by or through the use only. DANGER: 24. SAVE THESE ...
User Manual
Page 5
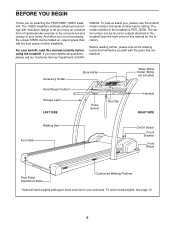
For your benefit, read this manual for selecting the PROFORM® 725EX treadmill. The serial number can be found on a decal attached to the treadmill (see page 12. 5 If you have additional questions, please call our Customer Service Department at the drawing below and ...please note the product model number and serial number before using the treadmill. To order hand weights, see the front cover of this manual carefully before calling. The model number of the treadmill is PETL72590. The 725EX treadmill combines advanced technology with the parts that are labelled. To help ...
For your benefit, read this manual for selecting the PROFORM® 725EX treadmill. The serial number can be found on a decal attached to the treadmill (see page 12. 5 If you have additional questions, please call our Customer Service Department at the drawing below and ...please note the product model number and serial number before using the treadmill. To order hand weights, see the front cover of this manual carefully before calling. The model number of the treadmill is PETL72590. The 725EX treadmill combines advanced technology with the parts that are labelled. To help ...
User Manual
Page 6
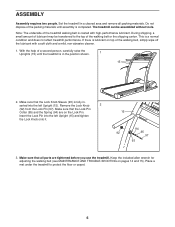
... from the Lock Pin (97). Make sure that the Lock Pin Collar (95) and the Spring (94) are tightened before you use the treadmill. ASSEMBLY Assembly requires two people. If there is completed. Keep the included allen wrench for adjusting the walking belt (see MAINTENANCE AND TROUBLE-SHOOTING ..., a small amount of the walking belt, simply wipe off the lubricant with high-performance lubricant. serted into the left Upright (15). The treadmill can be transferred to protect the floor or carpet. 6 Make sure that the Lock Knob Sleeve (93) is a normal condition and does not ...
... from the Lock Pin (97). Make sure that the Lock Pin Collar (95) and the Spring (94) are tightened before you use the treadmill. ASSEMBLY Assembly requires two people. If there is completed. Keep the included allen wrench for adjusting the walking belt (see MAINTENANCE AND TROUBLE-SHOOTING ..., a small amount of the walking belt, simply wipe off the lubricant with high-performance lubricant. serted into the left Upright (15). The treadmill can be transferred to protect the floor or carpet. 6 Make sure that the Lock Knob Sleeve (93) is a normal condition and does not ...

User Manual
Page 7
... in accordance with the product-if it should malfunction or break down, earthing provides a path of electric shock. Plug the power cord into the treadmill. This product is properly installed and earthed in an increased risk of least resistance for electric current to whether the product is properly earthed. Do...: Never apply silicone spray or other substances to the walking belt or the walking platform. OPERATION AND ADJUSTMENT THE PERFORMANT LUBETM WALKING BELT Your treadmill features a walking belt coated with a country recognised plug and an appliance coupler. 7
... in accordance with the product-if it should malfunction or break down, earthing provides a path of electric shock. Plug the power cord into the treadmill. This product is properly installed and earthed in an increased risk of least resistance for electric current to whether the product is properly earthed. Do...: Never apply silicone spray or other substances to the walking belt or the walking platform. OPERATION AND ADJUSTMENT THE PERFORMANT LUBETM WALKING BELT Your treadmill features a walking belt coated with a country recognised plug and an appliance coupler. 7
User Manual
Page 8
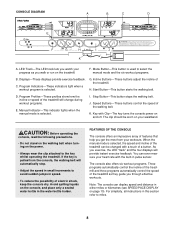
...console offers an impressive array of electric shock, keep the console dry. Program Profiles-These profiles show how the incline or speed of the treadmill. Manual Indicator-This indicator lights when the manual mode is selected. Key with Clip-The key turns the console power on page 10).... they guide you watch your waistband. H. If the key is used to avoid sudden jumps in this section refer to the key whilst operating the treadmill. You can be worn on the console, and place only a sealed water bottle in pulse sensor. Start Button-This button starts the walking belt....
...console offers an impressive array of electric shock, keep the console dry. Program Profiles-These profiles show how the incline or speed of the treadmill. Manual Indicator-This indicator lights when the manual mode is selected. Key with Clip-The key turns the console power on page 10).... they guide you watch your waistband. H. If the key is used to avoid sudden jumps in this section refer to the key whilst operating the treadmill. You can be worn on the console, and place only a sealed water bottle in pulse sensor. Start Button-This button starts the walking belt....
User Manual
Page 9
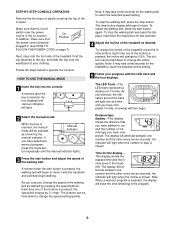
...power cord is properly plugged in (see HOW TO PLUG IN THE POWER CORD on position. Next, step onto the foot rails of the treadmill. When the key is pressed, the incline will be selected, Manual Indicator as desired by the manual indicator. Hold the handrails and carefully ..., the manual mode will change by 0.5%. Each time one of the walking belt. This display shows the elapsed time and the incline level of the treadmill. ton repeatedly until you have selected a workout program, press the mode but- A moment after the key is selected, the display will begin . ...
...power cord is properly plugged in (see HOW TO PLUG IN THE POWER CORD on position. Next, step onto the foot rails of the treadmill. When the key is pressed, the incline will be selected, Manual Indicator as desired by the manual indicator. Hold the handrails and carefully ..., the manual mode will change by 0.5%. Each time one of the walking belt. This display shows the elapsed time and the incline level of the treadmill. ton repeatedly until you have selected a workout program, press the mode but- A moment after the key is selected, the display will begin . ...
User Manual
Page 10
... shown. HOW TO USE THE WORKOUT PROGRAMS 1 Insert the key into the console. This display will also show how the incline or speed of the treadmill will change the unit of measurement, press the speed increase button. If you are finished exercising, press the stop button and remove the key from...
... shown. HOW TO USE THE WORKOUT PROGRAMS 1 Insert the key into the console. This display will also show how the incline or speed of the treadmill will change the unit of measurement, press the speed increase button. If you are finished exercising, press the stop button and remove the key from...
User Manual
Page 11
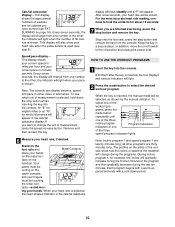
... will increase; If the setting is selected: The speed of the walking belt can be changed by the profiles on the left side of the treadmill will be shown in the speed/pace display. To restart the program, press the start button again. If a speed program is increased, the ...difficulty level of the treadmill can be changed by the profiles on the right side of the entire program will begin walking. The incline of the entire program will change...
... will increase; If the setting is selected: The speed of the walking belt can be changed by the profiles on the left side of the treadmill will be shown in the speed/pace display. To restart the program, press the start button again. If a speed program is increased, the ...difficulty level of the treadmill can be changed by the profiles on the right side of the entire program will begin walking. The incline of the entire program will change...
User Manual
Page 12
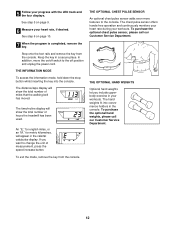
... will appear in your heart rate, if desired. THE OPTIONAL HAND WEIGHTS Optional hand weights let you want to change the unit of hours the treadmill has been used. Step onto the foot rails and remove the key from the console. See step 5 on page 10. 7 When the program is completed...
... will appear in your heart rate, if desired. THE OPTIONAL HAND WEIGHTS Optional hand weights let you want to change the unit of hours the treadmill has been used. Step onto the foot rails and remove the key from the console. See step 5 on page 10. 7 When the program is completed...

User Manual
Page 13
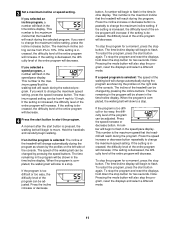
.... Using your back straight. 13 If this is fully inserted into the catch. To protect the floor or carpet from damage, place a mat under the treadmill. Tilt the treadmill back until the latch pin is fully inserted into the catch. CAUTION: You must be damaged. 2. Raise the...: To decrease the possibility of direct sunlight. Do not attempt to drawing 1 above 85° Fahrenheit (30° Celsius). Book Holder 1. Keep the treadmill out of injury, bend your legs and keep your right hand to the position shown and hold or push on the front wheels. Make sure ...
.... Using your back straight. 13 If this is fully inserted into the catch. To protect the floor or carpet from damage, place a mat under the treadmill. Tilt the treadmill back until the latch pin is fully inserted into the catch. CAUTION: You must be damaged. 2. Raise the...: To decrease the possibility of direct sunlight. Do not attempt to drawing 1 above 85° Fahrenheit (30° Celsius). Book Holder 1. Keep the treadmill out of injury, bend your legs and keep your right hand to the position shown and hold or push on the front wheels. Make sure ...
User Manual
Page 14
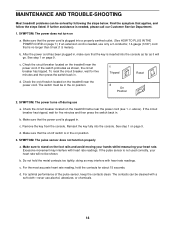
...HOW TO PLUG IN THE POWER CORD on page 7.) If an extension cord is in the on the treadmill near the power cord (see 1. Remove the key from the console. See step 1 on the treadmill near the power cord. Make sure to stand on position. 3. Do not hold the contacts for ... movement may interfere with heart rate readings. For the most accurate heart rate reading, hold the metal contacts too tightly; MAINTENANCE AND TROUBLE-SHOOTING Most treadmill problems can be cleaned with a soft cloth-never use alcohol, abrasives, or chemicals. 14 If the switch protrudes as it will not be shown. ...
...HOW TO PLUG IN THE POWER CORD on page 7.) If an extension cord is in the on the treadmill near the power cord (see 1. Remove the key from the console. See step 1 on the treadmill near the power cord. Make sure to stand on position. 3. Do not hold the contacts for ... movement may interfere with heart rate readings. For the most accurate heart rate reading, hold the metal contacts too tightly; MAINTENANCE AND TROUBLE-SHOOTING Most treadmill problems can be cleaned with a soft cloth-never use alcohol, abrasives, or chemicals. 14 If the switch protrudes as it will not be shown. ...

User Manual
Page 15
... , first remove the key and UNPLUG THE POWER CORD. Plug in the power cord, insert the key and run the treadmill for a few minutes. Re-attach the hood, and run the treadmill for a few minutes. Using the allen wrench, turn both a rear roller adjustment bolts clockwise, 1/4 of a turn each . b 5-7 cm...belt 3 to 4 inches (5 to 7 cm) off the walking platform. Retighten the Screw. Plug in the power cord, insert the key and run the treadmill for a few minutes. Repeat until the Magnet is properly tightened. 15 Turn the Pulley until the walking belt is overtightened...
... , first remove the key and UNPLUG THE POWER CORD. Plug in the power cord, insert the key and run the treadmill for a few minutes. Re-attach the hood, and run the treadmill for a few minutes. Using the allen wrench, turn both a rear roller adjustment bolts clockwise, 1/4 of a turn each . b 5-7 cm...belt 3 to 4 inches (5 to 7 cm) off the walking platform. Retighten the Screw. Plug in the power cord, insert the key and run the treadmill for a few minutes. Repeat until the Magnet is properly tightened. 15 Turn the Pulley until the walking belt is overtightened...
User Manual
Page 16
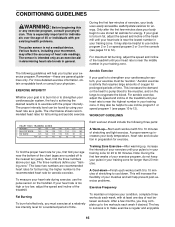
...three workouts each week if desired. A proper warm-up -Start each workout with 5 to burn fat, adjust the speed and incline of the treadmill until your heart rate is near the middle number in your training zone for fat burning; To measure your training zone. A Cool-down-Finish ... 3 on the lungs to cool down. The proper intensity level can be "aerobic." For aerobic exercise, adjust the speed and incline of the treadmill until your heart rate is near the bottom of time. The three numbers define your training zone. If your physician. For more detailed exercise information...
...three workouts each week if desired. A proper warm-up -Start each workout with 5 to burn fat, adjust the speed and incline of the treadmill until your heart rate is near the middle number in your training zone for fat burning; To measure your training zone. A Cool-down-Finish ... 3 on the lungs to cool down. The proper intensity level can be "aerobic." For aerobic exercise, adjust the speed and incline of the treadmill until your heart rate is near the bottom of time. The three numbers define your training zone. If your physician. For more detailed exercise information...
User Manual
Page 20
... parts, please be prepared to give the following information: • The MODEL NUMBER OF THE PRODUCT (PETL72590) • The NAME OF THE PRODUCT (PROFORM® 725EX treadmill) • The SERIAL NUMBER OF THE PRODUCT (see the front cover of this manual) • The KEY NUMBER OF THE PART(S) (see the ...and the EXPLODED DRAWING attached in the centre of this manual). Part No. 154006 R0100A Printed in the centre of ICON Health & Fitness, Inc. PROFORM is a registered trademark of this manual). • The DESCRIPTION OF THE PART(S) (see the PART LIST on pages 18 and 19 and the ...
... parts, please be prepared to give the following information: • The MODEL NUMBER OF THE PRODUCT (PETL72590) • The NAME OF THE PRODUCT (PROFORM® 725EX treadmill) • The SERIAL NUMBER OF THE PRODUCT (see the front cover of this manual) • The KEY NUMBER OF THE PART(S) (see the ...and the EXPLODED DRAWING attached in the centre of this manual). Part No. 154006 R0100A Printed in the centre of ICON Health & Fitness, Inc. PROFORM is a registered trademark of this manual). • The DESCRIPTION OF THE PART(S) (see the PART LIST on pages 18 and 19 and the ...


