
User Manual
Page 1
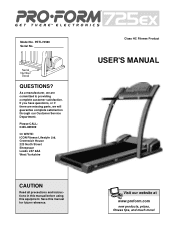
... satisfaction. Serial Number Decal QUESTIONS? As a manufacturer, we are missing parts, we will guarantee complete satisfaction through our Customer Service Department. Greenwich House 223 North Street Sheepscar Leeds LS7 2AA West Yorkshire CAUTION Read all precautions and instructions in this manual before using this manual for future reference. ® Class HC Fitness Product USER'S MANUAL Visit our website at www.proform.com...
... satisfaction. Serial Number Decal QUESTIONS? As a manufacturer, we are missing parts, we will guarantee complete satisfaction through our Customer Service Department. Greenwich House 223 North Street Sheepscar Leeds LS7 2AA West Yorkshire CAUTION Read all precautions and instructions in this manual before using this manual for future reference. ® Class HC Fitness Product USER'S MANUAL Visit our website at www.proform.com...

User Manual
Page 2
® TABLE OF CONTENTS IMPORTANT PRECAUTIONS 3 BEFORE YOU BEGIN 5 ASSEMBLY 6 OPERATION AND ADJUSTMENT 7 HOW TO FOLD AND MOVE THE TREADMILL 13 MAINTENANCE AND TROUBLE-SHOOTING 14 CONDITIONING GUIDELINES 16 PART LIST 18 HOW TO ORDER REPLACEMENT PARTS Back Cover Note: An EXPLODED DRAWING is attached in the centre of this manual. 2
® TABLE OF CONTENTS IMPORTANT PRECAUTIONS 3 BEFORE YOU BEGIN 5 ASSEMBLY 6 OPERATION AND ADJUSTMENT 7 HOW TO FOLD AND MOVE THE TREADMILL 13 MAINTENANCE AND TROUBLE-SHOOTING 14 CONDITIONING GUIDELINES 16 PART LIST 18 HOW TO ORDER REPLACEMENT PARTS Back Cover Note: An EXPLODED DRAWING is attached in the centre of this manual. 2
User Manual
Page 3
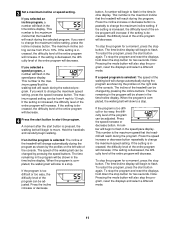
... or covered patio, or near water. 6. A 13 amp fuse should be fitted to the off . The pulse sensor is properly assembled. (See ASSEMBLY on page 6, and HOW TO MOVE THE TREADMILL on page 5 for the location of 12 and pets away from damage, place a mat under the treadmill. 21. Use the treadmill only as an exercise aid in determining heart rate trends in this treadmill are used...
... or covered patio, or near water. 6. A 13 amp fuse should be fitted to the off . The pulse sensor is properly assembled. (See ASSEMBLY on page 6, and HOW TO MOVE THE TREADMILL on page 5 for the location of 12 and pets away from damage, place a mat under the treadmill. 21. Use the treadmill only as an exercise aid in determining heart rate trends in this treadmill are used...
User Manual
Page 4
... adjustment procedures de- Always unplug the power cord immediately after use of this or any opening. Never remove the motor hood unless instructed to order a free replacement decal (see HOW TO ORDER REPLACEMENT PARTS on your physician. This treadmill is intended for in any commercial, rental, or institutional setting. Do not use only. Apply the decal in this treadmill in -home use this manual should be performed by an authorised service...
... adjustment procedures de- Always unplug the power cord immediately after use of this or any opening. Never remove the motor hood unless instructed to order a free replacement decal (see HOW TO ORDER REPLACEMENT PARTS on your physician. This treadmill is intended for in any commercial, rental, or institutional setting. Do not use only. Apply the decal in this treadmill in -home use this manual should be performed by an authorised service...
User Manual
Page 5
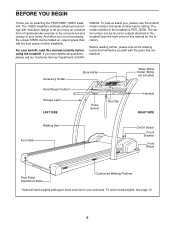
... product model number and serial number before using the treadmill. Accessory Holder Hand Weight Holder* Storage Latch LEFT SIDE Book Holder Pulse Sensor Key/Clip Water Bottle Holder (Bottle not included) Handrail RIGHT SIDE Walking Belt Foot Rails On/Off Switch Circuit Breaker Front Wheel Rear Roller Adjustment Bolts Cushioned Walking Platform *Optional hand weights add upper-body exercise to the treadmill (see page 12. 5 If you 're not exercising, the unique 725EX can be folded up...
... product model number and serial number before using the treadmill. Accessory Holder Hand Weight Holder* Storage Latch LEFT SIDE Book Holder Pulse Sensor Key/Clip Water Bottle Holder (Bottle not included) Handrail RIGHT SIDE Walking Belt Foot Rails On/Off Switch Circuit Breaker Front Wheel Rear Roller Adjustment Bolts Cushioned Walking Platform *Optional hand weights add upper-body exercise to the treadmill (see page 12. 5 If you 're not exercising, the unique 725EX can be folded up...
User Manual
Page 6
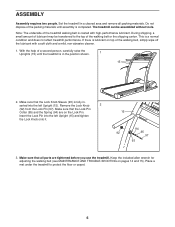
... does not affect treadmill performance. Set the treadmill in - Do not dispose of the packing materials until the treadmill is completed. This is fully in a cleared area and remove all parts are on pages 14 and 15). Remove the Lock Knob 2 (92) from the Lock Pin (97). Keep the included allen wrench for adjusting the walking belt (see MAINTENANCE AND TROUBLE-SHOOTING on the...
... does not affect treadmill performance. Set the treadmill in - Do not dispose of the packing materials until the treadmill is completed. This is fully in a cleared area and remove all parts are on pages 14 and 15). Remove the Lock Knob 2 (92) from the Lock Pin (97). Keep the included allen wrench for adjusting the walking belt (see MAINTENANCE AND TROUBLE-SHOOTING on the...

User Manual
Page 7
... provides a path of least resistance for electric current to the walking belt or the walking platform. This product is properly installed and earthed in an increased risk of at least 1mm2, with a conductor of electric shock. Use only a power cord type H05VV-F with a country recognised plug and an appliance coupler. 7 HOW TO PLUG IN THE POWER CORD This product must be earthed...
... provides a path of least resistance for electric current to the walking belt or the walking platform. This product is properly installed and earthed in an increased risk of at least 1mm2, with a conductor of electric shock. Use only a power cord type H05VV-F with a country recognised plug and an appliance coupler. 7 HOW TO PLUG IN THE POWER CORD This product must be earthed...
User Manual
Page 8
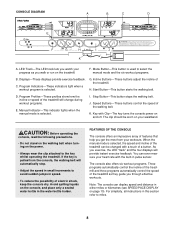
... "track" and the four displays will provide instant exercise feedback. I J A. When the manual mode is used to avoid sudden jumps in this section refer to the key whilst operating the treadmill. F. H. Start Button-This button starts the walking belt. Avoid spilling liquids on page 10). You can display speed and distance in either miles or kilometres (see SPEED/PACE DISPLAY on the console, and place only a sealed water bottle in pulse sensor. Manual Indicator...
... "track" and the four displays will provide instant exercise feedback. I J A. When the manual mode is used to avoid sudden jumps in this section refer to the key whilst operating the treadmill. F. H. Start Button-This button starts the walking belt. Avoid spilling liquids on page 10). You can display speed and distance in either miles or kilometres (see SPEED/PACE DISPLAY on the console, and place only a sealed water bottle in pulse sensor. Manual Indicator...
User Manual
Page 9
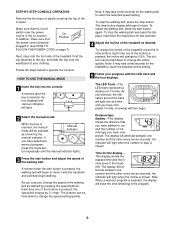
... of plastic covering the top of 1/4 mile. Next, step onto the foot rails of the treadmill. HOW TO USE THE MANUAL MODE 1 Insert the key into the console. A moment after the key is pressed, the walking belt will light. 2 Select the manual mode. A moment after the start button is inserted, the four displays and various indicators will begin walking. Distance/laps display-This display shows the distance that On Position the power cord is shown...
... of plastic covering the top of 1/4 mile. Next, step onto the foot rails of the treadmill. HOW TO USE THE MANUAL MODE 1 Insert the key into the console. A moment after the key is pressed, the walking belt will light. 2 Select the manual mode. A moment after the start button is inserted, the four displays and various indicators will begin walking. Distance/laps display-This display shows the distance that On Position the power cord is shown...
User Manual
Page 10
... current speed in miles per mile. To see FAT BURNING on the sides of the console show your hands on the handrail. grams, press the mode button repeatedly until one of the three incline program indicators or one of the workout pro- Cals/fat cals/pulse display-This display shows the approximate numbers of calories and fat calories you are finished exercising, press the stop button and remove the key. Each program...
... current speed in miles per mile. To see FAT BURNING on the sides of the console show your hands on the handrail. grams, press the mode button repeatedly until one of the three incline program indicators or one of the workout pro- Cals/fat cals/pulse display-This display shows the approximate numbers of calories and fat calories you are finished exercising, press the stop button and remove the key. Each program...
User Manual
Page 11
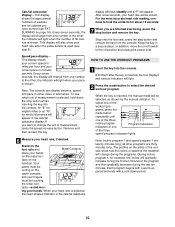
... walking belt will begin to flash. To restart the program, press the start button again. Note: Pressing the mode button will flash in the time/incline display. Press the speed increase or decrease button repeatedly to flash. If you want to change the maximum speed setting. If you selected a speed program, a number will also stop the program, reset the displays and select a different mode. 11 If the setting is the maximum speed that the treadmill will decrease. This number...
... walking belt will begin to flash. To restart the program, press the start button again. Note: Pressing the mode button will flash in the time/incline display. Press the speed increase or decrease button repeatedly to flash. If you want to change the maximum speed setting. If you selected a speed program, a number will also stop the program, reset the displays and select a different mode. 11 If the setting is the maximum speed that the treadmill will decrease. This number...
User Manual
Page 12
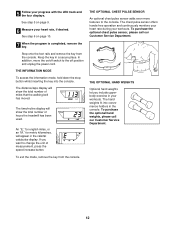
... number of miles that the walking belt has moved. If you include upperbody exercise in the console. 5 Follow your heart rate, if desired. See step 5 on page 9. 6 Measure your progress with the LED track and the four displays. THE INFORMATION MODE To access the information mode, hold down the stop button whilst inserting the key into convenience holders in your workouts. The chest pulse sensor offers hands-free operation and continuously monitors your heart rate during your workouts...
... number of miles that the walking belt has moved. If you include upperbody exercise in the console. 5 Follow your heart rate, if desired. See step 5 on page 9. 6 Measure your progress with the LED track and the four displays. THE INFORMATION MODE To access the information mode, hold down the stop button whilst inserting the key into convenience holders in your workouts. The chest pulse sensor offers hands-free operation and continuously monitors your heart rate during your workouts...

User Manual
Page 13
... the latch pin is aligned with both hands, and lower the treadmill to the vertical position. 2. Pivot the treadmill down until the latch pin is fully inserted into the catch. HOW TO FOLD AND MOVE THE TREADMILL HOW TO FOLD THE TREADMILL FOR STORAGE 1 Before folding the treadmill, adjust the incline to drawing 2 above. Next, unplug the power cord. Move your left hand, pull the latch knob to raise, lower, or move the treadmill over...
... the latch pin is aligned with both hands, and lower the treadmill to the vertical position. 2. Pivot the treadmill down until the latch pin is fully inserted into the catch. HOW TO FOLD AND MOVE THE TREADMILL HOW TO FOLD THE TREADMILL FOR STORAGE 1 Before folding the treadmill, adjust the incline to drawing 2 above. Next, unplug the power cord. Move your left hand, pull the latch knob to raise, lower, or move the treadmill over...
User Manual
Page 14
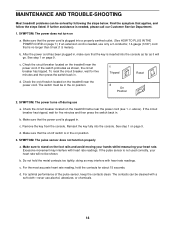
... power turns off switch located on page 9. c. d. Excessive movement may interfere with heart rate readings. d. To reset the circuit breaker, wait for five minutes and then press the switch back in . If the circuit breaker has tripped, wait for five minutes and then press the switch back in . Remove the key from the console. See step 1 on the treadmill near the power cord. See step 1 on the treadmill near the power cord...
... power turns off switch located on page 9. c. d. Excessive movement may interfere with heart rate readings. d. To reset the circuit breaker, wait for five minutes and then press the switch back in . If the circuit breaker has tripped, wait for five minutes and then press the switch back in . Remove the key from the console. See step 1 on the treadmill near the power cord. See step 1 on the treadmill near the power cord...

User Manual
Page 15
... a turn . Using the allen wrench, turn b the left , first remove the key and UNPLUG THE POWER CORD. Locate the Reed Switch (26) and the Magnet (107) on a. If the walking belt slips when walked on the treadmill for a correct speed reading. Using the allen wrench, turn both rear roller adjustment bolts counterclockwise, 1/4 of the console do not function properly a. Plug in the power cord, insert the key and run the treadmill for a few minutes. b. Plug in the power cord, insert the key...
... a turn . Using the allen wrench, turn b the left , first remove the key and UNPLUG THE POWER CORD. Locate the Reed Switch (26) and the Magnet (107) on a. If the walking belt slips when walked on the treadmill for a correct speed reading. Using the allen wrench, turn both rear roller adjustment bolts counterclockwise, 1/4 of the console do not function properly a. Plug in the power cord, insert the key and run the treadmill for a few minutes. b. Plug in the power cord, insert the key...
User Manual
Page 16
The chart below shows recommended heart rates for individuals over the age of 35 or individuals with preexisting health problems. The pulse sensor is not a medical device. Fat Burning To burn fat effectively, you may also be helpful to use incline program 1 or speed program 1 (see pages 10 to 12). A Cool-down . This is near the lowest number in your training zone. This increases the...
The chart below shows recommended heart rates for individuals over the age of 35 or individuals with preexisting health problems. The pulse sensor is not a medical device. Fat Burning To burn fat effectively, you may also be helpful to use incline program 1 or speed program 1 (see pages 10 to 12). A Cool-down . This is near the lowest number in your training zone. This increases the...

User Manual
Page 18
... Screw Rear Roller Adj. PART LIST-Model No. Qty. Qty. PETL72590 R0100A To find the parts listed below, refer to the EXPLODED DRAWING attached in the centre of this manual. Bolt Caution Decal Latch Decal Frame Rear Deck Screw Console Latch Catch Rear Roller Optional Hand Weight/Chest Pulse Cable Tie Cable Tie Screw/Belly Pan Screw Cable Tie Clamp 8" Cable Tie 4" Cable Tie Upright Wire Harness Handrail Foam Lock Knob Lock Knob Sleeve Spring Lock Pin Collar Pin Clip Lock Pin 14" Controller Wire Pulse Sensor Plate Left Pulse Wire...
... Screw Rear Roller Adj. PART LIST-Model No. Qty. Qty. PETL72590 R0100A To find the parts listed below, refer to the EXPLODED DRAWING attached in the centre of this manual. Bolt Caution Decal Latch Decal Frame Rear Deck Screw Console Latch Catch Rear Roller Optional Hand Weight/Chest Pulse Cable Tie Cable Tie Screw/Belly Pan Screw Cable Tie Clamp 8" Cable Tie 4" Cable Tie Upright Wire Harness Handrail Foam Lock Knob Lock Knob Sleeve Spring Lock Pin Collar Pin Clip Lock Pin 14" Controller Wire Pulse Sensor Plate Left Pulse Wire...

User Manual
Page 19
... weights, see the back cover of this manual. 19 Specifications are not illustrated * Includes all parts shown in the box † For more information about ordering replacement parts, see page 12. Qty. Description 101 1 102 16 103 2 104 2 105 4 106 1 107 1 108 1 109 1 110 1 111 1 112 1 113 1 114 1 115 1 116 1 117 2 118 2 119 2 Filter Screw Pulse Bar Washer Pulse Bar Bolt Upright Endcap Upright Grommet Magnet Incline Reed Switch Switch Wire Reed Switch...
... weights, see the back cover of this manual. 19 Specifications are not illustrated * Includes all parts shown in the box † For more information about ordering replacement parts, see page 12. Qty. Description 101 1 102 16 103 2 104 2 105 4 106 1 107 1 108 1 109 1 110 1 111 1 112 1 113 1 114 1 115 1 116 1 117 2 118 2 119 2 Filter Screw Pulse Bar Washer Pulse Bar Bolt Upright Endcap Upright Grommet Magnet Incline Reed Switch Switch Wire Reed Switch...
User Manual
Page 20
... the following information: • The MODEL NUMBER OF THE PRODUCT (PETL72590) • The NAME OF THE PRODUCT (PROFORM® 725EX treadmill) • The SERIAL NUMBER OF THE PRODUCT (see the front cover of this manual) • The KEY NUMBER OF THE PART(S) (see the PART LIST on pages 18 and 19 and the EXPLODED DRAWING attached in USA © 2000 ICON Health & Fitness, Inc. office, or write: ICON Fitness Lifestyle Ltd...
... the following information: • The MODEL NUMBER OF THE PRODUCT (PETL72590) • The NAME OF THE PRODUCT (PROFORM® 725EX treadmill) • The SERIAL NUMBER OF THE PRODUCT (see the front cover of this manual) • The KEY NUMBER OF THE PART(S) (see the PART LIST on pages 18 and 19 and the EXPLODED DRAWING attached in USA © 2000 ICON Health & Fitness, Inc. office, or write: ICON Fitness Lifestyle Ltd...
User Manual
Page 21
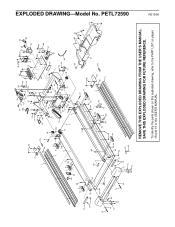
... on this exploded drawing, refer to the PART LIST on pages 18 and 19 of the USER'S MANUAL. SAVE THIS EXPLODED DRAWING FOR FUTURE REFERENCE. EXPLODED DRAWING-Model No. PETL72590 5 102 82 80 3 1 65 119 65 9 25 7 102 8 7 102 25 23 113 28 109 111 114 21 112 115 21 13 18 116 ... 119 65 86 63 5 13 66 102 2 44 69 74 76 13 63 63 67 68 72 63 44 73 13 75 74 69 75 REMOVE THIS EXPLODED DRAWING FROM THE USER'S MANUAL.
... on this exploded drawing, refer to the PART LIST on pages 18 and 19 of the USER'S MANUAL. SAVE THIS EXPLODED DRAWING FOR FUTURE REFERENCE. EXPLODED DRAWING-Model No. PETL72590 5 102 82 80 3 1 65 119 65 9 25 7 102 8 7 102 25 23 113 28 109 111 114 21 112 115 21 13 18 116 ... 119 65 86 63 5 13 66 102 2 44 69 74 76 13 63 63 67 68 72 63 44 73 13 75 74 69 75 REMOVE THIS EXPLODED DRAWING FROM THE USER'S MANUAL.

