
Uk Manual
Page 2
TABLE OF CONTENTS IMPORTANT PRECAUTIONS 3 BEFORE YOU BEGIN 4 ASSEMBLY 5 HOW TO USE THE ELLIPTICAL CROSSTRAINER 10 MAINTENANCE AND TROUBLESHOOTING 22 CONDITIONING GUIDELINES 23 PART LIST 25 EXPLODED DRAWING 27 HOW TO ORDER REPLACEMENT PARTS Back Cover PROFORM is a registered trademark of ICON IP, Inc. 2
TABLE OF CONTENTS IMPORTANT PRECAUTIONS 3 BEFORE YOU BEGIN 4 ASSEMBLY 5 HOW TO USE THE ELLIPTICAL CROSSTRAINER 10 MAINTENANCE AND TROUBLESHOOTING 22 CONDITIONING GUIDELINES 23 PART LIST 25 EXPLODED DRAWING 27 HOW TO ORDER REPLACEMENT PARTS Back Cover PROFORM is a registered trademark of ICON IP, Inc. 2
Uk Manual
Page 3
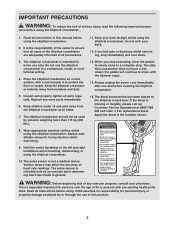
... elliptical crosstrainer. 2. Read all instructions in the location shown. 8. Place the elliptical crosstrainer on the elliptical crosstrainer. The elliptical crosstrainer does not have a free wheel; The elliptical crosstrainer should not be used by or through the use the elliptical crosstrainer in general. The pulse sensor is the responsibility of the owner to a complete stop immediately and cool down. 3. WARNING: Before beginning this product. 3 IMPORTANT PRECAUTIONS WARNING: To reduce the risk of heart rate...
... elliptical crosstrainer. 2. Read all instructions in the location shown. 8. Place the elliptical crosstrainer on the elliptical crosstrainer. The elliptical crosstrainer does not have a free wheel; The elliptical crosstrainer should not be used by or through the use the elliptical crosstrainer in general. The pulse sensor is the responsibility of the owner to a complete stop immediately and cool down. 3. WARNING: Before beginning this product. 3 IMPORTANT PRECAUTIONS WARNING: To reduce the risk of heart rate...

Uk Manual
Page 4
... on a decal attached to the elliptical crosstrainer (see the front cover of natural, elliptical-motion exercise from your knees and ankles. The serial number can be found on your exercise. And the unique PROFORM® 700 TR features adjustable resistance and a state-of-the-art console to a whole new world of this manual carefully before you , please note the product model number and serial number before calling. If...
... on a decal attached to the elliptical crosstrainer (see the front cover of natural, elliptical-motion exercise from your knees and ankles. The serial number can be found on your exercise. And the unique PROFORM® 700 TR features adjustable resistance and a state-of-the-art console to a whole new world of this manual carefully before you , please note the product model number and serial number before calling. If...

Uk Manual
Page 6
... Head Screw (45). Press the Handlebar Covers together and connect them with two M8 x 54mm Button Screws (33), two M8 x 38mm Button Screws (70), and four M8 Split Washers (94). Next, move and lift each Flex Bar (14) out of a second person, carefully tip the 3 elliptical crosstrainer onto one side. Attach the Rear Stabiliser (4) to the Front Stabiliser with the Button Screws. Attach the Upright Covers with four M8 x 45mm Button Screws...
... Head Screw (45). Press the Handlebar Covers together and connect them with two M8 x 54mm Button Screws (33), two M8 x 38mm Button Screws (70), and four M8 Split Washers (94). Next, move and lift each Flex Bar (14) out of a second person, carefully tip the 3 elliptical crosstrainer onto one side. Attach the Rear Stabiliser (4) to the Front Stabiliser with the Button Screws. Attach the Upright Covers with four M8 x 45mm Button Screws...
Uk Manual
Page 9
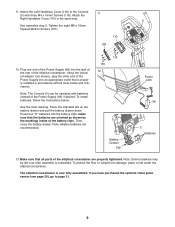
... the same way. 5 See assembly step 9. Press four "D" batteries into the jack at the rear of the battery clips. Make sure that the batteries are recommended. If you have purchased the optional chest pulse sensor (see page 20), go to the Console (5) with batteries instead of the elliptical crosstrainer are properly tightened. Plug one end of the Power Supply (96) into the battery clips; Note: Some hardware may...
... the same way. 5 See assembly step 9. Press four "D" batteries into the jack at the rear of the battery clips. Make sure that the batteries are recommended. If you have purchased the optional chest pulse sensor (see page 20), go to the Console (5) with batteries instead of the elliptical crosstrainer are properly tightened. Plug one end of the Power Supply (96) into the battery clips; Note: Some hardware may...
Uk Manual
Page 11
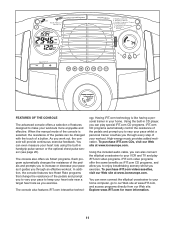
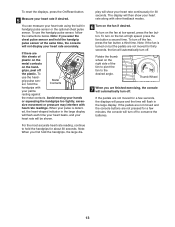
... measure your heart rate using the built-in handgrip pulse sensor or the optional chest pulse sensor (see page 20). Using the included audio cable, you can also connect the elliptical crosstrainer to your VCR and TV and play special iFIT.com CD programs. iFIT.com CD programs automatically control the resistance of the pedals and prompt you to vary your home. High-energy music provides added motivation. The console also features iFIT.com...
... measure your heart rate using the built-in handgrip pulse sensor or the optional chest pulse sensor (see page 20). Using the included audio cable, you can also connect the elliptical crosstrainer to your VCR and TV and play special iFIT.com CD programs. iFIT.com CD programs automatically control the resistance of the pedals and prompt you to vary your home. High-energy music provides added motivation. The console also features iFIT.com...

Uk Manual
Page 12
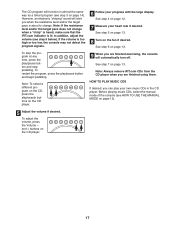
... pedalling speed, your pedalling pace (in the console (see step 5 on page 9). The lower section of the large display will be necessary to the next every few seconds. To change from one number to reselect the desired unit of measurement. Note: When the batteries are ten resistance levels; To use an iFIT.com video program, see page 15. HOW TO USE THE MANUAL MODE 1 Turn on the console, press the On/Reset button...
... pedalling speed, your pedalling pace (in the console (see step 5 on page 9). The lower section of the large display will be necessary to the next every few seconds. To change from one number to reselect the desired unit of measurement. Note: When the batteries are ten resistance levels; To use an iFIT.com video program, see page 15. HOW TO USE THE MANUAL MODE 1 Turn on the console, press the On/Reset button...
Uk Manual
Page 13
... automatically turn off . To use the handgrip pulse sensor, follow the instructions below. Note: When you first hold the handgrips for a few seconds, the displays will pause and the time will turn off to conserve the batteries. 13 To reset the displays, press the On/Reset button. 5 Measure your hands or squeezing the handgrips too tightly; exces- If the pedals are not moved and the console buttons...
... automatically turn off . To use the handgrip pulse sensor, follow the instructions below. Note: When you first hold the handgrips for a few seconds, the displays will pause and the time will turn off to conserve the batteries. 13 To reset the displays, press the On/Reset button. 5 Measure your hands or squeezing the handgrips too tightly; exces- If the pedals are not moved and the console buttons...
Uk Manual
Page 14
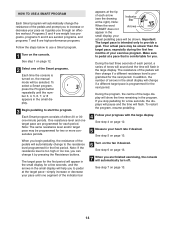
... small display. 3 Begin pedalling to pedal at the tip of your heart rate if desired. HOW TO USE A SMART PROGRAM Each Smart program will automatically change the resistance of the pedals and prompt you to increase or decrease your pace as it by pressing the Resistance buttons. See step 6 on page 13. 7 When you are high-performance programs. Follow the steps below to use a Smart program. 1 Turn on the console. One resistance...
... small display. 3 Begin pedalling to pedal at the tip of your heart rate if desired. HOW TO USE A SMART PROGRAM Each Smart program will automatically change the resistance of the pedals and prompt you to increase or decrease your pace as it by pressing the Resistance buttons. See step 6 on page 13. 7 When you are high-performance programs. Follow the steps below to use a Smart program. 1 Turn on the console. One resistance...
Uk Manual
Page 15
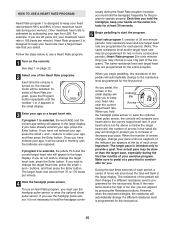
... heart rate are replaced. Make sure to pedal at a pace that you must hold the handgrip pulse sensor or wear the optional chest pulse sensor, the console will appear in the small display. 3 Enter your age or a target heart rate. To select a Heart Rate program, press the Program button repeatedly until the batteries are programmed for the next period. If you begin pedalling, the resistance of the program). The target heart rate can adjust it will automatically change...
... heart rate are replaced. Make sure to pedal at a pace that you must hold the handgrip pulse sensor or wear the optional chest pulse sensor, the console will appear in the small display. 3 Enter your age or a target heart rate. To select a Heart Rate program, press the Program button repeatedly until the batteries are programmed for the next period. If you begin pedalling, the resistance of the program). The target heart rate can adjust it will automatically change...
Uk Manual
Page 16
To use an iFIT.com CD program, a certified personal trainer will guide you through your progress with the large display. See step 6 on , the manual mode will be selected. Each time the console is pressed, your personal trainer will begin guiding you are finished exercising, the console will automatically turn off. The iFIT.com indicator will light and the letters IF will appear in the program. See step 7 on page...
To use an iFIT.com CD program, a certified personal trainer will guide you through your progress with the large display. See step 6 on , the manual mode will be selected. Each time the console is pressed, your personal trainer will begin guiding you are finished exercising, the console will automatically turn off. The iFIT.com indicator will light and the letters IF will appear in the program. See step 7 on page...
Uk Manual
Page 17
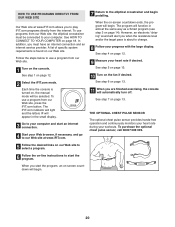
... not detect the program signals. To restart the program, press the play /pause button and stop pedalling. and + buttons on the CD player. 6 Follow your progress with the large display. However, an electronic "chirping" sound will alert you are finished exercising, the console will automatically turn off. In addition, adjust the volume (see HOW TO USE THE MANUAL MODE on page 14). See step 4 on page...
... not detect the program signals. To restart the program, press the play /pause button and stop pedalling. and + buttons on the CD player. 6 Follow your progress with the large display. However, an electronic "chirping" sound will alert you are finished exercising, the console will automatically turn off. In addition, adjust the volume (see HOW TO USE THE MANUAL MODE on page 14). See step 4 on page...
Uk Manual
Page 18
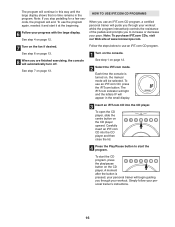
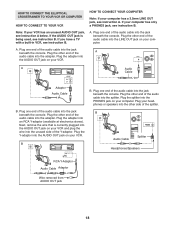
... jack on your computer. IN VIDEO AUDIO IN CH 34 OUT RF OUT AUDIO OUT RIGHT LEFT Audio Cable Adaptor Audio Cable B. Plug one end of the audio cable into the jack beneath the console. B. IN VIDEO AUDIO IN CH 34 OUT RF OUT PHONES Audio Cable Splitter Headphones/Speakers RCA Y-Adaptor Audio Cable Adaptor Wire removed from AUDIO OUT jack 18 HOW TO CONNECT THE ELLIPTICAL CROSSTRAINER TO YOUR VCR OR COMPUTER...
... jack on your computer. IN VIDEO AUDIO IN CH 34 OUT RF OUT AUDIO OUT RIGHT LEFT Audio Cable Adaptor Audio Cable B. Plug one end of the audio cable into the jack beneath the console. B. IN VIDEO AUDIO IN CH 34 OUT RF OUT PHONES Audio Cable Splitter Headphones/Speakers RCA Y-Adaptor Audio Cable Adaptor Wire removed from AUDIO OUT jack 18 HOW TO CONNECT THE ELLIPTICAL CROSSTRAINER TO YOUR VCR OR COMPUTER...
Uk Manual
Page 19
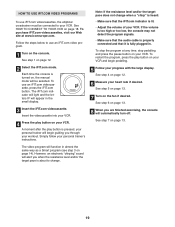
... audio cable is properly connected and that the iFIT.com indicator is pressed, your personal trainer will appear in almost the same way as a Smart program (see step 3 on your VCR. 4 Press the play button on page 14). See step 6 on , the manual mode will function in the small display. 3 Insert the iFIT.com videocassette. Insert the videocassette into your VCR. The video program will be connected to use...
... audio cable is properly connected and that the iFIT.com indicator is pressed, your personal trainer will appear in almost the same way as a Smart program (see step 3 on your VCR. 4 Press the play button on page 14). See step 6 on , the manual mode will function in the small display. 3 Insert the iFIT.com videocassette. Insert the videocassette into your VCR. The video program will be connected to use...
Uk Manual
Page 20
... start an internet connection. 4 Start your workouts. To use a program from the internet. See step 5 on page 13. 10 Turn on -screen countdown will automatically turn off. When you are finished exercising, the console will begin. 20 THE OPTIONAL CHEST PULSE SENSOR The optional chest pulse sensor provides hands-free operation and continuously monitors your heart rate during your Web browser, if necessary, and go to our Web site at www.iFIT...
... start an internet connection. 4 Start your workouts. To use a program from the internet. See step 5 on page 13. 10 Turn on -screen countdown will automatically turn off. When you are finished exercising, the console will begin. 20 THE OPTIONAL CHEST PULSE SENSOR The optional chest pulse sensor provides hands-free operation and continuously monitors your heart rate during your Web browser, if necessary, and go to our Web site at www.iFIT...

Uk Manual
Page 22
... the console. tical crosstrainer. HANDGRIP PULSE SENSOR TROUBLESHOOTING If the handgrip pulse sensor does not function properly, see step 5 on the front wheels, and carefully move Wheel the elliptical crosstrainer to the size and weight of mild detergent. Then, place one foot against one of the wheels. Due to the desired loca- MAINTENANCE AND TROUBLESHOOTING Inspect and tighten all parts of mild detergent. HOW TO MOVE THE ELLIPTICAL CROSSTRAINER Stand...
... the console. tical crosstrainer. HANDGRIP PULSE SENSOR TROUBLESHOOTING If the handgrip pulse sensor does not function properly, see step 5 on the front wheels, and carefully move Wheel the elliptical crosstrainer to the size and weight of mild detergent. Then, place one foot against one of the wheels. Due to the desired loca- MAINTENANCE AND TROUBLESHOOTING Inspect and tighten all parts of mild detergent. HOW TO MOVE THE ELLIPTICAL CROSSTRAINER Stand...
Uk Manual
Page 23
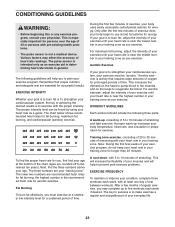
... must be found by using your cardiovascular system, the key to achieving the desired results is to burn fat or to exercise with at least one day of your exercise until your heart rate is near the lowest number in your training zone as a guide. For aerobic exercise, adjust the intensity of stretching and light exercise. WORKOUT GUIDELINES Each workout should include the following...
... must be found by using your cardiovascular system, the key to achieving the desired results is to burn fat or to exercise with at least one day of your exercise until your heart rate is near the lowest number in your training zone as a guide. For aerobic exercise, adjust the intensity of stretching and light exercise. WORKOUT GUIDELINES Each workout should include the following...
Uk Manual
Page 25
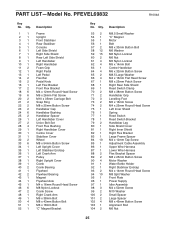
... Handlebar Foam Grip Right Pedal Left Pedal Flex Bar Pedal Knob Left Flex Bracket Front Flex Bracket M4 x 12mm Round Head Screw M6 x 26mm Flat Screw M10 x 35mm Carriage Bolt Snap Ring M8 x 25mm Button Screw Handlebar Cap Handlebar Bushing Handlebar Spacer Left Handlebar Cover Union Bolt Set Front Flex Bushing Right Handlebar Cover Centre Cover Stabiliser Cover Wheel M8 x 54mm Button Screw Left Upright Cover Left Stabiliser Endcap Left Crank Arm Pulley Right Upright Cover Crank Crank Bearing Flywheel Flywheel...
... Handlebar Foam Grip Right Pedal Left Pedal Flex Bar Pedal Knob Left Flex Bracket Front Flex Bracket M4 x 12mm Round Head Screw M6 x 26mm Flat Screw M10 x 35mm Carriage Bolt Snap Ring M8 x 25mm Button Screw Handlebar Cap Handlebar Bushing Handlebar Spacer Left Handlebar Cover Union Bolt Set Front Flex Bushing Right Handlebar Cover Centre Cover Stabiliser Cover Wheel M8 x 54mm Button Screw Left Upright Cover Left Stabiliser Endcap Left Crank Arm Pulley Right Upright Cover Crank Crank Bearing Flywheel Flywheel...
Uk Manual
Page 26
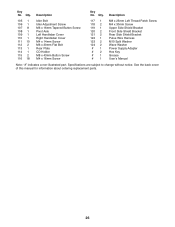
.... See the back cover of this manual for information about ordering replacement parts. 26 Key No. Qty. 117 1 118 2 119 1 120 2 121 2 122 1 123 2 124 2 #1 #2 #1 #1 Description M8 x 25mm Left Thread Patch Screw M4 x 30mm Screw Upper Side Shield Bracket Front Side Shield Bracket Rear Side Shield Bracket Pulse Wire Harness M10 Split Washer Wave Washer Power Supply Adapter Hex Key Grease Userʼs Manual Note: "#" indicates a non...
.... See the back cover of this manual for information about ordering replacement parts. 26 Key No. Qty. 117 1 118 2 119 1 120 2 121 2 122 1 123 2 124 2 #1 #2 #1 #1 Description M8 x 25mm Left Thread Patch Screw M4 x 30mm Screw Upper Side Shield Bracket Front Side Shield Bracket Rear Side Shield Bracket Pulse Wire Harness M10 Split Washer Wave Washer Power Supply Adapter Hex Key Grease Userʼs Manual Note: "#" indicates a non...
Uk Manual
Page 28
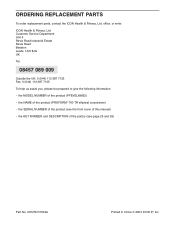
... to give the following information: • the MODEL NUMBER of the product (PFEVEL69832) • the NAME of the product (PROFORM® 700 TR elliptical crosstrainer) • the SERIAL NUMBER of the product (see the front cover of this manual) • the KEY NUMBER and DESCRIPTION of the part(s) (see page 25 and 26) Part No. 216476 R1004A Printed in China © 2004 ICON IP, Inc.
... to give the following information: • the MODEL NUMBER of the product (PFEVEL69832) • the NAME of the product (PROFORM® 700 TR elliptical crosstrainer) • the SERIAL NUMBER of the product (see the front cover of this manual) • the KEY NUMBER and DESCRIPTION of the part(s) (see page 25 and 26) Part No. 216476 R1004A Printed in China © 2004 ICON IP, Inc.


