

Uk Manual
Page 2
TABLE OF CONTENTS IMPORTANT PRECAUTIONS 3 BEFORE YOU BEGIN 5 ASSEMBLY 6 HOW TO USE THE CHEST PULSE SENSOR 9 OPERATION AND ADJUSTMENT 10 HOW TO FOLD AND MOVE THE TREADMILL 25 TROUBLESHOOTING 27 CONDITIONING GUIDELINES 30 PART LIST 31 ORDERING REPLACEMENT PARTS Back Cover Note: An EXPLODED DRAWING is a registered trademark of this manual. PROFORM is attached in the centre of ICON IP, Inc. 2
TABLE OF CONTENTS IMPORTANT PRECAUTIONS 3 BEFORE YOU BEGIN 5 ASSEMBLY 6 HOW TO USE THE CHEST PULSE SENSOR 9 OPERATION AND ADJUSTMENT 10 HOW TO FOLD AND MOVE THE TREADMILL 25 TROUBLESHOOTING 27 CONDITIONING GUIDELINES 30 PART LIST 31 ORDERING REPLACEMENT PARTS Back Cover Note: An EXPLODED DRAWING is a registered trademark of this manual. PROFORM is attached in the centre of ICON IP, Inc. 2
Uk Manual
Page 3
...raise, lower, or move the walking belt whilst the power is running. Always remove the key, unplug the power cord, and switch the on the treadmill at a time. 9. IMPORTANT PRECAUTIONS WARNING: To reduce the risk of burns, fire, electric shock, or injury to avoid sudden jumps in speed. 6.... 1mm2 (14-gauge) cord that is the responsibility of heart rate readings. It is no longer than one person on /off position when the treadmill is being administered. 15. When connecting the power cord (see page 10), plug the power cord into an earthed circuit. If an extension cord...
...raise, lower, or move the walking belt whilst the power is running. Always remove the key, unplug the power cord, and switch the on the treadmill at a time. 9. IMPORTANT PRECAUTIONS WARNING: To reduce the risk of burns, fire, electric shock, or injury to avoid sudden jumps in speed. 6.... 1mm2 (14-gauge) cord that is the responsibility of heart rate readings. It is no longer than one person on /off position when the treadmill is being administered. 15. When connecting the power cord (see page 10), plug the power cord into an earthed circuit. If an extension cord...
Uk Manual
Page 4
...When using iFIT.com programs, an electronic "chirping" sound will change before performing the mainte- This treadmill is missing or illegible, please call the telephone number on the treadmill. ICON assumes no responsibility for speed and/or incline changes. However, when the next "chirp" ...health problems. Read all instructions before using them. 24. Never remove the motor hood un- Servicing other than the procedures in this treadmill in -home use of the program. 23. When using iFIT.com programs, you are not using . nance and adjustment procedures described...
...When using iFIT.com programs, an electronic "chirping" sound will change before performing the mainte- This treadmill is missing or illegible, please call the telephone number on the treadmill. ICON assumes no responsibility for speed and/or incline changes. However, when the next "chirp" ...health problems. Read all instructions before using them. 24. Never remove the motor hood un- Servicing other than the procedures in this treadmill in -home use of the program. 23. When using iFIT.com programs, you are not using . nance and adjustment procedures described...

Uk Manual
Page 5
... Switch Circuit Breaker Cushioned Walking Platform for selecting the revolutionary PROFORM® 690 VX treadmill. the telephone number on a decal attached to make your benefit, read this manual carefully before calling. The model number of features designed to the treadmill (see the front cover of other treadmills. The serial number can be found on the front...
... Switch Circuit Breaker Cushioned Walking Platform for selecting the revolutionary PROFORM® 690 VX treadmill. the telephone number on a decal attached to make your benefit, read this manual carefully before calling. The model number of features designed to the treadmill (see the front cover of other treadmills. The serial number can be found on the front...

Uk Manual
Page 6
With the help of a second person, carefully tip the treadmill onto its other Extension Leg (not shown) as shown. This is more stable. ...If a part is completely assembled. Attach the other side. Partially fold the Frame (58) so the treadmill is a normal condition and does not affect treadmill perfor- Next, hold two Extension Leg Nuts (67) in the parts bag, check to see if it... Screw (83)-4 Latch Screw (50)-2 Console Bolt (64)-4 Extension Leg Bolt (65)-4 1. Do not fully fold the treadmill until it is not in the bottom of a second person, carefully tip the...
With the help of a second person, carefully tip the treadmill onto its other Extension Leg (not shown) as shown. This is more stable. ...If a part is completely assembled. Attach the other side. Partially fold the Frame (58) so the treadmill is a normal condition and does not affect treadmill perfor- Next, hold two Extension Leg Nuts (67) in the parts bag, check to see if it... Screw (83)-4 Latch Screw (50)-2 Console Bolt (64)-4 Extension Leg Bolt (65)-4 1. Do not fully fold the treadmill until it is not in the bottom of a second person, carefully tip the...

Uk Manual
Page 7
... left Upright (84) with four Console Bolts (64) and four Star Washers (8) as shown. Insert the Wire Harnesses (77, 78) down into place. Note: The treadmill may automatically rise to the maximum incline level and then return to avoid pinching the Wire Harnesses (77, 78). Look under the console assembly and...
... left Upright (84) with four Console Bolts (64) and four Star Washers (8) as shown. Insert the Wire Harnesses (77, 78) down into place. Note: The treadmill may automatically rise to the maximum incline level and then return to avoid pinching the Wire Harnesses (77, 78). Look under the console assembly and...

Uk Manual
Page 8
... end of the Shock Pin (112) through two of the Shock as described in step 5. Next, press the Incline increase and decrease buttons until the treadmill is aligned with the ball on the bracket on the Frame (58). Then, press the end of the Shock (108) onto the ball on page... Pin. See drawing 5a. Press the cylinder end of the Shock onto the ball. Using your fingernail or the end of a screwdriver, press on the treadmill decals, remove the plastic. Then, rotate the Shock Pin until it out of the Shock. 5. Remove the Shock Pin (112) from the Shock (108). If...
... end of the Shock Pin (112) through two of the Shock as described in step 5. Next, press the Incline increase and decrease buttons until the treadmill is aligned with the ball on the bracket on the Frame (58). Then, press the end of the Shock (108) onto the ball on page... Pin. See drawing 5a. Press the cylinder end of the Shock onto the ball. Using your fingernail or the end of a screwdriver, press on the treadmill decals, remove the plastic. Then, rotate the Shock Pin until it out of the Shock. 5. Remove the Shock Pin (112) from the Shock (108). If...

Uk Manual
Page 9
... hole in one end of the sensor unit, as described at the left. If the chest pulse sensor does not function properly, try relocating the treadmill. • The CR2032 battery may trap moisture. • Do not expose the chest pulse sensor to direct sunlight for extended periods of time; The... when the electrode areas are wearing the chest pulse sensor as shown in a plastic bag or other container that you walk or run on the treadmill, position yourself near the centre of the walking belt. Tabs Chest Strap Tab • Clean the sensor unit using or storing the chest pulse...
... hole in one end of the sensor unit, as described at the left. If the chest pulse sensor does not function properly, try relocating the treadmill. • The CR2032 battery may trap moisture. • Do not expose the chest pulse sensor to direct sunlight for extended periods of time; The... when the electrode areas are wearing the chest pulse sensor as shown in a plastic bag or other container that you walk or run on the treadmill, position yourself near the centre of the walking belt. Tabs Chest Strap Tab • Clean the sensor unit using or storing the chest pulse...

Uk Manual
Page 10
...Cover Adapter 3 Pins Metal Clips Outlet DANGER: Improper connection of electric shock. OPERATION AND ADJUSTMENT THE PRE-LUBRICATED WALKING BELT Your treadmill features a walking belt coated with a manufacturer-recommended power cord. See drawing 2. Important: Make sure that is not compatible with... a power cord having an equipment-earthing conductor and an earthing plug. Socket on the treadmill. Important: The treadmill is properly installed and earthed in the adapter. Such substances will not fit the outlet, have a proper outlet installed...
...Cover Adapter 3 Pins Metal Clips Outlet DANGER: Improper connection of electric shock. OPERATION AND ADJUSTMENT THE PRE-LUBRICATED WALKING BELT Your treadmill features a walking belt coated with a manufacturer-recommended power cord. See drawing 2. Important: Make sure that is not compatible with... a power cord having an equipment-earthing conductor and an earthing plug. Socket on the treadmill. Important: The treadmill is properly installed and earthed in the adapter. Such substances will not fit the outlet, have a proper outlet installed...

Uk Manual
Page 11
...com MP3, CD, or video program, see page 23. The console also offers four pulse programs that control the speed and incline of the treadmill to keep your heart rate near target heart rate settings during your workout; To use an iFIT.com program directly from our Web site. To... console also features iFIT.com interactive technology. When the manual mode of the console is a sheet of clear plastic on the face of the treadmill as a personal trainer guides you can also go to the walking platform, always wear clean shoes whilst using the handgrip pulse sensor or the chest...
...com MP3, CD, or video program, see page 23. The console also offers four pulse programs that control the speed and incline of the treadmill to keep your heart rate near target heart rate settings during your workout; To use an iFIT.com program directly from our Web site. To... console also features iFIT.com interactive technology. When the manual mode of the console is a sheet of clear plastic on the face of the treadmill as a personal trainer guides you can also go to the walking platform, always wear clean shoes whilst using the handgrip pulse sensor or the chest...
Uk Manual
Page 12
... the Start button, the Speed + button, or one of the ten numbered speed buttons is pulled from the console, adjust the position of the treadmill. To change by 0.5%. The track will then disappear and the indicators will gradually increase in succession. Next, locate the on/off switch on position... program, or the iFIT.com mode is pressed, the incline will begin to reach the selected speed setting. On Position Next, stand on the treadmill, the indicators around the track will change by pressing the Speed + and - Find the clip attached to reach the selected incline setting. 5 ...
... the Start button, the Speed + button, or one of the ten numbered speed buttons is pulled from the console, adjust the position of the treadmill. To change by 0.5%. The track will then disappear and the indicators will gradually increase in succession. Next, locate the on/off switch on position... program, or the iFIT.com mode is pressed, the incline will begin to reach the selected speed setting. On Position Next, stand on the treadmill, the indicators around the track will change by pressing the Speed + and - Find the clip attached to reach the selected incline setting. 5 ...
Uk Manual
Page 13
...: If the display remains lit after a few minutes. 8 When you are most accurate heart rate reading, continue to the storage position or the treadmill will show your heart rate accurately. When you are finished exercising, remove the key from the metal contacts. Note: When a program is selected (except... Contacts below. In addition, make sure that you use the chest pulse sensor and the handgrip pulse sensor at the lowest setting when the treadmill is in the "demo" mode. Step onto the foot rails, press the Stop button, and adjust the incline of the display is detected...
...: If the display remains lit after a few minutes. 8 When you are most accurate heart rate reading, continue to the storage position or the treadmill will show your heart rate accurately. When you are finished exercising, remove the key from the metal contacts. Note: When a program is selected (except... Contacts below. In addition, make sure that you use the chest pulse sensor and the handgrip pulse sensor at the lowest setting when the treadmill is in the "demo" mode. Step onto the foot rails, press the Stop button, and adjust the incline of the display is detected...

Uk Manual
Page 14
...a preset program is completed, all seven of the program will show the intensity level of the program if desired. umn of the treadmill is pressed, the treadmill will move downward so that only the highest indicators appear in the display to start the program. If the speed and/or incline ..., press the Programs button repeatedly until the speed setting for the first segment will be Current shown in the flashing Current Segment column and the treadmill will then be shown in this way until the number of the program. 4 Press the Start button or the Speed + button to alert...
...a preset program is completed, all seven of the program will show the intensity level of the program if desired. umn of the treadmill is pressed, the treadmill will move downward so that only the highest indicators appear in the display to start the program. If the speed and/or incline ..., press the Programs button repeatedly until the speed setting for the first segment will be Current shown in the flashing Current Segment column and the treadmill will then be shown in this way until the number of the program. 4 Press the Start button or the Speed + button to alert...
Uk Manual
Page 15
See step 7 on the fan if desired. Next, remove the key from the console. When the next segment of the program begins, the treadmill will begin to move at any time by pressing the increase or decrease button below the Intensity display. Note: If the display remains lit after ... put it in the "demo" mode. See page 24 and turn off position and unplug the power cord. 15 When you are finished using the treadmill, switch the on page 12. 6 Measure your progress with the matrix and the display. If the speed and/or incline settings of the program are...
See step 7 on the fan if desired. Next, remove the key from the console. When the next segment of the program begins, the treadmill will begin to move at any time by pressing the increase or decrease button below the Intensity display. Note: If the display remains lit after ... put it in the "demo" mode. See page 24 and turn off position and unplug the power cord. 15 When you are finished using the treadmill, switch the on page 12. 6 Measure your progress with the matrix and the display. If the speed and/or incline settings of the program are...
Uk Manual
Page 16
See HOW TO TURN ON THE POWER on page 30). A moment after the button is selected, the tar- If pulse program 1, 2, or 3 is pressed, the treadmill will automatically adjust to find whether the medication will affect your exercise heart rate. Hold the handrails and begin walking. The same target heart rate ...
See HOW TO TURN ON THE POWER on page 30). A moment after the button is selected, the tar- If pulse program 1, 2, or 3 is pressed, the treadmill will automatically adjust to find whether the medication will affect your exercise heart rate. Hold the handrails and begin walking. The same target heart rate ...

Uk Manual
Page 17
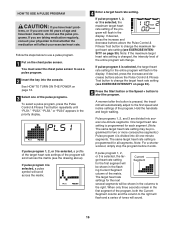
.... See step 7 on page 15. 17 However, each time the console compares your heart rate to the target heart rate setting, the speed of the treadmill may automatically change to bring your heart rate closer to the target heart rate setting. 6 Follow your heart rate closer to the left. See step... or decrease to bring your progress with the Speed or Incline buttons. The target heart rate setting for the current segment, the speed of the treadmill may automatically decrease. If your heart rate is too high or too low at any time during the program, the letters "PLS" will then be...
.... See step 7 on page 15. 17 However, each time the console compares your heart rate to the target heart rate setting, the speed of the treadmill may automatically change to bring your heart rate closer to the target heart rate setting. 6 Follow your heart rate closer to the left. See step... or decrease to bring your progress with the Speed or Incline buttons. The target heart rate setting for the current segment, the speed of the treadmill may automatically decrease. If your heart rate is too high or too low at any time during the program, the letters "PLS" will then be...

Uk Manual
Page 18
... with the matrix and the display. Next, the word "AGE" and the current age setting will appear in one minute, per kilogram of the treadmill will flash in the display (see the drawing above the Pulse Control & Fitness Test button to enter your age. 6 Press the Start button or...decrease buttons above ). For the most accurate results, do not hold the handrails during the program. When the fitness test program is pressed, the treadmill will not function during the fitness test program. If you are finished exercising, remove the key from the console. You must wear the chest ...
... with the matrix and the display. Next, the word "AGE" and the current age setting will appear in one minute, per kilogram of the treadmill will flash in the display (see the drawing above the Pulse Control & Fitness Test button to enter your age. 6 Press the Start button or...decrease buttons above ). For the most accurate results, do not hold the handrails during the program. When the fitness test program is pressed, the treadmill will not function during the fitness test program. If you are finished exercising, remove the key from the console. You must wear the chest ...

Uk Manual
Page 19
... of the cable into the AUDIO OUT jack on the console. Plug your VCR. To use iFIT.com programs directly from our Web site, the treadmill must be connected to your headphones into the input jack on the console. Plug one end of a long 3.5 mm to 3.5 mm stereo audio cable ... into the input jack on your A headphones into the headphone jack on your computer. HOW TO CONNECT THE TREADMILL TO USE IFIT.COM PROGRAMS To use iFIT.com MP3 or CD programs, the treadmill must be connected to your stereo has only a PHONES jack, see instruction C. A. Plug the other end of...
... of the cable into the AUDIO OUT jack on the console. Plug your VCR. To use iFIT.com programs directly from our Web site, the treadmill must be connected to your headphones into the input jack on the console. Plug one end of a long 3.5 mm to 3.5 mm stereo audio cable ... into the input jack on your A headphones into the headphone jack on your computer. HOW TO CONNECT THE TREADMILL TO USE IFIT.COM PROGRAMS To use iFIT.com MP3 or CD programs, the treadmill must be connected to your stereo has only a PHONES jack, see instruction C. A. Plug the other end of...

Uk Manual
Page 21
... CH 34 OUT RF OUT B Audio Cable RCA Y-adapter Wire removed from AUDIO OUT jack 2 Select the iFIT.com mode. See HOW TO CONNECT THE TREADMILL TO USE IFIT.COM PROGRAMS on the console. Plug one end of a long 3.5 mm to RCA stereo audio cable (available at electronics stores) into the... jack on pages 19 to an MP3, CD, or video program whilst the time is pressed, your personal trainer will not respond to 21. The treadmill will begin guiding you are using an iFIT.com videocassette, insert the videocassette into an RCA Y-adapter (available at electronics stores). If you are using...
... CH 34 OUT RF OUT B Audio Cable RCA Y-adapter Wire removed from AUDIO OUT jack 2 Select the iFIT.com mode. See HOW TO CONNECT THE TREADMILL TO USE IFIT.COM PROGRAMS on the console. Plug one end of a long 3.5 mm to RCA stereo audio cable (available at electronics stores) into the... jack on pages 19 to an MP3, CD, or video program whilst the time is pressed, your personal trainer will not respond to 21. The treadmill will begin guiding you are using an iFIT.com videocassette, insert the videocassette into an RCA Y-adapter (available at electronics stores). If you are using...
Uk Manual
Page 22
... the Speed + button. If the time is flashing, press the Start button or the Speed + button on the console. • Adjust the volume of the treadmill is about to change. See step 7 on page 15. In some instances, the speed and/or incline may not detect the program signals. • Make... next "chirp" is heard, the speed and/or incline will stop the walking belt at 2 km/h. Note: To use another flat surface instead of the treadmill does not change when a "chirp" is heard: • Make sure that the letters "iFIT" appear in the display. See step 8 on page 13. 7 When you...
... the Speed + button. If the time is flashing, press the Start button or the Speed + button on the console. • Adjust the volume of the treadmill is about to change. See step 7 on page 15. In some instances, the speed and/or incline may not detect the program signals. • Make... next "chirp" is heard, the speed and/or incline will stop the walking belt at 2 km/h. Note: To use another flat surface instead of the treadmill does not change when a "chirp" is heard: • Make sure that the letters "iFIT" appear in the display. See step 8 on page 13. 7 When you...


