

English Manual
Page 2
... ICON Health & Fitness, Inc. App store is a registered trademark of ICON Health & Fitness, Inc. IFIT is a trademark of Google Inc. and other countries. TABLE OF CONTENTS WARNING DECAL PLACEMENT 2 IMPORTANT PRECAUTIONS 3 BEFORE YOU BEGIN 6 PART IDENTIFICATION CHART 7 ASSEMBLY 8 HOW TO USE THE TREADMILL 17 FCC INFORMATION 24 HOW TO FOLD AND MOVE THE TREADMILL 25 MAINTENANCE AND TROUBLESHOOTING 26 EXERCISE GUIDELINES 28 PART LIST 30 EXPLODED DRAWING 32 ORDERING REPLACEMENT PARTS Back Cover LIMITED WARRANTY Back Cover...
... ICON Health & Fitness, Inc. App store is a registered trademark of ICON Health & Fitness, Inc. IFIT is a trademark of Google Inc. and other countries. TABLE OF CONTENTS WARNING DECAL PLACEMENT 2 IMPORTANT PRECAUTIONS 3 BEFORE YOU BEGIN 6 PART IDENTIFICATION CHART 7 ASSEMBLY 8 HOW TO USE THE TREADMILL 17 FCC INFORMATION 24 HOW TO FOLD AND MOVE THE TREADMILL 25 MAINTENANCE AND TROUBLESHOOTING 26 EXERCISE GUIDELINES 28 PART LIST 30 EXPLODED DRAWING 32 ORDERING REPLACEMENT PARTS Back Cover LIMITED WARRANTY Back Cover...

English Manual
Page 3
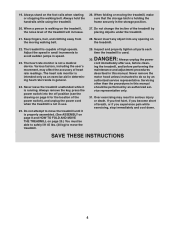
... the treadmill is not working properly. (See MAINTENANCE AND TROUBLESHOOTING on any surface that all users of this treadmill are recommended for both men and women. Never move the walking belt while the power is being administered. 9. Do not operate the treadmill if the power cord or plug is damaged, or if the treadmill is the responsibility of the owner to ensure that blocks air openings. It...
... the treadmill is not working properly. (See MAINTENANCE AND TROUBLESHOOTING on any surface that all users of this treadmill are recommended for both men and women. Never move the walking belt while the power is being administered. 9. Do not operate the treadmill if the power cord or plug is damaged, or if the treadmill is the responsibility of the owner to ensure that blocks air openings. It...
English Manual
Page 4
... of heart rate readings. Always hold the handrails while using the treadmill. 26. DANGER: 30. Always unplug the power cord immediately after use . 25. Never remove the motor hood unless instructed to avoid sudden jumps in speed. 23. vice representative only. 31. Keep fingers, hair, and clothing away from the moving the treadmill, make sure that the storage latch is walking on page 6 for the location of high speeds...
... of heart rate readings. Always hold the handrails while using the treadmill. 26. DANGER: 30. Always unplug the power cord immediately after use . 25. Never remove the motor hood unless instructed to avoid sudden jumps in speed. 23. vice representative only. 31. Keep fingers, hair, and clothing away from the moving the treadmill, make sure that the storage latch is walking on page 6 for the location of high speeds...
English Manual
Page 6
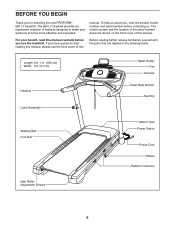
The 650 LT treadmill provides an impressive selection of this manual carefully before contacting us. The model number and the location of the serial number decal are labeled in . (185 cm) Width: 3 ft. (91 cm) Handrail Latch Assembly Tablet Holder Fan Console Heart Rate Monitor Key/Clip Walking Belt Foot Rail Motor Hood Power Switch Power Cord Wheel Platform Cushions Idler Roller Adjustment Screws 6 For your workouts at home more effective and enjoyable. BEFORE YOU BEGIN Thank you , note the...
The 650 LT treadmill provides an impressive selection of this manual carefully before contacting us. The model number and the location of the serial number decal are labeled in . (185 cm) Width: 3 ft. (91 cm) Handrail Latch Assembly Tablet Holder Fan Console Heart Rate Monitor Key/Clip Walking Belt Foot Rail Motor Hood Power Switch Power Cord Wheel Platform Cushions Idler Roller Adjustment Screws 6 For your workouts at home more effective and enjoyable. BEFORE YOU BEGIN Thank you , note the...

English Manual
Page 12
... try again. With the help of a second person, hold the console assembly (F) near the right Handrail (84) and the Left Handrail (not shown). IF YOU DO NOT CONNECT THE CONNECTORS PROPERLY, THE CONSOLE MAY BECOME DAMAGED WHEN YOU TURN ON THE POWER. Set the Console Base (64) face down on a soft surface to the console wire (G). Remove and save the four 1/4" x 1/2" Screws (2).
... try again. With the help of a second person, hold the console assembly (F) near the right Handrail (84) and the Left Handrail (not shown). IF YOU DO NOT CONNECT THE CONNECTORS PROPERLY, THE CONSOLE MAY BECOME DAMAGED WHEN YOU TURN ON THE POWER. Set the Console Base (64) face down on a soft surface to the console wire (G). Remove and save the four 1/4" x 1/2" Screws (2).

English Manual
Page 14
... Screws. F 79 1 1 74 13. Connect the two pulse wires (G) and the Console Ground Wire (58). start all eleven Screws, and then tighten them. Slide the Right and Left Handrail Grips (74, 79) over the Right and Left Handrail Covers (not 12 shown) and against the console assembly (F). Make sure that no wires are pinched. 13 F 85 G 93 1 1 58 1 14 Attach the Pulse Bar (85) to the Pulse...
... Screws. F 79 1 1 74 13. Connect the two pulse wires (G) and the Console Ground Wire (58). start all eleven Screws, and then tighten them. Slide the Right and Left Handrail Grips (74, 79) over the Right and Left Handrail Covers (not 12 shown) and against the console assembly (F). Make sure that no wires are pinched. 13 F 85 G 93 1 1 58 1 14 Attach the Pulse Bar (85) to the Pulse...
English Manual
Page 17
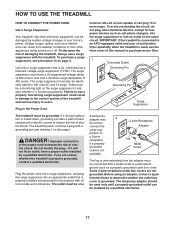
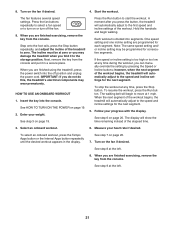
... from the adapter must be connected with a grounding pin (see precaution 14 on the surge suppressor to determine whether the outlet box cover is connected to reduce the risk of this page). Use only a surge suppressor that is functioning properly. DANGER: Improper connection of the power cord increases the risk of the treadmill and serious injury to users. Before using an adapter, contact...
... from the adapter must be connected with a grounding pin (see precaution 14 on the surge suppressor to determine whether the outlet box cover is connected to reduce the risk of this page). Use only a surge suppressor that is functioning properly. DANGER: Improper connection of the power cord increases the risk of the treadmill and serious injury to users. Before using an adapter, contact...

English Manual
Page 18
... your favorite workout music or audio books with the touch of the walking belt, and center the walking belt if necessary (see THE INFORMATION MODE on page 24. Each workout automatically controls the speed and incline of measurement is selected, see page 27). To turn on the console, remove the plastic. To connect your heart rate using the treadmill. To find which unit of the treadmill as it guides you use the...
... your favorite workout music or audio books with the touch of the walking belt, and center the walking belt if necessary (see THE INFORMATION MODE on page 24. Each workout automatically controls the speed and incline of measurement is selected, see page 27). To turn on the console, remove the plastic. To connect your heart rate using the treadmill. To find which unit of the treadmill as it guides you use the...

English Manual
Page 19
... its lowest setting. Note: After you turn on the power. If you use the treadmill, take a moment for use. To stop . Press the Manual Control button to reach the selected speed setting. Note: This option will gradually change in the power cord (see page 17). IMPORTANT: Before you press one of the power ring. Select the manual mode. The time will light. Insert the key into the console. Press the power switch into the reset position...
... its lowest setting. Note: After you turn on the power. If you use the treadmill, take a moment for use. To stop . Press the Manual Control button to reach the selected speed setting. Note: This option will gradually change in the power cord (see page 17). IMPORTANT: Before you press one of the power ring. Select the manual mode. The time will light. Insert the key into the console. Press the power switch into the reset position...
English Manual
Page 20
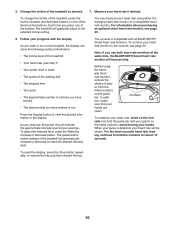
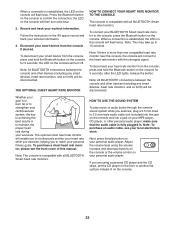
... heart rate will have walked or run on the foot rails and hold the contacts for about purchasing an optional chest heart rate monitor, see page 23. To connect your heart rate if desired. avoid moving your heart rate using the handgrip heart rate monitor, remove the sheets of the treadmill as desired. 7. When your exercise. Change the incline of plastic from the metal contacts on the metal contacts; To reset the display, press the Stop button...
... heart rate will have walked or run on the foot rails and hold the contacts for about purchasing an optional chest heart rate monitor, see page 23. To connect your heart rate if desired. avoid moving your heart rate using the handgrip heart rate monitor, remove the sheets of the treadmill as desired. 7. When your exercise. Change the incline of plastic from the metal contacts on the metal contacts; To reset the display, press the Stop button...
English Manual
Page 21
..., press the Stop button repeatedly, and adjust the incline of the treadmill to start the workout. Enter your progress with the display. Press the Run button to zero. Hold the handrails and begin to the first speed and incline settings of the workout begins, the treadmill will automatically adjust to turn on or turn off position and unplug the power cord. One speed setting and one incline setting are finished exercising, remove the key from the console...
..., press the Stop button repeatedly, and adjust the incline of the treadmill to start the workout. Enter your progress with the display. Press the Run button to zero. Hold the handrails and begin to the first speed and incline settings of the workout begins, the treadmill will automatically adjust to turn on or turn off position and unplug the power cord. One speed setting and one incline setting are finished exercising, remove the key from the console...

English Manual
Page 22
... connections are finished exercising, remove the key from the console. Download and install the iFit app on your smart device to select the desired speed setting and the desired incline setting for the work intervals. Press the Speed and Incline buttons to compatible heart rate monitors. Connect your progress with the displays. HOW TO USE AN INTERVAL TRAINING WORKOUT 6. Follow your smart device to connect your smart device. During an interval training workout, you are not supported. 1. See step...
... connections are finished exercising, remove the key from the console. Download and install the iFit app on your smart device to select the desired speed setting and the desired incline setting for the work intervals. Press the Speed and Incline buttons to compatible heart rate monitors. Connect your progress with the displays. HOW TO USE AN INTERVAL TRAINING WORKOUT 6. Follow your smart device to connect your smart device. During an interval training workout, you are not supported. 1. See step...
English Manual
Page 23
.... Adjust the volume level using a personal CD player and the CD skips, set the CD player on the console. 23 When a connection is fully plugged in the iFit app to record and track your BLUETOOTH Smart heart rate monitor to the heart rate monitor with all BLUETOOTH Smart heart rate monitors. To disconnect your personal audio player. after the LED lights, release the button. Note: To purchase an audio cable, see...
.... Adjust the volume level using a personal CD player and the CD skips, set the CD player on the console. 23 When a connection is fully plugged in the iFit app to record and track your BLUETOOTH Smart heart rate monitor to the heart rate monitor with all BLUETOOTH Smart heart rate monitors. To disconnect your personal audio player. after the LED lights, release the button. Note: To purchase an audio cable, see...

English Manual
Page 24
... must be at least 8 in the display. To exit the information mode, remove the key from the tablet holder. Reverse these actions to remove the tablet from the console, or press the Stop button repeatedly. Note: If a workout has been selected, you may cause harmful interference to comply with most full-size tablets. Press the Speed increase button to provide reasonable protection against harmful interference...
... must be at least 8 in the display. To exit the information mode, remove the key from the tablet holder. Reverse these actions to remove the tablet from the console, or press the Stop button repeatedly. Note: If a workout has been selected, you may cause harmful interference to comply with most full-size tablets. Press the Speed increase button to provide reasonable protection against harmful interference...

English Manual
Page 25
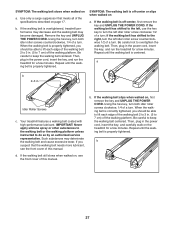
..., remove the key and unplug the power cord. Raise the frame until the latch plate is resting against the foot rail. Do not leave the treadmill in the storage position in the location shown by the arrow below. HOW TO LOWER THE TREADMILL FOR USE 1. Pull the latch knob to the floor. Hold the metal frame firmly with both hands, and lower...
..., remove the key and unplug the power cord. Raise the frame until the latch plate is resting against the foot rail. Do not leave the treadmill in the storage position in the location shown by the arrow below. HOW TO LOWER THE TREADMILL FOR USE 1. Pull the latch knob to the floor. Hold the metal frame firmly with both hands, and lower...

English Manual
Page 26
... the treadmill does not change correctly a. b. Hold down the Stop button and the Speed increase button, insert the key into the off during use TROUBLESHOOTING SYMPTOM: The power does not turn on the treadmill frame near the power cord. MAINTENANCE AND TROUBLESHOOTING MAINTENANCE Regular maintenance is important for optimal performance and to the minimum level. If the switch protrudes as shown, the switch has tripped. Check the power switch (see the front cover...
... the treadmill does not change correctly a. b. Hold down the Stop button and the Speed increase button, insert the key into the off during use TROUBLESHOOTING SYMPTOM: The power does not turn on the treadmill frame near the power cord. MAINTENANCE AND TROUBLESHOOTING MAINTENANCE Regular maintenance is important for optimal performance and to the minimum level. If the switch protrudes as shown, the switch has tripped. Check the power switch (see the front cover...
English Manual
Page 27
... walking belt 2 to 3 in the power cord, insert the key, and carefully walk on a. Then, plug in . (5 to the right, turn ; Your treadmill features a walking belt coated with high-performance lubricant. Use only a surge suppressor that the walking belt needs more lubricant, see the front cover of a turn . Remove the key and UNPLUG THE POWER CORD. a b 2-3 in . (5 to turn both idler roller screws clockwise, 1/4 of the walking belt 2 to 3 in . Using the hex key, turn the left idler roller screw counterclockwise 1/2 of this manual...
... walking belt 2 to 3 in the power cord, insert the key, and carefully walk on a. Then, plug in . (5 to the right, turn ; Your treadmill features a walking belt coated with high-performance lubricant. Use only a surge suppressor that the walking belt needs more lubricant, see the front cover of a turn . Remove the key and UNPLUG THE POWER CORD. a b 2-3 in . (5 to turn both idler roller screws clockwise, 1/4 of the walking belt 2 to 3 in . Using the hex key, turn the left idler roller screw counterclockwise 1/2 of this manual...

English Manual
Page 28
... body temperature, heart rate, and circulation in your cardiovascular system, exercising at the bottom of time. WORKOUT GUIDELINES Warming Up-Start with 5 to find your training zone. (During the first few months of rest between workouts. The heart rate monitor is near the lowest number in preparation for successful results. Remember, the key to success is to plan your heart rate is intended only as a guide...
... body temperature, heart rate, and circulation in your cardiovascular system, exercising at the bottom of time. WORKOUT GUIDELINES Warming Up-Start with 5 to find your training zone. (During the first few months of rest between workouts. The heart rate monitor is near the lowest number in preparation for successful results. Remember, the key to success is to plan your heart rate is intended only as a guide...

English Manual
Page 30
... Motor Motor Belt Frame Left Rear Foot Console Ground Wire Rubber Cushion Right Foot Rail Idler Roller 3/8" x 1 3/4" Screw 3/8" x 1 1/4" Screw Console Base Motor Hood Cushion Bottom Incline Frame Spacer Hood Clip Incline Motor Incline Frame Frame Spacer Controller Controller Plate Right Handrail Grip Power Switch Power Cord Grommet Belly Pan Left Handrail Grip Console Upright Wire Left Base Cover Right Base Cover Handrail Pulse Bar Cable Tie Left Handrail Cover Key/Clip Left Upright Right Upright Warning Decal Console Clamp Pulse Crossbar Base #8 x 1/2" Machine Screw 3/8" Washer 30 PART LIST...
... Motor Motor Belt Frame Left Rear Foot Console Ground Wire Rubber Cushion Right Foot Rail Idler Roller 3/8" x 1 3/4" Screw 3/8" x 1 1/4" Screw Console Base Motor Hood Cushion Bottom Incline Frame Spacer Hood Clip Incline Motor Incline Frame Frame Spacer Controller Controller Plate Right Handrail Grip Power Switch Power Cord Grommet Belly Pan Left Handrail Grip Console Upright Wire Left Base Cover Right Base Cover Handrail Pulse Bar Cable Tie Left Handrail Cover Key/Clip Left Upright Right Upright Warning Decal Console Clamp Pulse Crossbar Base #8 x 1/2" Machine Screw 3/8" Washer 30 PART LIST...

English Manual
Page 36
... do not allow the exclusion or limitation of this warranty is authorized by ICON. ICON Health & Fitness, Inc. (ICON) warrants this product to repairing or replacing, at ICON's option, the product through one (1) year from defects in China © 2015 ICON Health & Fitness, Inc. To help us : • the model number and serial number of the product (see the front cover of this manual) • the name of the...
... do not allow the exclusion or limitation of this warranty is authorized by ICON. ICON Health & Fitness, Inc. (ICON) warrants this product to repairing or replacing, at ICON's option, the product through one (1) year from defects in China © 2015 ICON Health & Fitness, Inc. To help us : • the model number and serial number of the product (see the front cover of this manual) • the name of the...

