

User Manual
Page 2
® TABLE OF CONTENTS IMPORTANT PRECAUTIONS 3 BEFORE YOU BEGIN 5 ASSEMBLY 6 OPERATION AND ADJUSTMENT 8 HOW TO FOLD AND MOVE THE TREADMILL 18 TROUBLE-SHOOTING 19 CONDITIONING GUIDELINES 21 PART LIST 22 HOW TO ORDER REPLACEMENT PARTS Back Cover Note: An EXPLODED DRAWING is attached in the centre of this manual. 2
® TABLE OF CONTENTS IMPORTANT PRECAUTIONS 3 BEFORE YOU BEGIN 5 ASSEMBLY 6 OPERATION AND ADJUSTMENT 8 HOW TO FOLD AND MOVE THE TREADMILL 18 TROUBLE-SHOOTING 19 CONDITIONING GUIDELINES 21 PART LIST 22 HOW TO ORDER REPLACEMENT PARTS Back Cover Note: An EXPLODED DRAWING is attached in the centre of this manual. 2

User Manual
Page 3
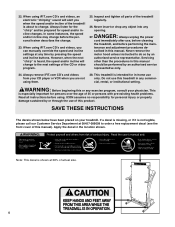
....). 9. When folding or moving the treadmill, make sure that the storage latch is not in a garage or covered patio, or near water. 16. Keep the treadmill indoors, away from heated surfaces. 3. Various factors, including the user's movement, may affect the accuracy of heart rate readings. Always remove the key, unplug the power cord and move the walking belt whilst the power is turned off position when the treadmill is fully...
....). 9. When folding or moving the treadmill, make sure that the storage latch is not in a garage or covered patio, or near water. 16. Keep the treadmill indoors, away from heated surfaces. 3. Various factors, including the user's movement, may affect the accuracy of heart rate readings. Always remove the key, unplug the power cord and move the walking belt whilst the power is turned off position when the treadmill is fully...
User Manual
Page 4
... it is intended for speed and/or incline changes. Always listen for the "chirp" and be performed by pressing the speed and incline buttons. Never remove the motor hood unless instructed to change . 23. scribed in this product. Always remove iFIT.com CD's and videos from your treadmill. Apply the decal in any opening. Always unplug the power cord immediately after use only. Do not use of the treadmill is about to...
... it is intended for speed and/or incline changes. Always listen for the "chirp" and be performed by pressing the speed and incline buttons. Never remove the motor hood unless instructed to change . 23. scribed in this product. Always remove iFIT.com CD's and videos from your treadmill. Apply the decal in any opening. Always unplug the power cord immediately after use only. Do not use of the treadmill is about to...
User Manual
Page 5
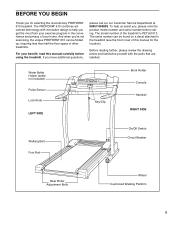
... model number and serial number before using the treadmill. If you for the location). The model number of your benefit, read this manual for selecting the revolutionary PROFORM® 610 treadmill. Water Bottle Holder (bottle not included) Pulse Sensor Lock Knob LEFT SIDE Key/Clip Book Holder Console Handrail RIGHT SIDE Walking Belt Foot Rail On/Off Switch Circuit Breaker Rear Roller Adjustment Bolts Wheel Cushioned Walking Platform 5 To help you get the most from your exercise program...
... model number and serial number before using the treadmill. If you for the location). The model number of your benefit, read this manual for selecting the revolutionary PROFORM® 610 treadmill. Water Bottle Holder (bottle not included) Pulse Sensor Lock Knob LEFT SIDE Key/Clip Book Holder Console Handrail RIGHT SIDE Walking Belt Foot Rail On/Off Switch Circuit Breaker Rear Roller Adjustment Bolts Wheel Cushioned Walking Platform 5 To help you get the most from your exercise program...
User Manual
Page 6
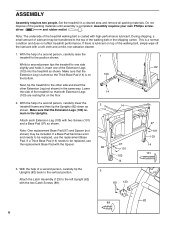
.... If a Thick Base Pad (14) needs to the top of the walking belt or the shipping carton. Set the treadmill in the Uprights. Assembly requires your own Phillips screw- During shipping, a small amount of a second person, carefully lower the treadmill frame and then tip the Uprights (82) down as shown. Make sure that the Extension Leg is turned so the Thick Base Pad...
.... If a Thick Base Pad (14) needs to the top of the walking belt or the shipping carton. Set the treadmill in the Uprights. Assembly requires your own Phillips screw- During shipping, a small amount of a second person, carefully lower the treadmill frame and then tip the Uprights (82) down as shown. Make sure that the Extension Leg is turned so the Thick Base Pad...
User Manual
Page 7
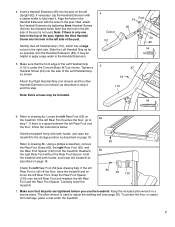
... 18. Hold the treadmill firmly with a rubber mallet to drawing 6b. Reattach the right Rear Foot without the Rear Foot Spacer. Note: Extra screws may be included. 4 Cutout 110 54 Post 85 54 82 54 5 87 54 110 54 6. Refer to fully insert it. If the left Rear Foot is not used to adjust the walking belt (see drawing...
... 18. Hold the treadmill firmly with a rubber mallet to drawing 6b. Reattach the right Rear Foot without the Rear Foot Spacer. Note: Extra screws may be included. 4 Cutout 110 54 Post 85 54 82 54 5 87 54 110 54 6. Refer to fully insert it. If the left Rear Foot is not used to adjust the walking belt (see drawing...
User Manual
Page 8
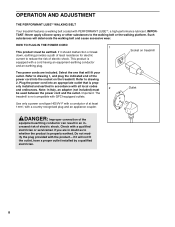
... on treadmill Two power cords are in an increased risk of at least 1mm2, with PERFORMANT LUBETM, a high-performance lubricant. DANGER: Improper connection of the equipment-earthing conductor can result in doubt as to drawing 1, and plug the indicated end of electric shock. Such substances will fit your outlet. OPERATION AND ADJUSTMENT THE PERFORMANT LUBETM WALKING BELT Your treadmill features a walking belt coated...
... on treadmill Two power cords are in an increased risk of at least 1mm2, with PERFORMANT LUBETM, a high-performance lubricant. DANGER: Improper connection of the equipment-earthing conductor can result in doubt as to drawing 1, and plug the indicated end of electric shock. Such substances will fit your outlet. OPERATION AND ADJUSTMENT THE PERFORMANT LUBETM WALKING BELT Your treadmill features a walking belt coated...

User Manual
Page 9
... water bottle holder. Video programs offer the same benefits as a personal trainer guides you through every step of the console, follow the steps beginning on page 10. Or, use the manual mode of your workout. DIAGRAM OF THE CONSOLE Manual Indicator Displays LED Track Displays iFIT.com Indicator Incline Mode Buttons Button Speed Buttons Key Clip Start Stop Button Button CAUTION: Before operating the console, read the following precautions. • Do not stand on the walking belt when turning on the power. • Always...
... water bottle holder. Video programs offer the same benefits as a personal trainer guides you through every step of the console, follow the steps beginning on page 10. Or, use the manual mode of your workout. DIAGRAM OF THE CONSOLE Manual Indicator Displays LED Track Displays iFIT.com Indicator Incline Mode Buttons Button Speed Buttons Key Clip Start Stop Button Button CAUTION: Before operating the console, read the following precautions. • Do not stand on the walking belt when turning on the power. • Always...
User Manual
Page 10
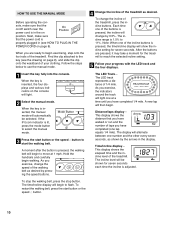
... plugged in (see the drawing on the console will begin to start button or the speed v button. 10 This display shows the Arrow distance that the power cord is adjusted. This display shows the elapsed time and the incline level of 1/4 mile. When the key is pressed, the walking belt will light. 2 Select the manual mode. The LED track represents a distance of the treadmill. The incline level will then begin walking. To stop the walking belt, press the stop button. To change...
... plugged in (see the drawing on the console will begin to start button or the speed v button. 10 This display shows the Arrow distance that the power cord is adjusted. This display shows the elapsed time and the incline level of 1/4 mile. When the key is pressed, the walking belt will light. 2 Select the manual mode. The LED track represents a distance of the treadmill. The incline level will then begin walking. To stop the walking belt, press the stop button. To change...
User Manual
Page 11
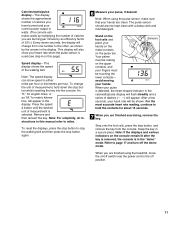
... speed ∆ button until the desired unit of the walking belt. Your palms must be touching the lower contacts- Speed display-This display shows the speed of measurement is in the "demo" mode. Note: The speed display can show your heart rate when the pulse sensor is used (see step 6 on this manual refer to page 17 and turn off the demo mode. Note: When using the treadmill, move the on the console remain lit after the key...
... speed ∆ button until the desired unit of the walking belt. Your palms must be touching the lower contacts- Speed display-This display shows the speed of measurement is in the "demo" mode. Note: The speed display can show your heart rate when the pulse sensor is used (see step 6 on this manual refer to page 17 and turn off the demo mode. Note: When using the treadmill, move the on the console remain lit after the key...
User Manual
Page 14
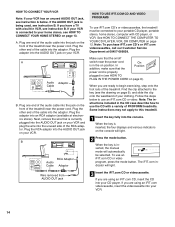
... connected to use an iFIT.com CD or video. A. Plug one end of the audio cable into an RCA adaptor (available at 08457-089009. IN VIDEO AUDIO IN CH 34 OUT RF OUT RCA Adaptor Audio Cable Adaptor HOW TO USE IFIT.COM CD AND VIDEO PROGRAMS To use an iFIT.com CD or video program, press the mode button. Follow the steps below . Note: The instructions included in (see instruction B. When the key is properly plugged...
... connected to use an iFIT.com CD or video. A. Plug one end of the audio cable into an RCA adaptor (available at 08457-089009. IN VIDEO AUDIO IN CH 34 OUT RF OUT RCA Adaptor Audio Cable Adaptor HOW TO USE IFIT.COM CD AND VIDEO PROGRAMS To use an iFIT.com CD or video program, press the mode button. Follow the steps below . Note: The instructions included in (see instruction B. When the key is properly plugged...

User Manual
Page 15
... audio cable is properly connected, that the time/incline display is flashing. Note: If the speed or incline of the CD or video program. See step 5 on the console. 4 Press the PLAY button on the console. If the speed or incline settings are too high or too low, you are finished using your CD player or VCR. The treadmill will begin to the off the demo mode. The program can manually override the settings...
... audio cable is properly connected, that the time/incline display is flashing. Note: If the speed or incline of the CD or video program. See step 5 on the console. 4 Press the PLAY button on the console. If the speed or incline settings are too high or too low, you are finished using your CD player or VCR. The treadmill will begin to the off the demo mode. The program can manually override the settings...

User Manual
Page 16
... sure that the power cord is inserted, the four displays and various indicators on the console will light. 2 Press the mode button. Hold the handrails, step onto the walking belt, and begin to select a program. You can play iFIT.com audio and video programs directly from our internet site. 1 Insert the key fully into the console. To use another program, press the stop and the time/incline display will change to the next settings of additional...
... sure that the power cord is inserted, the four displays and various indicators on the console will light. 2 Press the mode button. Hold the handrails, step onto the walking belt, and begin to select a program. You can play iFIT.com audio and video programs directly from our internet site. 1 Insert the key fully into the console. To use another program, press the stop and the time/incline display will change to the next settings of additional...

User Manual
Page 17
... miles that the walking belt has moved. The chest pulse sensor offers hands-free operation and continuously monitors your heart rate during your progress with the LED track and the four displays. When the information mode is in the demo mode, the power cord can be plugged in the "demo" mode. To exit the information mode, remove the key from miles per hour. See step 6 on and turn on page 11. 10 When the program is displayed in the speed display. The time/incline display...
... miles that the walking belt has moved. The chest pulse sensor offers hands-free operation and continuously monitors your heart rate during your progress with the LED track and the four displays. When the information mode is in the demo mode, the power cord can be plugged in the "demo" mode. To exit the information mode, remove the key from miles per hour. See step 6 on and turn on page 11. 10 When the program is displayed in the speed display. The time/incline display...

User Manual
Page 19
... follow the steps listed. Remove the screws from the hood and a carefully remove the hood. Re-attach the hood, and run , please call our Customer Service Department at 08457-089009. Tripped d On Position Reset PROBLEM: The power turns off switch located on the console does not function properly SOLUTION: a. Top Retighten the Screw. c. To reset the circuit breaker, wait for a correct speed reading. Check the fuse in the power cord. Turn the 76...
... follow the steps listed. Remove the screws from the hood and a carefully remove the hood. Re-attach the hood, and run , please call our Customer Service Department at 08457-089009. Tripped d On Position Reset PROBLEM: The power turns off switch located on the console does not function properly SOLUTION: a. Top Retighten the Screw. c. To reset the circuit breaker, wait for a correct speed reading. Check the fuse in the power cord. Turn the 76...

User Manual
Page 20
... incline. Using the allen wrench, turn both rear roller adjustment bolts clockwise, 1/4 of a turn each side of the incline buttons. If the walking belt has shifted to overtighten the walking belt. Plug in the console, press one of the walking belt 7 to 10 cm (3 to 4 in the power cord, insert the key and carefully walk on the treadmill for a few minutes. Repeat until the walking belt is centred. move the key and UNPLUG THE POWER CORD. Using the a allen wrench, turn both rear roller adjustment bolts...
... incline. Using the allen wrench, turn both rear roller adjustment bolts clockwise, 1/4 of a turn each side of the incline buttons. If the walking belt has shifted to overtighten the walking belt. Plug in the console, press one of the walking belt 7 to 10 cm (3 to 4 in the power cord, insert the key and carefully walk on the treadmill for a few minutes. Repeat until the walking belt is centred. move the key and UNPLUG THE POWER CORD. Using the a allen wrench, turn both rear roller adjustment bolts...
User Manual
Page 21
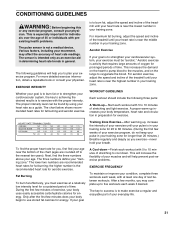
... health problems. The pulse sensor is to strengthen your exercise must exercise at least one day of the treadmill until your heart rate is to the nearest ten years). For maximum fat burning, adjust the speed and incline of time. the higher number is intended only as you , first find the three numbers above your physician. For aerobic exercise, adjust the speed and incline of the treadmill until your heart rate...
... health problems. The pulse sensor is to strengthen your exercise must exercise at least one day of the treadmill until your heart rate is to the nearest ten years). For maximum fat burning, adjust the speed and incline of time. the higher number is intended only as you , first find the three numbers above your physician. For aerobic exercise, adjust the speed and incline of the treadmill until your heart rate...

User Manual
Page 22
... 1 Reed Switch Clip 23 1 Motor/Controller Wire 24 1 Controller 25 1 Electronics Bracket 26 1 Circuit Breaker 27 1 Receptacle 28 1 Tension Bolt Sleeve 29 1 On/Off Switch 30 1 Power Inlet Bracket 31 1 Incline Leg 32 2 Frame Pivot Bolt 33 2 Frame Pivot Spacer 34 1 Upright Wire Harness 35 1 Front Roller Adj. Qty. Description Key No. Bolt Motor Latch Decal Rear Platform Screw Electronics Screw Catch Walking Platform 8" Cable Tie Jack Motor Tension Bolt Foot Rail Insert Small Screw Console 2-lb. (1-kg) Weight...
... 1 Reed Switch Clip 23 1 Motor/Controller Wire 24 1 Controller 25 1 Electronics Bracket 26 1 Circuit Breaker 27 1 Receptacle 28 1 Tension Bolt Sleeve 29 1 On/Off Switch 30 1 Power Inlet Bracket 31 1 Incline Leg 32 2 Frame Pivot Bolt 33 2 Frame Pivot Spacer 34 1 Upright Wire Harness 35 1 Front Roller Adj. Qty. Description Key No. Bolt Motor Latch Decal Rear Platform Screw Electronics Screw Catch Walking Platform 8" Cable Tie Jack Motor Tension Bolt Foot Rail Insert Small Screw Console 2-lb. (1-kg) Weight...

User Manual
Page 23
... Pulse Bar Bolt Pulse Bar Washer Pulse Bar Left Handrail Grip Audio Wire Nut Right Handrail Grip Motor Isolator Plate Motor Square Bushing Filter Console Base Bottom Upright Endcap Choke Bracket Base Pad Spacer Rear Foot Spacer iFIT.com CD 3-lb. (1.3-kg) Weight Latch Assembly Belt Guide Screw 125 1 126* 2 127 1 128 1 #1 #1 #1 #1 #1 #1 #1 #1 #1 #1 #1 #1 #1 #1 Hand Pulse Wire Extension Leg Assembly Belly Pan Foot Foam Tape 8" White Wire, 2F 10" White Wire, 2F 14" White Wire, 2F 4" Black Wire, M/F 8" Blue Wire, 2F 4" Blue Wire...
... Pulse Bar Bolt Pulse Bar Washer Pulse Bar Left Handrail Grip Audio Wire Nut Right Handrail Grip Motor Isolator Plate Motor Square Bushing Filter Console Base Bottom Upright Endcap Choke Bracket Base Pad Spacer Rear Foot Spacer iFIT.com CD 3-lb. (1.3-kg) Weight Latch Assembly Belt Guide Screw 125 1 126* 2 127 1 128 1 #1 #1 #1 #1 #1 #1 #1 #1 #1 #1 #1 #1 #1 #1 Hand Pulse Wire Extension Leg Assembly Belly Pan Foot Foam Tape 8" White Wire, 2F 10" White Wire, 2F 14" White Wire, 2F 4" Black Wire, M/F 8" Blue Wire, 2F 4" Blue Wire...

User Manual
Page 24
... information: • The MODEL NUMBER OF THE PRODUCT (PETL61010) • The NAME OF THE PRODUCT (PROFORM® 610 treadmill) • The SERIAL NUMBER OF THE PRODUCT (see the front cover of this product, or if you need to order replacement parts, call the ICON Health & Fitness Ltd. HOW TO ORDER REPLACEMENT PARTS If you encounter any difficulties with this manual) • The KEY NUMBER AND DESCRIPTION OF THE PART(S) (see the PART LIST...
... information: • The MODEL NUMBER OF THE PRODUCT (PETL61010) • The NAME OF THE PRODUCT (PROFORM® 610 treadmill) • The SERIAL NUMBER OF THE PRODUCT (see the front cover of this product, or if you need to order replacement parts, call the ICON Health & Fitness Ltd. HOW TO ORDER REPLACEMENT PARTS If you encounter any difficulties with this manual) • The KEY NUMBER AND DESCRIPTION OF THE PART(S) (see the PART LIST...


