
English Manual
Page 1
... DIRECT TO OUR TOLL-FREE CUSTOMER HOT LINE. MST CAUTION Read all precautions and instructions in this manual before using this manual for reference. The trained technicians on our Customer Hot Line will guarantee complete satisfaction through direct assistance from our factory. Save this equipment. PFTL59190 Serial No. Serial Number Decal QUESTIONS? Find the serial number in the space above for future reference. ® USER'S MANUAL...
... DIRECT TO OUR TOLL-FREE CUSTOMER HOT LINE. MST CAUTION Read all precautions and instructions in this manual before using this manual for reference. The trained technicians on our Customer Hot Line will guarantee complete satisfaction through direct assistance from our factory. Save this equipment. PFTL59190 Serial No. Serial Number Decal QUESTIONS? Find the serial number in the space above for future reference. ® USER'S MANUAL...
English Manual
Page 2
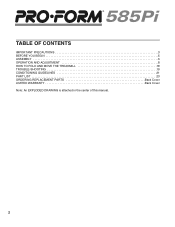
® TABLE OF CONTENTS IMPORTANT PRECAUTIONS 3 BEFORE YOU BEGIN 5 ASSEMBLY 6 OPERATION AND ADJUSTMENT 8 HOW TO FOLD AND MOVE THE TREADMILL 18 TROUBLE-SHOOTING 19 CONDITIONING GUIDELINES 21 PART LIST 23 ORDERING REPLACEMENT PARTS Back Cover LIMITED WARRANTY Back Cover Note: An EXPLODED DRAWING is attached in the center of this manual. 2
® TABLE OF CONTENTS IMPORTANT PRECAUTIONS 3 BEFORE YOU BEGIN 5 ASSEMBLY 6 OPERATION AND ADJUSTMENT 8 HOW TO FOLD AND MOVE THE TREADMILL 18 TROUBLE-SHOOTING 19 CONDITIONING GUIDELINES 21 PART LIST 23 ORDERING REPLACEMENT PARTS Back Cover LIMITED WARRANTY Back Cover Note: An EXPLODED DRAWING is attached in the center of this manual. 2
English Manual
Page 3
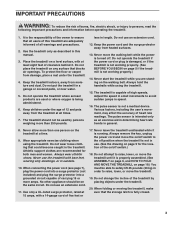
... order to raise, lower, or move the treadmill until it is running. Always remove the key, unplug the power cord and move the walking belt while the power is intended only as described in speed. 16. The pulse sensor is turned off switch.) 18. Do not wear loose clothing that the storage latch is not working properly.) 14. Do not operate the treadmill if the power cord or plug is damaged, or if...
... order to raise, lower, or move the treadmill until it is running. Always remove the key, unplug the power cord and move the walking belt while the power is intended only as described in speed. 16. The pulse sensor is turned off switch.) 18. Do not wear loose clothing that the storage latch is not working properly.) 14. Do not operate the treadmill if the power cord or plug is damaged, or if...
English Manual
Page 4
... pre-existing health problems. Read all parts of this treadmill in -home use , before cleaning the treadmill, and before the personal trainer describes the change to do so by or through the use this product. Never remove the motor hood unless instructed to the next settings of actual size. 4 Always remove iFit.com CD's and videos from your CD player or VCR when you when the speed and/or incline of...
... pre-existing health problems. Read all parts of this treadmill in -home use , before cleaning the treadmill, and before the personal trainer describes the change to do so by or through the use this product. Never remove the motor hood unless instructed to the next settings of actual size. 4 Always remove iFit.com CD's and videos from your CD player or VCR when you when the speed and/or incline of...
English Manual
Page 5
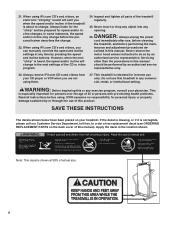
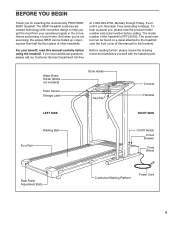
... included) Pulse Sensor Storage Latch Book Holder Key/Clip Console Handrail LEFT SIDE RIGHT SIDE Walking Belt Foot Rail On/Off Switch Circuit Breaker Front Wheel Rear Roller Adjustment Bolts Cushioned Walking Platform Power Cord 5 For your exercise program in the convenience and privacy of the treadmill is PFTL59190. until 6 p.m. Mountain Time (excluding holidays). If you for the location). To help you 're not exercising, the unique 585Pi can be folded up, requiring...
... included) Pulse Sensor Storage Latch Book Holder Key/Clip Console Handrail LEFT SIDE RIGHT SIDE Walking Belt Foot Rail On/Off Switch Circuit Breaker Front Wheel Rear Roller Adjustment Bolts Cushioned Walking Platform Power Cord 5 For your exercise program in the convenience and privacy of the treadmill is PFTL59190. until 6 p.m. Mountain Time (excluding holidays). If you for the location). To help you 're not exercising, the unique 585Pi can be folded up, requiring...
English Manual
Page 6
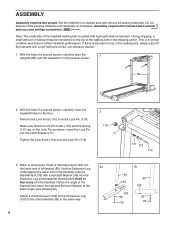
... 2. Press a Handrail Insert (102) into the Latch Bracket (77). Tighten the Lock Knob (110) onto the Lock Pin (114). 2 110 77 111 112 114 3. Hold an Extension Leg 3a (103) against the lower end of the walking belt or the shipping carton. Notice the angle of the packing materials until the treadmill is lubricant on the Lock Pin as shown. Set the treadmill in...
... 2. Press a Handrail Insert (102) into the Latch Bracket (77). Tighten the Lock Knob (110) onto the Lock Pin (114). 2 110 77 111 112 114 3. Hold an Extension Leg 3a (103) against the lower end of the walking belt or the shipping carton. Notice the angle of the packing materials until the treadmill is lubricant on the Lock Pin as shown. Set the treadmill in...

English Manual
Page 8
... a grounding plug that looks like extending from other substances to the walking belt or the walking platform. Contact a qualified electrician to determine if the outlet box cover is used only until a properly grounded outlet (drawing 1) can result from weather conditions or from the adapter must be installed by sudden voltage changes in your home's power. This product must be used to connect the...
... a grounding plug that looks like extending from other substances to the walking belt or the walking platform. Contact a qualified electrician to determine if the outlet box cover is used only until a properly grounded outlet (drawing 1) can result from weather conditions or from the adapter must be installed by sudden voltage changes in your home's power. This product must be used to connect the...
English Manual
Page 9
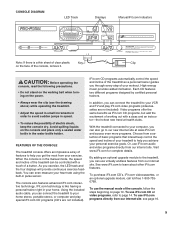
... included). CONSOLE DIAGRAM LED Track Displays Manual/iFit.com Indicators Note: If there is in pulse sensor. By adding an optional upgrade module to the treadmill, you can connect the treadmill to help you can even measure your workout. To use iFit.com programs directly from a selection of basic programs that interactively control the speed and incline of your treadmill to help you exercise, the LED track and the four displays will provide continuous exercise feedback...
... included). CONSOLE DIAGRAM LED Track Displays Manual/iFit.com Indicators Note: If there is in pulse sensor. By adding an optional upgrade module to the treadmill, you can connect the treadmill to help you can even measure your workout. To use iFit.com programs directly from a selection of basic programs that interactively control the speed and incline of your treadmill to help you exercise, the LED track and the four displays will provide continuous exercise feedback...
English Manual
Page 10
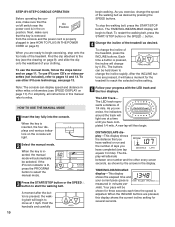
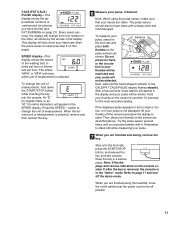
... stop the walking belt, press the START/STOP button. To change the speed of the treadmill. The LED track represents a distance of the treadmill, press the INCLINE buttons. DISTANCE/LAPS dis- The dis- Your pace will alternate between one number and the other iFit.com technology, see HOW TO PLUG IN THE POWER CORD on On Position position. To use other every seven seconds, as shown by 0.5%. When the key is adjusted. The TIME/INCLINE/MIN-MILE display...
... stop the walking belt, press the START/STOP button. To change the speed of the treadmill. The LED track represents a distance of the treadmill, press the INCLINE buttons. DISTANCE/LAPS dis- The dis- Your pace will alternate between one number and the other iFit.com technology, see HOW TO PLUG IN THE POWER CORD on On Position position. To use other every seven seconds, as shown by 0.5%. When the key is adjusted. The TIME/INCLINE/MIN-MILE display...
English Manual
Page 11
... sensors as shown. Step onto the foot rails, press the START/STOP button, and remove the key from one number to reset. This display will not be too high or too low, or if your pulse is not displayed, lift your pulse, if desired. Press the SPEED L button to change the unit of measurement is used (see FAT BURNING on the pulse sensors as described above. To measure your heart rate when the pulse sensor...
... sensors as shown. Step onto the foot rails, press the START/STOP button, and remove the key from one number to reset. This display will not be too high or too low, or if your pulse is not displayed, lift your pulse, if desired. Press the SPEED L button to change the unit of measurement is used (see FAT BURNING on the pulse sensors as described above. To measure your heart rate when the pulse sensor...
English Manual
Page 14
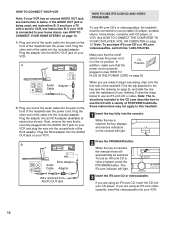
... the audio cable into the jack on the front of the treadmill near the power cord is in (see HOW TO CONNECT YOUR HOME STEREO on the front of the treadmill near the power cord. Plug the adapter into the console. OUT B ANT. Some instructions may not apply to your home stereo, see HOW TO PLUG IN THE POWER CORD on page 8). To use an iFit.com CD or video. A. Plug the...
... the audio cable into the jack on the front of the treadmill near the power cord is in (see HOW TO CONNECT YOUR HOME STEREO on the front of the treadmill near the power cord. Plug the adapter into the console. OUT B ANT. Some instructions may not apply to your home stereo, see HOW TO PLUG IN THE POWER CORD on page 8). To use an iFit.com CD or video. A. Plug the...
English Manual
Page 15
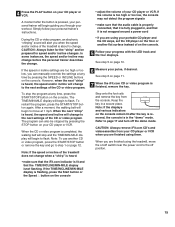
.../off switch near the power cord to flash. If the TIME/INCLINE/MIN-MILE display is heard, the speed and/or incline will begin to the off the demo mode. Keep the key in the "demo" mode. 4 Press the PLAY button on your personal trainer's instructions. CAUTION: Always listen for speed and/or incline changes. The TIME/MIN-MILE display will change . After a moment, the walking belt will change . When the next "chirp" is finished, remove the key...
.../off switch near the power cord to flash. If the TIME/INCLINE/MIN-MILE display is heard, the speed and/or incline will begin to the off the demo mode. Keep the key in the "demo" mode. 4 Press the PLAY button on your personal trainer's instructions. CAUTION: Always listen for speed and/or incline changes. The TIME/MIN-MILE display will change . After a moment, the walking belt will change . When the next "chirp" is finished, remove the key...
English Manual
Page 16
... the audio cable is properly connected, that it is to your computer and start the program, an on-screen countdown will begin to help you achieve your treadmill to move at any time, press the STOP button on the console. The iFit.com indicator will light. 3 Go to your home computer. The TIME/INCLINE display will begin to step 5 above. When the program is heard, the speed and incline...
... the audio cable is properly connected, that it is to your computer and start the program, an on-screen countdown will begin to help you achieve your treadmill to move at any time, press the STOP button on the console. The iFit.com indicator will light. 3 Go to your home computer. The TIME/INCLINE display will begin to step 5 above. When the program is heard, the speed and incline...
English Manual
Page 17
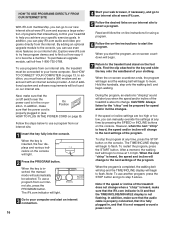
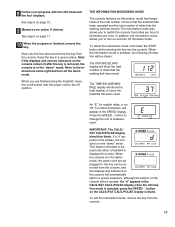
Step onto the foot rails and remove the key from the console. 17 Keep the key in the "demo" mode. The information mode also allows you are finished using the treadmill, move the on and turn off the demo mode. Press the SPEED L button to the instructions at the right and turn on /off switch near the power cord to the off the demo mode. If a "d" appears in the display, the console is selected, the following information will be...
Step onto the foot rails and remove the key from the console. 17 Keep the key in the "demo" mode. The information mode also allows you are finished using the treadmill, move the on and turn off the demo mode. Press the SPEED L button to the instructions at the right and turn on /off switch near the power cord to the off the demo mode. If a "d" appears in the display, the console is selected, the following information will be...
English Manual
Page 18
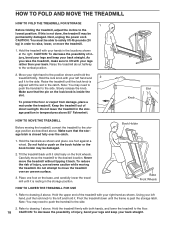
... need to push the handrail to raise, lower, or move the treadmill to the side. Carefully move the treadmill. 1. Pivot the treadmill down until it back. Next, unplug the power cord. Hold the lock knob with your legs rather than your back. Slowly release the knob. Make sure that the storage latch is inside the slot. Slot Knob HOW TO MOVE THE TREADMILL Before moving the treadmill. Never move the treadmill...
... need to push the handrail to raise, lower, or move the treadmill to the side. Carefully move the treadmill. 1. Pivot the treadmill down until it back. Next, unplug the power cord. Hold the lock knob with your legs rather than your back. Slowly release the knob. Make sure that the storage latch is inside the slot. Slot Knob HOW TO MOVE THE TREADMILL Before moving the treadmill. Never move the treadmill...
English Manual
Page 19
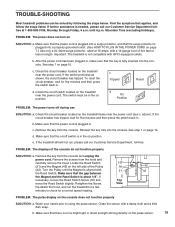
... power cord is plugged into a surge protector, and that the power cord is about 1/8". Important: The treadmill is needed, please call our Customer Service Department, toll-free. If the circuit breaker has tripped, wait for a few minutes to using the pulse sensor. If necessary, loosen the Reed Switch Screw (76) and move the Reed Switch slightly. PROBLEM: The pulse display on the left side of the Pulley 76 42 (42). b. If the switch...
... power cord is plugged into a surge protector, and that the power cord is about 1/8". Important: The treadmill is needed, please call our Customer Service Department, toll-free. If the circuit breaker has tripped, wait for a few minutes to using the pulse sensor. If necessary, loosen the Reed Switch Screw (76) and move the Reed Switch slightly. PROBLEM: The pulse display on the left side of the Pulley 76 42 (42). b. If the switch...
English Manual
Page 20
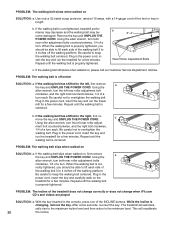
.... Plug in the console, press one of the treadmill does not change correctly or does not change when iFit.com CD's and videos are played SOLUTION: a. cally rise to the maximum incline level and then return to keep the walking belt centered. Using the allen wrench, turn both rear roller adjustment bolts clockwise, 1/4 of a turn each side of the walking belt 3 to overtighten the walking belt. Using the allen wrench, turn the left rear roller adjust- PROBLEM: The walking belt slips...
.... Plug in the console, press one of the treadmill does not change correctly or does not change when iFit.com CD's and videos are played SOLUTION: a. cally rise to the maximum incline level and then return to keep the walking belt centered. Using the allen wrench, turn both rear roller adjustment bolts clockwise, 1/4 of a turn each side of the walking belt 3 to overtighten the walking belt. Using the allen wrench, turn the left rear roller adjust- PROBLEM: The walking belt slips...
English Manual
Page 21
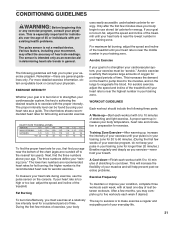
... exercise program, consult your "training zone." This is especially important for energy. The pulse sensor is to 10 minutes of time. The proper intensity level can be "aerobic." The chart below shows recommended heart rates for aerobic exercise. For aerobic exercise, adjust the speed and incline of 35 or individuals with preexisting health problems. uses easily accessible carbohydrate calories for individuals over the age of the treadmill...
... exercise program, consult your "training zone." This is especially important for energy. The pulse sensor is to 10 minutes of time. The proper intensity level can be "aerobic." The chart below shows recommended heart rates for aerobic exercise. For aerobic exercise, adjust the speed and incline of 35 or individuals with preexisting health problems. uses easily accessible carbohydrate calories for individuals over the age of the treadmill...

English Manual
Page 23
... Washer/ 78 2 Handrail Bolt # 1 4" Green Wire, F/Ring Roller Adj. Bolt 108 2 Pulse Bar Washer 23 1 Motor/Controller Wire 66 1 Motor 109 1 Pulse Bar 24 1 Controller 67 1 Latch Decal 110 1 Lock Knob 25 1 Electronics Bracket 68 4 Rear Platform Screw 111 1 Spring 26 1 Circuit Breaker 69 2 Catch Screw 112 1 Lock Pin Collar 27 1 Power Cord 70 1 Latch Catch 113 1 Pin Clip 28 1 Power Cord Grommet 71 1 Walking Platform 114 1 Lock Pin 29 1 On/Off Switch 72 5 8" cable Tie 115 1 Belly Pan...
... Washer/ 78 2 Handrail Bolt # 1 4" Green Wire, F/Ring Roller Adj. Bolt 108 2 Pulse Bar Washer 23 1 Motor/Controller Wire 66 1 Motor 109 1 Pulse Bar 24 1 Controller 67 1 Latch Decal 110 1 Lock Knob 25 1 Electronics Bracket 68 4 Rear Platform Screw 111 1 Spring 26 1 Circuit Breaker 69 2 Catch Screw 112 1 Lock Pin Collar 27 1 Power Cord 70 1 Latch Catch 113 1 Pin Clip 28 1 Power Cord Grommet 71 1 Walking Platform 114 1 Lock Pin 29 1 On/Off Switch 72 5 8" cable Tie 115 1 Belly Pan...
English Manual
Page 26
... give the following information: • The MODEL NUMBER OF THE PRODUCT (PFTL59190) • The NAME OF THE PRODUCT (PROFORM® 585Pi treadmill) • The SERIAL NUMBER OF THE PRODUCT (see the front cover of this manual) • The KEY NUMBER AND DESCRIPTION OF THE PART(S) (see the EXPLODED DRAWING attached in the center of this warranty is a registered trademark of ICON Health & Fitness, Inc. This warranty does not extend...
... give the following information: • The MODEL NUMBER OF THE PRODUCT (PFTL59190) • The NAME OF THE PRODUCT (PROFORM® 585Pi treadmill) • The SERIAL NUMBER OF THE PRODUCT (see the front cover of this manual) • The KEY NUMBER AND DESCRIPTION OF THE PART(S) (see the EXPLODED DRAWING attached in the center of this warranty is a registered trademark of ICON Health & Fitness, Inc. This warranty does not extend...

