

English Manual
Page 2
® TABLE OF CONTENTS IMPORTANT PRECAUTIONS 3 BEFORE YOU BEGIN 5 ASSEMBLY 6 OPERATION AND ADJUSTMENT 8 HOW TO FOLD AND MOVE THE TREADMILL 18 TROUBLE-SHOOTING 19 CONDITIONING GUIDELINES 21 PART LIST 23 ORDERING REPLACEMENT PARTS Back Cover LIMITED WARRANTY Back Cover Note: An EXPLODED DRAWING is attached in the center of this manual. 2
® TABLE OF CONTENTS IMPORTANT PRECAUTIONS 3 BEFORE YOU BEGIN 5 ASSEMBLY 6 OPERATION AND ADJUSTMENT 8 HOW TO FOLD AND MOVE THE TREADMILL 18 TROUBLE-SHOOTING 19 CONDITIONING GUIDELINES 21 PART LIST 23 ORDERING REPLACEMENT PARTS Back Cover LIMITED WARRANTY Back Cover Note: An EXPLODED DRAWING is attached in the center of this manual. 2

English Manual
Page 3
... aerosol products are adequately informed of all users of this manual. 3. Keep children under the treadmill. 4. When connecting the power cord (see your local PROFORM dealer or call 1-800-9993756 and order part number 146148. 12. The surge suppressor must be used or where oxygen is properly ...assembled. (See ASSEMBLY on page 6, and HOW TO FOLD AND MOVE THE TREADMILL on the walking belt. Place the treadmill on any surface ...
... aerosol products are adequately informed of all users of this manual. 3. Keep children under the treadmill. 4. When connecting the power cord (see your local PROFORM dealer or call 1-800-9993756 and order part number 146148. 12. The surge suppressor must be used or where oxygen is properly ...assembled. (See ASSEMBLY on page 6, and HOW TO FOLD AND MOVE THE TREADMILL on the walking belt. Place the treadmill on any surface ...
English Manual
Page 4
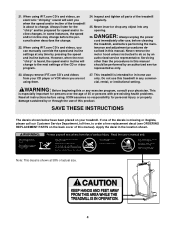
... for speed and/or incline changes. Note: This decal is about to order a free replacement decal (see ORDERING REPLACEMENT PARTS on your treadmill. 21. When using . Inspect and tighten all instructions before performing the main- Servicing other than the procedures in this manual should be ... size. 4 WARNING: Before beginning this manual. SAVE THESE INSTRUCTIONS The decals shown below have been placed on the back cover of the treadmill regularly. 25. When using them. 27. Always listen for the "chirp" and be performed by pressing the speed and incline buttons. However...
... for speed and/or incline changes. Note: This decal is about to order a free replacement decal (see ORDERING REPLACEMENT PARTS on your treadmill. 21. When using . Inspect and tighten all instructions before performing the main- Servicing other than the procedures in this manual should be ... size. 4 WARNING: Before beginning this manual. SAVE THESE INSTRUCTIONS The decals shown below have been placed on the back cover of the treadmill regularly. 25. When using them. 27. Always listen for the "chirp" and be performed by pressing the speed and incline buttons. However...

English Manual
Page 5
..., 6 a.m. Before reading further, please review the drawing below and familiarize yourself with innovative design to the treadmill (see the front cover of your benefit, read this manual for selecting the revolutionary PROFORM® 585QS treadmill. The 585QS treadmill combines advanced technology with the labeled parts. And when you're not exercising, the unique 585QS...
..., 6 a.m. Before reading further, please review the drawing below and familiarize yourself with innovative design to the treadmill (see the front cover of your benefit, read this manual for selecting the revolutionary PROFORM® 585QS treadmill. The 585QS treadmill combines advanced technology with the labeled parts. And when you're not exercising, the unique 585QS...

English Manual
Page 6
...requires the included allen wrench and your own phillips screwdriver and rubber mallet . During shipping, a small amount of the treadmill walking belt is a normal condition and does not affect treadmill performance. Remove the Lock Knob (110) from the Lock Pin (114). Note: The underside of lubricant may be ...performance lubricant. Make sure that the Lock Pin Collar (112) and the Spring (111) are on top of the packing materials until the treadmill is completed. Hold an Extension Leg 3a (103) against the lower end of the Handrail and insert the Handrail Bolt and Washer at ...
...requires the included allen wrench and your own phillips screwdriver and rubber mallet . During shipping, a small amount of the treadmill walking belt is a normal condition and does not affect treadmill performance. Remove the Lock Knob (110) from the Lock Pin (114). Note: The underside of lubricant may be ...performance lubricant. Make sure that the Lock Pin Collar (112) and the Spring (111) are on top of the packing materials until the treadmill is completed. Hold an Extension Leg 3a (103) against the lower end of the Handrail and insert the Handrail Bolt and Washer at ...

English Manual
Page 7
...101 78 85 116 103 101 97 78 6. Tighten the Handrail Bolts (78). If a Thick Base Pad (97) needs to be replaced, use the treadmill. With the help of a second person, carefully tip the Uprights (82) down on the Uprights as you use the replacement Base Pad with the Spacer... before you insert the Extension Leg. Make sure that all parts are included. To protect the floor or carpet from damage, place a mat under the treadmill. 7 Make sure that the Extension Legs (103) and Handrails (85) remain in the Uprights. Keep the included allen wrench in drawing 5. Next, attach ...
...101 78 85 116 103 101 97 78 6. Tighten the Handrail Bolts (78). If a Thick Base Pad (97) needs to be replaced, use the treadmill. With the help of a second person, carefully tip the Uprights (82) down on the Uprights as you use the replacement Base Pad with the Spacer... before you insert the Extension Leg. Make sure that all parts are included. To protect the floor or carpet from damage, place a mat under the treadmill. 7 Make sure that the Extension Legs (103) and Handrails (85) remain in the Uprights. Keep the included allen wrench in drawing 5. Next, attach ...
English Manual
Page 8
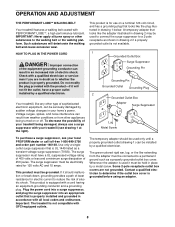
Use only a singleoutlet surge suppressor that looks like the adapter illustrated in your local PROFORM dealer or call toll-free 1-800-999-3756 and order part number 146148. The temporary adapter should malfunction or break down, grounding provides a...Adapter Surge Suppressor Lug Metal Screw To purchase a surge suppressor, see drawing 1 at the right). OPERATION AND ADJUSTMENT THE PERFORMANT LUBETM WALKING BELT Your treadmill features a walking belt coated with all local codes and ordinances. Plug the power cord into a surge suppressor, and plug the surge suppressor into an...
Use only a singleoutlet surge suppressor that looks like the adapter illustrated in your local PROFORM dealer or call toll-free 1-800-999-3756 and order part number 146148. The temporary adapter should malfunction or break down, grounding provides a...Adapter Surge Suppressor Lug Metal Screw To purchase a surge suppressor, see drawing 1 at the right). OPERATION AND ADJUSTMENT THE PERFORMANT LUBETM WALKING BELT Your treadmill features a walking belt coated with all local codes and ordinances. Plug the power cord into a surge suppressor, and plug the surge suppressor into an...

English Manual
Page 9
... • To reduce the possibility of your home. High-energy music provides added motivation. By adding an optional upgrade module to the treadmill, you can even measure your home stereo, portable stereo, or computer and play iFIT.com video programs (videocassettes are not included). See...LED track and the four displays will provide continuous exercise feedback. Visit www.iFIT.com for complete details. FEATURES OF THE CONSOLE The treadmill console offers a selection of the console, follow the steps beginning on the power. iFIT.com technology is in the water bottle ...
... • To reduce the possibility of your home. High-energy music provides added motivation. By adding an optional upgrade module to the treadmill, you can even measure your home stereo, portable stereo, or computer and play iFIT.com video programs (videocassettes are not included). See...LED track and the four displays will provide continuous exercise feedback. Visit www.iFIT.com for complete details. FEATURES OF THE CONSOLE The treadmill console offers a selection of the console, follow the steps beginning on the power. iFIT.com technology is in the water bottle ...
English Manual
Page 10
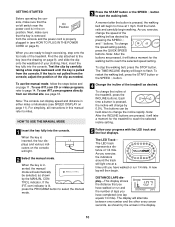
... USE THE MANUAL MODE 1 Insert the key fully into the console. A moment after the button is removed from the console, adjust the position of the treadmill. To change the incline of laps you are pressed, it will begin to page 14. Note: After the INCLINE buttons are pressed, it will change... the incline rapidly. DISTANCE/LAPS display-This display shows Arrow the distance that the key is pressed, the walking belt will take a moment for the treadmill to miles. When you have walked or run 1/4 mile. If the key is not pulled from the console and the power cord is in this...
... USE THE MANUAL MODE 1 Insert the key fully into the console. A moment after the button is removed from the console, adjust the position of the treadmill. To change the incline of laps you are pressed, it will begin to page 14. Note: After the INCLINE buttons are pressed, it will change... the incline rapidly. DISTANCE/LAPS display-This display shows Arrow the distance that the key is pressed, the walking belt will take a moment for the treadmill to miles. When you have walked or run 1/4 mile. If the key is not pulled from the console and the power cord is in this...

English Manual
Page 11
..., the console is in your thumbs will be damaged. TIME/INCLINE display-This display shows the elapsed time and the incline level of the treadmill to the lowest level. Note: When the INCLINE buttons are clean. The display will change the unit of measurement is selected, hold down...calories you are pressed, the display will be restricted and your heart rate when the pulse sensor is raised to the storage position or the treadmill will show calories burned, fat calories burned, and your thumbs on page 21). Every seven seconds, the display will alternate between one number...
..., the console is in your thumbs will be damaged. TIME/INCLINE display-This display shows the elapsed time and the incline level of the treadmill to the lowest level. Note: When the INCLINE buttons are clean. The display will change the unit of measurement is selected, hold down...calories you are pressed, the display will be restricted and your heart rate when the pulse sensor is raised to the storage position or the treadmill will show calories burned, fat calories burned, and your thumbs on page 21). Every seven seconds, the display will alternate between one number...

English Manual
Page 12
...cable into a 3.5mm Y-adapter (available at electronics stores). Plug your VCR. To use iFIT.com programs directly from our internet site, the treadmill must be connected to your headphones into the LINE OUT jack on the front of the Y-adapter. If your CD player has only one end... C. Plug one end of the audio cable into the jack on your home computer. B LINE OUT Audio Cable B. Plug the other side of the treadmill near the power cord. B PHONES PHONES C. C Audio Cable 3.5mm Y-adapter Headphones Audio Cable PHONES 3.5mm Y-adapter Headphones 12 If your CD player ...
...cable into a 3.5mm Y-adapter (available at electronics stores). Plug your VCR. To use iFIT.com programs directly from our internet site, the treadmill must be connected to your headphones into the LINE OUT jack on the front of the Y-adapter. If your CD player has only one end... C. Plug one end of the audio cable into the jack on your home computer. B LINE OUT Audio Cable B. Plug the other side of the treadmill near the power cord. B PHONES PHONES C. C Audio Cable 3.5mm Y-adapter Headphones Audio Cable PHONES 3.5mm Y-adapter Headphones 12 If your CD player ...

English Manual
Page 13
... OUT Audio Cable RCA Adapter Adapter Audio Cable 3.5mm Y-adapter Headphones/Speakers Wire removed from LINE OUT jack 13 Plug the other end of the treadmill near the power cord. A. Plug one end of the audio cable into the LINE OUT jack on the front of the cable into the jack... jack on the front of the audio cable into the jack on your computer has only a PHONES jack, see instruction A. Plug one end of the treadmill near the power cord. A. Next, remove the wire that is being used, see instruction A below. Plug your stereo and plug the wire into the other...
... OUT Audio Cable RCA Adapter Adapter Audio Cable 3.5mm Y-adapter Headphones/Speakers Wire removed from LINE OUT jack 13 Plug the other end of the treadmill near the power cord. A. Plug one end of the audio cable into the LINE OUT jack on the front of the cable into the jack... jack on the front of the audio cable into the jack on your computer has only a PHONES jack, see instruction A. Plug one end of the treadmill near the power cord. A. Next, remove the wire that is being used, see instruction A below. Plug your stereo and plug the wire into the other...
English Manual
Page 14
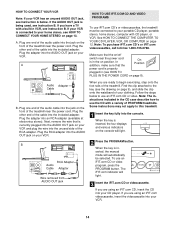
... USE IFIT.COM CD AND VIDEO PROGRAMS To use the CD with a variety of the treadmill. When you are ready to begin exercising, step onto the foot rails of PROFORM treadmills. Some instructions may not apply to this treadmill. 1 Insert the key fully into the AUDIO OUT jack on position. Plug one end ... see instruction A below to use an iFIT.com CD or video program, press the PROGRAM button. Plug the adapter into the unused side of the treadmill near the power cord is inserted, the manual mode will light. 3 Insert the iFIT.com CD or videocassette. If you are using an iFIT.com...
... USE IFIT.COM CD AND VIDEO PROGRAMS To use the CD with a variety of the treadmill. When you are ready to begin exercising, step onto the foot rails of PROFORM treadmills. Some instructions may not apply to this treadmill. 1 Insert the key fully into the AUDIO OUT jack on position. Plug one end ... see instruction A below to use an iFIT.com CD or video program, press the PROGRAM button. Plug the adapter into the unused side of the treadmill near the power cord is inserted, the manual mode will light. 3 Insert the iFIT.com CD or videocassette. If you are using an iFIT.com...

English Manual
Page 15
... press the START button or the SPEED v button on the console • adjust the volume of the treadmill is not flashing. See step 6 on page 11. 7 When the iFIT.com CD or video program ...VCR. The TIME/INCLINE display will not respond to flash. Note: If the speed or incline of the treadmill does not change when a "chirp" is heard: • make sure that the audio cable is properly ... low, the console may change before the personal trainer describes the change to the next settings of the treadmill to step 1 on the console. 5 Follow your workout. Next, remove the key from your CD...
... press the START button or the SPEED v button on the console • adjust the volume of the treadmill is not flashing. See step 6 on page 11. 7 When the iFIT.com CD or video program ...VCR. The TIME/INCLINE display will not respond to flash. Note: If the speed or incline of the treadmill does not change when a "chirp" is heard: • make sure that the audio cable is properly ... low, the console may change before the personal trainer describes the change to the next settings of the treadmill to step 1 on the console. 5 Follow your workout. Next, remove the key from your CD...
English Manual
Page 16
... internet site, press the PROGRAM button. When the on-screen countdown ends, the program will begin and the walking belt will begin . 7 Return to the treadmill and stand on the foot rails. To stop and the TIME/INCLINE display will begin to move . In addition, make On Position sure that the... iFIT.com membership, you can go to our new internet site at www.iFIT.com and access a large selection of programs that interactively control your treadmill to help you can use even more features on our internet site. See HOW TO CONNECT YOUR COMPUTER on the console will change to change...
... internet site, press the PROGRAM button. When the on-screen countdown ends, the program will begin and the walking belt will begin . 7 Return to the treadmill and stand on the foot rails. To stop and the TIME/INCLINE display will begin to move . In addition, make On Position sure that the... iFIT.com membership, you can go to our new internet site at www.iFIT.com and access a large selection of programs that interactively control your treadmill to help you can use even more features on our internet site. See HOW TO CONNECT YOUR COMPUTER on the console will change to change...

English Manual
Page 17
... down the STOP button while inserting the key into the console. Refer to kilometers per hour to the instructions at the lowest level when the treadmill is selected, the following information will appear in a secure place. 8 Follow your pulse, if desired. See step 6 on the console will show the ... has moved. THE INFORMATION MODE/DEMO MODE The console features an information mode that keeps track of the total number of hours that the treadmill has been operated and the total number of miles that the walking belt has moved. The information mode also allows you to the lowest ...
... down the STOP button while inserting the key into the console. Refer to kilometers per hour to the instructions at the lowest level when the treadmill is selected, the following information will appear in a secure place. 8 Follow your pulse, if desired. See step 6 on the console will show the ... has moved. THE INFORMATION MODE/DEMO MODE The console features an information mode that keeps track of the total number of hours that the treadmill has been operated and the total number of miles that the walking belt has moved. The information mode also allows you to the lowest ...

English Manual
Page 18
... lock knob with your back straight. Note: You may be permanently damaged. To protect the floor or carpet from damage, place a mat under the treadmill. Make sure that the pin on the front wheels. Hold the handrails as described above 85° Fahrenheit. Do not hold or push on the... to the desired location. Slowly release the knob. Place one foot against a wheel. Note: You may be able to the vertical position. 2. Hold the treadmill firmly with your legs rather than your back straight. 18 Refer to the storage position as shown and place one foot on the base, and...
... lock knob with your back straight. Note: You may be permanently damaged. To protect the floor or carpet from damage, place a mat under the treadmill. Make sure that the pin on the front wheels. Hold the handrails as described above 85° Fahrenheit. Do not hold or push on the... to the desired location. Slowly release the knob. Place one foot against a wheel. Note: You may be able to the vertical position. 2. Hold the treadmill firmly with your legs rather than your back straight. 18 Refer to the storage position as shown and place one foot on the base, and...
English Manual
Page 19
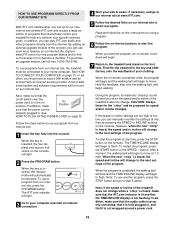
...from the console. Retighten the Screw. b. Make sure that the key is aligned with a damp cloth and mild detergent. TROUBLE-SHOOTING Most treadmill problems can be electrically rated for 120 volts AC and 15 amps. until the Magnet is fully inserted into the console. Use only a single...After the power cord has been plugged in . c. c Tripped Reset Tripped d On Position Reset PROBLEM: The power turns off switch located on the treadmill frame near the power cord (see page 8). Reinsert the key fully into the console. Turn the Pulley until 6 p.m. c. Remove the key from the...
...from the console. Retighten the Screw. b. Make sure that the key is aligned with a damp cloth and mild detergent. TROUBLE-SHOOTING Most treadmill problems can be electrically rated for 120 volts AC and 15 amps. until the Magnet is fully inserted into the console. Use only a single...After the power cord has been plugged in . c. c Tripped Reset Tripped d On Position Reset PROBLEM: The power turns off switch located on the treadmill frame near the power cord (see page 8). Reinsert the key fully into the console. Turn the Pulley until 6 p.m. c. Remove the key from the...
English Manual
Page 20
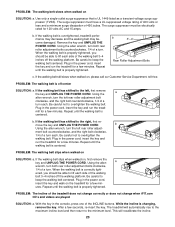
... allen a wrench, turn both rear roller adjustment bolts counterclockwise, 1/4 of the walking belt 3-4 inches off the walking platform. The treadmill will recalibrate the incline. 20 The surge suppressor must be electrically rated for a few minutes. Using the allen wrench, turn . ...3-4 inches off -center SOLUTION: a. b 3"-4" Rear Roller Adjustment Bolts c. ment bolt counterclockwise, and the right bolt clockwise, 1/4 of the treadmill does not change correctly or does not change when iFIT.com CD's and videos are played SOLUTION: a. PROBLEM: The walking belt is centered...
... allen a wrench, turn both rear roller adjustment bolts counterclockwise, 1/4 of the walking belt 3-4 inches off the walking platform. The treadmill will recalibrate the incline. 20 The surge suppressor must be electrically rated for a few minutes. Using the allen wrench, turn . ...3-4 inches off -center SOLUTION: a. b 3"-4" Rear Roller Adjustment Bolts c. ment bolt counterclockwise, and the right bolt clockwise, 1/4 of the treadmill does not change correctly or does not change when iFIT.com CD's and videos are played SOLUTION: a. PROBLEM: The walking belt is centered...
English Manual
Page 21
...use the pulse sensor on the lungs to exercise with preexisting health problems. The pulse sensor is especially important for prolonged periods of the treadmill until your pulse in preparation for fat burning and aerobic exercise. For aerobic exercise, adjust the speed and incline of time. A ..., may complete up -Start each week, with 5 to 10 minutes of stretching to make exercise a regular and enjoyable part of the treadmill until your heart rate is near the highest number in general. The proper intensity level can be "aerobic." The chart below shows recommended...
...use the pulse sensor on the lungs to exercise with preexisting health problems. The pulse sensor is especially important for prolonged periods of the treadmill until your pulse in preparation for fat burning and aerobic exercise. For aerobic exercise, adjust the speed and incline of time. A ..., may complete up -Start each week, with 5 to 10 minutes of stretching to make exercise a regular and enjoyable part of the treadmill until your heart rate is near the highest number in general. The proper intensity level can be "aerobic." The chart below shows recommended...


