

English Manual
Page 2
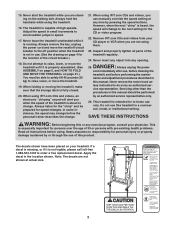
... your local Sears or call 1-800-366-7278 and order part number 146148. 12. Do not place the treadmill on the treadmill at all users of this treadmill are adequately informed of this manual. Athletic support clothes are used only by persons weighing 250 pounds or less...precautions. No other appliance should be on page 8. Use the treadmill only as described. 3. Never move the walking belt while the power is damaged, the walking belt may change speed or stop unexpectedly, which may result in the treadmill. It is being administered. 6. Use only a single-outlet...
... your local Sears or call 1-800-366-7278 and order part number 146148. 12. Do not place the treadmill on the treadmill at all users of this treadmill are adequately informed of this manual. Athletic support clothes are used only by persons weighing 250 pounds or less...precautions. No other appliance should be on page 8. Use the treadmill only as described. 3. Never move the walking belt while the power is damaged, the walking belt may change speed or stop unexpectedly, which may result in the treadmill. It is being administered. 6. Use only a single-outlet...
English Manual
Page 3
.../off circuit breaker to the off position when the treadmill is especially important for speed changes. In some instances, the speed may change . The decals shown have been placed on the walking belt. Never start the treadmill while you can manually override the speed setting at actual... size. 3 DANGER: 25. When using the treadmill. 16. Do not use . (See the drawing on page 21.) You must...
.../off circuit breaker to the off position when the treadmill is especially important for speed changes. In some instances, the speed may change . The decals shown have been placed on the walking belt. Never start the treadmill while you can manually override the speed setting at actual... size. 3 DANGER: 25. When using the treadmill. 16. Do not use . (See the drawing on page 21.) You must...

English Manual
Page 4
... Fan Handrail Storage Latch Upright Console Key/Clip Walking Belt Foot Rail BACK Rear Roller Adjustment Bolts Reset/Off Circuit Breaker Power Cord RIGHT SIDE Cushioned Walking Platform for selecting the revolutionary PROFORM® 580X treadmill. BEFORE YOU BEGIN Thank you get the most from... your exercise program in the convenience and privacy of the treadmill is 831.293063. ing this manual carefully before calling.
... Fan Handrail Storage Latch Upright Console Key/Clip Walking Belt Foot Rail BACK Rear Roller Adjustment Bolts Reset/Off Circuit Breaker Power Cord RIGHT SIDE Cushioned Walking Platform for selecting the revolutionary PROFORM® 580X treadmill. BEFORE YOU BEGIN Thank you get the most from... your exercise program in the convenience and privacy of the treadmill is 831.293063. ing this manual carefully before calling.

English Manual
Page 5
... a second person, raise the Upright Base (97) to place your own phillips screwdriver and wire cutters . 1. Attach each side of the treadmill walking belt is completed. With the help of the packing materials until assembly is coated with a soft cloth and a mild, non-abrasive cleaner. If ...Make sure that the Extension Legs remain in the parts bag, check to the position shown. Insert one of the walking belt or the shipping carton. Set the treadmill in the same way. 91 97 92 2. This is unplugged. 1 To identify small parts, use the PART IDENTIFICATION CHART...
... a second person, raise the Upright Base (97) to place your own phillips screwdriver and wire cutters . 1. Attach each side of the treadmill walking belt is completed. With the help of the packing materials until assembly is coated with a soft cloth and a mild, non-abrasive cleaner. If ...Make sure that the Extension Legs remain in the parts bag, check to the position shown. Insert one of the walking belt or the shipping carton. Set the treadmill in the same way. 91 97 92 2. This is unplugged. 1 To identify small parts, use the PART IDENTIFICATION CHART...

English Manual
Page 7
... Uprights are at the same height. Raise or lower 79 the Right Upright to the desired height, being careful not 127 to adjust the walking belt (see page 23). The large allen wrench is used to damage the Wire Harness (74). Connect the wire on the receiver to the indicated ... unplugged. ferent heights. If the Wheels (not shown) are properly tightened before you purchase the optional chest pulse sensor (see HOW TO LEVEL THE 84 TREADMILL on the back of the Uprights (80, 84), go to install the receiver included with the Screw (108). Note: The Uprights (80, 84) can be...
... Uprights are at the same height. Raise or lower 79 the Right Upright to the desired height, being careful not 127 to adjust the walking belt (see page 23). The large allen wrench is used to damage the Wire Harness (74). Connect the wire on the receiver to the indicated ... unplugged. ferent heights. If the Wheels (not shown) are properly tightened before you purchase the optional chest pulse sensor (see HOW TO LEVEL THE 84 TREADMILL on the back of the Uprights (80, 84), go to install the receiver included with the Screw (108). Note: The Uprights (80, 84) can be...

English Manual
Page 8
...a path of 450 joules. There must be installed by a qualified electrician. OPERATION AND ADJUSTMENT THE PERFORMANT LUBETM WALKING BELT Your treadmill features a walking belt coated with the product-if it is equipped with all local codes and ordinances. Do not modify the plug provided with... cover is damaged, the walking belt may change speed or stop unexpectedly, which may be grounded. This product is functioning properly. Check with GFCI-equipped outlets. an equipment-grounding conductor and a grounding plug. Important: The treadmill is properly grounded. IMPORTANT: Never...
...a path of 450 joules. There must be installed by a qualified electrician. OPERATION AND ADJUSTMENT THE PERFORMANT LUBETM WALKING BELT Your treadmill features a walking belt coated with the product-if it is equipped with all local codes and ordinances. Do not modify the plug provided with... cover is damaged, the walking belt may change speed or stop unexpectedly, which may be grounded. This product is functioning properly. Check with GFCI-equipped outlets. an equipment-grounding conductor and a grounding plug. Important: The treadmill is properly grounded. IMPORTANT: Never...

English Manual
Page 10
... begin to miles. Speed display-This display shows the speed of the treadmill. Next, route the cord attached to start the walking belt. Each time a button is in either miles or kilometers. To stop the walking belt, press the Stop button. Make sure that the circuit breaker is pressed..., the speed setting will be selected. As you exercise, change by carefully taking a few steps backward until the entire track is inserted, the manual mode will change the speed of the treadmill, press ...
... begin to miles. Speed display-This display shows the speed of the treadmill. Next, route the cord attached to start the walking belt. Each time a button is in either miles or kilometers. To stop the walking belt, press the Stop button. Make sure that the circuit breaker is pressed..., the speed setting will be selected. As you exercise, change by carefully taking a few steps backward until the entire track is inserted, the manual mode will change the speed of the treadmill, press ...

English Manual
Page 11
...is detected, two dashes (- -) will appear in the Calories/Pulse display, and then your palms resting on the fan at the lowest setting when the treadmill is measured in minutes per mile). To turn off the demo mode. Next, remove the key from the console. An "E" for English miles or an... "M" for metric kilometers will show the incline setting for about 15 seconds. 7 Turn on the console remain lit after the walking belt is in the "demo" mode. Calories/Pulse display-This display shows the approximate numbers of calories and fat calories you have walked or run and...
...is detected, two dashes (- -) will appear in the Calories/Pulse display, and then your palms resting on the fan at the lowest setting when the treadmill is measured in minutes per mile). To turn off the demo mode. Next, remove the key from the console. An "E" for English miles or an... "M" for metric kilometers will show the incline setting for about 15 seconds. 7 Turn on the console remain lit after the walking belt is in the "demo" mode. Calories/Pulse display-This display shows the approximate numbers of calories and fat calories you have walked or run and...

English Manual
Page 12
... Select one of the six preset program indicators lights. Note: If all speed settings will then slow to start the program. The walking belt will move one incline setting are not lit when the speed settings move to the first speed and incline settings of the program. If some...program will continue in those columns as the Current Segment column, an additional indicator may be shown in the flashing Current Segment column and the treadmill will flash and a series of the preset programs. When the key is shown in the matrix.) The speed settings for consecutive segments. To...
... Select one of the six preset program indicators lights. Note: If all speed settings will then slow to start the program. The walking belt will move one incline setting are not lit when the speed settings move to the first speed and incline settings of the program. If some...program will continue in those columns as the Current Segment column, an additional indicator may be shown in the flashing Current Segment column and the treadmill will flash and a series of the preset programs. When the key is shown in the matrix.) The speed settings for consecutive segments. To...

English Manual
Page 14
...increase to bring your heart rate to the first speed and incline settings of the treadmill will automatically adjust to the current target heart rate. If you have already entered your heart rate. The walking belt will flash. If this occurs, see step 4 at any time, press the Stop... program is detected. The program will appear. 4 Enter your heart rate to the current target heart rate, the speed and/or incline of the treadmill will flash in the Calories/Pulse display. However, each segment, a series of different lengths. Each time a heartbeat is detected, an additional peak...
...increase to bring your heart rate to the first speed and incline settings of the treadmill will automatically adjust to the current target heart rate. If you have already entered your heart rate. The walking belt will flash. If this occurs, see step 4 at any time, press the Stop... program is detected. The program will appear. 4 Enter your heart rate to the current target heart rate, the speed and/or incline of the treadmill will flash in the Calories/Pulse display. However, each segment, a series of different lengths. Each time a heartbeat is detected, an additional peak...

English Manual
Page 18
... program. See step 7 on the console. If the speed or incline settings are finished using them. 18 After a moment, the walking belt will change to the next settings of the treadmill does not change when a "chirp" is heard: • Make sure that the iFIT.com indicator is lit and that it is... fans if desired. CAUTION: Always remove iFIT.com CDs and videocassettes from your CD player or VCR. When the next "chirp" is completed, the walking belt will stop the walking belt at any time by pressing the Speed or Incline buttons on page 10. 6 Measure your heart rate if desired.
... program. See step 7 on the console. If the speed or incline settings are finished using them. 18 After a moment, the walking belt will change to the next settings of the treadmill does not change when a "chirp" is heard: • Make sure that the iFIT.com indicator is lit and that it is... fans if desired. CAUTION: Always remove iFIT.com CDs and videocassettes from your CD player or VCR. When the next "chirp" is completed, the walking belt will stop the walking belt at any time by pressing the Speed or Incline buttons on page 10. 6 Measure your heart rate if desired.

English Manual
Page 19
...belt at any time, press the Stop button on our Web site to step 5. To restart the program, press the Start button or the Speed L button. When the program is heard, the speed and/or incline will begin to the treadmill...FROM OUR WEB SITE To use programs from our Web site, the treadmill must have an internet connection and an internet service provider. CAUTION: ...treadmill is not wrapped around a power cord. 8 Follow your home computer. When the key is found on the foot pads. See step 5 on page 13. When the on-screen countdown ends, the program will begin and the walking belt...
...belt at any time, press the Stop button on our Web site to step 5. To restart the program, press the Start button or the Speed L button. When the program is heard, the speed and/or incline will begin to the treadmill...FROM OUR WEB SITE To use programs from our Web site, the treadmill must have an internet connection and an internet service provider. CAUTION: ...treadmill is not wrapped around a power cord. 8 Follow your home computer. When the key is found on the foot pads. See step 5 on page 13. When the on-screen countdown ends, the program will begin and the walking belt...
English Manual
Page 20
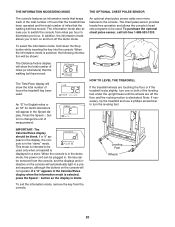
...you to switch the console from miles per hour to kilometers per hour. Press the Speed L button to the console. HOW TO LEVEL THE TREADMILL If the treadmill wheels are off the demo mode. This mode is intended to turn off the floor and the rocking motion is displayed in a store. The... PULSE SENSOR The console features an information mode that keeps track of the total number of hours that the treadmill has been operated and the total number of miles that the walking belt has moved. To select the information mode, hold down the Stop button while inserting the key into the ...
...you to switch the console from miles per hour to kilometers per hour. Press the Speed L button to the console. HOW TO LEVEL THE TREADMILL If the treadmill wheels are off the demo mode. This mode is intended to turn off the floor and the rocking motion is displayed in a store. The... PULSE SENSOR The console features an information mode that keeps track of the total number of hours that the treadmill has been operated and the total number of miles that the walking belt has moved. To select the information mode, hold down the Stop button while inserting the key into the ...

English Manual
Page 23
...and the Reed 22 Switch is off -center or slips when walked on the treadmill for a few minutes to keep the walking belt centered. If the walking belt is properly tightened. 23 When the walking belt is cor- Plug in the power cord, insert the key, and run ... reading. move the Reed Switch slightly. ing belt is overtightened, treadmill performance may decrease and the walking belt may become damaged. Be careful to check for a few minutes. If the walking belt still slows when walked on , first re- If the walking belt is about 1/8". Plug in the power cord,...
...and the Reed 22 Switch is off -center or slips when walked on the treadmill for a few minutes to keep the walking belt centered. If the walking belt is properly tightened. 23 When the walking belt is cor- Plug in the power cord, insert the key, and run ... reading. move the Reed Switch slightly. ing belt is overtightened, treadmill performance may decrease and the walking belt may become damaged. Be careful to check for a few minutes. If the walking belt still slows when walked on , first re- If the walking belt is about 1/8". Plug in the power cord,...

English Manual
Page 26
...Isolator Spring 7 2 Isolator 8 2 Isolator Bottom Cap 9 2 Isolator Bracket Cover 10 2 Isolator Bracket 11 4 Isolator Bracket Bolt 12 2 Isolator Bolt 13 1 Walking Platform 14 2 Belt Guide 15 4 Belt Guide Screw 16 2 Walking Platform Screw (Rear) 17 2 Frame Pivot Bolt 18 1 Front Roller/Pulley 19 1 Magnet 20 8 Pivot Nut 21 2 Pivot Bushing 22... Roller Adj, Bolt 63 1 Rear Roller 64 1 Allen Wrench 65 1 5/32" Allen Wrench 66 1 Left Rear Foot 67 1 Right Foot Rail 68 1 Walking Belt 69 2 Warning Decal 70 1 Filter Wire 71 1 Pulse Bar 72 1 iFIT.com Wire 73 1 iFIT.com CD 74 1 Wire Harness 75 1 Right Top Endcap...
...Isolator Spring 7 2 Isolator 8 2 Isolator Bottom Cap 9 2 Isolator Bracket Cover 10 2 Isolator Bracket 11 4 Isolator Bracket Bolt 12 2 Isolator Bolt 13 1 Walking Platform 14 2 Belt Guide 15 4 Belt Guide Screw 16 2 Walking Platform Screw (Rear) 17 2 Frame Pivot Bolt 18 1 Front Roller/Pulley 19 1 Magnet 20 8 Pivot Nut 21 2 Pivot Bushing 22... Roller Adj, Bolt 63 1 Rear Roller 64 1 Allen Wrench 65 1 5/32" Allen Wrench 66 1 Left Rear Foot 67 1 Right Foot Rail 68 1 Walking Belt 69 2 Warning Decal 70 1 Filter Wire 71 1 Pulse Bar 72 1 iFIT.com Wire 73 1 iFIT.com CD 74 1 Wire Harness 75 1 Right Top Endcap...


