

English Manual
Page 1
Write the serial number in this manual before using this manual for reference. CUSTOMER CARE For service at any time, go to www.proformservice.com. MT Please do not contact the store. Keep this equipment. Or call 1-888-533-1333 Mon.-Fri. 6 a.m.-6 p.m. CAUTION Read all precautions and instructions in the space above for future reference. MT Sat. 8 a.m.-12 p.m. USER'S MANUAL PFRW3814.0 Serial No. www.proform.com Model No. Serial Number Decal (under rail) ACTIVATE YOUR WARRANTY To activate your warranty today, go to www.proformservice.com/ registration.
Write the serial number in this manual before using this manual for reference. CUSTOMER CARE For service at any time, go to www.proformservice.com. MT Please do not contact the store. Keep this equipment. Or call 1-888-533-1333 Mon.-Fri. 6 a.m.-6 p.m. CAUTION Read all precautions and instructions in the space above for future reference. MT Sat. 8 a.m.-12 p.m. USER'S MANUAL PFRW3814.0 Serial No. www.proform.com Model No. Serial Number Decal (under rail) ACTIVATE YOUR WARRANTY To activate your warranty today, go to www.proformservice.com/ registration.
English Manual
Page 2
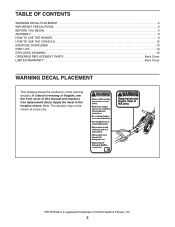
... PRECAUTIONS 3 BEFORE YOU BEGIN 5 ASSEMBLY 6 HOW TO USE THE ROWER 9 HOW TO USE THE CONSOLE 12 EXERCISE GUIDELINES 13 PART LIST 14 EXPLODED DRAWING 15 ORDERING REPLACEMENT PARTS Back Cover LIMITED WARRANTY Back Cover WARNING DECAL PLACEMENT This drawing shows the location(s) of ICON Health & Fitness, Inc. 2 Apply the decal in the location shown. PROFORM is missing or illegible, see the front cover of this manual and request a free replacement decal. If a decal is...
... PRECAUTIONS 3 BEFORE YOU BEGIN 5 ASSEMBLY 6 HOW TO USE THE ROWER 9 HOW TO USE THE CONSOLE 12 EXERCISE GUIDELINES 13 PART LIST 14 EXPLODED DRAWING 15 ORDERING REPLACEMENT PARTS Back Cover LIMITED WARRANTY Back Cover WARNING DECAL PLACEMENT This drawing shows the location(s) of ICON Health & Fitness, Inc. 2 Apply the decal in the location shown. PROFORM is missing or illegible, see the front cover of this manual and request a free replacement decal. If a decal is...
English Manual
Page 3
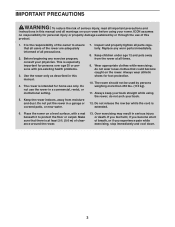
... a level surface, with pre-existing health problems. 3. IMPORTANT PRECAUTIONS WARNING: To reduce the risk of serious injury, read all important precautions and instructions in this manual. 4. Do not release the row bar while the cord is at all parts regularly. ICON assumes no responsibility for foot protection. 10. Keep the rower indoors, away from the rower at least 2 ft. (0.6 m) of...
... a level surface, with pre-existing health problems. 3. IMPORTANT PRECAUTIONS WARNING: To reduce the risk of serious injury, read all important precautions and instructions in this manual. 4. Do not release the row bar while the cord is at all parts regularly. ICON assumes no responsibility for foot protection. 10. Keep the rower indoors, away from the rower at least 2 ft. (0.6 m) of...
English Manual
Page 4
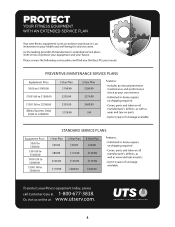
UTS STANDARD SERVICE PLANS all 4
UTS STANDARD SERVICE PLANS all 4
English Manual
Page 5
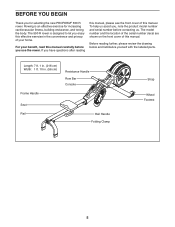
... cardiovascular fitness, building endurance, and toning the body. The 550 R rower is an effective exercise for selecting the new PROFORM® 550 R rower. For your home. BEFORE YOU BEGIN Thank you use the rower. Rowing is designed to let you enjoy this effective exercise in . (56 cm) Frame Handle Resistance Handle Row Bar Console Seat Rail Rail Handle Folding Clamp Strap Wheel Footrest 5 The model number and the location...
... cardiovascular fitness, building endurance, and toning the body. The 550 R rower is an effective exercise for selecting the new PROFORM® 550 R rower. For your home. BEFORE YOU BEGIN Thank you use the rower. Rowing is designed to let you enjoy this effective exercise in . (56 cm) Frame Handle Resistance Handle Row Bar Console Seat Rail Rail Handle Folding Clamp Strap Wheel Footrest 5 The model number and the location...

English Manual
Page 6
...; Place all assembly steps. • Assembly requires the following tool(s): one Phillips screwdriver one adjustable wrench To avoid damaging parts, do not use power tools. 1. ASSEMBLY • To hire an authorized service technician to assemble this manual) and register your warranty • saves you time if you ever need to contact Customer Care • allows us to notify you of upgrades and offers Note...
...; Place all assembly steps. • Assembly requires the following tool(s): one Phillips screwdriver one adjustable wrench To avoid damaging parts, do not use power tools. 1. ASSEMBLY • To hire an authorized service technician to assemble this manual) and register your warranty • saves you time if you ever need to contact Customer Care • allows us to notify you of upgrades and offers Note...
English Manual
Page 7
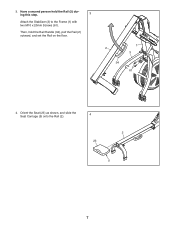
Orient the Seat (23) as shown, and slide the Seat Carriage (5) onto the Rail (2). 4 2 23 5 7 Have a second person hold the Rail Handle (34), pull the Rail (2) outward, and set the Rail on the floor. 2 34 1 3 61 4. Then, hold the Rail (2) during this step. 3 Attach the Stabilizer (3) to the Frame (1) with two M10 x 20mm Screws (61). 3.
Orient the Seat (23) as shown, and slide the Seat Carriage (5) onto the Rail (2). 4 2 23 5 7 Have a second person hold the Rail Handle (34), pull the Rail (2) outward, and set the Rail on the floor. 2 34 1 3 61 4. Then, hold the Rail (2) during this step. 3 Attach the Stabilizer (3) to the Frame (1) with two M10 x 20mm Screws (61). 3.
English Manual
Page 8
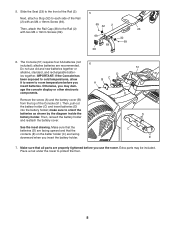
... before you insert batteries. Remove the screw (A) and the battery cover (B) from the top of the Rail (2) with two M4 x 19mm Screws (69). 69 32 2 23 69 69 38 32 69 6. 5. Slide the Seat (23) to the front of the Rail (2). 5 Next, attach a Stop (32) to each side of the Console (51). alkaline batteries are properly tightened before you use old and new...
... before you insert batteries. Remove the screw (A) and the battery cover (B) from the top of the Rail (2) with two M4 x 19mm Screws (69). 69 32 2 23 69 69 38 32 69 6. 5. Slide the Seat (23) to the front of the Rail (2). 5 Next, attach a Stop (32) to each side of the Console (51). alkaline batteries are properly tightened before you use old and new...
English Manual
Page 9
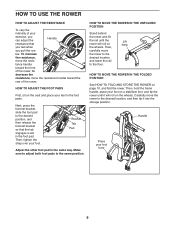
... bar. HOW TO MOVE THE ROWER IN THE UNFOLDED POSITION Stand behind the rower and lift the rail until it into the storage position. tance handle toward the rear of the rower; Bracket Tab Pad Adjust the other foot pad in the foot pad. Carefully move the rower to the desired location, and lower the rail to the same position. To increase the resistance, move...
... bar. HOW TO MOVE THE ROWER IN THE UNFOLDED POSITION Stand behind the rower and lift the rail until it into the storage position. tance handle toward the rear of the rower; Bracket Tab Pad Adjust the other foot pad in the foot pad. Carefully move the rower to the desired location, and lower the rail to the same position. To increase the resistance, move...
English Manual
Page 10
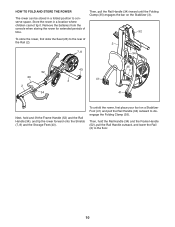
... store the rower, first slide the Seat (23) to the floor. 10 Store the rower in a folded position to disengage the Folding Clamp (35). Then, pull the Rail Handle (34) inward until the Folding Clamp (35) engages the bar on a Stabilizer Foot (41) and pull the Rail Handle (34) outward to conserve space. Remove the batteries from the console when storing...
... store the rower, first slide the Seat (23) to the floor. 10 Store the rower in a folded position to disengage the Folding Clamp (35). Then, pull the Rail Handle (34) inward until the Folding Clamp (35) engages the bar on a Stabilizer Foot (41) and pull the Rail Handle (34) outward to conserve space. Remove the batteries from the console when storing...
English Manual
Page 11
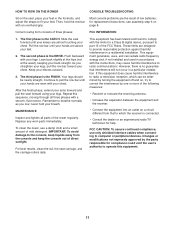
... in accordance with a smooth, fluid motion. CONSOLE TROUBLESHOOTING Most console problems are almost touching your chest. Changes or modifications not expressly approved by one or more of mild detergent. As you row; To clean the rower, use only shielded interface cables when connecting to pull the row bar until your chest. Correct rowing form consists of direct sunlight. Continue to computer or peripheral devices...
... in accordance with a smooth, fluid motion. CONSOLE TROUBLESHOOTING Most console problems are almost touching your chest. Changes or modifications not expressly approved by one or more of mild detergent. As you row; To clean the rower, use only shielded interface cables when connecting to pull the row bar until your chest. Correct rowing form consists of direct sunlight. Continue to computer or peripheral devices...

English Manual
Page 12
... simply begin rowing. 2. To turn off feature. If the row bar does not move and the console buttons are not pressed for continuous display, press the Priority Display button repeatedly until the word SCAN appears in a repeating cycle. HOW TO USE THE CONSOLE Make sure that provide instant exercise feedback during your workout. Strokes Per Minute (SPM)-This mode shows the number of clear plastic on...
... simply begin rowing. 2. To turn off feature. If the row bar does not move and the console buttons are not pressed for continuous display, press the Priority Display button repeatedly until the word SCAN appears in a repeating cycle. HOW TO USE THE CONSOLE Make sure that provide instant exercise feedback during your workout. Strokes Per Minute (SPM)-This mode shows the number of clear plastic on...
English Manual
Page 13
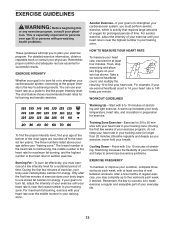
... find the proper intensity level. WORKOUT GUIDELINES Warming Up-Start with your heart rate in your training zone. (During the first few minutes of the chart (ages are essential for exercise. Training Zone Exercise-Exercise for 20 to burn fat, adjust the intensity of your exercise until your heart rate is to success is near the highest number in your training zone for longer than 20...
... find the proper intensity level. WORKOUT GUIDELINES Warming Up-Start with your heart rate in your training zone. (During the first few minutes of the chart (ages are essential for exercise. Training Zone Exercise-Exercise for 20 to burn fat, adjust the intensity of your exercise until your heart rate is to success is near the highest number in your training zone for longer than 20...
English Manual
Page 14
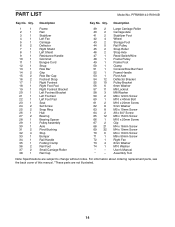
... 2 Storage Foot 44 5 Rail Pulley 45 2 Strap Roller 46 2 Strap Axle 47 1 Reed Switch/Wire 48 1 Frame Pulley 49 1 Frame Foot 50 1 Clamp 51 1 Console/Row Bar Rest 52 1 Frame Handle 53 1 Pivot Axle 54 12 Deflector Bracket 55 10 Pulley Bracket 56 6 6mm Washer 57 11 M6 Locknut 58 3 M8 Washer 59 2 M8 x 12mm Screw 60 1 M10 x 40mm Bolt 61 2 M10 x 20mm Screw 62...
... 2 Storage Foot 44 5 Rail Pulley 45 2 Strap Roller 46 2 Strap Axle 47 1 Reed Switch/Wire 48 1 Frame Pulley 49 1 Frame Foot 50 1 Clamp 51 1 Console/Row Bar Rest 52 1 Frame Handle 53 1 Pivot Axle 54 12 Deflector Bracket 55 10 Pulley Bracket 56 6 6mm Washer 57 11 M6 Locknut 58 3 M8 Washer 59 2 M8 x 12mm Screw 60 1 M10 x 40mm Bolt 61 2 M10 x 20mm Screw 62...
English Manual
Page 15
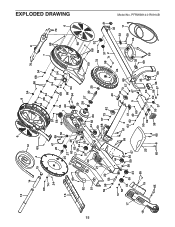
PFRW3814.0 R0914B EXPLODED DRAWING 6 13 8 15 14 12 54 70 9 66 74 24 16 69 15 4 69 54 68 54 68 68 54 47 26 69 50 25 27 63 46 57 62 56 44 45 57 56 48 54 1 49 29 54 68 54 68 10 68 64 54 7 68 70 6 68 52 51 20 57 55 44 62 63 28 27 30 25 21 60 69 72 68 32 69 59 58 22 53 57 44 56 17 44 55 44 58 59 56 57 68 57 73 42 43 58 31 71 2 69 61 3 63 62 41 40 69 42 24 73 57 69 5 67 32 31 32 33 11 69 34 18 65 19 23 55 39 35 63 69 69 65 65 65 38 55 37 62 56 57 36 69 Model No.
PFRW3814.0 R0914B EXPLODED DRAWING 6 13 8 15 14 12 54 70 9 66 74 24 16 69 15 4 69 54 68 54 68 68 54 47 26 69 50 25 27 63 46 57 62 56 44 45 57 56 48 54 1 49 29 54 68 54 68 10 68 64 54 7 68 70 6 68 52 51 20 57 55 44 62 63 28 27 30 25 21 60 69 72 68 32 69 59 58 22 53 57 44 56 17 44 55 44 58 59 56 57 68 57 73 42 43 58 31 71 2 69 61 3 63 62 41 40 69 42 24 73 57 69 5 67 32 31 32 33 11 69 34 18 65 19 23 55 39 35 63 69 69 65 65 65 38 55 37 62 56 57 36 69 Model No.
English Manual
Page 16
... the product (see the front cover of this manual) • the key number and description of the replacement part(s) (see page 4. ORDERING REPLACEMENT PARTS To order replacement parts, please see the front cover of this manual) LIMITED WARRANTY IMPORTANT: To protect your fitness equipment with an extended service plan, see the PART LIST and the EXPLODED DRAWING near the end of this manual. ICON Health & Fitness, Inc. (ICON) warrants this product to the...
... the product (see the front cover of this manual) • the key number and description of the replacement part(s) (see page 4. ORDERING REPLACEMENT PARTS To order replacement parts, please see the front cover of this manual) LIMITED WARRANTY IMPORTANT: To protect your fitness equipment with an extended service plan, see the PART LIST and the EXPLODED DRAWING near the end of this manual. ICON Health & Fitness, Inc. (ICON) warrants this product to the...


