

English Manual
Page 1
Visit our website at www.proform.com new products, prizes, fitness tips, and much more! Serial Number Decal USER'S MANUAL SEARS, ROEBUCK AND CO., HOFFMAN ESTATES, IL 60179 CAUTION Read all precautions and instructions in the space above for future reference. Keep this equipment. Write the serial number in this manual before using this manual for future reference. Patent Pending Model No. 831.285960 Serial No.
Visit our website at www.proform.com new products, prizes, fitness tips, and much more! Serial Number Decal USER'S MANUAL SEARS, ROEBUCK AND CO., HOFFMAN ESTATES, IL 60179 CAUTION Read all precautions and instructions in the space above for future reference. Keep this equipment. Write the serial number in this manual before using this manual for future reference. Patent Pending Model No. 831.285960 Serial No.

English Manual
Page 2
TABLE OF CONTENTS IMPORTANT PRECAUTIONS 3 BEFORE YOU BEGIN 4 PART IDENTIFICATION CHART 5 ASSEMBLY 6 HOW TO USE THE ELLIPTICAL TRAINER 9 MAINTENANCE 11 CONDITIONING GUIDELINES 12 PART LIST 14 EXPLODED DRAWING 15 HOW TO ORDER REPLACEMENT PARTS Back Cover FULL 90 DAY WARRANTY Back Cover 2
TABLE OF CONTENTS IMPORTANT PRECAUTIONS 3 BEFORE YOU BEGIN 4 PART IDENTIFICATION CHART 5 ASSEMBLY 6 HOW TO USE THE ELLIPTICAL TRAINER 9 MAINTENANCE 11 CONDITIONING GUIDELINES 12 PART LIST 14 EXPLODED DRAWING 15 HOW TO ORDER REPLACEMENT PARTS Back Cover FULL 90 DAY WARRANTY Back Cover 2

English Manual
Page 3
... of all instructions before using the elliptical trainer. Replace any time while exercising, stop exercising on a level surface, with pre-existing health problems. Read all precautions. 4. IMPORTANT PRECAUTIONS WARNING: To reduce the risk of 35 or persons with a mat beneath it to ensure that is in this or any exercise program, consult your physician. Place the elliptical trainer on the elliptical trainer, allow the pedals to come...
... of all instructions before using the elliptical trainer. Replace any time while exercising, stop exercising on a level surface, with pre-existing health problems. Read all precautions. 4. IMPORTANT PRECAUTIONS WARNING: To reduce the risk of 35 or persons with a mat beneath it to ensure that is in this or any exercise program, consult your physician. Place the elliptical trainer on the elliptical trainer, allow the pedals to come...
English Manual
Page 4
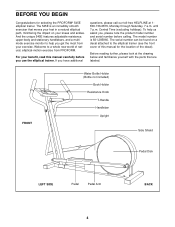
..., read this manual for selecting the PROFORM® 545E elliptical trainer. And the unique 545E features adjustable resistance, upper-body and stationary handlebars, and a multimode exercise monitor to help us assist you have additional questions, please call our toll-free HELPLINE at the drawing below and familiarize yourself with the parts that moves your feet in a natural elliptical path, minimizing the impact on a decal attached to...
..., read this manual for selecting the PROFORM® 545E elliptical trainer. And the unique 545E features adjustable resistance, upper-body and stationary handlebars, and a multimode exercise monitor to help us assist you have additional questions, please call our toll-free HELPLINE at the drawing below and familiarize yourself with the parts that moves your feet in a natural elliptical path, minimizing the impact on a decal attached to...
English Manual
Page 5
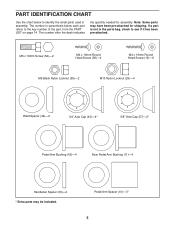
...)-2* Pedal Arm Bushing (42)-4 Rear Pedal Arm Bushing (11)-4 Handlebar Spacer (39)-2 * Extra parts may have been pre-attached for assembly. The number in the parts bag, check to see if it has been pre-attached. Note: Some parts may be included. If a part is not in parenthesis below to the key number of the part, from the PART LIST on page 14. PART IDENTIFICATION CHART Use the chart below each part refers...
...)-2* Pedal Arm Bushing (42)-4 Rear Pedal Arm Bushing (11)-4 Handlebar Spacer (39)-2 * Extra parts may have been pre-attached for assembly. The number in the parts bag, check to see if it has been pre-attached. Note: Some parts may be included. If a part is not in parenthesis below to the key number of the part, from the PART LIST on page 14. PART IDENTIFICATION CHART Use the chart below each part refers...
English Manual
Page 6
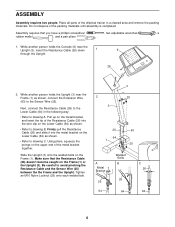
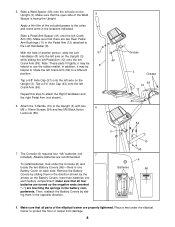
... not dispose of the elliptical trainer in the following way: • Refer to avoid pinching the Resistance Cable and the Sensor Wire (25) between the the Frame and the Upright. Next, connect the Resistance Cable (26) to the Lower Cable (64) in a cleared area and remove the packing materials. Slide the Upright (3) onto the welded bolts on the upper end of the Resistance Cable (26) into the...
... not dispose of the elliptical trainer in the following way: • Refer to avoid pinching the Resistance Cable and the Sensor Wire (25) between the the Frame and the Upright. Next, connect the Resistance Cable (26) to the Lower Cable (64) in a cleared area and remove the packing materials. Slide the Upright (3) onto the welded bolts on the upper end of the Resistance Cable (26) into the...
English Manual
Page 7
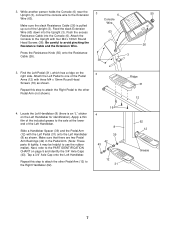
... the Console (6) near the Upright (3), connect the console wire to the axle at the lower end of the Left Handlebar. Locate the Left Handlebar (8) (there is pulled Wire up out of the Pedal Arms (12) with three M4 x 19mm Round Head Screws (16) as shown. Make sure that there are two Pedal Arm Bushings (42) in the Pedal Arm. (Note: These parts fit tightly; Repeat this step to...
... the Console (6) near the Upright (3), connect the console wire to the axle at the lower end of the Left Handlebar. Locate the Left Handlebar (8) (there is pulled Wire up out of the Pedal Arms (12) with three M4 x 19mm Round Head Screws (16) as shown. Make sure that there are two Pedal Arm Bushings (42) in the Pedal Arm. (Note: These parts fit tightly; Repeat this step to...
English Manual
Page 8
... on the Battery Covers. Alkaline batteries are two Rear Pedal Arm Bushings (11) in the opposite direction. Then, reattach the Battery Covers by the arrows on the Upright (3). Place a mat under the Console (6) and locate the two Battery Covers (66)-there is facing the Upright. Make sure that all four batteries are turned so the negative ends (marked "-") are properly tightened. Apply a thin film of the elliptical trainer are touching...
... on the Battery Covers. Alkaline batteries are two Rear Pedal Arm Bushings (11) in the opposite direction. Then, reattach the Battery Covers by the arrows on the Upright (3). Place a mat under the Console (6) and locate the two Battery Covers (66)-there is facing the Upright. Make sure that all four batteries are turned so the negative ends (marked "-") are properly tightened. Apply a thin film of the elliptical trainer are touching...
English Manual
Page 9
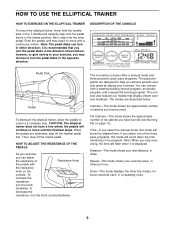
... fat burning program. Distance-This mode shows your exercise. Scan-This mode displays the other pedal. Push the pedals until they begin to decrease the resistance, turn the knob clockwise; it is in either direction; to move until the flywheel stops. Fat Calories-This mode shows the approximate number of fat calories you turn the pedal disks in the program. Then, step off the highest pedal first. The innovative console offers a manual mode and...
... fat burning program. Distance-This mode shows your exercise. Scan-This mode displays the other pedal. Push the pedals until they begin to decrease the resistance, turn the knob clockwise; it is in either direction; to move until the flywheel stops. Fat Calories-This mode shows the approximate number of fat calories you turn the pedal disks in the program. Then, step off the highest pedal first. The innovative console offers a manual mode and...
English Manual
Page 10
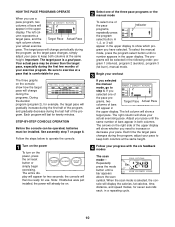
... the steps below to step 4. the console will show your workout If you selected the manual mode, go to operate the console. 1 Turn on the power To turn on the power, press the on/reset button or simply begin exercising. gram you have selected. gram 1 (interval), program 2 (aerobic), program 3 (fat burn), manual mode. 3 Begin your actual exercising pace. If you selected one of bars will appear in the following order: pro- The...
... the steps below to step 4. the console will show your workout If you selected the manual mode, go to operate the console. 1 Turn on the power To turn on the power, press the on/reset button or simply begin exercising. gram you have selected. gram 1 (interval), program 2 (aerobic), program 3 (fat burn), manual mode. 3 Begin your actual exercising pace. If you selected one of bars will appear in the following order: pro- The...
English Manual
Page 11
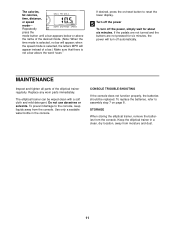
... is selected, no bar will turn off automatically. MAINTENANCE Inspect and tighten all parts of the desired mode. (Note: When the time mode is not a bar above the word "scan." If desired, press the on/reset button to assembly step 7 on page 8. Replace any worn parts immediately. STORAGE When storing the elliptical trainer, remove the batteries from the console. Do not use abrasives or solvents. Repeatedly press the mode button until a bar appears below or above...
... is selected, no bar will turn off automatically. MAINTENANCE Inspect and tighten all parts of the desired mode. (Note: When the time mode is not a bar above the word "scan." If desired, press the on/reset button to assembly step 7 on page 8. Replace any worn parts immediately. STORAGE When storing the elliptical trainer, remove the batteries from the console. Do not use abrasives or solvents. Repeatedly press the mode button until a bar appears below or above...

English Manual
Page 12
... or any exercise program, consult your training zone. For aerobic exercise, adjust the intensity of your exercise until your heart rate is the recommended heart rate for aerobic exercise. Then, stop exercising.) WORKOUT GUIDELINES Each workout should include the following guidelines will help to prevent post-exercise problems. EXERCISE FREQUENCY To maintain or improve your heart rate as you exercise. The smallest number is near the largest number in your heart rate, first exercise for at...
... or any exercise program, consult your training zone. For aerobic exercise, adjust the intensity of your exercise until your heart rate is the recommended heart rate for aerobic exercise. Then, stop exercising.) WORKOUT GUIDELINES Each workout should include the following guidelines will help to prevent post-exercise problems. EXERCISE FREQUENCY To maintain or improve your heart rate as you exercise. The smallest number is near the largest number in your heart rate, first exercise for at...
English Manual
Page 13
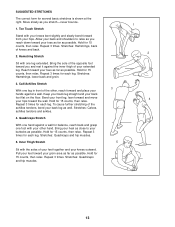
...Stretches: Hamstrings, lower back and groin. 3. Bend your front leg, lean forward and move your hips toward...leg. Repeat 3 times for each leg. Stretches: Quadriceps and hip muscles. 5. Hold for each leg. Inner Thigh Stretch Sit with one leg extended. Calf/Achilles Stretch With one leg in front of the achilles tendons, bend your back leg...your back foot flat on the floor. Keep your back leg straight and your hips. Pull your feet toward the ...Stretches: Hamstrings, back of your extended leg. Hold for 15 counts, then relax. Move slowly as possible. Hold for 15 counts...
...Stretches: Hamstrings, lower back and groin. 3. Bend your front leg, lean forward and move your hips toward...leg. Repeat 3 times for each leg. Stretches: Quadriceps and hip muscles. 5. Hold for each leg. Inner Thigh Stretch Sit with one leg extended. Calf/Achilles Stretch With one leg in front of the achilles tendons, bend your back leg...your back foot flat on the floor. Keep your back leg straight and your hips. Pull your feet toward the ...Stretches: Hamstrings, back of your extended leg. Hold for 15 counts, then relax. Move slowly as possible. Hold for 15 counts...
English Manual
Page 14
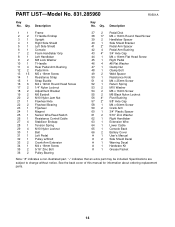
... Screw 14 1 Resistance Strap 15 1 Strap Buckle 16 6 M4 x 19mm Round Head Screw 17 2 1/4" Nylon Locknut 18 2 Adjustment Bracket 19 2 M6 Eyebolt 20 2 M10 Nylon Jam Nut 21 1 Flywheel Axle 22 2 Flywheel Bearing 23 1 Flywheel 24 1 Magnet 25 1 Sensor Wire/Reed Switch 26 1 Resistance Control/Cable 27 4 Stabilizer Endcap 28 1 Tension Spring 29 4 M10 Nylon Locknut 30 1 Belt 31 1 Left Pedal 32 1 Pulley w/Shaft 33 2 Crank Arm Extension...
... Screw 14 1 Resistance Strap 15 1 Strap Buckle 16 6 M4 x 19mm Round Head Screw 17 2 1/4" Nylon Locknut 18 2 Adjustment Bracket 19 2 M6 Eyebolt 20 2 M10 Nylon Jam Nut 21 1 Flywheel Axle 22 2 Flywheel Bearing 23 1 Flywheel 24 1 Magnet 25 1 Sensor Wire/Reed Switch 26 1 Resistance Control/Cable 27 4 Stabilizer Endcap 28 1 Tension Spring 29 4 M10 Nylon Locknut 30 1 Belt 31 1 Left Pedal 32 1 Pulley w/Shaft 33 2 Crank Arm Extension...
English Manual
Page 15
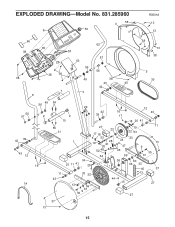
EXPLODED DRAWING-Model No. 831.285960 4 58 6 50 R0501A 13 13 66 62 65 38 51 57 26 63 38 8 38 38 7 56 56 49 38 43 45 42 3 38 13 38 5 30 56 57 42 39 43 12 14 56 49 2 16 54 29 42 16 2 39 17 12 43 10 18 20 41 55 31 11 43 27 22 17 18 19 22 53 11 53 23 1 19 28 21 20 24 47 13 9 52 48 46 35 64 59 61 34 27 11 41 25 36 60 36 33 40 37 33 32 13 13 59 9 61 35 44 15 27 27 37 13 15
EXPLODED DRAWING-Model No. 831.285960 4 58 6 50 R0501A 13 13 66 62 65 38 51 57 26 63 38 8 38 38 7 56 56 49 38 43 45 42 3 38 13 38 5 30 56 57 42 39 43 12 14 56 49 2 16 54 29 42 16 2 39 17 12 43 10 18 20 41 55 31 11 43 27 22 17 18 19 22 53 11 53 23 1 19 28 21 20 24 47 13 9 52 48 46 35 64 59 61 34 27 11 41 25 36 60 36 33 40 37 33 32 13 13 59 9 61 35 44 15 27 27 37 13 15
English Manual
Page 16
...-free numbers listed at the left. This warranty does not apply when the ELLIPTICAL EXERCISER is missing • or you may also have other rights which vary from the date of the decal. This warranty gives you specific legal rights, and you need help or service, or ordering parts, please be replaced, call the following information: • The NAME OF THE PRODUCT (PROFORM® 545E...
...-free numbers listed at the left. This warranty does not apply when the ELLIPTICAL EXERCISER is missing • or you may also have other rights which vary from the date of the decal. This warranty gives you specific legal rights, and you need help or service, or ordering parts, please be replaced, call the following information: • The NAME OF THE PRODUCT (PROFORM® 545E...

