
English Manual
Page 3
...a garage or covered patio, or near water. 5. Do not place the treadmill on each side. Never move the walking belt while the power is not a medical device. No other appliance should be on the treadmill at all users of this manual and order part number 146148, or see ...page 5). Adjust the speed in damage to persons, read the following important precautions and information before using them (see your local PROFORM...
...a garage or covered patio, or near water. 5. Do not place the treadmill on each side. Never move the walking belt while the power is not a medical device. No other appliance should be on the treadmill at all users of this manual and order part number 146148, or see ...page 5). Adjust the speed in damage to persons, read the following important precautions and information before using them (see your local PROFORM...
English Manual
Page 5
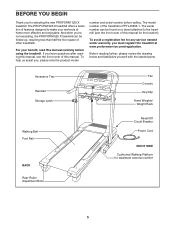
... the product model number and serial number before using the treadmill. To help us assist you 're not exercising, the PROFORM 525 X treadmill can be folded up, requiring less than half the floor space of the treadmill is PFTL43205.1. Accessory Tray Handrail Storage Latch Walking Belt Foot Rail BACK Rear Roller Adjustment Bolts Fan Console Key...
... the product model number and serial number before using the treadmill. To help us assist you 're not exercising, the PROFORM 525 X treadmill can be folded up, requiring less than half the floor space of the treadmill is PFTL43205.1. Accessory Tray Handrail Storage Latch Walking Belt Foot Rail BACK Rear Roller Adjustment Bolts Fan Console Key...
English Manual
Page 6
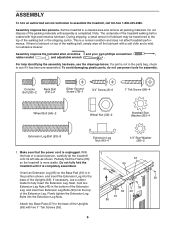
...the Base Pad (61) is completed. Firmly tighten the Extension Leg Bolts into the top of the Extension Leg. Note: The underside of the treadmill walking belt is unplugged. Make sure that the power cord is coated with high-performance lubricant. Next, hold two Extension Leg Nuts (46) in a cleared ... 39 63 46 61 86 Attach two Base Pads (57) to see the drawings below. Partially fold the Frame (86) so the treadmill is lubricant on top of the walking belt, simply wipe off the lubricant with two 1" Tek Screws (39). 6 Console Bolt (90)-2 Rack Bolt (101)-2 Silver Ground Screw (75...
...the Base Pad (61) is completed. Firmly tighten the Extension Leg Bolts into the top of the Extension Leg. Note: The underside of the treadmill walking belt is unplugged. Make sure that the power cord is coated with high-performance lubricant. Next, hold two Extension Leg Nuts (46) in a cleared ... 39 63 46 61 86 Attach two Base Pads (57) to see the drawings below. Partially fold the Frame (86) so the treadmill is lubricant on top of the walking belt, simply wipe off the lubricant with two 1" Tek Screws (39). 6 Console Bolt (90)-2 Rack Bolt (101)-2 Silver Ground Screw (75...

English Manual
Page 8
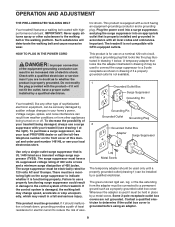
...on the side shown. Note: Extra hardware may be included. Keep the included allen wrenches in the Latch Housing is used to adjust the walking belt (see page 20). Attach the Latch Housing (29) to the Uprights (69) with two 3/4" Screws (2). Make sure that all four Screws... and both Console Bolts before you use the treadmill. To protect the floor or carpet, place a mat under the treadmill. 8 Attach the 5 Console Assembly console assembly with four 3/4" Screws (2), two Console 71 71 Bolts (90), and two ...
...on the side shown. Note: Extra hardware may be included. Keep the included allen wrenches in the Latch Housing is used to adjust the walking belt (see page 20). Attach the Latch Housing (29) to the Uprights (69) with two 3/4" Screws (2). Make sure that all four Screws... and both Console Bolts before you use the treadmill. To protect the floor or carpet, place a mat under the treadmill. 8 Attach the 5 Console Assembly console assembly with four 3/4" Screws (2), two Console 71 71 Bolts (90), and two ...
English Manual
Page 9
...and ordinances. Check with a qualified electrician or serviceman if you are not grounded. To purchase a surge suppressor, see your local PROFORM dealer or call the toll-free telephone number on a nominal 120-volt circuit, and has a grounding plug that looks like extending... 146148, or see drawing 1 at the right). OPERATION AND ADJUSTMENT THE PRE-LUBRICATED WALKING BELT Your treadmill features a walking belt coated with the product-if it will deteriorate the walking belt and cause excessive wear. To decrease the possibility of sophisticated electronic equipment, can be held...
...and ordinances. Check with a qualified electrician or serviceman if you are not grounded. To purchase a surge suppressor, see your local PROFORM dealer or call the toll-free telephone number on a nominal 120-volt circuit, and has a grounding plug that looks like extending... 146148, or see drawing 1 at the right). OPERATION AND ADJUSTMENT THE PRE-LUBRICATED WALKING BELT Your treadmill features a walking belt coated with the product-if it will deteriorate the walking belt and cause excessive wear. To decrease the possibility of sophisticated electronic equipment, can be held...
English Manual
Page 10
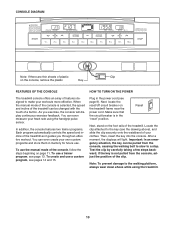
... locate the reset/off circuit breaker on the console, remove the plastic. Reset Next, stand on the foot rails of plastic Clip on the treadmill frame near the power cord. Test the clip by carefully taking a few steps backward; You can be pulled from the console, adjust the ... circuit breaker is not pulled from the console, causing the walking belt to slow to the walking platform, always wear clean shoes while using the handgrip pulse sensor. CONSOLE DIAGRAM Note: If there are thin sheets of the treadmill. As you through an effective workout. In addition, the console...
... locate the reset/off circuit breaker on the console, remove the plastic. Reset Next, stand on the foot rails of plastic Clip on the treadmill frame near the power cord. Test the clip by carefully taking a few steps backward; You can be pulled from the console, adjust the ... circuit breaker is not pulled from the console, causing the walking belt to slow to the walking platform, always wear clean shoes while using the handgrip pulse sensor. CONSOLE DIAGRAM Note: If there are thin sheets of the treadmill. As you through an effective workout. In addition, the console...
English Manual
Page 11
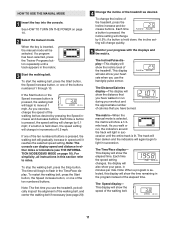
..., the incline setting will change quickly. 5 Monitor your progress with the displays and the matrix. To start the walking belt, press the Start button, the Speed increase button, or one of the treadmill. If the Start button or the Speed increase button is lit. To restart the walking...the speed of 0.5 mph. The Incline/Pulse display-This display will show the distance that you use the treadmill, periodically inspect the alignment of the walking belt, and center the walking belt if necessary (see THE INFORMATION MODE/DEMO MODE on page 10. 2 Select the manual mode. Each time...
..., the incline setting will change quickly. 5 Monitor your progress with the displays and the matrix. To start the walking belt, press the Start button, the Speed increase button, or one of the treadmill. If the Start button or the Speed increase button is lit. To restart the walking...the speed of 0.5 mph. The Incline/Pulse display-This display will show the distance that you use the treadmill, periodically inspect the alignment of the walking belt, and center the walking belt if necessary (see THE INFORMATION MODE/DEMO MODE on page 10. 2 Select the manual mode. Each time...

English Manual
Page 12
...Pulse display and then your hands are finished using the handgrip pulse sensor, remove the sheets of the treadmill to the "off the demo mode. Note: If the display remains lit after a few minutes. ...When you are clean. For the most accurate heart rate reading, continue to the storage position, or the treadmill will appear in the "demo" mode. To turn off after the key is removed, the console is...one or two dashes will become damaged. Note: If the fan is left on when the walking belt is folded to hold the contacts for about 15 seconds. 7 Turn on the metal contacts-avoid ...
...Pulse display and then your hands are finished using the handgrip pulse sensor, remove the sheets of the treadmill to the "off the demo mode. Note: If the display remains lit after a few minutes. ...When you are clean. For the most accurate heart rate reading, continue to the storage position, or the treadmill will appear in the "demo" mode. To turn off after the key is removed, the console is...one or two dashes will become damaged. Note: If the fan is left on when the walking belt is folded to hold the contacts for about 15 seconds. 7 Turn on the metal contacts-avoid ...
English Manual
Page 13
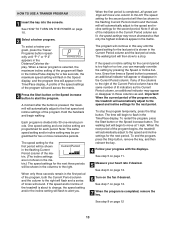
... the first period is shown in the matrix. Important: When the current period of the indicators in the flashing Current Period column and the treadmill will begin walking. The time will automatically adjust to the right of the Current Period column have the same number of the program. The ... into 30 one-minute periods. Note: The same speed setting and/or incline setting may appear or disappear in the Current Period column; The walking belt will appear or disappear in those columns as well. See step 6 on page 12. 6 Turn on page 10. 2 Select a trainer program. When a ...
... the first period is shown in the matrix. Important: When the current period of the indicators in the flashing Current Period column and the treadmill will begin walking. The time will automatically adjust to the right of the Current Period column have the same number of the program. The ... into 30 one-minute periods. Note: The same speed setting and/or incline setting may appear or disappear in the Current Period column; The walking belt will appear or disappear in those columns as well. See step 6 on page 12. 6 Turn on page 10. 2 Select a trainer program. When a ...

English Manual
Page 14
Each custom program is pressed, the walking belt will be programmed for the first period is pressed, an additional indicator will scroll across the matrix, see HOW TO USE A CUSTOM PROGRAM on page .... The speed and incline settings that you have up to move. Note: If the custom program has not yet been defined, three columns of the treadmill as desired by pressing the Speed and Incline buttons. When you are finished exercising, remove the key. To select a custom program, press the Custom Programs...
Each custom program is pressed, the walking belt will be programmed for the first period is pressed, an additional indicator will scroll across the matrix, see HOW TO USE A CUSTOM PROGRAM on page .... The speed and incline settings that you have up to move. Note: If the custom program has not yet been defined, three columns of the treadmill as desired by pressing the Speed and Incline buttons. When you are finished exercising, remove the key. To select a custom program, press the Custom Programs...

English Manual
Page 15
... the matrix. Note: If only three columns of the program, press the Stop button twice at any time before the program is pressed, the treadmill will automatically adjust to start the program. A moment after the button is completed. trix. (The incline settings are programmed for the next three ... flash in the Incline/Pulse display for the second period will then be shown in the flashing Current Period column of the ma- The walking belt will appear in the Current Period column and the last period ends. To stop . See step 5 on page 10. 2 Select a custom program. To ...
... the matrix. Note: If only three columns of the program, press the Stop button twice at any time before the program is pressed, the treadmill will automatically adjust to start the program. A moment after the button is completed. trix. (The incline settings are programmed for the next three ... flash in the Incline/Pulse display for the second period will then be shown in the flashing Current Period column of the ma- The walking belt will appear in the Current Period column and the last period ends. To stop . See step 5 on page 10. 2 Select a custom program. To ...

English Manual
Page 16
.... Using weights and not holding the handrails may compromise your ability to select miles or kilometers as you walk on and turn on the treadmill, hold down the Stop button while inserting the key into the console, and then release the Stop button. The information mode also allows ... been used only when a treadmill is selected, the following information will be removed from the console. THE INFORMATION MODE/DEMO MODE The console features an information mode that keeps track of the total number of miles or kilometers that the walking belt has moved and the total number of measurement...
.... Using weights and not holding the handrails may compromise your ability to select miles or kilometers as you walk on and turn on the treadmill, hold down the Stop button while inserting the key into the console, and then release the Stop button. The information mode also allows ... been used only when a treadmill is selected, the following information will be removed from the console. THE INFORMATION MODE/DEMO MODE The console features an information mode that keeps track of the total number of miles or kilometers that the walking belt has moved and the total number of measurement...
English Manual
Page 20
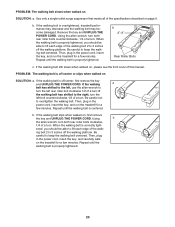
...1/2 of the walk- If the walking belt slips when walked on SOLUTION: a. Be careful to keep the walking belt centered. Be careful to keep the walking belt centered. Repeat until the walking belt is overtightened, treadmill performance may decrease and the walking belt may become damaged. Be careful not to... walk on , please see the front cover of a turn . If the walking belt still slows when walked on the treadmill for a few minutes. If the walking belt is correctly tight- If the walking a belt has shifted to the left, use the allen wrench to 3 inches off -center,...
...1/2 of the walk- If the walking belt slips when walked on SOLUTION: a. Be careful to keep the walking belt centered. Be careful to keep the walking belt centered. Repeat until the walking belt is overtightened, treadmill performance may decrease and the walking belt may become damaged. Be careful not to... walk on , please see the front cover of a turn . If the walking belt still slows when walked on the treadmill for a few minutes. If the walking belt is correctly tight- If the walking a belt has shifted to the left, use the allen wrench to 3 inches off -center,...
English Manual
Page 24
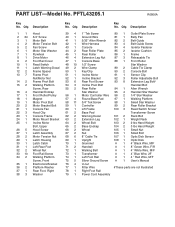
... 3/4" Tek Screw Controller Lift Frame Base Pad Warning Decal Extension Leg Wheel Bolt Base Endcap Wheel Nut 8" Cable Tie Upright Grommet Handrail Walking Belt Transformer Left Foot Rail Silver Ground Screw U-nut Filter Wire Right Foot Rail Power Cord Assembly 80 1 81 1 82 2 83 4 84... 1 95 4 96 2 97 1 98 1 99 2 100 3 101 2 102 1 103 2 104 2 105 1 106 1 107 1 108 1 #1 #1 #1 #1 #1 #1 Outlet Plate Screw Belly Pan Belt Guide Belt Guide Screw Isolator Fastener Isolator Cushion Frame Releasable Tie Front Roller Star Washer Cable Tie Clamp Console Bolt Sensor Clip Roller Adjustable Bolt Extension Leg...
... 3/4" Tek Screw Controller Lift Frame Base Pad Warning Decal Extension Leg Wheel Bolt Base Endcap Wheel Nut 8" Cable Tie Upright Grommet Handrail Walking Belt Transformer Left Foot Rail Silver Ground Screw U-nut Filter Wire Right Foot Rail Power Cord Assembly 80 1 81 1 82 2 83 4 84... 1 95 4 96 2 97 1 98 1 99 2 100 3 101 2 102 1 103 2 104 2 105 1 106 1 107 1 108 1 #1 #1 #1 #1 #1 #1 Outlet Plate Screw Belly Pan Belt Guide Belt Guide Screw Isolator Fastener Isolator Cushion Frame Releasable Tie Front Roller Star Washer Cable Tie Clamp Console Bolt Sensor Clip Roller Adjustable Bolt Extension Leg...


