
English Manual
Page 1
...: www.proformservice.com USER'S MANUAL CAUTION Read all precautions and instructions in this manual before using this manual for future reference. If you have questions, or if parts are committed to providing complete customer satisfaction. Save this equipment. PFTL43205.1 Serial No. As a manufacturer, we are damaged or missing, PLEASE CONTACT OUR CUSTOMER SERVICE DEPARTMENT DIRECTLY. CALL TOLL-FREE: 1-888-533-1333...
...: www.proformservice.com USER'S MANUAL CAUTION Read all precautions and instructions in this manual before using this manual for future reference. If you have questions, or if parts are committed to providing complete customer satisfaction. Save this equipment. PFTL43205.1 Serial No. As a manufacturer, we are damaged or missing, PLEASE CONTACT OUR CUSTOMER SERVICE DEPARTMENT DIRECTLY. CALL TOLL-FREE: 1-888-533-1333...
English Manual
Page 3
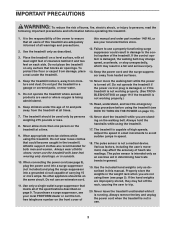
... is turned off the rack, causing the user to trip. 20. Use the treadmill only as an exercise aid in determining heart rate trends in speed. 18. this manual. Keep the power cord and the surge suppressor away from the treadmill at least eight feet of clearance behind it is not a medical device. Keep children under the treadmill. Never move the walking belt while the power is...
... is turned off the rack, causing the user to trip. 20. Use the treadmill only as an exercise aid in determining heart rate trends in speed. 18. this manual. Keep the power cord and the surge suppressor away from the treadmill at least eight feet of clearance behind it is not a medical device. Keep children under the treadmill. Never move the walking belt while the power is...
English Manual
Page 4
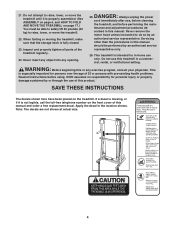
.... When folding or moving the treadmill, make sure that the storage latch is fully closed. 23. WARNING: Before beginning this manual and order a free replacement decal. 21. Inspect and properly tighten all instructions before performing the main- Always unplug the power cord immediately after use this manual should be able to safely lift 45 pounds (20 kg) to do so by an authorized service representative...
.... When folding or moving the treadmill, make sure that the storage latch is fully closed. 23. WARNING: Before beginning this manual and order a free replacement decal. 21. Inspect and properly tighten all instructions before performing the main- Always unplug the power cord immediately after use this manual should be able to safely lift 45 pounds (20 kg) to do so by an authorized service representative...
English Manual
Page 5
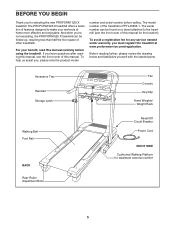
... parts. The PROFORM 525 X treadmill offers a selection of features designed to the treadmill (see the front cover of this manual for any service needed under warranty, you must register the treadmill at home more effective and enjoyable. The serial number can be found on a decal attached to make your benefit, read this manual. To avoid a registration fee for the location). Accessory Tray Handrail Storage Latch Walking Belt Foot Rail BACK Rear Roller Adjustment Bolts Fan Console Key...
... parts. The PROFORM 525 X treadmill offers a selection of features designed to the treadmill (see the front cover of this manual for any service needed under warranty, you must register the treadmill at home more effective and enjoyable. The serial number can be found on a decal attached to make your benefit, read this manual. To avoid a registration fee for the location). Accessory Tray Handrail Storage Latch Walking Belt Foot Rail BACK Rear Roller Adjustment Bolts Fan Console Key...
English Manual
Page 6
... an Extension Leg (63) so the Base Pad (61) is coated with two 1" Tek Screws (39). 6 Set the treadmill in the parts bag, check to the top of the Uprights (69). Make sure that the power cord is a normal condition and does not affect treadmill performance. Do not fully fold the treadmill until assembly is not in a cleared area and remove all packing...
... an Extension Leg (63) so the Base Pad (61) is coated with two 1" Tek Screws (39). 6 Set the treadmill in the parts bag, check to the top of the Uprights (69). Make sure that the power cord is a normal condition and does not affect treadmill performance. Do not fully fold the treadmill until assembly is not in a cleared area and remove all packing...

English Manual
Page 7
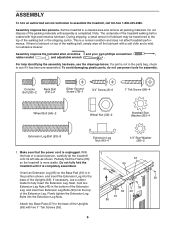
Remove the two bolts (A) attaching the Weight Rack (102) to the wire harness on the right Upright (69), and tighten two Extension Leg Bolts (93) with the Silver Ground Screw (75). Hold one connector and try again. Connect the Wire Harness (42) to the Uprights (69), and discard the bolts. Do not overtighten the Wheel Bolt; Set the Handrail (71) on the Console Base (47). Make sure that...
Remove the two bolts (A) attaching the Weight Rack (102) to the wire harness on the right Upright (69), and tighten two Extension Leg Bolts (93) with the Silver Ground Screw (75). Hold one connector and try again. Connect the Wire Harness (42) to the Uprights (69), and discard the bolts. Do not overtighten the Wheel Bolt; Set the Handrail (71) on the Console Base (47). Make sure that...

English Manual
Page 8
... walking belt (see page 20). Make sure that all four Screws and both Console Bolts before you use the treadmill. 5. Note: Extra hardware may be included. Keep the included allen wrenches in the Latch Housing is used to the Uprights (69) with 6 two Rack Screws (101). 101 69 102 101 7. Set the console assembly on the Weight Rack (102). 7 69 29 Knob 2 102 Spring Collar Pin 8. Start all parts...
... walking belt (see page 20). Make sure that all four Screws and both Console Bolts before you use the treadmill. 5. Note: Extra hardware may be included. Keep the included allen wrenches in the Latch Housing is used to the Uprights (69) with 6 two Rack Screws (101). 101 69 102 101 7. Set the console assembly on the Weight Rack (102). 7 69 29 Knob 2 102 Spring Collar Pin 8. Start all parts...
English Manual
Page 9
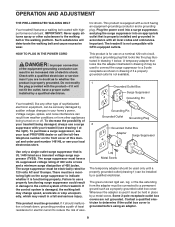
... surge dissipation of this manual and order part number 146148, or see your treadmill (see your local PROFORM dealer or call the toll-free telephone number on or off. Plug the power cord into a surge suppressor, and plug the surge suppressor into an appropriate outlet that is damaged, the walking belt may change speed, accelerate or stop unexpectedly, which may be electrically rated for 120 volts AC...
... surge dissipation of this manual and order part number 146148, or see your treadmill (see your local PROFORM dealer or call the toll-free telephone number on or off. Plug the power cord into a surge suppressor, and plug the surge suppressor into an appropriate outlet that is damaged, the walking belt may change speed, accelerate or stop unexpectedly, which may be electrically rated for 120 volts AC...
English Manual
Page 10
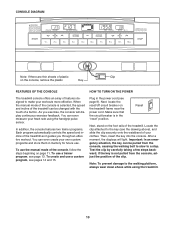
...; When the manual mode of the console is selected, the speed and incline of the treadmill can even measure your heart rate using the treadmill. 10 To use . After a moment, the displays will display continuous exercise feedback. if the key is in the "reset" position. Key FEATURES OF THE CONSOLE HOW TO TURN ON THE POWER The treadmill console offers an array of the clip. As you through an effective workout. You can...
...; When the manual mode of the console is selected, the speed and incline of the treadmill can even measure your heart rate using the treadmill. 10 To use . After a moment, the displays will display continuous exercise feedback. if the key is in the "reset" position. Key FEATURES OF THE CONSOLE HOW TO TURN ON THE POWER The treadmill console offers an array of the clip. As you through an effective workout. You can...
English Manual
Page 11
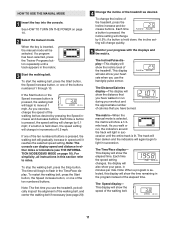
..., all instructions in the matrix. 3 Start the walking belt. To change by 0.5%; The Time/Pace display- See HOW TO TURN ON THE POWER on page 16). if a button is pressed, the walking belt will gradually increase in either miles or kilometers (see page 20). 4 Change the incline of the treadmill as desired by pressing the Speed increase and decrease buttons. The Incline/Pulse display-This display will show your heart rate when you exercise, change by 0.1 mph...
..., all instructions in the matrix. 3 Start the walking belt. To change by 0.5%; The Time/Pace display- See HOW TO TURN ON THE POWER on page 16). if a button is pressed, the walking belt will gradually increase in either miles or kilometers (see page 20). 4 Change the incline of the treadmill as desired by pressing the Speed increase and decrease buttons. The Incline/Pulse display-This display will show your heart rate when you exercise, change by 0.1 mph...

English Manual
Page 12
... power cord. 12 When you are clean. To turn on the fan, press the Fan button. Note: If the display remains lit after a few minutes. 8 When you are finished using the handgrip pulse sensor, remove the sheets of the treadmill to the storage position, or the treadmill will appear in the "demo" mode. Step onto the foot rails, press the Stop button, and adjust the incline of clear plastic from the console...
... power cord. 12 When you are clean. To turn on the fan, press the Fan button. Note: If the display remains lit after a few minutes. 8 When you are finished using the handgrip pulse sensor, remove the sheets of the treadmill to the storage position, or the treadmill will appear in the "demo" mode. Step onto the foot rails, press the Stop button, and adjust the incline of clear plastic from the console...
English Manual
Page 13
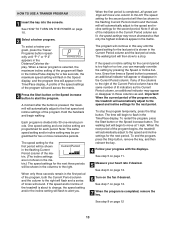
... with the displays. See step 7 on page 10. 2 Select a trainer program. Each program is divided into the console. See step 6 on page 12. 6 Turn on page 12 13 When the next period of the treadmill is completed, remove the key. The speed setting for the second period will then slow to alert you can manually override the setting by pressing the Speed or Incline buttons. To stop . The walking belt will then...
... with the displays. See step 7 on page 10. 2 Select a trainer program. Each program is divided into the console. See step 6 on page 12. 6 Turn on page 12 13 When the next period of the treadmill is completed, remove the key. The speed setting for the second period will then slow to alert you can manually override the setting by pressing the Speed or Incline buttons. To stop . The walking belt will then...

English Manual
Page 14
... period, simply adjust the speed and incline of indicators will appear or disappear in the Current Period column. See step 8 on page 10. 2 Select a custom program. Note: If the custom program has not yet been defined, three columns of the matrix. (The incline settings are finished exercising, remove the key. A moment after the button is di- Each custom program is pressed, the walking belt will scroll...
... period, simply adjust the speed and incline of indicators will appear or disappear in the Current Period column. See step 8 on page 10. 2 Select a custom program. Note: If the custom program has not yet been defined, three columns of the matrix. (The incline settings are finished exercising, remove the key. A moment after the button is di- Each custom program is pressed, the walking belt will scroll...

English Manual
Page 15
... a stop the program temporarily, press the Stop button. When a custom program is completed. When only three seconds remain in the flashing Current Period column, and the treadmill will move one incline setting are finished exercising, remove the key from the console. The speed setting for each period. HOW TO USE A CUSTOM PROGRAM 1 Insert the key into several oneminute periods. One speed setting and one column to the second speed and incline settings that you programmed...
... a stop the program temporarily, press the Stop button. When a custom program is completed. When only three seconds remain in the flashing Current Period column, and the treadmill will move one incline setting are finished exercising, remove the key from the console. The speed setting for each period. HOW TO USE A CUSTOM PROGRAM 1 Insert the key into several oneminute periods. One speed setting and one column to the second speed and incline settings that you programmed...

English Manual
Page 16
... and turn off the demo mode. IMPORTANT: If a "d" appears in the Incline/Pulse display, the console is in the Speed display. If a "d" appears when the information mode is intended to change the unit of measurement and to maintain your upper body as the unit of measurement, if desired. THE INFORMATION MODE/DEMO MODE The console features an information mode that keeps track of the total number of miles or kilometers that the walking belt has moved...
... and turn off the demo mode. IMPORTANT: If a "d" appears in the Incline/Pulse display, the console is in the Speed display. If a "d" appears when the information mode is intended to change the unit of measurement and to maintain your upper body as the unit of measurement, if desired. THE INFORMATION MODE/DEMO MODE The console features an information mode that keeps track of the total number of miles or kilometers that the walking belt has moved...
English Manual
Page 19
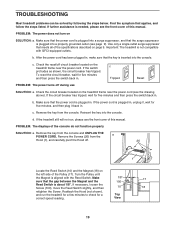
... Hood off during use SOLUTION: a. c. Remove the key from the console. PROBLEM: The power does not turn on SOLUTION: a. If necessary, loosen the Screw (100), move the Reed Switch slightly, and then 10 18 retighten the Screw. c Tripped Reset PROBLEM: The power turns off . 26 1 Locate the Reed Switch (10) and the Magnet (18) on the treadmill frame near the power cord (see the front cover of the console do not function properly SOLUTION: a. TROUBLESHOOTING Most treadmill problems...
... Hood off during use SOLUTION: a. c. Remove the key from the console. PROBLEM: The power does not turn on SOLUTION: a. If necessary, loosen the Screw (100), move the Reed Switch slightly, and then 10 18 retighten the Screw. c Tripped Reset PROBLEM: The power turns off . 26 1 Locate the Reed Switch (10) and the Magnet (18) on the treadmill frame near the power cord (see the front cover of the console do not function properly SOLUTION: a. TROUBLESHOOTING Most treadmill problems...
English Manual
Page 20
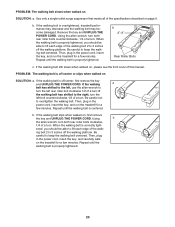
... walking belt is properly tightened. b. Using b the allen wrench, turn both rear roller bolts counterclockwise, 1/4 of a turn . Then, plug in the power cord, insert the key, and carefully walk on the treadmill for a few minutes. Use only a single-outlet surge suppressor that meets all of this manual. Repeat until the walking belt is off -center or slips when walked on page 9. If the walking belt still slows when walked on, please see the front cover...
... walking belt is properly tightened. b. Using b the allen wrench, turn both rear roller bolts counterclockwise, 1/4 of a turn . Then, plug in the power cord, insert the key, and carefully walk on the treadmill for a few minutes. Use only a single-outlet surge suppressor that meets all of this manual. Repeat until the walking belt is off -center or slips when walked on page 9. If the walking belt still slows when walked on, please see the front cover...
English Manual
Page 21
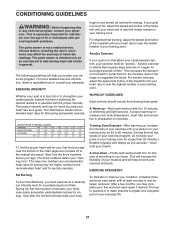
... any exercise program, consult your body uses easily accessible carbohydrate calories for energy. The proper intensity level can be "aerobic." Aerobic exercise is the recommended heart rate for longer than 20 minutes.) Breathe regularly and deeply as a guide. the higher number is activity that requires large amounts of oxygen for prolonged periods of 35 or individuals with preexisting health problems. The pulse sensor...
... any exercise program, consult your body uses easily accessible carbohydrate calories for energy. The proper intensity level can be "aerobic." Aerobic exercise is the recommended heart rate for longer than 20 minutes.) Breathe regularly and deeply as a guide. the higher number is activity that requires large amounts of oxygen for prolonged periods of 35 or individuals with preexisting health problems. The pulse sensor...
English Manual
Page 24
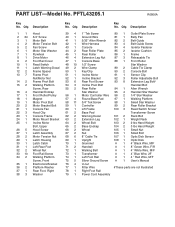
... Wire, M/F 8" Green Wire, F/R 4" White Wire, M/F 4" Blue Wire, 2F 4 " Red Wire, M/F User's Manual #These parts are not illustrated PFTL43205.1 R0806A Key No. Description 1 1 Hood 2 24 3/4" Screw 3 1 Motor Belt 4 2 Motor Tension Bolt 5 2 Fan Screw 6 1 Motor Star Washer 7 1 Flywheel 8 1 Drive Motor 9 2 Foot Rail Cover 10 1 Reed Switch 11 1 Latch Warning Decal 12 2 Frame Spacer 13 7 Frame Pivot Nut/Motor Nut 14 2 Frame Pivot Bolt 15 2 Walking Platform Screw, Rear 16 4 Handrail Endcap 17 1 Front Roller/Pulley 18 1 Magnet 19 1 Motor Pivot Bolt 20 2 Motor Bracket Bolt 21 1 Console...
... Wire, M/F 8" Green Wire, F/R 4" White Wire, M/F 4" Blue Wire, 2F 4 " Red Wire, M/F User's Manual #These parts are not illustrated PFTL43205.1 R0806A Key No. Description 1 1 Hood 2 24 3/4" Screw 3 1 Motor Belt 4 2 Motor Tension Bolt 5 2 Fan Screw 6 1 Motor Star Washer 7 1 Flywheel 8 1 Drive Motor 9 2 Foot Rail Cover 10 1 Reed Switch 11 1 Latch Warning Decal 12 2 Frame Spacer 13 7 Frame Pivot Nut/Motor Nut 14 2 Frame Pivot Bolt 15 2 Walking Platform Screw, Rear 16 4 Handrail Endcap 17 1 Front Roller/Pulley 18 1 Magnet 19 1 Motor Pivot Bolt 20 2 Motor Bracket Bolt 21 1 Console...
English Manual
Page 26
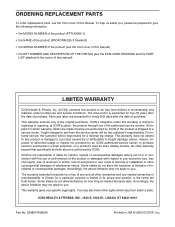
... an implied warranty lasts. The drive motor is shipped to a service center, freight charges to give the following information: • the MODEL NUMBER of the product (PFTL43205.1) • the NAME of the product (PROFORM 525 X treadmill) • the SERIAL NUMBER of the product (see the front cover of this warranty is limited to replacing or repairing, at ICON's option, the product through one of merchantability or fitness for a particular...
... an implied warranty lasts. The drive motor is shipped to a service center, freight charges to give the following information: • the MODEL NUMBER of the product (PFTL43205.1) • the NAME of the product (PROFORM 525 X treadmill) • the SERIAL NUMBER of the product (see the front cover of this warranty is limited to replacing or repairing, at ICON's option, the product through one of merchantability or fitness for a particular...

