
User Manual
Page 2
... v$ inin.iStere °6 Keep a rom e e age of burns7,fitee 46i-14061i before ,00 .pr u topersons read t .the treadmill::: !s the otui OWilet. 4.alfagyk;in etw le th.a o o r o o era* the treadmil u is , a e roper( e I w ere agrOs NduOts'areuSe or: ere Oxygen is :: 0 .WOr sproperl 2 rea mill ...mill at all times e. TABLE OF CONTENTS IMPORTANT PRECAUTIONS BEFORE YOU BEGIN ASSEMBLY OPERATION AND ADJUSTMENT HOW TO FOLD AND MOVE THE TREADMILL MAINTENANCE AND TROUBLE-SHOOTING CONDITIONING GUIDELINES ORDERING REPLACEMENT PARTS LIMITED WARRANTY 2 4 5 7 10 12 14 Back Cover Back Cover Note...
... v$ inin.iStere °6 Keep a rom e e age of burns7,fitee 46i-14061i before ,00 .pr u topersons read t .the treadmill::: !s the otui OWilet. 4.alfagyk;in etw le th.a o o r o o era* the treadmil u is , a e roper( e I w ere agrOs NduOts'areuSe or: ere Oxygen is :: 0 .WOr sproperl 2 rea mill ...mill at all times e. TABLE OF CONTENTS IMPORTANT PRECAUTIONS BEFORE YOU BEGIN ASSEMBLY OPERATION AND ADJUSTMENT HOW TO FOLD AND MOVE THE TREADMILL MAINTENANCE AND TROUBLE-SHOOTING CONDITIONING GUIDELINES ORDERING REPLACEMENT PARTS LIMITED WARRANTY 2 4 5 7 10 12 14 Back Cover Back Cover Note...
User Manual
Page 3
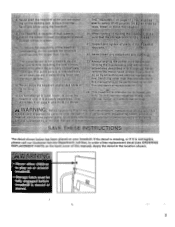
..., please call our Customer Service Department, toll-free, to order a free replacement decal (see ORDERING REPLACEMENT PARTS on or around treadmill. • Storage latch must be ,..n:,.m..p :, ,.1....P loportarittor polioww.pet •e•-•''''O. e on0 .ceaUraa:. ca u ou...8222;9xiS personal A .. . WC) ro e e 44, •• -fXCXXif., The decal shown below has been placed on your treadmill. e treadmill is moved or stored. 3 Apply the decal in the location shown. cf. unlessinstructed` .g authisiiii---""'ap••••r•,: est &#...
..., please call our Customer Service Department, toll-free, to order a free replacement decal (see ORDERING REPLACEMENT PARTS on or around treadmill. • Storage latch must be ,..n:,.m..p :, ,.1....P loportarittor polioww.pet •e•-•''''O. e on0 .ceaUraa:. ca u ou...8222;9xiS personal A .. . WC) ro e e 44, •• -fXCXXif., The decal shown below has been placed on your treadmill. e treadmill is moved or stored. 3 Apply the decal in the location shown. cf. unlessinstructed` .g authisiiii---""'ap••••r•,: est &#...
User Manual
Page 4
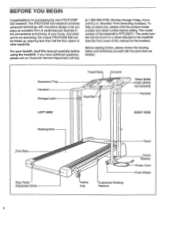
... Wheel 4 And when you , please note the product model number and serial number before using the treadmill. Mountain Time (excluding holidays). To help us assist you 're not exercising, the unique PROFORM 525 can be folded up, requiring less than half the floor space of your benefit, read this manual... PFTL52571. BEFORE YOU BEGIN Congratulations for the location). The model number of this manual carefully before calling. The PROFORM 525 treadmill combines advanced technology with the parts that are labeled. The serial number can be found on a decal attached to let you have ...
... Wheel 4 And when you , please note the product model number and serial number before using the treadmill. Mountain Time (excluding holidays). To help us assist you 're not exercising, the unique PROFORM 525 can be folded up, requiring less than half the floor space of your benefit, read this manual... PFTL52571. BEFORE YOU BEGIN Congratulations for the location). The model number of this manual carefully before calling. The PROFORM 525 treadmill combines advanced technology with the parts that are labeled. The serial number can be found on a decal attached to let you have ...
User Manual
Page 5
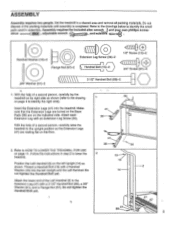
...2. Follow the instructions in assembly. Attach the lower end of a second person, carefully raise the treadmill to lower the treadmill. Do not dispose of a second person, carefully lay the treadmill on its right side as shown. With the help of the Left Handrail (2) to identify the ...right side). Thread a Handrail Bolt (15) with a Handrail Washer (16) into the treadmill. Set the treadmill in a cleared area and remove all packing materials. Position the Left Handrail (2) on the indicated side. With the help of the packing...
...2. Follow the instructions in assembly. Attach the lower end of a second person, carefully raise the treadmill to lower the treadmill. Do not dispose of a second person, carefully lay the treadmill on its right side as shown. With the help of the Left Handrail (2) to identify the ...right side). Thread a Handrail Bolt (15) with a Handrail Washer (16) into the treadmill. Set the treadmill in a cleared area and remove all packing materials. Position the Left Handrail (2) on the indicated side. With the help of the packing...

User Manual
Page 6
...) in the Right Handrail (32). Press the Allen Wrench (73) into the right Upright. To protect the floor or carpet, place a 6 mat under the treadmill. 41 57 -------- 61 89 / C; With the help of the Right Handrail (32) to the Extension Leg (41) with a Handrail Washer (16) into ...6 32 88 6 26- 91 32 88 . 14 a iit 26 '4-'91 4 Z:7 32 6 91 2 ° . Make sure that all parts are tightened before you use the treadmill. Tighten all excess Wire Harness (26) into the Console Base. Make sure that the Wire Harness is no slack Wire Harness between the Strain Relief...
...) in the Right Handrail (32). Press the Allen Wrench (73) into the right Upright. To protect the floor or carpet, place a 6 mat under the treadmill. 41 57 -------- 61 89 / C; With the help of the Right Handrail (32) to the Extension Leg (41) with a Handrail Washer (16) into ...6 32 88 6 26- 91 32 88 . 14 a iit 26 '4-'91 4 Z:7 32 6 91 2 ° . Make sure that all parts are tightened before you use the treadmill. Tighten all excess Wire Harness (26) into the Console Base. Make sure that the Wire Harness is no slack Wire Harness between the Strain Relief...
User Manual
Page 7
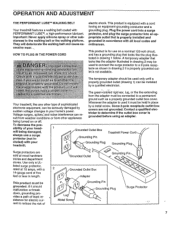
.... listed surge protector, rated at most hardware stores and department stores. A temporary adapter that is properly installed and grounded in your treadmill being turned on a nominal 120-volt circuit, and has a grounding plug that looks like the adapter illustrated in drawing 2 may ... They will deteriorate the walking belt and cause excessive wear... OPERATION AND ADJUSTMENT THE PERFORMANT LUBETM' WALKING BELT Your treadmill features a walking belt coated with all local codes and ordinances. Grounded Outlet Grounded Outlet Box Adapter Grounding Pin This product must...
.... listed surge protector, rated at most hardware stores and department stores. A temporary adapter that is properly installed and grounded in your treadmill being turned on a nominal 120-volt circuit, and has a grounding plug that looks like the adapter illustrated in drawing 2 may ... They will deteriorate the walking belt and cause excessive wear... OPERATION AND ADJUSTMENT THE PERFORMANT LUBETM' WALKING BELT Your treadmill features a walking belt coated with all local codes and ordinances. Grounded Outlet Grounded Outlet Box Adapter Grounding Pin This product must...
User Manual
Page 8
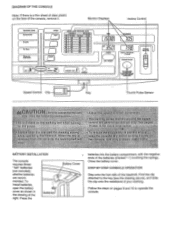
... INCLINE Speed Control Clip Key Thumb Pulse Sensor ore o eta 0 0:WM TA0a4 10 trot stanc on the face of the console, remove it. ee eratj-rt ktqqg: drawing 0:1$. 104%010 !?lie tra y and zones marked arounc guidehnes'ohft gee -Nox. Page 4tog ossibill v# eleGtr> WIC I 90 103 115 SLOW RESET INSERT...
... INCLINE Speed Control Clip Key Thumb Pulse Sensor ore o eta 0 0:WM TA0a4 10 trot stanc on the face of the console, remove it. ee eratj-rt ktqqg: drawing 0:1$. 104%010 !?lie tra y and zones marked arounc guidehnes'ohft gee -Nox. Page 4tog ossibill v# eleGtr> WIC I 90 103 115 SLOW RESET INSERT...
User Manual
Page 9
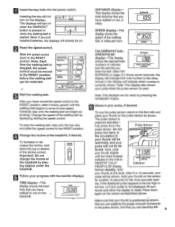
...number is pressure-activated- The pulse sensor is currently shown. After 5 to the pulse sensor, and that you have walked or run on RT KEY I CALORIES/FAT CALORIES/PULSE Arrow display-This display shows the approximate numbers of calories and fat calories you have burned. (See FAT ... This display shows the total distance that your pulse, if desired. CAL./ FAT CALS. / PULSE RIES/FAT CALO- Change the speed of the treadmill by pressing the ON/RESET button. 6 Measure your thumb is not displayed, lift your thumb on . Next, raise your pulse-when the pulse ...
...number is pressure-activated- The pulse sensor is currently shown. After 5 to the pulse sensor, and that you have walked or run on RT KEY I CALORIES/FAT CALORIES/PULSE Arrow display-This display shows the approximate numbers of calories and fat calories you have burned. (See FAT ... This display shows the total distance that your pulse, if desired. CAL./ FAT CALS. / PULSE RIES/FAT CALO- Change the speed of the treadmill by pressing the ON/RESET button. 6 Measure your thumb is not displayed, lift your thumb on . Next, raise your pulse-when the pulse ...
User Manual
Page 10
... sure to the vertical position. 10 After the key is removed, the displays will automatically turn off. Hold the treadmill with your legs rather than your back. Caution: To decrease the possibility of injury, bend your legs and keep your hands in the locations shown ... right. As you are pressed for five minutes, the displays will remain on for about halfway to lift with your back straight. Raise the treadmill about five minutes. 'RT KEY I\ POWER Note: Any time that the walking belt is stopped and no console buttons are finished exercising, stop the walking belt, and...
... sure to the vertical position. 10 After the key is removed, the displays will automatically turn off. Hold the treadmill with your legs rather than your back. Caution: To decrease the possibility of injury, bend your legs and keep your hands in the locations shown ... right. As you are pressed for five minutes, the displays will remain on for about halfway to lift with your back straight. Raise the treadmill about five minutes. 'RT KEY I\ POWER Note: Any time that the walking belt is stopped and no console buttons are finished exercising, stop the walking belt, and...

User Manual
Page 11
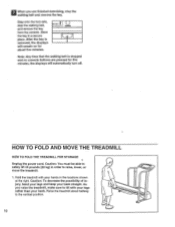
... and keep your right hand as described above 85° Fahrenheit. Hold the handrails and place one foot on the base, and carefully lower the treadmill until it back, or the base pads may come off. Place one foot on the front wheels. To protect the floor or carpet from damage..., place a mat under the treadmill. Tilt tie treadmill back until it . Do not attempt to move the treadmill over the catch. Make sure that the storage latch is fully engaged over the catch. 1. Do not leave the...
... and keep your right hand as described above 85° Fahrenheit. Hold the handrails and place one foot on the base, and carefully lower the treadmill until it back, or the base pads may come off. Place one foot on the front wheels. To protect the floor or carpet from damage..., place a mat under the treadmill. Tilt tie treadmill back until it . Do not attempt to move the treadmill over the catch. Make sure that the storage latch is fully engaged over the catch. 1. Do not leave the...
User Manual
Page 12
...OFF DURING USE a. If the circuit breaker has tripped, wait for five minutes and then press the switch back in . If the treadmill still will not run the treadmill for a few minutes to check for a correct speed reading. Most problems are the result of the Pulley (85). Carefully remove the...Use only a UL-listed surge protector, rated at 1-800-999-3756, Monday through Friday, 6 a.m. left side of drained batteries. MAINTENANCE AND TROUBLE-SHOOTING Most treadmill problems can be solved by following the steps below. until the Magnet is plugged into the console. (See step 1 on the...
...OFF DURING USE a. If the circuit breaker has tripped, wait for five minutes and then press the switch back in . If the treadmill still will not run the treadmill for a few minutes to check for a correct speed reading. Most problems are the result of the Pulley (85). Carefully remove the...Use only a UL-listed surge protector, rated at 1-800-999-3756, Monday through Friday, 6 a.m. left side of drained batteries. MAINTENANCE AND TROUBLE-SHOOTING Most treadmill problems can be solved by following the steps below. until the Magnet is plugged into the console. (See step 1 on the...
User Manual
Page 13
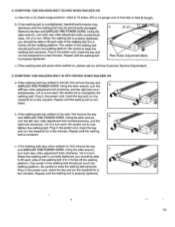
..., first remove the key and UNPLUG THE POWER CORD. c. Fr- 13 4. Plug in the power cord, insert the key and run the treadmill for a few minutes. Using the alien wrench, turn both rear roller adjustment bolts counterclockwise, 1/4 of a turn . Remove the key and UNPLUG...right bolt clockwise, 1/4 of a turn each . b. The center of five feet or less in the power cord, insert the key and run the treadmill for a few minutes. Plug in length. SYMPTOM: THE WALKING BELT SLOWS WHEN WALKED ON a. b. b 3"-4" ----------- Rear Roller Adjustment Bolts c. If ...
..., first remove the key and UNPLUG THE POWER CORD. c. Fr- 13 4. Plug in the power cord, insert the key and run the treadmill for a few minutes. Using the alien wrench, turn both rear roller adjustment bolts counterclockwise, 1/4 of a turn . Remove the key and UNPLUG...right bolt clockwise, 1/4 of a turn each . b. The center of five feet or less in the power cord, insert the key and run the treadmill for a few minutes. Plug in length. SYMPTOM: THE WALKING BELT SLOWS WHEN WALKED ON a. b. b 3"-4" ----------- Rear Roller Adjustment Bolts c. If ...
User Manual
Page 14
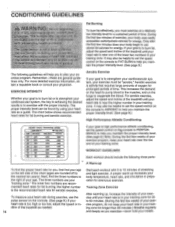
..., and circulation in your training zone. EXERCISE INTENSITY Whether your goal is to 60 minutes. (During the first few minutes of the treadmill until your heart rate is near the higher number in your age. Aerobic exercise is near the low end of your training zone. The...intensity level can be "aerobic." The lower two numbers are general guidelines only. For aerobic exercise, adjust the speed and incline of the treadmill until your heart rate is activity that requires large amounts of oxygen for a sustained period of your train- cise program, do not keep ...
..., and circulation in your training zone. EXERCISE INTENSITY Whether your goal is to 60 minutes. (During the first few minutes of the treadmill until your heart rate is near the higher number in your age. Aerobic exercise is near the low end of your training zone. The...intensity level can be "aerobic." The lower two numbers are general guidelines only. For aerobic exercise, adjust the speed and incline of the treadmill until your heart rate is activity that requires large amounts of oxygen for a sustained period of your train- cise program, do not keep ...
User Manual
Page 16
...caused by or attributable to freight damage, abuse, misuse, improper or abnormal usage or repairs not provided by ICON. If possible, place the treadmill near your telephone for a particular purpose is not responsible or liable for indirect, special or consequential damages arising out of or in its ..., please be prepared to give the following information: • The MODEL NUMBER OF THE PRODUCT (PFTL52571). • The NAME OF THE PRODUCT (PROFORM® 525 treadmill). • The SERIAL NUMBER OF THE PRODUCT (see the front cover of this manual). • The KEY NUMBER OF THE PART(S) (see ...
...caused by or attributable to freight damage, abuse, misuse, improper or abnormal usage or repairs not provided by ICON. If possible, place the treadmill near your telephone for a particular purpose is not responsible or liable for indirect, special or consequential damages arising out of or in its ..., please be prepared to give the following information: • The MODEL NUMBER OF THE PRODUCT (PFTL52571). • The NAME OF THE PRODUCT (PROFORM® 525 treadmill). • The SERIAL NUMBER OF THE PRODUCT (see the front cover of this manual). • The KEY NUMBER OF THE PART(S) (see ...


