
User Manual
Page 1
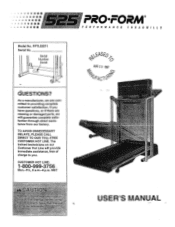
PRO•FORM® PERFORMANCE TREADMI LLS Model No. As a manufacturer, we will provide immediate assistance, free of charge to providing complete customer satisfaction. The trained technicians on our Customer Hot Line will guarantee complete satisfaction through direct assistance from our factory. USER'S MANUAL Serial Number Decal 0 AUG 2 9 1997 '*/ "'EAC-0' QUESTIONS? If you have questions, or if there are missing or...
PRO•FORM® PERFORMANCE TREADMI LLS Model No. As a manufacturer, we will provide immediate assistance, free of charge to providing complete customer satisfaction. The trained technicians on our Customer Hot Line will guarantee complete satisfaction through direct assistance from our factory. USER'S MANUAL Serial Number Decal 0 AUG 2 9 1997 '*/ "'EAC-0' QUESTIONS? If you have questions, or if there are missing or...

User Manual
Page 2
rea mill should not be used.by: ersons. of this manual. rea rni I „is Hein v$ inin.iStere °6 Keep a rom e e age of 12 and pets mill at all times e....res_:' Never use the tre drrr 11 Witf'14are. .0.pn .oni s errconnebtm e . .overs:Oa _see`H..O. TABLE OF CONTENTS IMPORTANT PRECAUTIONS BEFORE YOU BEGIN ASSEMBLY OPERATION AND ADJUSTMENT HOW TO FOLD AND MOVE THE TREADMILL MAINTENANCE AND TROUBLE-SHOOTING CONDITIONING GUIDELINES ORDERING REPLACEMENT PARTS LIMITED WARRANTY 2 4 5 7 10 12 14 Back Cover Back Cover Note: An EXPLODED DRAWING and PART LIST are attached to the center...
rea mill should not be used.by: ersons. of this manual. rea rni I „is Hein v$ inin.iStere °6 Keep a rom e e age of 12 and pets mill at all times e....res_:' Never use the tre drrr 11 Witf'14are. .0.pn .oni s errconnebtm e . .overs:Oa _see`H..O. TABLE OF CONTENTS IMPORTANT PRECAUTIONS BEFORE YOU BEGIN ASSEMBLY OPERATION AND ADJUSTMENT HOW TO FOLD AND MOVE THE TREADMILL MAINTENANCE AND TROUBLE-SHOOTING CONDITIONING GUIDELINES ORDERING REPLACEMENT PARTS LIMITED WARRANTY 2 4 5 7 10 12 14 Back Cover Back Cover Note: An EXPLODED DRAWING and PART LIST are attached to the center...
User Manual
Page 3
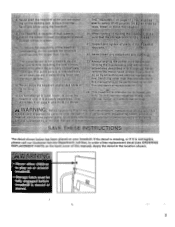
... Customer Service Department, toll-free, to order a free replacement decal (see ORDERING REPLACEMENT PARTS on or around treadmill. • Storage latch must be ,..n:,.m..p :, ,.1....P loportarittor polioww.pet •e•-•''''O. FvH ' re, • reduce; ossibility of this xf tcj t;en - PP arty CC 1p.s ace ..,„.....B.e...,:.9%be fully engaged before treadmill is ca able R AD 6...to play on the back cover of...
... Customer Service Department, toll-free, to order a free replacement decal (see ORDERING REPLACEMENT PARTS on or around treadmill. • Storage latch must be ,..n:,.m..p :, ,.1....P loportarittor polioww.pet •e•-•''''O. FvH ' re, • reduce; ossibility of this xf tcj t;en - PP arty CC 1p.s ace ..,„.....B.e...,:.9%be fully engaged before treadmill is ca able R AD 6...to play on the back cover of...
User Manual
Page 4
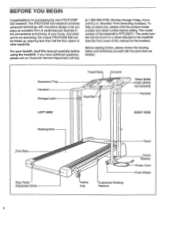
... innovative design to the treadmill (see the front cover of other treadmills. Accessory Tray Handrail Storage Latch Towel Rack Console .,p Key/Clip Water Bottle Holder (Bottle not included) Handrail LEFT SIDE RIGHT SIDE Walking Belt foot Rails Rear Roller Adjustment Bolts Hood Incline Leg Cushioned Walking Platform Circuit Breaker Power Cord Front Wheel 4 For your home. To help us assist you enjoy an excellent form of cardiovascular exercise in the convenience and...
... innovative design to the treadmill (see the front cover of other treadmills. Accessory Tray Handrail Storage Latch Towel Rack Console .,p Key/Clip Water Bottle Holder (Bottle not included) Handrail LEFT SIDE RIGHT SIDE Walking Belt foot Rails Rear Roller Adjustment Bolts Hood Incline Leg Cushioned Walking Platform Circuit Breaker Power Cord Front Wheel 4 For your home. To help us assist you enjoy an excellent form of cardiovascular exercise in the convenience and...
User Manual
Page 5
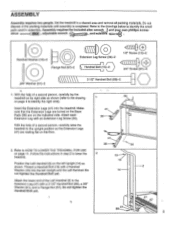
... (refer to identify the small parts used in assembly. Refer to HOW TO LOWER THE TREADMILL FOR USE on page 4 to the upright position so the Extension Legs (41) are on the floor. 2. Thread a Handrail Bolt (15) with a Handrail Washer (16) into the treadmill. Set the treadmill in step 2 to the Extension Leg (41) with an Extension Leg Screw (34). Attach the lower end of a second person, carefully...
... (refer to identify the small parts used in assembly. Refer to HOW TO LOWER THE TREADMILL FOR USE on page 4 to the upright position so the Extension Legs (41) are on the floor. 2. Thread a Handrail Bolt (15) with a Handrail Washer (16) into the treadmill. Set the treadmill in step 2 to the Extension Leg (41) with an Extension Leg Screw (34). Attach the lower end of a second person, carefully...

User Manual
Page 6
... Leg (41) with two 1/2" Screws (13). Attach the Storage Latch (12) to the Left and Right Handrails (2, 32) with a Handrail Washer (16) into the right Upright; Press the Allen Wrench (73) into the right Upright. 3. Slide the Strain Relief Clip (88) onto the Wire Harness (26). QRTAI~T: TheS4oi • abbe Weji:MNORMipf re mus 4. Do not tighten the Handrail Bolt yet. Press...
... Leg (41) with two 1/2" Screws (13). Attach the Storage Latch (12) to the Left and Right Handrails (2, 32) with a Handrail Washer (16) into the right Upright; Press the Allen Wrench (73) into the right Upright. 3. Slide the Strain Relief Clip (88) onto the Wire Harness (26). QRTAI~T: TheS4oi • abbe Weji:MNORMipf re mus 4. Do not tighten the Handrail Bolt yet. Press...
User Manual
Page 7
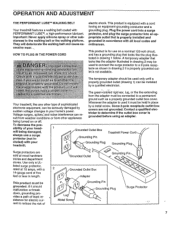
... with your home's power. Grounded Outlet Box Treadmill Power Cord Grounding Pin 0 Grounding Plug Grounding Plug 0 Surge protectors are not grounded. listed surge protector, rated at most hardware stores and department stores. They will deteriorate the walking belt and cause excessive wear... This product is not available. The temporary adapter should malfunction or break down, grounding provides a path of least resistance for use a surge protector...
... with your home's power. Grounded Outlet Box Treadmill Power Cord Grounding Pin 0 Grounding Plug Grounding Plug 0 Surge protectors are not grounded. listed surge protector, rated at most hardware stores and department stores. They will deteriorate the walking belt and cause excessive wear... This product is not available. The temporary adapter should malfunction or break down, grounding provides a path of least resistance for use a surge protector...
User Manual
Page 8
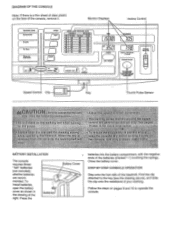
Monitor Displays Incline Contro TRAINING ZONE Performance Aerobic Fat Burn Warm-up Cool-down SET 3 A\ SPEED FAST 1 HEART RATE TRAINING ZONE -\ ( I ww SPY • • MAX RAI 1 (AGE I For auto Max Rum ( 20 I 125 ( 30 LSO 145 165 ) 131 155 ) ( 40 I 115 ( so I 110 ( 60 f 105 130 145 ) 125 140 1111 no ) ( 70 J 95 110 125 ) ( 80 I Zridena POWER INCLINE Speed Control Clip Key Thumb Pulse Sensor ore o eta...
Monitor Displays Incline Contro TRAINING ZONE Performance Aerobic Fat Burn Warm-up Cool-down SET 3 A\ SPEED FAST 1 HEART RATE TRAINING ZONE -\ ( I ww SPY • • MAX RAI 1 (AGE I For auto Max Rum ( 20 I 125 ( 30 LSO 145 165 ) 131 155 ) ( 40 I 115 ( so I 110 ( 60 f 105 130 145 ) 125 140 1111 no ) ( 70 J 95 110 125 ) ( 80 I Zridena POWER INCLINE Speed Control Clip Key Thumb Pulse Sensor ore o eta...
User Manual
Page 9
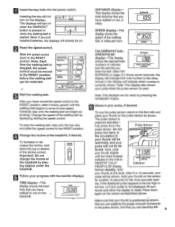
... circulation in miles. The displays will turn on the sensor as shown, that your thumb on the sensor for another 15 seconds for the most accurate read- TIME '5:38 DISTANCE display- Slide the speed control down again on the displays. fltAIM/MG SOME Perionmsoc• htl Maw.* C.1-0•• SET 3 A FAH l4:ESET Start the walking belt. Press down to reset. POWER INCLINE I \ POWER when the ON/RESET button is pressed or...
... circulation in miles. The displays will turn on the sensor as shown, that your thumb on the sensor for another 15 seconds for the most accurate read- TIME '5:38 DISTANCE display- Slide the speed control down again on the displays. fltAIM/MG SOME Perionmsoc• htl Maw.* C.1-0•• SET 3 A FAH l4:ESET Start the walking belt. Press down to reset. POWER INCLINE I \ POWER when the ON/RESET button is pressed or...
User Manual
Page 10
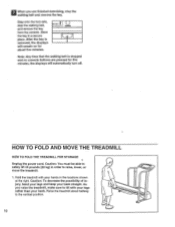
... remove the key. Raise the treadmill about five minutes. 'RT KEY I\ POWER Note: Any time that the walking belt is stopped and no console buttons are finished exercising, stop the walking belt, and remove the key from the console. Caution: You must be able to safely lift 45 pounds (20 kg) in a secure place. HOW TO FOLD AND MOVE THE TREADMILL HOW TO FOLD THE TREADMILL FOR STORAGE 1 Unplug the power cord. After the key is removed, the displays...
... remove the key. Raise the treadmill about five minutes. 'RT KEY I\ POWER Note: Any time that the walking belt is stopped and no console buttons are finished exercising, stop the walking belt, and remove the key from the console. Caution: You must be able to safely lift 45 pounds (20 kg) in a secure place. HOW TO FOLD AND MOVE THE TREADMILL HOW TO FOLD THE TREADMILL FOR STORAGE 1 Unplug the power cord. After the key is removed, the displays...

User Manual
Page 11
.... Pivot the treadmill until the storage latch closes over the catch. 1. Storage Latch Catch Min Closed Base Front Wheels Storage Latch Ilan Opened 11 2. Do not attempt to the position shown and hold it rolls freely on the front wheels. Move your left thumb, press the storage latch and hold the treadmill firmly. Keep the treadmill out of injury, bend your legs and keep your...
.... Pivot the treadmill until the storage latch closes over the catch. 1. Storage Latch Catch Min Closed Base Front Wheels Storage Latch Ilan Opened 11 2. Do not attempt to the position shown and hold it rolls freely on the front wheels. Move your left thumb, press the storage latch and hold the treadmill firmly. Keep the treadmill out of injury, bend your legs and keep your...
User Manual
Page 12
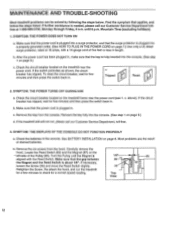
... BATTERY INSTALLATION on the treadmill frame near the power cord. Make sure that the key is plugged into the console. (See step 1 on the treadmill near the power cord (see 1. Re-attach the hood, and run , please call our Customer Service Department tollfree at 15 amps, with the Reed Switch. SYMPTOM: THE POWER TURNS OFF DURING USE a. b. Turn the Pulley until 6 p.m. b. Check the circuit breaker located on page 8. If necessary, loosen the Screw (35...
... BATTERY INSTALLATION on the treadmill frame near the power cord. Make sure that the key is plugged into the console. (See step 1 on the treadmill near the power cord (see 1. Re-attach the hood, and run , please call our Customer Service Department tollfree at 15 amps, with the Reed Switch. SYMPTOM: THE POWER TURNS OFF DURING USE a. b. Turn the Pulley until 6 p.m. b. Check the circuit breaker located on page 8. If necessary, loosen the Screw (35...
User Manual
Page 13
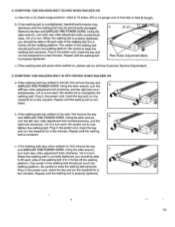
... . Plug in the power cord, insert the key and run the treadmill for a few minutes. b. Be careful not to 4 inches off the walking platform. If the walking belt slips when walked on , please call our toll-free Customer Service Department. 5. Be careful to the left rear roller adjustment bolt counterclockwise, and the right bolt clockwise, 1/4 of a turn each side of the walking belt 3 to overtighten the walking belt. Use only a UL-listed surge protector, rated...
... . Plug in the power cord, insert the key and run the treadmill for a few minutes. b. Be careful not to 4 inches off the walking platform. If the walking belt slips when walked on , please call our toll-free Customer Service Department. 5. Be careful to the left rear roller adjustment bolt counterclockwise, and the right bolt clockwise, 1/4 of a turn each side of the walking belt 3 to overtighten the walking belt. Use only a UL-listed surge protector, rated...
User Manual
Page 14
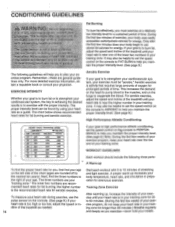
... be helpful to set the speed control on the console to FAT BURN to help you exercise-never hold your heart rate during exercise, use stored fat calories for 20 pulse sensor on the left side of your train- A proper warm-up , increase the intensity of the chart (ages are your physician. cise program, do not keep your heart rate near the higher number in your exer...
... be helpful to set the speed control on the console to FAT BURN to help you exercise-never hold your heart rate during exercise, use stored fat calories for 20 pulse sensor on the left side of your train- A proper warm-up , increase the intensity of the chart (ages are your physician. cise program, do not keep your heart rate near the higher number in your exer...
User Manual
Page 15
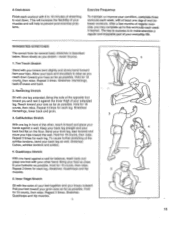
... for each leg. Keep your back leg straight and your extended leg. Repeat 3 times for each leg. To cause further stretching of regular exercise, you stretch-never bounce. 1. Quadriceps Stretch With one hand against a wall for several basic stretches is to five workouts each week if desired. Hold for 15 counts, then relax. Move slowly as possible...
... for each leg. Keep your back leg straight and your extended leg. Repeat 3 times for each leg. To cause further stretching of regular exercise, you stretch-never bounce. 1. Quadriceps Stretch With one hand against a wall for several basic stretches is to five workouts each week if desired. Hold for 15 counts, then relax. Move slowly as possible...
User Manual
Page 16
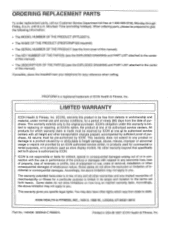
... (PROFORM® 525 treadmill). • The SERIAL NUMBER OF THE PRODUCT (see the front cover of this manual). • The KEY NUMBER OF THE PART(S) (see the EXPLODED DRAWING and PART LIST attached to the center of this manual). • The DESCRIPTION OF THE PART(S) (see the EXPLODED DRAWING and PART LIST attached to the original purchaser. You may also have other warranty beyond that specifically set forth herein. ORDERING REPLACEMENT PARTS To...
... (PROFORM® 525 treadmill). • The SERIAL NUMBER OF THE PRODUCT (see the front cover of this manual). • The KEY NUMBER OF THE PART(S) (see the EXPLODED DRAWING and PART LIST attached to the center of this manual). • The DESCRIPTION OF THE PART(S) (see the EXPLODED DRAWING and PART LIST attached to the original purchaser. You may also have other warranty beyond that specifically set forth herein. ORDERING REPLACEMENT PARTS To...

User Manual
Page 17
Note: Specifications are subject to change without notice. Save this page for future reference. For information about ordering replacement parts, see the back cover of the User's Manual. VP' "Pe "4 \ %1 1 • •k• - REMOVE THIS EXPLODED DRAWING AND PART LIST FROM THE MANUAL.
Note: Specifications are subject to change without notice. Save this page for future reference. For information about ordering replacement parts, see the back cover of the User's Manual. VP' "Pe "4 \ %1 1 • •k• - REMOVE THIS EXPLODED DRAWING AND PART LIST FROM THE MANUAL.
User Manual
Page 19
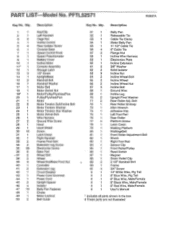
...Rear Isolator Screw Console Base Speed Control Knob Speed Potentiometer Battery Cover Incline Motor Console Assembly Storage Latch 1/2" Screw Upright/Base Handrail Bolt Handrail Washer Motor Belt Motor Swivel Nut Motor/Pulley/Flywheel/Fan Pulley/Flywheel/Fan Motor Motor Tension Bolt/Incline Bolt Motor Tension Washer Motor Tension Star Washer Motor Swivel Bolt Wire Harness Ground Wire Screw Hood Hood Shield Screw Latch Decal Right Handrail Frame Pivot Bolt Extension Leg Screw Electronics Screw Base Pad Wheel Bolt Wheel Wheel Nut/Base Pivot Nut Controller Extension Leg Circuit Breaker Power Cord...
...Rear Isolator Screw Console Base Speed Control Knob Speed Potentiometer Battery Cover Incline Motor Console Assembly Storage Latch 1/2" Screw Upright/Base Handrail Bolt Handrail Washer Motor Belt Motor Swivel Nut Motor/Pulley/Flywheel/Fan Pulley/Flywheel/Fan Motor Motor Tension Bolt/Incline Bolt Motor Tension Washer Motor Tension Star Washer Motor Swivel Bolt Wire Harness Ground Wire Screw Hood Hood Shield Screw Latch Decal Right Handrail Frame Pivot Bolt Extension Leg Screw Electronics Screw Base Pad Wheel Bolt Wheel Wheel Nut/Base Pivot Nut Controller Extension Leg Circuit Breaker Power Cord...

