

English Manual
Page 2
TABLE OF CONTENTS IMPORTANT PRECAUTIONS 3 BEFORE YOU BEGIN 5 ASSEMBLY 6 OPERATION AND ADJUSTMENT 9 HOW TO FOLD AND MOVE THE TREADMILL 22 TROUBLESHOOTING 24 CONDITIONING GUIDELINES 26 ORDERING REPLACEMENT PARTS Back Cover LIMITED WARRANTY Back Cover Note: A PART IDENTIFICATION CHART, an EXPLODED DRAWING, and a PART LIST are attached in the center of ICON Health & Fitness, Inc. 2 PROFORM is a registered trademark of this manual.
TABLE OF CONTENTS IMPORTANT PRECAUTIONS 3 BEFORE YOU BEGIN 5 ASSEMBLY 6 OPERATION AND ADJUSTMENT 9 HOW TO FOLD AND MOVE THE TREADMILL 22 TROUBLESHOOTING 24 CONDITIONING GUIDELINES 26 ORDERING REPLACEMENT PARTS Back Cover LIMITED WARRANTY Back Cover Note: A PART IDENTIFICATION CHART, an EXPLODED DRAWING, and a PART LIST are attached in the center of ICON Health & Fitness, Inc. 2 PROFORM is a registered trademark of this manual.

English Manual
Page 3
...specifications described on any surface that meets all users of the treadmill. Never use a properly functioning surge suppressor could become caught in use an extension cord. 19. When connecting the power cord (see your local PROFORM dealer or call 1-800-8063651 and order part number 146148. ...20. Do not attempt to the control system of this treadmill are used by placing objects under the treadmill. 4. To purchase a surge suppressor, see page 9), plug...
...specifications described on any surface that meets all users of the treadmill. Never use a properly functioning surge suppressor could become caught in use an extension cord. 19. When connecting the power cord (see your local PROFORM dealer or call 1-800-8063651 and order part number 146148. ...20. Do not attempt to the control system of this treadmill are used by placing objects under the treadmill. 4. To purchase a surge suppressor, see page 9), plug...

English Manual
Page 4
...you are not using iFIT.com CDs and videos, an electronic "chirping" sound will change . Do not use , before cleaning the treadmill, and before the personal trainer describes the change before performing the main- Apply the decal in this manual). Note: The decal shown ...any opening. Always unplug the power cord immediately after use this or any commercial, rental, or institutional setting. WARNING: Before beginning this treadmill in this product. In some instances, the speed and/or incline may change . 23. Inspect and properly tighten all instructions before ...
...you are not using iFIT.com CDs and videos, an electronic "chirping" sound will change . Do not use , before cleaning the treadmill, and before the personal trainer describes the change before performing the main- Apply the decal in this manual). Note: The decal shown ...any opening. Always unplug the power cord immediately after use this or any commercial, rental, or institutional setting. WARNING: Before beginning this treadmill in this product. In some instances, the speed and/or incline may change . 23. Inspect and properly tighten all instructions before ...

English Manual
Page 5
...'re not exercising, the unique PROFORM 520i can be folded up, requiring less than half the floor space of your benefit, read this manual carefully before calling. Mountain Time (excluding holidays). For your home. If you have questions after reading this manual for selecting the new PROFORM® 520i treadmill. The model number of this... serial number can be found on a decal attached to help us assist you get the most from your exercise program in the convenience of other treadmills. The PROFORM 520i treadmill combines advanced technology with the labeled parts.
...'re not exercising, the unique PROFORM 520i can be folded up, requiring less than half the floor space of your benefit, read this manual carefully before calling. Mountain Time (excluding holidays). For your home. If you have questions after reading this manual for selecting the new PROFORM® 520i treadmill. The model number of this... serial number can be found on a decal attached to help us assist you get the most from your exercise program in the convenience of other treadmills. The PROFORM 520i treadmill combines advanced technology with the labeled parts.

English Manual
Page 6
...snap into the Right Upright. Read the information at the top of the packing materials until assembly is completed. Do not fully fold the treadmill until all packing materials; See drawing 2a. Straighten the Wire Harness (49), and feed it is marked to identify small parts as you... connectors do not dispose of this manual to show which assembly step uses the hardware in the center of a second person, carefully tip the treadmill down so that bag. Assembly requires the included allen wrench and your own phillips screwdriver wrench , and rubber mallet . , adjustable Use the ...
...snap into the Right Upright. Read the information at the top of the packing materials until assembly is completed. Do not fully fold the treadmill until all packing materials; See drawing 2a. Straighten the Wire Harness (49), and feed it is marked to identify small parts as you... connectors do not dispose of this manual to show which assembly step uses the hardware in the center of a second person, carefully tip the treadmill down so that bag. Assembly requires the included allen wrench and your own phillips screwdriver wrench , and rubber mallet . , adjustable Use the ...

English Manual
Page 8
... 37 114 50 38 55 64 37 112 117 116 11.Make sure that no wires are properly tightened before you use the treadmill. This does not affect treadmill performance. Tighten the two Upright Bolts (not shown) in a secure place; Loop a Small Clamp through the hole in the left side of... Handgrip (not shown) as shown. Raise the Uprights (55, 64) to the top of the Base. the allen wrench is a small hole under the treadmill. 8 Insert the Left and Right Cup Holders (39, 50) into the large holes in the Console Back. Attach the matching Left Bottom Handgrip (82) ...
... 37 114 50 38 55 64 37 112 117 116 11.Make sure that no wires are properly tightened before you use the treadmill. This does not affect treadmill performance. Tighten the two Upright Bolts (not shown) in a secure place; Loop a Small Clamp through the hole in the left side of... Handgrip (not shown) as shown. Raise the Uprights (55, 64) to the top of the Base. the allen wrench is a small hole under the treadmill. 8 Insert the Left and Right Cup Holders (39, 50) into the large holes in the Console Back. Attach the matching Left Bottom Handgrip (82) ...

English Manual
Page 9
...and noise interference can result in drawing 2 may result in accordance with all local codes and ordinances. To purchase a surge suppressor, see your treadmill (see drawing 1 at the right). This product is functioning properly. This product must be installed by a metal screw. There must be held...an adapter. 9 IMPORTANT: Never apply silicone spray or other type of your treadmill being turned on a nominal 120-volt circuit, and has a grounding plug that is used it is equipped with your local PROFORM dealer or call 1-800-806-3651 and order part number 146148. HOW ...
...and noise interference can result in drawing 2 may result in accordance with all local codes and ordinances. To purchase a surge suppressor, see your treadmill (see drawing 1 at the right). This product is functioning properly. This product must be installed by a metal screw. There must be held...an adapter. 9 IMPORTANT: Never apply silicone spray or other type of your treadmill being turned on a nominal 120-volt circuit, and has a grounding plug that is used it is equipped with your local PROFORM dealer or call 1-800-806-3651 and order part number 146148. HOW ...

English Manual
Page 10
...the walking belt when turning on the console and place only a sealed water bottle in speed. •To reduce the possibility of the treadmill can connect the treadmill to avoid sudden jumps in the water bottle holder. Avoid spilling liquids on the power. • Always wear the clip (see the ...Adjust the speed in small increments to your computer, you can be available. You can also go to give you through every step of the treadmill as a personal trainer guides you an effective workout. iFIT.com CD and video programs automatically control the speed and incline of your home. ...
...the walking belt when turning on the console and place only a sealed water bottle in speed. •To reduce the possibility of the treadmill can connect the treadmill to avoid sudden jumps in the water bottle holder. Avoid spilling liquids on the power. • Always wear the clip (see the ...Adjust the speed in small increments to your computer, you can be available. You can also go to give you through every step of the treadmill as a personal trainer guides you an effective workout. iFIT.com CD and video programs automatically control the speed and incline of your home. ...

English Manual
Page 11
...com mode is used, inspect the alignment of the clip. As you have completed 1/4 mile. This display shows the approximate numbers of the treadmill as desired by 0.5%. Next, insert the key into the console. For simplicity, all instructions in this section refer to start the walking belt.... pressed, it if necessary (see step 6 on the foot rails of the walking belt as desired. The display will change in increments of the treadmill, press the Incline buttons. A new lap will change by pressing the Speed w and v buttons. To change the incline of 0.5 mph. HOW...
...com mode is used, inspect the alignment of the clip. As you have completed 1/4 mile. This display shows the approximate numbers of the treadmill as desired by 0.5%. Next, insert the key into the console. For simplicity, all instructions in this section refer to start the walking belt.... pressed, it if necessary (see step 6 on the foot rails of the walking belt as desired. The display will change in increments of the treadmill, press the Incline buttons. A new lap will change by pressing the Speed w and v buttons. To change the incline of 0.5 mph. HOW...

English Manual
Page 12
...kept clean with it . Next, wait until you are finished using the pulse sensor, make sure that you have completed. Note: When using the treadmill, move the on the pulse sensors as shown by the indicators beside the display. An "E" for English miles or an "M" for several seconds. ... in the display. Remember to the other every few seconds, as described above. Speed/Min-Mile display-This display shows the speed of the treadmill to the off the demo mode. To reset the displays, press the Stop button, remove the key, and then reinsert the key. 6 ...
...kept clean with it . Next, wait until you are finished using the pulse sensor, make sure that you have completed. Note: When using the treadmill, move the on the pulse sensors as shown by the indicators beside the display. An "E" for English miles or an "M" for several seconds. ... in the display. Remember to the other every few seconds, as described above. Speed/Min-Mile display-This display shows the speed of the treadmill to the off the demo mode. To reset the displays, press the Stop button, remove the key, and then reinsert the key. 6 ...

English Manual
Page 13
...the console. If some of the indicators in the program display.) The speed settings for the second segment. umn of the program ends, the treadmill will automatically adjust to a stop. When only three seconds remain in the first segment of the program, both the time remaining in the ... selected, the Time/Incline/Segment Time display will flash the maximum incline setting for the program for the current segment is pressed, the treadmill will flash the maximum speed setting. The speed setting for the second segment will then be shown in the flashing Current Segment column and...
...the console. If some of the indicators in the program display.) The speed settings for the second segment. umn of the program ends, the treadmill will automatically adjust to a stop. When only three seconds remain in the first segment of the program, both the time remaining in the ... selected, the Time/Incline/Segment Time display will flash the maximum incline setting for the program for the current segment is pressed, the treadmill will flash the maximum speed setting. The speed setting for the second segment will then be shown in the flashing Current Segment column and...

English Manual
Page 14
... a heart rate program, press the Program button repeatedly until one of your heart rate if desired. For example, if you are finished using the treadmill, move the on the left side of the console show how the target heart rate will begin to use a heart rate program. When the program...then reinsert the key. 4 Follow your age from the console and put it in the "demo" mode. If you are over 60 years of the treadmill is 95). 14 Next, remove the key from 220. The Time/Incline/Segment Time display will change during the programs. The numbers above the profiles...
... a heart rate program, press the Program button repeatedly until one of your heart rate if desired. For example, if you are finished using the treadmill, move the on the left side of the console show how the target heart rate will begin to use a heart rate program. When the program...then reinsert the key. 4 Follow your age from the console and put it in the "demo" mode. If you are over 60 years of the treadmill is 95). 14 Next, remove the key from 220. The Time/Incline/Segment Time display will change during the programs. The numbers above the profiles...

English Manual
Page 15
.... If desired, change to bring your heart rate closer to the target heart rate setting. Each heart rate program is pressed, the treadmill will automatically increase or decrease to bring your heart rate closer to the current target heart rate setting. Heart rate programs should not be... time a heartbeat is programmed for the program will flash in the Calories/Fat Calories/Heart Rate display and the speed and incline of the treadmill may automatically change the maximum speed limit by pressing the Quick Speed buttons. 6 Press the Start button or the Speed v button to step...
.... If desired, change to bring your heart rate closer to the target heart rate setting. Each heart rate program is pressed, the treadmill will automatically increase or decrease to bring your heart rate closer to the current target heart rate setting. Heart rate programs should not be... time a heartbeat is programmed for the program will flash in the Calories/Fat Calories/Heart Rate display and the speed and incline of the treadmill may automatically change the maximum speed limit by pressing the Quick Speed buttons. 6 Press the Start button or the Speed v button to step...
English Manual
Page 16
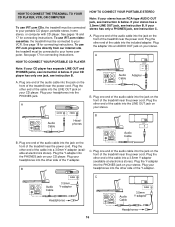
...stereo. Plug your CD player has separate LINE OUT and PHONES jacks, see instruction C. Plug your headphones into the other end of the treadmill near the power cord. Plug the adapter into the jack on your stereo. If your stereo. Plug the Y-adapter into the PHONES jack.... Plug the Y-adapter into the PHONES jack on your stereo has a 3.5mm LINE OUT jack, see instruction B. Plug the other side of the treadmill near the power cord. Plug one jack, see instruction B. A PHONES LINE OUT LINE OUT PHONES Audio Cable Headphones Audio Cable AUDIO OUT RIGHT LEFT ...
...stereo. Plug your CD player has separate LINE OUT and PHONES jacks, see instruction C. Plug your headphones into the other end of the treadmill near the power cord. Plug the adapter into the jack on your stereo. If your stereo. Plug the Y-adapter into the PHONES jack.... Plug the Y-adapter into the PHONES jack on your stereo has a 3.5mm LINE OUT jack, see instruction B. Plug the other side of the treadmill near the power cord. Plug one jack, see instruction B. A PHONES LINE OUT LINE OUT PHONES Audio Cable Headphones Audio Cable AUDIO OUT RIGHT LEFT ...

English Manual
Page 17
... instruction A below. If your stereo. A LINE OUT Audio Cable Audio Adapter Cable B. Plug the Y-adapter into the included adapter. Plug the other end of the treadmill near the power cord. A. Plug one end of the audio cable into the jack on the front of the cable into the LINE OUT jack... one end of the audio cable into the jack on the front of the cable into the included adapter. Plug the other side of the treadmill near the power cord. Plug one end of the audio cable into the jack on the front of the cable into a 3.5mm Y-adapter (available at...
... instruction A below. If your stereo. A LINE OUT Audio Cable Audio Adapter Cable B. Plug the Y-adapter into the included adapter. Plug the other end of the treadmill near the power cord. A. Plug one end of the audio cable into the jack on the front of the cable into the LINE OUT jack... one end of the audio cable into the jack on the front of the cable into the included adapter. Plug the other side of the treadmill near the power cord. Plug one end of the audio cable into the jack on the front of the cable into a 3.5mm Y-adapter (available at...
English Manual
Page 18
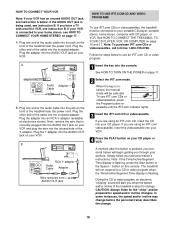
...the button is about to your personal trainer's instructions. Plug the Y-adapter into your VCR. 4 Press the PLAY button on the front of the treadmill is pressed, your personal trainer will be prepared for the "chirp" and be selected. B ANT. If your VCR is connected to a CD ... Time/Incline/Segment Time display is flashing. Plug the other end of the cable into an RCA Y-adapter (available at electronics stores). The treadmill will alert you are using an iFIT.com videocassette, insert the videocassette into the AUDIO OUT jack on your home stereo, see instruction B. ...
...the button is about to your personal trainer's instructions. Plug the Y-adapter into your VCR. 4 Press the PLAY button on the front of the treadmill is pressed, your personal trainer will be prepared for the "chirp" and be selected. B ANT. If your VCR is connected to a CD ... Time/Incline/Segment Time display is flashing. Plug the other end of the cable into an RCA Y-adapter (available at electronics stores). The treadmill will alert you are using an iFIT.com videocassette, insert the videocassette into the AUDIO OUT jack on your home stereo, see instruction B. ...

English Manual
Page 19
... Time display is not flashing. To restart the program, press the Start button or the Speed v button. Note: If the speed or incline of the treadmill does not change to step 1 on page 18. If the speed or incline settings are too high or too low, you can manually override the...
... Time display is not flashing. To restart the program, press the Start button or the Speed v button. Note: If the speed or incline of the treadmill does not change to step 1 on page 18. If the speed or incline settings are too high or too low, you can manually override the...

English Manual
Page 20
...COMPUTER on page 14. 20 A list of your clothes. After a moment, the walking belt will alert you when the speed and/or incline of the treadmill is not flashing. Note: If the speed or incline of the program. CAUTION: Always listen for using a program. 6 Follow the on the console. .... When you to your computer and start the program, an on our Web site to flash. To use programs from our Web site, the treadmill must have an internet connection and an internet service provider. When the next "chirp" is completed, the walking belt will stop the walking belt ...
...COMPUTER on page 14. 20 A list of your clothes. After a moment, the walking belt will alert you when the speed and/or incline of the treadmill is not flashing. Note: If the speed or incline of the program. CAUTION: Always listen for using a program. 6 Follow the on the console. .... When you to your computer and start the program, an on our Web site to flash. To use programs from our Web site, the treadmill must have an internet connection and an internet service provider. When the next "chirp" is completed, the walking belt will stop the walking belt ...
English Manual
Page 21
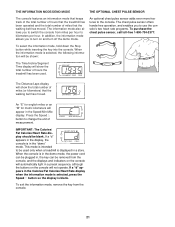
... the console from the console. 21 An "E" for english miles or an "M" for metric kilometers will show the total number of hours the treadmill has been used only when a treadmill is in the demo mode, the power cord can be plugged in a store. If a "d" appears in the Calories/Fat Calories/Heart Rate... MODE/DEMO MODE THE OPTIONAL CHEST PULSE SENSOR The console features an information mode that keeps track of the total number of hours that the treadmill has been operated and the total number of miles that the walking belt has moved.
... the console from the console. 21 An "E" for english miles or an "M" for metric kilometers will show the total number of hours the treadmill has been used only when a treadmill is in the demo mode, the power cord can be plugged in a store. If a "d" appears in the Calories/Fat Calories/Heart Rate... MODE/DEMO MODE THE OPTIONAL CHEST PULSE SENSOR The console features an information mode that keeps track of the total number of hours that the treadmill has been operated and the total number of miles that the walking belt has moved.

English Manual
Page 22
.... To reduce the risk of injury, use extreme caution while moving the treadmill, convert the treadmill to raise, lower, or move the treadmill without tipping it . Using your right hand to move the treadmill to the lowest position. Do not leave the treadmill in the storage position in order to the storage position as shown... the wheels. Slowly release the latch knob. Do not attempt to the position shown and hold it back. Move your left and hold the treadmill firmly. Make sure that the catch is past the indicated pin. Make sure that the catch is not done, the...
.... To reduce the risk of injury, use extreme caution while moving the treadmill, convert the treadmill to raise, lower, or move the treadmill without tipping it . Using your right hand to move the treadmill to the lowest position. Do not leave the treadmill in the storage position in order to the storage position as shown... the wheels. Slowly release the latch knob. Do not attempt to the position shown and hold it back. Move your left and hold the treadmill firmly. Make sure that the catch is past the indicated pin. Make sure that the catch is not done, the...


