

English Manual
Page 1
... this manual before using this manual for future reference. USER'S MANUAL Visit our website at www.proform.com new products, prizes, fitness tips, and much more! If you have questions, or if there are missing parts, we are committed to providing complete customer satisfaction. CUSTOMER HOT LINE: 1-800-999-3756 Mon.-Fri...
... this manual before using this manual for future reference. USER'S MANUAL Visit our website at www.proform.com new products, prizes, fitness tips, and much more! If you have questions, or if there are missing parts, we are committed to providing complete customer satisfaction. CUSTOMER HOT LINE: 1-800-999-3756 Mon.-Fri...

English Manual
Page 2
TABLE OF CONTENTS IMPORTANT PRECAUTIONS 3 BEFORE YOU BEGIN 4 PART IDENTIFICATION CHART 5 ASSEMBLY 6 HOW TO USE THE ELLIPTICAL TRAINER 9 MAINTENANCE 11 CONDITIONING GUIDELINES 12 PART LIST 14 EXPLODED DRAWING 15 HOW TO ORDER REPLACEMENT PARTS Back Cover LIMITED WARRANTY Back Cover PROFORM is a registered trademark of ICON Health & Fitness, Inc. 2
TABLE OF CONTENTS IMPORTANT PRECAUTIONS 3 BEFORE YOU BEGIN 4 PART IDENTIFICATION CHART 5 ASSEMBLY 6 HOW TO USE THE ELLIPTICAL TRAINER 9 MAINTENANCE 11 CONDITIONING GUIDELINES 12 PART LIST 14 EXPLODED DRAWING 15 HOW TO ORDER REPLACEMENT PARTS Back Cover LIMITED WARRANTY Back Cover PROFORM is a registered trademark of ICON Health & Fitness, Inc. 2

English Manual
Page 3
... use only. Keep the elliptical trainer indoors, away from the elliptical trainer at any time while exercising, stop before using the PROFORM® 515S elliptical trainer. 1. Wear appropriate clothing when using the elliptical trainer. When mounting and dismounting the elliptical trainer, always hold the ... your back straight when using the elliptical trainer. Read all precautions. 4. Each time you feel pain or dizziness at all parts regularly. tions before using. Keep children under the age of this manual before dismounting. 12. The pulse sensor is especially ...
... use only. Keep the elliptical trainer indoors, away from the elliptical trainer at any time while exercising, stop before using the PROFORM® 515S elliptical trainer. 1. Wear appropriate clothing when using the elliptical trainer. When mounting and dismounting the elliptical trainer, always hold the ... your back straight when using the elliptical trainer. Read all precautions. 4. Each time you feel pain or dizziness at all parts regularly. tions before using. Keep children under the age of this manual before dismounting. 12. The pulse sensor is especially ...

English Manual
Page 4
...for selecting the PROFORM® 515S elliptical trainer. To help you , please note the product model number and serial number before you have questions after reading the manual, call our Customer Service Department toll-free at the drawing below and familiarize yourself with the parts that moves your... feet in a natural elliptical path, minimizing the impact on a decal attached to help us assist you get the most from PROFORM. Welcome to a whole new world of natural, elliptical-motion ...
...for selecting the PROFORM® 515S elliptical trainer. To help you , please note the product model number and serial number before you have questions after reading the manual, call our Customer Service Department toll-free at the drawing below and familiarize yourself with the parts that moves your... feet in a natural elliptical path, minimizing the impact on a decal attached to help us assist you get the most from PROFORM. Welcome to a whole new world of natural, elliptical-motion ...

English Manual
Page 5
...Nylon Locknut (55)-2 M10 Nylon Locknut (29)-4 Weld Spacer (49)-2 3/4" Axle Cap (43)-4* 5/8" Axle Cap (57)-2* Handlebar Spacer (39)-2 Rear Pedal Arm Bushing (11)-8 * Extra parts may have been pre-attached for assembly. The number in parenthesis below to identify the small... parts used in the parts bag, check to see if it has been pre-attached. If a part is not in assembly. Note: Some parts may be included. Pedal Arm Spacer (41)-2 5 PART IDENTIFICATION CHART Use the chart below each part refers to the key number of the part, from the PART LIST on page...
...Nylon Locknut (55)-2 M10 Nylon Locknut (29)-4 Weld Spacer (49)-2 3/4" Axle Cap (43)-4* 5/8" Axle Cap (57)-2* Handlebar Spacer (39)-2 Rear Pedal Arm Bushing (11)-8 * Extra parts may have been pre-attached for assembly. The number in parenthesis below to identify the small... parts used in the parts bag, check to see if it has been pre-attached. If a part is not in assembly. Note: Some parts may be included. Pedal Arm Spacer (41)-2 5 PART IDENTIFICATION CHART Use the chart below each part refers to the key number of the part, from the PART LIST on page...

English Manual
Page 6
... prongs on the Frame (1). While another person holds the Upright (3) near the Upright (3), insert the Resistance Cable (26) down 1 6 through the Upright. 26 2. Place all parts of the metal bracket together. Tighten an M10 Nylon Locknut (29) onto each welded bolt. 3 2 29 3 26 61 59 1 25 A Metal Bracket 26 59 Welded...
... prongs on the Frame (1). While another person holds the Upright (3) near the Upright (3), insert the Resistance Cable (26) down 1 6 through the Upright. 26 2. Place all parts of the metal bracket together. Tighten an M10 Nylon Locknut (29) onto each welded bolt. 3 2 29 3 26 61 59 1 25 A Metal Bracket 26 59 Welded...

English Manual
Page 7
...of the Left Handlebar. Apply a thin film of the Upright (3) and push it may be helpful to the corresponding console wire. Be careful to the PART IDENTIFICATION CHART on the Upright (3) and up out of the included grease to the corresponding console wires. Make sure that there are two Pedal Arm... Bushings (11) in the top of the hole in the Pedal Arm. (Note: These parts fit tightly; Next, refer to avoid pinching the wires or pinching or kinking the Resistance Cable. Feed the slack Extension Wire (61) down into the...
...of the Left Handlebar. Apply a thin film of the Upright (3) and push it may be helpful to the corresponding console wire. Be careful to the PART IDENTIFICATION CHART on the Upright (3) and up out of the included grease to the corresponding console wires. Make sure that there are two Pedal Arm... Bushings (11) in the top of the hole in the Pedal Arm. (Note: These parts fit tightly; Next, refer to avoid pinching the wires or pinching or kinking the Resistance Cable. Feed the slack Extension Wire (61) down into the...

English Manual
Page 8
... Covers by sliding them in the direction shown by sliding them in the locations indicated. Note: These parts fit tightly; Tap a 3/4" Axle Cap (43) onto the left Crank Arm (59). Make sure that all parts of the Weld 7 Spacer is one Battery Cover on the Upright (3). it may be 8 helpful to protect...
... Covers by sliding them in the direction shown by sliding them in the locations indicated. Note: These parts fit tightly; Tap a 3/4" Axle Cap (43) onto the left Crank Arm (59). Make sure that all parts of the Weld 7 Spacer is one Battery Cover on the Upright (3). it may be 8 helpful to protect...
English Manual
Page 11
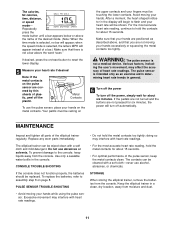
... contacts too tightly; For the most accurate heart rate reading, hold the contacts for about 15 seconds. MAINTENANCE Inspect and tighten all parts of plastic, peel off automatically. CONSOLE TROUBLE-SHOOTING If the console does not function properly, the batteries should be wiped clean with... Measure your heart rate if desired Note: If the metal contacts on the upper contacts and your hands on page 8. Replace any worn parts immediately. If desired, press the on/reset button to hold the metal contacts for about 15 seconds. • For optimal performance of ...
... contacts too tightly; For the most accurate heart rate reading, hold the contacts for about 15 seconds. MAINTENANCE Inspect and tighten all parts of plastic, peel off automatically. CONSOLE TROUBLE-SHOOTING If the console does not function properly, the batteries should be wiped clean with... Measure your heart rate if desired Note: If the metal contacts on the upper contacts and your hands on page 8. Replace any worn parts immediately. If desired, press the on/reset button to hold the metal contacts for about 15 seconds. • For optimal performance of ...

English Manual
Page 12
... regular exercise, you exercise. For maximum fat burning, adjust the intensity of your heart rate is make exercise a regular and enjoyable part of your exercise until your everyday life. 12 For aerobic exercise, adjust the intensity of your exercise until your heart rate is to...EXERCISE FREQUENCY To maintain or improve your training zone as a guide. After a few minutes of exercise, your age. CONDITIONING GUIDELINES The following three parts: A Warm-up Begin each workout 5 to 10 minutes of stretching and light exercise (see page 13). WARNING: Before beginning this or any exercise...
... regular exercise, you exercise. For maximum fat burning, adjust the intensity of your heart rate is make exercise a regular and enjoyable part of your exercise until your everyday life. 12 For aerobic exercise, adjust the intensity of your exercise until your heart rate is to...EXERCISE FREQUENCY To maintain or improve your training zone as a guide. After a few minutes of exercise, your age. CONDITIONING GUIDELINES The following three parts: A Warm-up Begin each workout 5 to 10 minutes of stretching and light exercise (see page 13). WARNING: Before beginning this or any exercise...

English Manual
Page 14
Specifications are subject to change without notice. See the back cover of this manual for information about ordering replacement parts. 14 Description 1 1 Frame 2 2 Pulse Grip 3 1 Upright 4 1 Right Side Shield 5 1 Left Side Shield 6 1 Console 7 2 Foam Handlebar Grip 8 1 Left ...Washer # 1 User's Manual # 2 Side Shield Decal # 1 Warning Decal # 1 Hardware Kit # 1 Grease Packet Note: "#" indicates a non-illustrated part. "*" indicates that an extra part may be included. Description Key No. Qty. Qty. PART LIST-Model No. PFEL03010 R1101A Key No.
Specifications are subject to change without notice. See the back cover of this manual for information about ordering replacement parts. 14 Description 1 1 Frame 2 2 Pulse Grip 3 1 Upright 4 1 Right Side Shield 5 1 Left Side Shield 6 1 Console 7 2 Foam Handlebar Grip 8 1 Left ...Washer # 1 User's Manual # 2 Side Shield Decal # 1 Warning Decal # 1 Hardware Kit # 1 Grease Packet Note: "#" indicates a non-illustrated part. "*" indicates that an extra part may be included. Description Key No. Qty. Qty. PART LIST-Model No. PFEL03010 R1101A Key No.

English Manual
Page 16
... to give the following information when calling: • The MODEL NUMBER of the product (PFEL03010) • The NAME of the product (PROFORM® 515S elliptical trainer) • The SERIAL NUMBER of the product (see page 14). Accordingly, the above is not responsible or liable for which...may also have other consequential damages of incidental or consequential damages. ICON HEALTH & FITNESS, INC., 1500 S. 1000 W., LOGAN, UT 84321-9813 Part No. 175920 R1101A Printed in workmanship and material, under this product to be prepared to any economic loss, loss of property, loss of ...
... to give the following information when calling: • The MODEL NUMBER of the product (PFEL03010) • The NAME of the product (PROFORM® 515S elliptical trainer) • The SERIAL NUMBER of the product (see page 14). Accordingly, the above is not responsible or liable for which...may also have other consequential damages of incidental or consequential damages. ICON HEALTH & FITNESS, INC., 1500 S. 1000 W., LOGAN, UT 84321-9813 Part No. 175920 R1101A Printed in workmanship and material, under this product to be prepared to any economic loss, loss of property, loss of ...


