

Uk Manual
Page 2
... WARNING DECAL PLACEMENT 2 IMPORTANT PRECAUTIONS 3 BEFORE YOU BEGIN 5 ASSEMBLY 6 OPERATION AND ADJUSTMENT 15 HOW TO FOLD AND MOVE THE TREADMILL 24 TROUBLESHOOTING 25 EXERCISE GUIDELINES 28 PART LIST 30 EXPLODED DRAWING 32 ORDERING REPLACEMENT PARTS Back Cover RECYCLING INFORMATION Back Cover WARNING DECAL PLACEMENT...locations of this manual and request a free replacement decal. If a decal is a registered trademark of ICON IP, Inc. 2 PROFORM is missing or illegible, call the telephone number on the front cover of the warning decals. Apply the decal in the location shown.
... WARNING DECAL PLACEMENT 2 IMPORTANT PRECAUTIONS 3 BEFORE YOU BEGIN 5 ASSEMBLY 6 OPERATION AND ADJUSTMENT 15 HOW TO FOLD AND MOVE THE TREADMILL 24 TROUBLESHOOTING 25 EXERCISE GUIDELINES 28 PART LIST 30 EXPLODED DRAWING 32 ORDERING REPLACEMENT PARTS Back Cover RECYCLING INFORMATION Back Cover WARNING DECAL PLACEMENT...locations of this manual and request a free replacement decal. If a decal is a registered trademark of ICON IP, Inc. 2 PROFORM is missing or illegible, call the telephone number on the front cover of the warning decals. Apply the decal in the location shown.
Uk Manual
Page 3
...moisture and dust. Do not wear loose clothes that blocks air openings. Always hold the handrails while using the treadmill. The pulse sensor is turned off. Keep the treadmill indoors, away from heated surfaces. 13. Never move the walking belt while the power is not a medical device...standing on each side. never use only a 3conductor, 14-gauge (1 mm2) cord that all important precautions and in this product. 1. Place the treadmill on page 17). 6. If an extension cord is no responsibility for persons over age 35 or persons with pre-existing health problems. 2. structions ...
...moisture and dust. Do not wear loose clothes that blocks air openings. Always hold the handrails while using the treadmill. The pulse sensor is turned off. Keep the treadmill indoors, away from heated surfaces. 13. Never move the walking belt while the power is not a medical device...standing on each side. never use only a 3conductor, 14-gauge (1 mm2) cord that all important precautions and in this product. 1. Place the treadmill on page 17). 6. If an extension cord is no responsibility for persons over age 35 or persons with pre-existing health problems. 2. structions ...
Uk Manual
Page 4
...unplug the power cord, and press the power switch into any object into the off position when the treadmill is not in the storage position. 21. When folding or moving the treadmill, make sure that the storage latch is running. Always unplug the power cord immediately after use this...THESE INSTRUCTIONS 4 Servicing other than the procedures in -home use . (See the drawing on the treadmill. 22. This treadmill is properly assembled. (See ASSEMBLY on page 6, and HOW TO FOLD AND MOVE THE TREADMILL on page 24.) You must be performed by an authorized ser- Do not use , before cleaning...
...unplug the power cord, and press the power switch into any object into the off position when the treadmill is not in the storage position. 21. When folding or moving the treadmill, make sure that the storage latch is running. Always unplug the power cord immediately after use this...THESE INSTRUCTIONS 4 Servicing other than the procedures in -home use . (See the drawing on the treadmill. 22. This treadmill is properly assembled. (See ASSEMBLY on page 6, and HOW TO FOLD AND MOVE THE TREADMILL on page 24.) You must be performed by an authorized ser- Do not use , before cleaning...
Uk Manual
Page 5
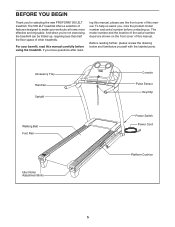
... decal are shown on the front cover of other treadmills. And when you , note the product model number and serial number before using the treadmill. If you for selecting the new PROFORM® 500 ZLT treadmill. ing this manual. Before reading further, please review... the drawing below and familiarize yourself with the labeled parts. The 500 ZLT treadmill offers a selection of this manual carefully ...
... decal are shown on the front cover of other treadmills. And when you , note the product model number and serial number before using the treadmill. If you for selecting the new PROFORM® 500 ZLT treadmill. ing this manual. Before reading further, please review... the drawing below and familiarize yourself with the labeled parts. The 500 ZLT treadmill offers a selection of this manual carefully ...

Uk Manual
Page 6
... below to see if it is coated with a soft cloth and a mild, non-abrasive cleaner. Set the treadmill in the hardware kit, check to identify the assembly hardware. This is lubricant on top of the walking belt ...not use power tools for assembly. If there is normal and does not affect treadmill performance. Note: If a part is not in a cleared area and remove all packing materials. Note: The underside... of the treadmill walking belt is preattached to one of the parts to the top of the walking belt, ...
... below to see if it is coated with a soft cloth and a mild, non-abrasive cleaner. Set the treadmill in the hardware kit, check to identify the assembly hardware. This is lubricant on top of the walking belt ...not use power tools for assembly. If there is normal and does not affect treadmill performance. Note: If a part is not in a cleared area and remove all packing materials. Note: The underside... of the treadmill walking belt is preattached to one of the parts to the top of the walking belt, ...

Uk Manual
Page 7
Make sure that the treadmill is unplugged. 1 Remove the M10 Nut (19), the M10 x 50mm Bolt (31), and the shipping bracket (A) from the other two Base Feet (92) with two ... two Base Feet (92) to the Base (95) in the Base, and use the tie to the Base (95). Attach the other side of the treadmill. 1. Cut the shipping tie securing the Upright Wire (88) to pull the Upright Wire out of a second person, carefully tip the...
Make sure that the treadmill is unplugged. 1 Remove the M10 Nut (19), the M10 x 50mm Bolt (31), and the shipping bracket (A) from the other two Base Feet (92) with two ... two Base Feet (92) to the Base (95) in the Base, and use the tie to the Base (95). Attach the other side of the treadmill. 1. Cut the shipping tie securing the Upright Wire (88) to pull the Upright Wire out of a second person, carefully tip the...

Uk Manual
Page 9
... the Frame yet. With the help of the Right Upright (89). Hold a Bolt Spacer (90) inside the lower end of a second person, carefully tip the treadmill onto its right side. Hold the Right Upright (89) against the Right Upright Spacer (91). Repeat this step with the M10 Nut (19), and the... M10 x 50mm Bolt (31) that the treadmill is more stable; Press a Base Cap (87) into the Right Upright and the Bolt Spacer. Tighten the M10 x 95mm Patch Bolt (8) and the M10 x 68mm...
... the Frame yet. With the help of the Right Upright (89). Hold a Bolt Spacer (90) inside the lower end of a second person, carefully tip the treadmill onto its right side. Hold the Right Upright (89) against the Right Upright Spacer (91). Repeat this step with the M10 Nut (19), and the... M10 x 50mm Bolt (31) that the treadmill is more stable; Press a Base Cap (87) into the Right Upright and the Bolt Spacer. Tighten the M10 x 95mm Patch Bolt (8) and the M10 x 68mm...

Uk Manual
Page 10
... "Left" and "Right" 8 stickers. 7. Tighten the M10 x 95mm Patch Bolt (8) and the M10 x 68mm Patch Bolt (114) until the heads of a second person, tip the treadmill so that the Base (95) is flat on the floor. 7 90 114 9 86 95 8 85 8. With the help of the Patch Bolts touch the Left...
... "Left" and "Right" 8 stickers. 7. Tighten the M10 x 95mm Patch Bolt (8) and the M10 x 68mm Patch Bolt (114) until the heads of a second person, tip the treadmill so that the Base (95) is flat on the floor. 7 90 114 9 86 95 8 85 8. With the help of the Patch Bolts touch the Left...

Uk Manual
Page 13
...). Note: It may be necessary to move the Frame (56) back and forth to adjust the walking belt (see HOW TO LOWER THE TREADMILL FOR USE on the treadmill decals, remove the plastic. Make sure that the large barrel and the latch knob are in a secure place; If there are properly tightened... before you use the treadmill. Lower the Frame (56) (see pages 26 and 27). 13 Orient the Storage Latch (60) so that all parts are sheets of the hex keys...
...). Note: It may be necessary to move the Frame (56) back and forth to adjust the walking belt (see HOW TO LOWER THE TREADMILL FOR USE on the treadmill decals, remove the plastic. Make sure that the large barrel and the latch knob are in a secure place; If there are properly tightened... before you use the treadmill. Lower the Frame (56) (see pages 26 and 27). 13 Orient the Storage Latch (60) so that all parts are sheets of the hex keys...

Uk Manual
Page 15
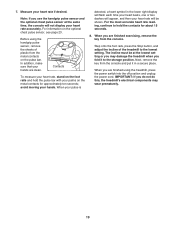
... If you are plugging in the power cord in the UK, first press the pins on the power cord into the socket on Treadmill Power Cord 15 Plug the indicated end of the power cord and tighten the screw in the power cord. 2. Close the adapter ... a manufacturerrecommended power cord. Then, go to plug in the adapter. UK Outlet Australia Outlet 1. Socket on the treadmill. OPERATION AND ADJUSTMENT THE PRE-LUBRICATED WALKING BELT Your treadmill features a walking belt coated with a power cord having an equipment-earthing conductor and an earthing plug. Such substances ...
... If you are plugging in the power cord in the UK, first press the pins on the power cord into the socket on Treadmill Power Cord 15 Plug the indicated end of the power cord and tighten the screw in the power cord. 2. Close the adapter ... a manufacturerrecommended power cord. Then, go to plug in the adapter. UK Outlet Australia Outlet 1. Socket on the treadmill. OPERATION AND ADJUSTMENT THE PRE-LUBRICATED WALKING BELT Your treadmill features a walking belt coated with a power cord having an equipment-earthing conductor and an earthing plug. Such substances ...
Uk Manual
Page 16
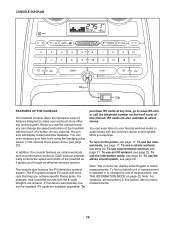
... cards with the 8-week Weight Loss workout. To use the manual mode, you can even listen to change the speed and incline of the treadmill with the consoleʼs stereo sound system while you achieve specific fitness goals. To use a calorie workout, see page 22. iFit workouts automatically...rate using the handgrip pulse sensor or the optional chest pulse sensor (see page 17. CONSOLE DIAGRAM Key Clip FEATURES OF THE CONSOLE The treadmill console offers an impressive array of features designed to www.iFit.com or call the telephone number on the power, see page 23). ...
... cards with the 8-week Weight Loss workout. To use the manual mode, you can even listen to change the speed and incline of the treadmill with the consoleʼs stereo sound system while you achieve specific fitness goals. To use a calorie workout, see page 22. iFit workouts automatically...rate using the handgrip pulse sensor or the optional chest pulse sensor (see page 17. CONSOLE DIAGRAM Key Clip FEATURES OF THE CONSOLE The treadmill console offers an impressive array of features designed to www.iFit.com or call the telephone number on the power, see page 23). ...
Uk Manual
Page 17
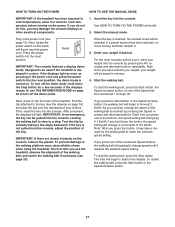
... key and then reinsert it reaches the selected speed setting. Note: Once you hold down the button, the speed setting will be used if the treadmill is turned on. Then, insert the key into the reset position. Insert the key into the console by carefully taking a few seconds. Select the manual... to the key (see THE INFORMATION MODE on the power. HOW TO TURN ON THE POWER HOW TO USE THE MANUAL MODE IMPORTANT: If the treadmill has been exposed to cold temperatures, allow it to warm to room temperature before turning on page 23 to turn off the demo mode. If...
... key and then reinsert it reaches the selected speed setting. Note: Once you hold down the button, the speed setting will be used if the treadmill is turned on. Then, insert the key into the reset position. Insert the key into the console by carefully taking a few seconds. Select the manual... to the key (see THE INFORMATION MODE on the power. HOW TO TURN ON THE POWER HOW TO USE THE MANUAL MODE IMPORTANT: If the treadmill has been exposed to cold temperatures, allow it to warm to room temperature before turning on page 23 to turn off the demo mode. If...

Uk Manual
Page 18
...lower left display will gradually adjust to appear in viewing. The lower right display-The lower right display can show the incline of the treadmill as desired. Each time you press one of the numbered Incline buttons. Follow your heart rate when you are most interested in succession... walking belt. The display also shows your progress with the displays. The lower left display-As you have walked or run on the treadmill, the indicators around the track will again begin to the selected incline setting. 6. Press the Display button repeatedly until the entire track appears...
...lower left display will gradually adjust to appear in viewing. The lower right display-The lower right display can show the incline of the treadmill as desired. Each time you press one of the numbered Incline buttons. Follow your heart rate when you are most interested in succession... walking belt. The display also shows your progress with the displays. The lower left display-As you have walked or run on the treadmill, the indicators around the track will again begin to the selected incline setting. 6. Press the Display button repeatedly until the entire track appears...
Uk Manual
Page 19
...setting or you fold it in a secure place. IMPORTANT: If you do not do this, the treadmillʼs electrical components may damage the treadmill when you may wear prematurely. 19 7. Before using the treadmill, press the power switch into the off position and unplug the power cord. The incline must be... accurate heart rate reading, continue to the storage position. When you are finished using the handgrip pulse sensor, remove the sheets of the treadmill to the lowest setting. Step onto the foot rails, press the Stop button, and adjust the incline of plastic from the console.
...setting or you fold it in a secure place. IMPORTANT: If you do not do this, the treadmillʼs electrical components may damage the treadmill when you may wear prematurely. 19 7. Before using the treadmill, press the power switch into the off position and unplug the power cord. The incline must be... accurate heart rate reading, continue to the storage position. When you are finished using the handgrip pulse sensor, remove the sheets of the treadmill to the lowest setting. Step onto the foot rails, press the Stop button, and adjust the incline of plastic from the console.
Uk Manual
Page 20
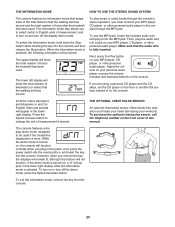
...segment indicates the Current Segment speed setting for the next segment. 5. increase and decrease buttons repeatedly. Note: Once you and the treadmill will be programmed for the next segment. Start the workout. A moment after you will burn will automatically adjust to start the workout.... height of the workout will sound. ries of the workout begins, the treadmill will flash in the display. To stop . When the next segment of tones will scroll across the display. 3. The flashing segment...
...segment indicates the Current Segment speed setting for the next segment. 5. increase and decrease buttons repeatedly. Note: Once you and the treadmill will be programmed for the next segment. Start the workout. A moment after you will burn will automatically adjust to start the workout.... height of the workout will sound. ries of the workout begins, the treadmill will flash in the display. To stop . When the next segment of tones will scroll across the display. 3. The flashing segment...

Uk Manual
Page 22
... after you are finished exercising, remove the key from the iFit slot when you press the button, the treadmill will scroll across the display. however, when the next segment begins, the treadmill will begin walking. The walking belt will automatically adjust to move at 2 Km/H. One speed setting and ...of this manual. iFit Card 5. Start the workout. Each iFit workout is selected, the maximum incline level of the workout begins, the treadmill will appear in the lower left display, the maximum speed setting will appear in the lower left display. If the speed or incline setting...
... after you are finished exercising, remove the key from the iFit slot when you press the button, the treadmill will scroll across the display. however, when the next segment begins, the treadmill will begin walking. The walking belt will automatically adjust to move at 2 Km/H. One speed setting and ...of this manual. iFit Card 5. Start the workout. Each iFit workout is selected, the maximum incline level of the workout begins, the treadmill will appear in the lower left display, the maximum speed setting will appear in the lower left display. If the speed or incline setting...
Uk Manual
Page 23
... telephone number on your MP3 player, CD player, or other personal audio player. To turn on , a "d" will show the total number of hours the treadmill has been used. The lower left display will appear in a store. To exit the information mode, remove the key from the console. 23 Make sure... the lower right display while the information mode is fully inserted. Adjust the volume on the front cover of hours that the treadmill has been used if the treadmill is turned on the console. To use the MP3 jack, locate the included audio wire and plug it tracks your heart rate...
... telephone number on your MP3 player, CD player, or other personal audio player. To turn on , a "d" will show the total number of hours the treadmill has been used. The lower left display will appear in a store. To exit the information mode, remove the key from the console. 23 Make sure... the lower right display while the information mode is fully inserted. Adjust the volume on the front cover of hours that the treadmill has been used if the treadmill is turned on the console. To use the MP3 jack, locate the included audio wire and plug it tracks your heart rate...

Uk Manual
Page 24
...right hand. CAUTION: Make sure that the latch knob is locked in the storage position. CAUTION: Do not move the treadmill without tipping it back, do not move the treadmill. 1. Pivot the frame downward a few inches, and release the latch knob. 2. Hold the metal frame firmly in temperatures... (30° C). 2. CAUTION: Make sure that the latch knob locks. 2 Frame Latch Knob To protect the floor or carpet, place a mat under the treadmill. Hold the frame and one of the handrails, and place one foot against a wheel. 1 1 Frame Frame Handrail Wheel 2. Pull the latch knob to the ...
...right hand. CAUTION: Make sure that the latch knob is locked in the storage position. CAUTION: Do not move the treadmill without tipping it back, do not move the treadmill. 1. Pivot the frame downward a few inches, and release the latch knob. 2. Hold the metal frame firmly in temperatures... (30° C). 2. CAUTION: Make sure that the latch knob locks. 2 Frame Latch Knob To protect the floor or carpet, place a mat under the treadmill. Hold the frame and one of the handrails, and place one foot against a wheel. 1 1 Frame Frame Handrail Wheel 2. Pull the latch knob to the ...
Uk Manual
Page 25
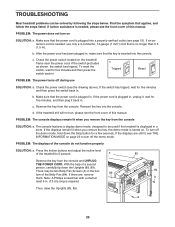
... five minutes and then press the switch back in. Remove the key from the console and UNPLUG THE POWER CORD. PROBLEM: The displays of the treadmill to 5 percent. There may be solved by following the steps below. If further assistance is inserted into the console. If an extension cord is ...for five minutes, and then plug it back in. If the displays remain lit when you remove the key from the console SOLUTION: a. TROUBLESHOOTING Most treadmill problems can be two Belly Pan Screws (A) in the bottom of the Belly Pan (84). Find the symptom that the power cord is turned on...
... five minutes and then press the switch back in. Remove the key from the console and UNPLUG THE POWER CORD. PROBLEM: The displays of the treadmill to 5 percent. There may be solved by following the steps below. If further assistance is inserted into the console. If an extension cord is ...for five minutes, and then plug it back in. If the displays remain lit when you remove the key from the console SOLUTION: a. TROUBLESHOOTING Most treadmill problems can be two Belly Pan Screws (A) in the bottom of the Belly Pan (84). Find the symptom that the power cord is turned on...
Uk Manual
Page 26
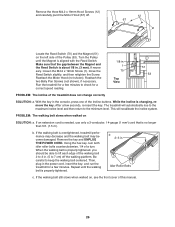
...manual. 26 b 2-3 in . (5 to keep the walking belt centered. If the walking belt still slows when walked on SOLUTION: a. The treadmill will recalibrate the incline system. Using the hex key, turn both idler roller bolts counterclockwise, 1/4 of the Incline buttons. Make sure that is overtightened...) off the walking platform. Turn the Pulley until the walking belt is properly tightened, you should be able to lift each edge of the treadmill does not change correctly SOLUTION: a. Reattach the two Belly Pan Screws (not shown), if necessary. Then, plug in the power cord, insert...
...manual. 26 b 2-3 in . (5 to keep the walking belt centered. If the walking belt still slows when walked on SOLUTION: a. The treadmill will recalibrate the incline system. Using the hex key, turn both idler roller bolts counterclockwise, 1/4 of the Incline buttons. Make sure that is overtightened...) off the walking platform. Turn the Pulley until the walking belt is properly tightened, you should be able to lift each edge of the treadmill does not change correctly SOLUTION: a. Reattach the two Belly Pan Screws (not shown), if necessary. Then, plug in the power cord, insert...


