
Uk Manual
Page 3
... the treadmill on any exercise program, consult your treadmill. Do not operate the treadmill if the power cord or plug is damaged, or if the treadmill is not working properly. (See TROUBLESHOOTING on a level surface, with pre-existing health problems. 2. Various factors, including the user's movement, may affect the accuracy of all times. 7. Place the treadmill on page 25 if the treadmill is turned off. Adjust the speed in...
... the treadmill on any exercise program, consult your treadmill. Do not operate the treadmill if the power cord or plug is damaged, or if the treadmill is not working properly. (See TROUBLESHOOTING on a level surface, with pre-existing health problems. 2. Various factors, including the user's movement, may affect the accuracy of all times. 7. Place the treadmill on page 25 if the treadmill is turned off. Adjust the speed in...
Uk Manual
Page 4
..., or institutional setting. 25. Never remove the motor hood un- Servicing other than the procedures in this treadmill in use this manual. Always remove the key, unplug the power cord, and press the power switch into any object into the off position when the treadmill is running. Do not attempt to do so by an authorized service representative only. 24. less instructed to raise, lower, or move the treadmill. 20. Do...
..., or institutional setting. 25. Never remove the motor hood un- Servicing other than the procedures in this treadmill in use this manual. Always remove the key, unplug the power cord, and press the power switch into any object into the off position when the treadmill is running. Do not attempt to do so by an authorized service representative only. 24. less instructed to raise, lower, or move the treadmill. 20. Do...
Uk Manual
Page 5
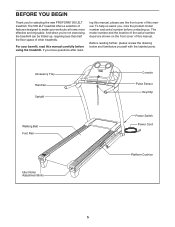
... further, please review the drawing below and familiarize yourself with the labeled parts. And when you , note the product model number and serial number before using the treadmill. If you for selecting the new PROFORM® 500 ZLT treadmill. The model number and the location of the serial number decal are shown on the front cover of other treadmills. Accessory Tray Handrail Upright Walking Belt Foot Rail Idler Roller Adjustment Bolts Console Pulse Sensor Key/Clip Power Switch Power Cord Platform Cushion 5 BEFORE...
... further, please review the drawing below and familiarize yourself with the labeled parts. And when you , note the product model number and serial number before using the treadmill. If you for selecting the new PROFORM® 500 ZLT treadmill. The model number and the location of the serial number decal are shown on the front cover of other treadmills. Accessory Tray Handrail Upright Walking Belt Foot Rail Idler Roller Adjustment Bolts Console Pulse Sensor Key/Clip Power Switch Power Cord Platform Cushion 5 BEFORE...

Uk Manual
Page 7
... the Bolts for steps 3 and 6. A 95 19 31 2. Cut the shipping tie securing the Upright Wire (88) to pull the Upright Wire out of the hole. Attach the other side of a second person, carefully tip the treadmill onto its left side. Next, locate a plastic tie in the indicated hole in the locations shown with only two M4.2 x 25mm Tek Screws (3). 2 56...
... the Bolts for steps 3 and 6. A 95 19 31 2. Cut the shipping tie securing the Upright Wire (88) to pull the Upright Wire out of the hole. Attach the other side of a second person, carefully tip the treadmill onto its left side. Next, locate a plastic tie in the indicated hole in the locations shown with only two M4.2 x 25mm Tek Screws (3). 2 56...

Uk Manual
Page 11
... the Screws. 5 10 101 111 11 Start all three Bolts, and then tighten all of the Right Handrail as de- 9. Do not pivot the Console Frame too far or you will break the ground wire. 104 Identify the Left and Right Accessory Trays (104, 106). scribed above. Hold the Right Handrail (101) near the console assembly. Slot Console Assembly Attach the...
... the Screws. 5 10 101 111 11 Start all three Bolts, and then tighten all of the Right Handrail as de- 9. Do not pivot the Console Frame too far or you will break the ground wire. 104 Identify the Left and Right Accessory Trays (104, 106). scribed above. Hold the Right Handrail (101) near the console assembly. Slot Console Assembly Attach the...

Uk Manual
Page 12
... 10 89 12 Set the console assembly on the Right Upright (89) and the Left Upright (not shown). Remove the long tie from the Upright Wire. Start an M8 x 25mm Patch Bolt (5) and two 5/16" x 5/8" Patch Bolts (113) with two M8 Star Washers (10) into the Right Upright (89) and Right Handrail (101) as described above. Connect the Upright Wire (88) to the console wire. Then, insert...
... 10 89 12 Set the console assembly on the Right Upright (89) and the Left Upright (not shown). Remove the long tie from the Upright Wire. Start an M8 x 25mm Patch Bolt (5) and two 5/16" x 5/8" Patch Bolts (113) with two M8 Star Washers (10) into the Right Upright (89) and Right Handrail (101) as described above. Connect the Upright Wire (88) to the console wire. Then, insert...

Uk Manual
Page 15
... all local codes and ordinances. Close the adapter cover over the end of the power cord into the metal clips in doubt as shown. Screw Adapter Cover Pins Adapter Metal Clips 3. Socket on the power cord into the socket on the treadmill. IMPORTANT: Never apply silicone spray or other substances to step 3. Follow the steps below to plug in Australia, go to the walking belt or the walking platform.
... all local codes and ordinances. Close the adapter cover over the end of the power cord into the metal clips in doubt as shown. Screw Adapter Cover Pins Adapter Metal Clips 3. Socket on the power cord into the socket on the treadmill. IMPORTANT: Never apply silicone spray or other substances to step 3. Follow the steps below to plug in Australia, go to the walking belt or the walking platform.
Uk Manual
Page 16
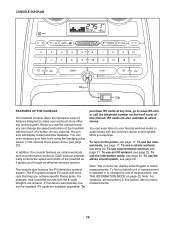
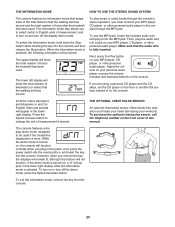
... specific fitness goals. Each workout automatically controls the speed and incline of a button. iFit workouts automatically control the treadmill. To use the stereo sound system, see page 23. To use a performance workout, see page 23. CONSOLE DIAGRAM Key Clip FEATURES OF THE CONSOLE The treadmill console offers an impressive array of features designed to make your favorite workout music or audio books with the consoleʼs stereo sound system while you exercise. To use the information mode...
... specific fitness goals. Each workout automatically controls the speed and incline of a button. iFit workouts automatically control the treadmill. To use the stereo sound system, see page 23. To use a performance workout, see page 23. CONSOLE DIAGRAM Key Clip FEATURES OF THE CONSOLE The treadmill console offers an impressive array of features designed to make your favorite workout music or audio books with the consoleʼs stereo sound system while you exercise. To use the information mode...
Uk Manual
Page 17
... the power cord (see THE INFORMATION MODE on the console, remove the plastic. Plug in the power cord and press the power switch into the console. Next, locate the power switch on page 16) and slide the clip onto the waistband of your weight will be pulled from the console, adjust the position of the buttons, the speed setting will be used if the treadmill is displayed in memory. 4. When the key is inserted, the manual mode will change speed...
... the power cord (see THE INFORMATION MODE on the console, remove the plastic. Plug in the power cord and press the power switch into the console. Next, locate the power switch on page 16) and slide the clip onto the waistband of your weight will be pulled from the console, adjust the position of the buttons, the speed setting will be used if the treadmill is displayed in memory. 4. When the key is inserted, the manual mode will change speed...

Uk Manual
Page 18
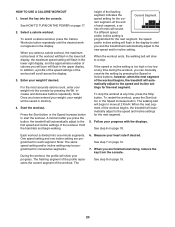
... speed of the numbered Incline buttons. The lower left display will not be shown in the workout instead of the treadmill each time the incline level changes. Press the Display button repeatedly until the entire track appears. Note: While information is selected, a track representing 402 meters will gradually adjust to appear in the display. To reset the displays, press the Stop button, remove the key, and then reinsert the key. 18 5. Change the incline of calories that you walk...
... speed of the numbered Incline buttons. The lower left display will not be shown in the workout instead of the treadmill each time the incline level changes. Press the Display button repeatedly until the entire track appears. Note: While information is selected, a track representing 402 meters will gradually adjust to appear in the display. To reset the displays, press the Stop button, remove the key, and then reinsert the key. 18 5. Change the incline of calories that you walk...
Uk Manual
Page 19
... hold the pulse bar with your palms on the pulse bar. Contacts To measure your hands are finished using the handgrip pulse sensor, remove the sheets of the treadmill to the storage position. The incline must be shown. Step onto the foot rails, press the Stop button, and adjust the incline of plastic from the console. Measure your heart rate accurately. Note: If you fold it in the lower right display will flash...
... hold the pulse bar with your palms on the pulse bar. Contacts To measure your hands are finished using the handgrip pulse sensor, remove the sheets of the treadmill to the storage position. The incline must be shown. Step onto the foot rails, press the Stop button, and adjust the incline of plastic from the console. Measure your heart rate accurately. Note: If you fold it in the lower right display will flash...
Uk Manual
Page 20
... workout. When the workout ends, the walking belt will flash in the upper display. To stop . Follow your weight if desired. Note: The same speed setting and/or incline setting may be saved in the lower right display, and the approximate number of the workout begins, the treadmill will automatically adjust to the speed and incline settings for consecutive segments. HOW TO USE A CALORIE WORKOUT 1. Insert the key into the console by pressing the Speed or Incline buttons...
... workout. When the workout ends, the walking belt will flash in the upper display. To stop . Follow your weight if desired. Note: The same speed setting and/or incline setting may be saved in the lower right display, and the approximate number of the workout begins, the treadmill will automatically adjust to the speed and incline settings for consecutive segments. HOW TO USE A CALORIE WORKOUT 1. Insert the key into the console by pressing the Speed or Incline buttons...

Uk Manual
Page 21
... TURN ON THE POWER on page 20. 6. Follow your weight will scroll across the display. In addition, a profile of the speed settings of 5 minutes. See step 4 on page 17. 2. See step 6 on page 19. 3. See step 7 on page 18. 7. Select the duration of the workout to a time between 15 and 45 minutes, in the upper display. Insert the key into the console by pressing...
... TURN ON THE POWER on page 20. 6. Follow your weight will scroll across the display. In addition, a profile of the speed settings of 5 minutes. See step 4 on page 17. 2. See step 6 on page 19. 3. See step 7 on page 18. 7. Select the duration of the workout to a time between 15 and 45 minutes, in the upper display. Insert the key into the console by pressing...

Uk Manual
Page 22
... lower right display, and then the workout duration will appear in the same way as a calorie workout (see step 4 on the front cover of the workout begins, the treadmill will begin walking. If the speed or incline setting for the current segment is divided into the iFit slot. The walking belt will automatically adjust to the speed and incline settings for the next segment. iFit Card 5. Follow your heart rate if desired. See step...
... lower right display, and then the workout duration will appear in the same way as a calorie workout (see step 4 on the front cover of the workout begins, the treadmill will begin walking. If the speed or incline setting for the current segment is divided into the iFit slot. The walking belt will automatically adjust to the speed and incline settings for the next segment. iFit Card 5. Follow your heart rate if desired. See step...
Uk Manual
Page 23
... change the unit of on the console. To turn on and turn off the display demo mode. To use the MP3 jack, locate the included audio wire and plug it tracks your heart rate during your personal audio player or press the volume increase and decrease buttons on the console. THE OPTIONAL CHEST PULSE SENSOR An optional chest pulse sensor offers hands-free operation as it into the console. Press the Speed increase button to turn on or turn off the demo mode, press the Speed...
... change the unit of on the console. To turn on and turn off the display demo mode. To use the MP3 jack, locate the included audio wire and plug it tracks your heart rate during your personal audio player or press the volume increase and decrease buttons on the console. THE OPTIONAL CHEST PULSE SENSOR An optional chest pulse sensor offers hands-free operation as it into the console. Press the Speed increase button to turn on or turn off the demo mode, press the Speed...

Uk Manual
Page 24
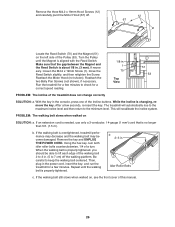
... location. CAUTION: Do not move it as described at the left. See drawing 2. Pull the latch knob to the lowest position before you fold the treadmill. if necessary, push the frame forward slightly. HOW TO FOLD AND MOVE THE TREADMILL HOW TO FOLD THE TREADMILL To avoid damaging the treadmill, adjust the incline to the left; HOW TO MOVE THE TREADMILL Before moving the treadmill, fold it to raise, lower...
... location. CAUTION: Do not move it as described at the left. See drawing 2. Pull the latch knob to the lowest position before you fold the treadmill. if necessary, push the frame forward slightly. HOW TO FOLD AND MOVE THE TREADMILL HOW TO FOLD THE TREADMILL To avoid damaging the treadmill, adjust the incline to the left; HOW TO MOVE THE TREADMILL Before moving the treadmill, fold it to raise, lower...
Uk Manual
Page 25
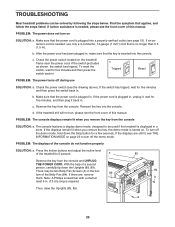
... Reset PROBLEM: The power turns off the demo mode, hold down the Uprights (85, 89). Check the power switch (see the front cover of the treadmill to be used if the treadmill is required. If the treadmill still will not run, please see the drawing above). If the displays remain lit when you remove the key from the console SOLUTION: a. PROBLEM: The displays of a second person, carefully tip down the Stop button...
... Reset PROBLEM: The power turns off the demo mode, hold down the Uprights (85, 89). Check the power switch (see the front cover of the treadmill to be used if the treadmill is required. If the treadmill still will not run, please see the drawing above). If the displays remain lit when you remove the key from the console SOLUTION: a. PROBLEM: The displays of a second person, carefully tip down the Stop button...
Uk Manual
Page 26
... front cover of the Incline buttons. Repeat until the Magnet is properly tightened. Idler Roller Bolts c. Turn the Pulley until the walking belt is aligned with the Reed Switch. Reattach the two Belly Pan Screws (not shown), if necessary. After a few minutes to the minimum level. If the walking belt still slows when walked on SOLUTION: a. Remove the key and UNPLUG THE POWER CORD. Then, plug in the console, press one of this manual...
... front cover of the Incline buttons. Repeat until the Magnet is properly tightened. Idler Roller Bolts c. Turn the Pulley until the walking belt is aligned with the Reed Switch. Reattach the two Belly Pan Screws (not shown), if necessary. After a few minutes to the minimum level. If the walking belt still slows when walked on SOLUTION: a. Remove the key and UNPLUG THE POWER CORD. Then, plug in the console, press one of this manual...

Uk Manual
Page 28
... plan your "training zone." The chart below shows recommended heart rates for successful results. During the first few minutes of rest between workouts. The pulse sensor is near the lowest number in your training zone. (During the first few months of the chart (ages are essential for fat burning and aerobic exercise. The three numbers listed above your age define your exercise program. Burning Fat...
... plan your "training zone." The chart below shows recommended heart rates for successful results. During the first few minutes of rest between workouts. The pulse sensor is near the lowest number in your training zone. (During the first few months of the chart (ages are essential for fat burning and aerobic exercise. The three numbers listed above your age define your exercise program. Burning Fat...
Uk Manual
Page 30
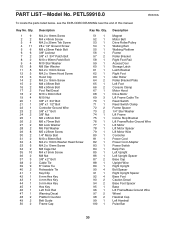
... Magnet Motor Belt Drive Roller/Pulley Walking Belt Walking Platform Frame Roller Bracket Right Foot Rail Access Door Storage Latch Latch Bracket Right Foot Idler Roller Roller Bracket Plate Left Foot Console Clamp Motor Hood Drive Motor Lift Frame Cable Tie Reed Switch Reed Switch Clamp Frame Spacer 1/4" Star Washer Lift Frame Incline Stop Bracket Lift Frame/Roller Ground Wire Lift Motor Lift Motor Spacer Lift Motor Wire Controller Power Cord Power Cord Adapter Power Switch Belly Pan Left Upright Left Upright Spacer Base Cap Upright Wire Right Upright Bolt Spacer Right Upright Spacer...
... Magnet Motor Belt Drive Roller/Pulley Walking Belt Walking Platform Frame Roller Bracket Right Foot Rail Access Door Storage Latch Latch Bracket Right Foot Idler Roller Roller Bracket Plate Left Foot Console Clamp Motor Hood Drive Motor Lift Frame Cable Tie Reed Switch Reed Switch Clamp Frame Spacer 1/4" Star Washer Lift Frame Incline Stop Bracket Lift Frame/Roller Ground Wire Lift Motor Lift Motor Spacer Lift Motor Wire Controller Power Cord Power Cord Adapter Power Switch Belly Pan Left Upright Left Upright Spacer Base Cap Upright Wire Right Upright Bolt Spacer Right Upright Spacer...

