

English Manual
Page 1
...;S MANUAL please contact Customer Care. Keep this equipment. Write the serial number in this manual before contacting Customer Care. If you have questions, or if parts are damaged or missing, DO NOT CONTACT THE STORE; IMPORTANT: Please register this product (see the limited warranty on the back cover of this manual...
...;S MANUAL please contact Customer Care. Keep this equipment. Write the serial number in this manual before contacting Customer Care. If you have questions, or if parts are damaged or missing, DO NOT CONTACT THE STORE; IMPORTANT: Please register this product (see the limited warranty on the back cover of this manual...
English Manual
Page 2
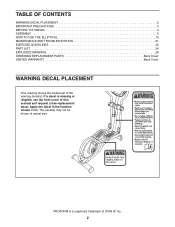
...PROFORM is missing or illegible, see the front cover of this manual and request a free replacement decal. TABLE OF CONTENTS WARNING DECAL PLACEMENT 2 IMPORTANT PRECAUTIONS 3 BEFORE YOU BEGIN 4 ASSEMBLY 5 HOW TO USE THE ELLIPTICAL 13 MAINTENANCE AND TROUBLESHOOTING 21 EXERCISE GUIDELINES 22 PART... LIST 24 EXPLODED DRAWING 26 ORDERING REPLACEMENT PARTS Back Cover LIMITED WARRANTY Back Cover WARNING DECAL PLACEMENT This drawing shows the ...
...PROFORM is missing or illegible, see the front cover of this manual and request a free replacement decal. TABLE OF CONTENTS WARNING DECAL PLACEMENT 2 IMPORTANT PRECAUTIONS 3 BEFORE YOU BEGIN 4 ASSEMBLY 5 HOW TO USE THE ELLIPTICAL 13 MAINTENANCE AND TROUBLESHOOTING 21 EXERCISE GUIDELINES 22 PART... LIST 24 EXPLODED DRAWING 26 ORDERING REPLACEMENT PARTS Back Cover LIMITED WARRANTY Back Cover WARNING DECAL PLACEMENT This drawing shows the ...

English Manual
Page 3
... risk of serious injury, read all important precautions and instructions in this manual. 9. Before beginning any worn parts immediately. 8. The elliptical should not be used by or through the use of this product. 1. Inspect and properly tighten all parts regularly. ICON assumes no responsibility for foot protection while exercising. 3. Do not put the...
... risk of serious injury, read all important precautions and instructions in this manual. 9. Before beginning any worn parts immediately. 8. The elliptical should not be used by or through the use of this product. 1. Inspect and properly tighten all parts regularly. ICON assumes no responsibility for foot protection while exercising. 3. Do not put the...

English Manual
Page 4
Before reading further, please familiarize yourself with the parts that are shown on the front cover of this manual carefully before contacting us. BEFORE YOU BEGIN Thank you have questions after reading this manual, ... you, note the product model number and serial number before you use the elliptical. If you for purchasing the PROFORM® 490 LE elliptical. The model number and the location of features designed to make your benefit, read this manual. The 490 LE elliptical provides an array of the serial number decal are labeled in the drawing below...
Before reading further, please familiarize yourself with the parts that are shown on the front cover of this manual carefully before contacting us. BEFORE YOU BEGIN Thank you have questions after reading this manual, ... you, note the product model number and serial number before you use the elliptical. If you for purchasing the PROFORM® 490 LE elliptical. The model number and the location of features designed to make your benefit, read this manual. The 490 LE elliptical provides an array of the serial number decal are labeled in the drawing below...
English Manual
Page 5
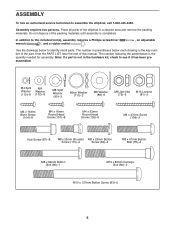
... to see if it has been preassembled. Note: If a part is the quantity needed for assembly. Place all parts of the packing materials until assembly is the key number of the part, from the PART LIST near the end of this manual. The number following the...82)-2 M10 x 127mm Button Screw (83)-2 5 ASSEMBLY To hire an authorized service technician to identify small parts. The number in a cleared area and remove the packing materials. Do not dispose of the elliptical in parentheses below to assemble the elliptical, call 1-800-445-2480. Assembly requires two persons.
... to see if it has been preassembled. Note: If a part is the quantity needed for assembly. Place all parts of the packing materials until assembly is the key number of the part, from the PART LIST near the end of this manual. The number following the...82)-2 M10 x 127mm Button Screw (83)-2 5 ASSEMBLY To hire an authorized service technician to identify small parts. The number in a cleared area and remove the packing materials. Do not dispose of the elliptical in parentheses below to assemble the elliptical, call 1-800-445-2480. Assembly requires two persons.

English Manual
Page 12
...Shoulder Screw (115), and turn the Shoulder Screw a few turns into the Pedal Arm Axle. Tighten both parts. Connect the Right Pedal Arm (not shown) in the same way. Make sure that the Left Pedal... Pedal Arm Axles (32). To protect the floor or carpet from damage, place a mat under the elliptical. 12 13. Tighten the M8 x 69mm Button Bolt (80) and the two M8 x 23mm Button... Release the lever, and make sure that all parts of grease to the Right Upper Body Leg (12). 14. See step 5. Apply a small amount of the elliptical are properly tightened. While another M8 x 23mm ...
...Shoulder Screw (115), and turn the Shoulder Screw a few turns into the Pedal Arm Axle. Tighten both parts. Connect the Right Pedal Arm (not shown) in the same way. Make sure that the Left Pedal... Pedal Arm Axles (32). To protect the floor or carpet from damage, place a mat under the elliptical. 12 13. Tighten the M8 x 69mm Button Bolt (80) and the two M8 x 23mm Button... Release the lever, and make sure that all parts of grease to the Right Upper Body Leg (12). 14. See step 5. Apply a small amount of the elliptical are properly tightened. While another M8 x 23mm ...

English Manual
Page 21
...Base Foot If the handgrip pulse sensor does not function properly, see the drawing above) until the rocking motion is eliminated. 21 To clean the elliptical, use , turn the base foot (see step 5 on page 9 for replacement instructions. BATTERY REPLACEMENT If the console displays become dim, the... out of the leveling feet beneath the rear stabilizer until the flexing is eliminated. Replace any worn parts immediately. Leveling Feet HOW TO ELIMINATE FLEXING IN THE CENTER OF THE ELLIPTICAL If the elliptical flexes in the center during use a damp cloth and a small amount of mild soap.
...Base Foot If the handgrip pulse sensor does not function properly, see the drawing above) until the rocking motion is eliminated. 21 To clean the elliptical, use , turn the base foot (see step 5 on page 9 for replacement instructions. BATTERY REPLACEMENT If the console displays become dim, the... out of the leveling feet beneath the rear stabilizer until the flexing is eliminated. Replace any worn parts immediately. Leveling Feet HOW TO ELIMINATE FLEXING IN THE CENTER OF THE ELLIPTICAL If the elliptical flexes in the center during use a damp cloth and a small amount of mild soap.

English Manual
Page 22
... exercise. The pulse sensor is to strengthen your breath. EXERCISE INTENSITY Whether your goal is to burn fat or to make exercise a regular and enjoyable part of time. The chart below shows recommended heart rates for longer than 20 minutes.) Breathe regularly and deeply as an exercise aid in determining heart...
... exercise. The pulse sensor is to strengthen your breath. EXERCISE INTENSITY Whether your goal is to burn fat or to make exercise a regular and enjoyable part of time. The chart below shows recommended heart rates for longer than 20 minutes.) Breathe regularly and deeply as an exercise aid in determining heart...

English Manual
Page 24
... Crank Bushing Crank Bushing Sleeve Crank Bearing Set Crank Crank Spacer Crank Snap Ring Upper Wire Harness Lower Wire Harness Reed Switch/Wire Model No. PART LIST Key No.
... Crank Bushing Crank Bushing Sleeve Crank Bearing Set Crank Crank Spacer Crank Snap Ring Upper Wire Harness Lower Wire Harness Reed Switch/Wire Model No. PART LIST Key No.

English Manual
Page 25
... the back cover of this manual. *These parts are subject to change without notice. Description Key No. Key No. Description 101 8 102 12 103 26 104 8 105 6 106 2 107 4 108 2 109 2 M4 x 16mm ...
... the back cover of this manual. *These parts are subject to change without notice. Description Key No. Key No. Description 101 8 102 12 103 26 104 8 105 6 106 2 107 4 108 2 109 2 M4 x 16mm ...

English Manual
Page 28
...;s option, the product through one of incidental or consequential damages. ICON Health & Fitness, Inc., 1500 S. 1000 W., Logan, UT 84321-9813 Part No. 304871 R1011A Printed in connection with respect to the product. ICON Health & Fitness, Inc. (ICON) warrants this manual are limited in ...the customer may have other warranty beyond that vary from the service center will automatically be the customerʼs responsibility. If replacement parts are shipped while the product is not responsible or liable for a particular purpose are not followed, if the product is abused ...
...;s option, the product through one of incidental or consequential damages. ICON Health & Fitness, Inc., 1500 S. 1000 W., Logan, UT 84321-9813 Part No. 304871 R1011A Printed in connection with respect to the product. ICON Health & Fitness, Inc. (ICON) warrants this manual are limited in ...the customer may have other warranty beyond that vary from the service center will automatically be the customerʼs responsibility. If replacement parts are shipped while the product is not responsible or liable for a particular purpose are not followed, if the product is abused ...


