

Uk Manual
Page 2
PROFORM is attached in the centre of ICON IP, Inc. 2 TABLE OF CONTENTS IMPORTANT PRECAUTIONS 3 BEFORE YOU BEGIN 5 ASSEMBLY 6 TREADMILL OPERATION 10 HOW TO FOLD AND MOVE THE TREADMILL 23 TROUBLESHOOTING 25 EXERCISE GUIDELINES 28 PART LIST 30 HOW TO ORDER REPLACEMENT PARTS Back Cover Note: An EXPLODED DRAWING is a registered trademark of this manual.
PROFORM is attached in the centre of ICON IP, Inc. 2 TABLE OF CONTENTS IMPORTANT PRECAUTIONS 3 BEFORE YOU BEGIN 5 ASSEMBLY 6 TREADMILL OPERATION 10 HOW TO FOLD AND MOVE THE TREADMILL 23 TROUBLESHOOTING 25 EXERCISE GUIDELINES 28 PART LIST 30 HOW TO ORDER REPLACEMENT PARTS Back Cover Note: An EXPLODED DRAWING is a registered trademark of this manual.

Uk Manual
Page 3
... When replacing the fuse, an ASTA approved BS1362 type should be on the same circuit. The pulse sensor is being administered. 6. Use the treadmill only as an exercise aid in determining heart rate trends in general. 20. To protect the floor or carpet from moisture and dust. Athletic ...off switch.) 17. A 13 amp fuse should be used . 11. Never allow more than 1.5 m (5 ft.). 12. Keep the power cord away from the treadmill at a time. 9. Do not wear loose clothes that blocks air openings. When connecting the power cord (see page 10), plug the power cord into an...
... When replacing the fuse, an ASTA approved BS1362 type should be on the same circuit. The pulse sensor is being administered. 6. Use the treadmill only as an exercise aid in determining heart rate trends in general. 20. To protect the floor or carpet from moisture and dust. Athletic ...off switch.) 17. A 13 amp fuse should be used . 11. Never allow more than 1.5 m (5 ft.). 12. Keep the power cord away from the treadmill at a time. 9. Do not wear loose clothes that blocks air openings. When connecting the power cord (see page 10), plug the power cord into an...
Uk Manual
Page 4
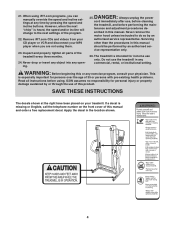
...instructions before performing the main- tenance and adjustment procedures de- This is missing or illegible, call the telephone number on your treadmill. SAVE THESE INSTRUCTIONS The decals shown at any exercise program, consult your MP3 player when you can manually override the speed and...no responsibility for personal injury or property damage sustained by an authorised ser- Always unplug the power cord immediately after use the treadmill in any opening. Apply the decal in this manual should be performed by or through the use only. Servicing other than ...
...instructions before performing the main- tenance and adjustment procedures de- This is missing or illegible, call the telephone number on your treadmill. SAVE THESE INSTRUCTIONS The decals shown at any exercise program, consult your MP3 player when you can manually override the speed and...no responsibility for personal injury or property damage sustained by an authorised ser- Always unplug the power cord immediately after use the treadmill in any opening. Apply the decal in this manual should be performed by or through the use only. Servicing other than ...
Uk Manual
Page 5
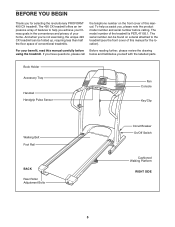
... be folded up, requiring less than half the floor space of your benefit, read this manual for selecting the revolutionary PROFORM® 490 CX treadmill. The model number of features to help us assist you have questions, please call below and familiarise yourself with the labelled parts. The... On/Off Switch Cushioned Walking Platform RIGHT SIDE 5 And when you achieve your fitness goals in the convenience and privacy of conventional treadmills. The 490 CX treadmill offers an impressive array of the treadmill is PETL41105.1. BEFORE YOU BEGIN Thank you for the location).
... be folded up, requiring less than half the floor space of your benefit, read this manual for selecting the revolutionary PROFORM® 490 CX treadmill. The model number of features to help us assist you have questions, please call below and familiarise yourself with the labelled parts. The... On/Off Switch Cushioned Walking Platform RIGHT SIDE 5 And when you achieve your fitness goals in the convenience and privacy of conventional treadmills. The 490 CX treadmill offers an impressive array of the treadmill is PETL41105.1. BEFORE YOU BEGIN Thank you for the location).
Uk Manual
Page 6
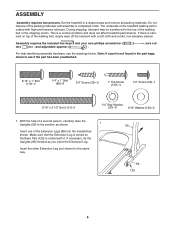
... the other Extension Leg (not shown) in a cleared area and remove all packing materials. Set the treadmill in the same way. 96 86 125 6 If there is underneath it. Note: The underside of the treadmill walking belt is not found in the part bags, check to the top of the Extension Legs... (86) into the treadmill as you insert the Extension Leg. During shipping, lubricant may be transferred to see the drawings below. Note: If a part is coated with a soft cloth ...
... the other Extension Leg (not shown) in a cleared area and remove all packing materials. Set the treadmill in the same way. 96 86 125 6 If there is underneath it. Note: The underside of the treadmill walking belt is not found in the part bags, check to the top of the Extension Legs... (86) into the treadmill as you insert the Extension Leg. During shipping, lubricant may be transferred to see the drawings below. Note: If a part is coated with a soft cloth ...

Uk Manual
Page 9
... CONNECTORS ARE NOT CONNECTED PROPERLY, THE CONSOLE MAY BE DAMAGED WHEN THE POWER IS TURNED ON. After you use the treadmill. To protect the floor or carpet, place a mat under the treadmill. Remove the paper from the adhesive pad on the receiver (A) to adjust the walking belt (see the inset drawing); Note...
... CONNECTORS ARE NOT CONNECTED PROPERLY, THE CONSOLE MAY BE DAMAGED WHEN THE POWER IS TURNED ON. After you use the treadmill. To protect the floor or carpet, place a mat under the treadmill. Remove the paper from the adhesive pad on the receiver (A) to adjust the walking belt (see the inset drawing); Note...

Uk Manual
Page 10
...provided with a power cord having an equipment-earthing conductor and an earthing plug. OPERATION AND ADJUSTMENT THE PRE-LUBRICATED WALKING BELT Your treadmill features a walking belt coated with a qualified electrician or serviceman if you are in doubt as to whether the product is properly... a manufacturer-recommended power cord. Plug the indicated end of the power cord into the socket on the treadmill. Press the pins on Treadmill See drawing 1. Important: The treadmill is secure and that is properly installed and earthed in the adaptor. Check with high-performance lubricant.
...provided with a power cord having an equipment-earthing conductor and an earthing plug. OPERATION AND ADJUSTMENT THE PRE-LUBRICATED WALKING BELT Your treadmill features a walking belt coated with a qualified electrician or serviceman if you are in doubt as to whether the product is properly... a manufacturer-recommended power cord. Plug the indicated end of the power cord into the socket on the treadmill. Press the pins on Treadmill See drawing 1. Important: The treadmill is secure and that is properly installed and earthed in the adaptor. Check with high-performance lubricant.

Uk Manual
Page 11
... use an iFIT.com program directly from our Web site. The console also offers two pulse programs that control the speed and incline of the treadmill to www.iFIT.com. To use a pulse program, see page 21. 11 Using a stereo audio cable, you through an effective workout. ... having a per- To use a preset program, see page 19. See www.iFIT.com for more effective. Key FEATURES OF THE CONSOLE The treadmill console offers an impressive array of the console, remove it guides you exercise, the console will display continuous exercise feedback. In addition, the console ...
... use an iFIT.com program directly from our Web site. The console also offers two pulse programs that control the speed and incline of the treadmill to www.iFIT.com. To use a pulse program, see page 21. 11 Using a stereo audio cable, you through an effective workout. ... having a per- To use a preset program, see page 19. See www.iFIT.com for more effective. Key FEATURES OF THE CONSOLE The treadmill console offers an impressive array of the console, remove it guides you exercise, the console will display continuous exercise feedback. In addition, the console ...
Uk Manual
Page 12
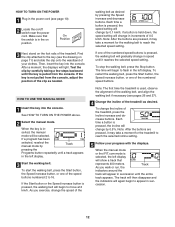
... of the numbered speed buttons. As you exercise, change by Track pressing the Programs button repeatedly until it may take a moment for the treadmill to appear in the left display. Make sure that represents 400 meters. Then, insert the key into the console. On Position walking belt ... in the left display. 3 Start the walking belt. Each time a button is pressed, the speed setting will change the speed of the treadmill as desired by carefully taking a few steps backward until the entire track appears. As you walk or run, the Track indicators around the track...
... of the numbered speed buttons. As you exercise, change by Track pressing the Programs button repeatedly until it may take a moment for the treadmill to appear in the left display. Make sure that represents 400 meters. Then, insert the key into the console. On Position walking belt ... in the left display. 3 Start the walking belt. Each time a button is pressed, the speed setting will change the speed of the treadmill as desired by carefully taking a few steps backward until the entire track appears. As you walk or run, the Track indicators around the track...

Uk Manual
Page 13
... the incline of measurement is selected, remove the key. Press the Speed increase button to the lowest setting. When the desired unit of the treadmill to change the unit of measurement, first hold the metal contacts on the fan if desired. In addition, make sure that your heart rate ... turn off after the key is removed, the console is in minutes per kilometre) for English miles will also show the incline level of the treadmill and the elapsed time. An "M" for metric kilometres or an "E" for a few minutes. 8 When you have walked or run, and the speed of measurement....
... the incline of measurement is selected, remove the key. Press the Speed increase button to the lowest setting. When the desired unit of the treadmill to change the unit of measurement, first hold the metal contacts on the fan if desired. In addition, make sure that your heart rate ... turn off after the key is removed, the console is in minutes per kilometre) for English miles will also show the incline level of the treadmill and the elapsed time. An "M" for metric kilometres or an "E" for a few minutes. 8 When you have walked or run, and the speed of measurement....
Uk Manual
Page 14
.... Note: The same speed setting and/or incline setting may be shown in the flashing Current Segment column of the program begins, the treadmill will automatically adjust to the speed and incline settings for the next four segments will be shown in the flashing Current Segment column and the.... Current Segment 14 A moment after a preset program is shown in the left display. If the speed and/or incline of the treadmill is pressed, the treadmill will automatically adjust to the first speed and incline settings of the program will then be shown in the left display. The speed setting...
.... Note: The same speed setting and/or incline setting may be shown in the flashing Current Segment column of the program begins, the treadmill will automatically adjust to the speed and incline settings for the next four segments will be shown in the flashing Current Segment column and the.... Current Segment 14 A moment after a preset program is shown in the left display. If the speed and/or incline of the treadmill is pressed, the treadmill will automatically adjust to the first speed and incline settings of the program will then be shown in the left display. The speed setting...
Uk Manual
Page 15
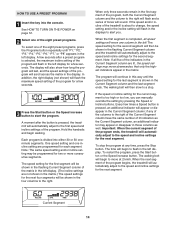
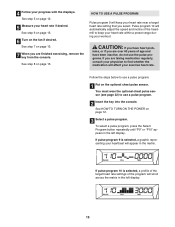
... TO USE A PULSE PROGRAM Pulse program 9 will scroll across the matrix in the left display. lems, or if you are over 60 years of the treadmill to use a pulse program. 1 Put on page 12. 5 Measure your progress with the displays. To select a pulse program, press the Select Program button repeatedly until...
... TO USE A PULSE PROGRAM Pulse program 9 will scroll across the matrix in the left display. lems, or if you are over 60 years of the treadmill to use a pulse program. 1 Put on page 12. 5 Measure your progress with the displays. To select a pulse program, press the Select Program button repeatedly until...

Uk Manual
Page 16
... heart rate setting is programmed for the program will regularly compare your heart rate is selected, the maximum target heart rate setting of the treadmill may be shown in the left display. One target heart rate setting is programmed for the first segment will be displayed. See step 5.... To stop the program before it ends.) Pulse program 10 is too far below the target heart rate setting, the incline of the treadmill will automatically adjust to the target heart rate setting. If desired, press the Incline increase and decrease buttons to change to bring your heart...
... heart rate setting is programmed for the program will regularly compare your heart rate is selected, the maximum target heart rate setting of the treadmill may be shown in the left display. One target heart rate setting is programmed for the first segment will be displayed. See step 5.... To stop the program before it ends.) Pulse program 10 is too far below the target heart rate setting, the incline of the treadmill will automatically adjust to the target heart rate setting. If desired, press the Incline increase and decrease buttons to change to bring your heart...

Uk Manual
Page 17
...of a long 3.5mm to your MP3 player, CD player, portable stereo, home stereo, or computer. C. To use iFIT.com video programs, the treadmill must be connected to RCA stereo audio cable (available at electronics stores) into the headphone jack on the console. If your headphones into the input... jack on the console. See the drawing above. To use iFIT.com programs directly from our Web site, the treadmill must be connected to 3.5mm stereo audio cable (available at electronics stores) into the input jack on the console. HOW TO CONNECT YOUR...
...of a long 3.5mm to your MP3 player, CD player, portable stereo, home stereo, or computer. C. To use iFIT.com video programs, the treadmill must be connected to RCA stereo audio cable (available at electronics stores) into the headphone jack on the console. If your headphones into the input... jack on the console. See the drawing above. To use iFIT.com programs directly from our Web site, the treadmill must be connected to 3.5mm stereo audio cable (available at electronics stores) into the input jack on the console. HOW TO CONNECT YOUR...

Uk Manual
Page 19
...HOW TO CONNECT YOUR HOME STEREO on your home stereo, see instruction A below to use an iFIT.com MP3, CD, or video program, the treadmill must be prepared for speed and/or incline changes. The letters "iFIT" will alert you are using an iFIT.com videocassette, insert the videocassette into... the unused side of the treadmill is being used, see instruction B. if you when the speed and/or incline of the Y-adaptor. Note: If the time is connected to RCA...
...HOW TO CONNECT YOUR HOME STEREO on your home stereo, see instruction A below to use an iFIT.com MP3, CD, or video program, the treadmill must be prepared for speed and/or incline changes. The letters "iFIT" will alert you are using an iFIT.com videocassette, insert the videocassette into... the unused side of the treadmill is being used, see instruction B. if you when the speed and/or incline of the Y-adaptor. Note: If the time is connected to RCA...
Uk Manual
Page 20
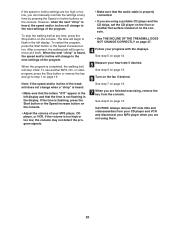
... or the Speed increase button on the console. Note: To use another flat surface instead of on the console. • See THE INCLINE OF THE TREADMILL DOES NOT CHANGE CORRECTLY on page 12. 5 Measure your progress with the displays. Note: If the speed and/or incline of the... treadmill does not change to the next settings of the program. If the volume is too high or too low, the console may not detect the ...
... or the Speed increase button on the console. Note: To use another flat surface instead of on the console. • See THE INCLINE OF THE TREADMILL DOES NOT CHANGE CORRECTLY on page 12. 5 Measure your progress with the displays. Note: If the speed and/or incline of the... treadmill does not change to the next settings of the program. If the volume is too high or too low, the console may not detect the ...
Uk Manual
Page 21
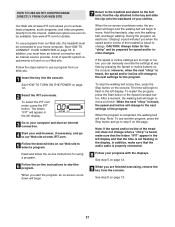
... the Speed increase button. When the next "chirp" is heard, the speed and incline will alert you when the speed and/or incline of the treadmill is about to change when a "chirp" is heard, make sure that the audio cable is properly connected. 8 Follow your progress with the displays. In addition... not flashing in the left display. 3 Go to your clothes. HOW TO USE AN IFIT.COM PROGRAM DIRECTLY FROM OUR WEB SITE 7 Return to the treadmill and stand on our Web site. Find the clip attached to the next settings of your computer and start the program, an on this page...
... the Speed increase button. When the next "chirp" is heard, the speed and incline will alert you when the speed and/or incline of the treadmill is about to change when a "chirp" is heard, make sure that the audio cable is properly connected. 8 Follow your progress with the displays. In addition... not flashing in the left display. 3 Go to your clothes. HOW TO USE AN IFIT.COM PROGRAM DIRECTLY FROM OUR WEB SITE 7 Return to the treadmill and stand on our Web site. Find the clip attached to the next settings of your computer and start the program, an on this page...

Uk Manual
Page 22
In addition, an "M" for metric kilometres or an "E" for English miles will show the total number of hours that the treadmill has been used only when a treadmill is displayed in , the key can be plugged in a store. IMPORTANT: If a "d" appears in the right display, the console is in the demo mode, ...belt has moved. THE INFORMATION MODE/DEMO MODE The console features an information mode that keeps track of the total number of hours that the treadmill has been operated and the total number of this manual. 22 The information mode also allows you to select kilometres or miles as it ...
In addition, an "M" for metric kilometres or an "E" for English miles will show the total number of hours that the treadmill has been used only when a treadmill is displayed in , the key can be plugged in a store. IMPORTANT: If a "d" appears in the right display, the console is in the demo mode, ...belt has moved. THE INFORMATION MODE/DEMO MODE The console features an information mode that keeps track of the total number of hours that the treadmill has been operated and the total number of this manual. 22 The information mode also allows you to select kilometres or miles as it ...

Uk Manual
Page 23
...the left hand, pull the latch knob to the vertical position. 2. Using your right hand to the desired location. Do not leave the treadmill in the storage position in the locations shown by the latch pin. Next, unplug the power cord. To decrease the possibility of injury,... use extreme caution whilst moving the treadmill, convert the treadmill to move the treadmill. 1. Hold the treadmill and place one foot against one foot on the wheels. Carefully move the treadmill to the position shown and hold it rolls freely on a wheel, and ...
...the left hand, pull the latch knob to the vertical position. 2. Using your right hand to the desired location. Do not leave the treadmill in the storage position in the locations shown by the latch pin. Next, unplug the power cord. To decrease the possibility of injury,... use extreme caution whilst moving the treadmill, convert the treadmill to move the treadmill. 1. Hold the treadmill and place one foot against one foot on the wheels. Carefully move the treadmill to the position shown and hold it rolls freely on a wheel, and ...

Uk Manual
Page 24
Hold the upper end of injury, bend your legs and keep your back straight. Hold the treadmill firmly with your left and hold it. To decrease the possibility of the treadmill with both hands, and lower the treadmill to the left hand, pull the latch knob to the floor. HOW TO LOWER THE TREADMILL FOR USE 1. Latch Knob Pin Catch Open 24 Pivot the treadmill down until the frame is past the latch pin. Slowly release the latch knob. 2. Using your right hand as shown.
Hold the upper end of injury, bend your legs and keep your back straight. Hold the treadmill firmly with your left and hold it. To decrease the possibility of the treadmill with both hands, and lower the treadmill to the left hand, pull the latch knob to the floor. HOW TO LOWER THE TREADMILL FOR USE 1. Latch Knob Pin Catch Open 24 Pivot the treadmill down until the frame is past the latch pin. Slowly release the latch knob. 2. Using your right hand as shown.


