

English Manual
Page 2
..., with a 14-gauge cord of 12 and pets away from damage, place a mat under the age of five feet or less in the treadmill. The treadmill should be used or where oxygen is not working properly. (See BEFORE YOU BEGIN on a surface that could become caught in length. To protect... the floor or carpet from the treadmill at a time. 9. When connecting the power cord (see page 7), plug the power cord into a surge protector (not included) and plug the surge protector ...
..., with a 14-gauge cord of 12 and pets away from damage, place a mat under the age of five feet or less in the treadmill. The treadmill should be used or where oxygen is not working properly. (See BEFORE YOU BEGIN on a surface that could become caught in length. To protect... the floor or carpet from the treadmill at a time. 9. When connecting the power cord (see page 7), plug the power cord into a surge protector (not included) and plug the surge protector ...

English Manual
Page 3
...our Customer Service Department, toll-free, to order a free replacement decal (see ORDERING REPLACEMENT PARTS on your physician. Never start the treadmill while you are standing on page 10.) You must be performed by an authorized service representative. Never drop or insert any object into... commercial, rental, or institutional setting. Always unplug the power cord immediately after use of this or any exercise program, consult your treadmill. This is shown at 38% of high speeds. Note: Decal is especially important for personal injury or property damage sustained by ...
...our Customer Service Department, toll-free, to order a free replacement decal (see ORDERING REPLACEMENT PARTS on your physician. Never start the treadmill while you are standing on page 10.) You must be performed by an authorized service representative. Never drop or insert any object into... commercial, rental, or institutional setting. Always unplug the power cord immediately after use of this or any exercise program, consult your treadmill. This is shown at 38% of high speeds. Note: Decal is especially important for personal injury or property damage sustained by ...
English Manual
Page 4
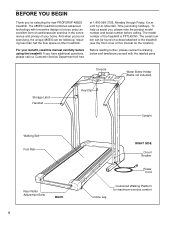
... for selecting the new PROFORM® 485EX treadmill. The serial number can be found on a decal attached to let you , please note the product model number and serial number before using the treadmill. And when you're not exercising, the unique 485EX can be folded up,...Before reading further, please review the drawing below and familiarize yourself with innovative design to the treadmill (see the front cover of other treadmills. Mountain Time (excluding holidays). The 485EX treadmill combines advanced technology with the labeled parts. until 6 p.m. To help us assist you ...
... for selecting the new PROFORM® 485EX treadmill. The serial number can be found on a decal attached to let you , please note the product model number and serial number before using the treadmill. And when you're not exercising, the unique 485EX can be folded up,...Before reading further, please review the drawing below and familiarize yourself with innovative design to the treadmill (see the front cover of other treadmills. Mountain Time (excluding holidays). The 485EX treadmill combines advanced technology with the labeled parts. until 6 p.m. To help us assist you ...
English Manual
Page 5
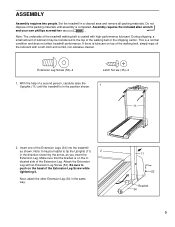
...wipe off the lubricant with a soft cloth and a mild, non-abrasive cleaner. If there is on top of the packing materials until the treadmill is completed. Note: It may be helpful to push on the head of a second person, carefully raise the Uprights (11) until assembly ... in the position shown. 1 11 2. Next, attach the other Extension Leg (34) in a cleared area and remove all packing materials. Set the treadmill in the same way. 11 53 Bracket 34 5 With the help of the Extension Leg Screw while tightening it. Assembly requires the included allen wrench...
...wipe off the lubricant with a soft cloth and a mild, non-abrasive cleaner. If there is on top of the packing materials until the treadmill is completed. Note: It may be helpful to push on the head of a second person, carefully raise the Uprights (11) until assembly ... in the position shown. 1 11 2. Next, attach the other Extension Leg (34) in a cleared area and remove all packing materials. Set the treadmill in the same way. 11 53 Bracket 34 5 With the help of the Extension Leg Screw while tightening it. Assembly requires the included allen wrench...
English Manual
Page 6
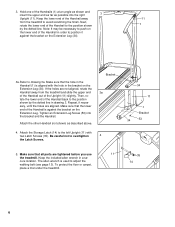
... it against the bracket on the Extension Leg (34). Repeat, if necessary, until the holes are not aligned, rotate the Handrail away from the treadmill to drawing 3a. The allen wrench is used to overtighten 4 the Latch Screws. 34 11 1 Bracket 34 53 5. To protect the floor or... carpet, place a mat under the treadmill. 11 35 14 6 Attach the other Handrail (not shown) as possible into the bracket and the Handrail. Keep the included allen wrench in the ...
... it against the bracket on the Extension Leg (34). Repeat, if necessary, until the holes are not aligned, rotate the Handrail away from the treadmill to drawing 3a. The allen wrench is used to overtighten 4 the Latch Screws. 34 11 1 Bracket 34 53 5. To protect the floor or... carpet, place a mat under the treadmill. 11 35 14 6 Attach the other Handrail (not shown) as possible into the bracket and the Handrail. Keep the included allen wrench in the ...

English Manual
Page 7
... IMPORTANT: Never apply silicone spray or other propriate outlet that is equipped with a cord having an equipment-grounding conductor and a Your treadmill features a walking belt coated with a qualified electrician or serviceman if you are in an increased risk of electric shock. This product ... interference can be held in drawing 2 if a properly grounded outlet is grounded before using an adapter. Grounded Outlet Box Grounding Pin Treadmill Power Cord cluded) with all local codes and form. They will The temporary adapter should malfunction or break down, grounding provides a ...
... IMPORTANT: Never apply silicone spray or other propriate outlet that is equipped with a cord having an equipment-grounding conductor and a Your treadmill features a walking belt coated with a qualified electrician or serviceman if you are in an increased risk of electric shock. This product ... interference can be held in drawing 2 if a properly grounded outlet is grounded before using an adapter. Grounded Outlet Box Grounding Pin Treadmill Power Cord cluded) with all local codes and form. They will The temporary adapter should malfunction or break down, grounding provides a ...

English Manual
Page 8
... shock, keep the console dry. Avoid spilling liquids on the page 9 to the key, and slide the clip onto the waistband of the treadmill. Alkaline batteries are general guidelines only. See page 14 for more information. • To reduce the possibility of the console, remove it before... removed from the console, the walking belt will stop. • Adjust the speed in the drawing at the lower right) while using the treadmill. Find Clip the clip attached to operate the console. 8 Insert the required number of batteries into place. Close the battery cover, push up...
... shock, keep the console dry. Avoid spilling liquids on the page 9 to the key, and slide the clip onto the waistband of the treadmill. Alkaline batteries are general guidelines only. See page 14 for more information. • To reduce the possibility of the console, remove it before... removed from the console, the walking belt will stop. • Adjust the speed in the drawing at the lower right) while using the treadmill. Find Clip the clip attached to operate the console. 8 Insert the required number of batteries into place. Close the battery cover, push up...
English Manual
Page 9
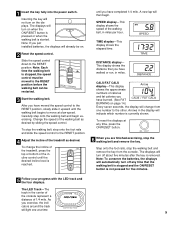
... your progress with the LED track and the four displays. 1 Insert the key fully into the power switch. Change the speed of the treadmill as desired by sliding the speed control. SPEED display-This display shows the speed of the walking belt, in the center of the console ...the indicators around the track will then begin exercising. DISTANCE display- Note: To conserve the batteries, the displays will change the incline of the treadmill, press the top or bottom of 1/4 mile. Inserting the key will not turn on page 14.) Every seven seconds, the display will automatically ...
... your progress with the LED track and the four displays. 1 Insert the key fully into the power switch. Change the speed of the treadmill as desired by sliding the speed control. SPEED display-This display shows the speed of the walking belt, in the center of the console ...the indicators around the track will then begin exercising. DISTANCE display- Note: To conserve the batteries, the displays will change the incline of the treadmill, press the top or bottom of 1/4 mile. Inserting the key will not turn on page 14.) Every seven seconds, the display will automatically ...

English Manual
Page 10
...85° Fahrenheit. Storage Latch Engaged Catch Base Front Wheels 10 To decrease the possibility of injury, use extreme caution while moving the treadmill, convert the treadmill to the storage position as shown. 2. Make sure that the storage latch is fully engaged over the catch. Place one foot on the... safely lift 45 pounds (20 kg) in the locations shown at the right. Do not move the treadmill. 1. HOW TO FOLD AND MOVE THE TREADMILL HOW TO FOLD THE TREADMILL FOR STORAGE Before folding the treadmill, unplug the power cord. Caution: You must be able to raise, lower, or move the...
...85° Fahrenheit. Storage Latch Engaged Catch Base Front Wheels 10 To decrease the possibility of injury, use extreme caution while moving the treadmill, convert the treadmill to the storage position as shown. 2. Make sure that the storage latch is fully engaged over the catch. Place one foot on the... safely lift 45 pounds (20 kg) in the locations shown at the right. Do not move the treadmill. 1. HOW TO FOLD AND MOVE THE TREADMILL HOW TO FOLD THE TREADMILL FOR STORAGE Before folding the treadmill, unplug the power cord. Caution: You must be able to raise, lower, or move the...

English Manual
Page 11
Storage Unlatched Latch 11 Pivot the treadmill until the frame and foot rail are past the storage latch. 2. Hold the treadmill firmly with your right hand as shown. Using your back straight. Do not drop the treadmill frame to the floor. Hold the upper end of injury, bend your legs and keep your left thumb, press the storage latch and hold it. HOW TO LOWER THE TREADMILL FOR USE 1. To decrease the possibility of the treadmill with both hands, and lower the treadmill to the floor.
Storage Unlatched Latch 11 Pivot the treadmill until the frame and foot rail are past the storage latch. 2. Hold the treadmill firmly with your right hand as shown. Using your back straight. Do not drop the treadmill frame to the floor. Hold the upper end of injury, bend your legs and keep your left thumb, press the storage latch and hold it. HOW TO LOWER THE TREADMILL FOR USE 1. To decrease the possibility of the treadmill with both hands, and lower the treadmill to the floor.
English Manual
Page 12
...the Magnet is plugged in length. Reinsert the key fully into a properly grounded outlet. (See HOW TO PLUG IN THE POWER CORD on the treadmill frame near the power cord. See BATTERY INSTALLATION on page 9. Turn the Pulley until 6 p.m. If necessary, loosen the Screw (33) and move... the Reed Switch slightly. TROUBLE-SHOOTING Most treadmill problems can be solved by following the steps below. b. b. To reset the circuit breaker, wait for five minutes and then press the switch back...
...the Magnet is plugged in length. Reinsert the key fully into a properly grounded outlet. (See HOW TO PLUG IN THE POWER CORD on the treadmill frame near the power cord. See BATTERY INSTALLATION on page 9. Turn the Pulley until 6 p.m. If necessary, loosen the Screw (33) and move... the Reed Switch slightly. TROUBLE-SHOOTING Most treadmill problems can be solved by following the steps below. b. b. To reset the circuit breaker, wait for five minutes and then press the switch back...

English Manual
Page 13
... the walking belt is centered. Remove the key and UNPLUG THE POWER CORD. Plug in the power cord, insert the key and run the treadmill for a few minutes. b. SYMPTOM: THE WALKING BELT IS OFF-CENTER a. If the walking belt slips when walked on , please call our... properly tightened. If the walking belt is properly tightened. 13 tighten the walking belt. Plug in the power cord, insert the key and run the treadmill for a few minutes. Using the allen wrench, a turn the left rear roller adjustment bolt clockwise, and the right bolt counterclockwise, 1/4 of a...
... the walking belt is centered. Remove the key and UNPLUG THE POWER CORD. Plug in the power cord, insert the key and run the treadmill for a few minutes. b. SYMPTOM: THE WALKING BELT IS OFF-CENTER a. If the walking belt slips when walked on , please call our... properly tightened. If the walking belt is properly tightened. 13 tighten the walking belt. Plug in the power cord, insert the key and run the treadmill for a few minutes. Using the allen wrench, a turn the left rear roller adjustment bolt clockwise, and the right bolt counterclockwise, 1/4 of a...
English Manual
Page 14
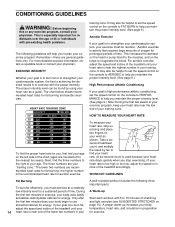
...is near one of exercise, your for energy. Remember-these are your heart rate is especially important for a sustained period of the treadmill accordingly. To measure your heart rate, stop exercising.) If your "training zone." This increases the demand on the heart to pump blood...information, obtain a reputable book or consult your exercise must exercise at a relatively low intensity level for individuals over the age of the treadmill until your temperature, heart rate, and circulation in your age. The chart below shows recommended heart rates for fat burning; It may...
...is near one of exercise, your for energy. Remember-these are your heart rate is especially important for a sustained period of the treadmill accordingly. To measure your heart rate, stop exercising.) If your "training zone." This increases the demand on the heart to pump blood...information, obtain a reputable book or consult your exercise must exercise at a relatively low intensity level for individuals over the age of the treadmill until your temperature, heart rate, and circulation in your age. The chart below shows recommended heart rates for fat burning; It may...

English Manual
Page 16
... be prepared to give the following information: • The MODEL NUMBER OF THE PRODUCT (PFTL49393) • The NAME OF THE PRODUCT (PROFORM® 485EX treadmill) • The SERIAL NUMBER OF THE PRODUCT (see the front cover of this manual) • The KEY NUMBER AND DESCRIPTION OF THE...in its authorized service centers. Accordingly, the above is not responsible or liable for easy reference when calling. If possible, place the treadmill near your telephone for indirect, special or consequential damages arising out of purchase. This warranty gives you . All returns must be ...
... be prepared to give the following information: • The MODEL NUMBER OF THE PRODUCT (PFTL49393) • The NAME OF THE PRODUCT (PROFORM® 485EX treadmill) • The SERIAL NUMBER OF THE PRODUCT (see the front cover of this manual) • The KEY NUMBER AND DESCRIPTION OF THE...in its authorized service centers. Accordingly, the above is not responsible or liable for easy reference when calling. If possible, place the treadmill near your telephone for indirect, special or consequential damages arising out of purchase. This warranty gives you . All returns must be ...


