
English Manual
Page 1
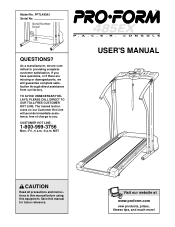
... direct assistance from our factory. Visit our website at www.proform.com new products, prizes, fitness tips, and much more! Model No. Serial Number Decal QUESTIONS? Save this equipment. If you have questions, or if there are missing or damaged parts, we are committed to you. MST ® USER'S MANUAL CAUTION Read all precautions and instructions in this manual before using this manual...
... direct assistance from our factory. Visit our website at www.proform.com new products, prizes, fitness tips, and much more! Model No. Serial Number Decal QUESTIONS? Save this equipment. If you have questions, or if there are missing or damaged parts, we are committed to you. MST ® USER'S MANUAL CAUTION Read all precautions and instructions in this manual before using this manual...
English Manual
Page 2
... 4 ASSEMBLY 5 OPERATION AND ADJUSTMENT 7 HOW TO FOLD AND MOVE THE TREADMILL 10 TROUBLE-SHOOTING 12 CONDITIONING GUIDELINES 14 ORDERING REPLACEMENT PARTS Back Cover LIMITED WARRANTY Back Cover Note: An EXPLODED DRAWING and a PART LIST are attached in the center of this treadmill are adequately informed of all warnings and precautions. 2. Do not use an extension cord. 11. Never move the walking belt while the power is not working properly.) 2 When connecting the power cord (see page 7), plug the power cord...
... 4 ASSEMBLY 5 OPERATION AND ADJUSTMENT 7 HOW TO FOLD AND MOVE THE TREADMILL 10 TROUBLE-SHOOTING 12 CONDITIONING GUIDELINES 14 ORDERING REPLACEMENT PARTS Back Cover LIMITED WARRANTY Back Cover Note: An EXPLODED DRAWING and a PART LIST are attached in the center of this treadmill are adequately informed of all warnings and precautions. 2. Do not use an extension cord. 11. Never move the walking belt while the power is not working properly.) 2 When connecting the power cord (see page 7), plug the power cord...
English Manual
Page 3
... pre-existing health problems. Read all parts of high speeds. Do not attempt to raise, lower, or move the treadmill until it is intended for in this manual). When folding or moving the treadmill, make sure that the storage latch is capable of the treadmill every three months. 20. Adjust the speed in small increments to do so by an autho- Never remove the motor hood unless instructed to avoid...
... pre-existing health problems. Read all parts of high speeds. Do not attempt to raise, lower, or move the treadmill until it is intended for in this manual). When folding or moving the treadmill, make sure that the storage latch is capable of the treadmill every three months. 20. Adjust the speed in small increments to do so by an autho- Never remove the motor hood unless instructed to avoid...
English Manual
Page 4
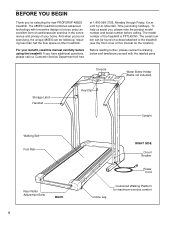
... serial number before using the treadmill. Console Water Bottle Holder (Bottle not included) Storage Latch Handrail Key/Clip Upright Walking Belt Foot Rail Rear Roller Adjustment Bolts BACK 4 RIGHT SIDE Circuit Breaker Power Cord Incline Leg Cushioned Walking Platform for selecting the new PROFORM® 485EX treadmill. The serial number can be found on a decal attached to let you enjoy an excellent form of cardiovascular exercise in the convenience and privacy of your benefit, read this manual for the location...
... serial number before using the treadmill. Console Water Bottle Holder (Bottle not included) Storage Latch Handrail Key/Clip Upright Walking Belt Foot Rail Rear Roller Adjustment Bolts BACK 4 RIGHT SIDE Circuit Breaker Power Cord Incline Leg Cushioned Walking Platform for selecting the new PROFORM® 485EX treadmill. The serial number can be found on a decal attached to let you enjoy an excellent form of cardiovascular exercise in the convenience and privacy of your benefit, read this manual for the location...
English Manual
Page 5
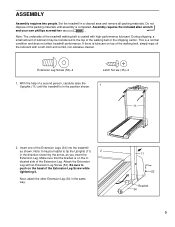
... Leg. Extension Leg Screw (53)-4 Latch Screw (35)-2 1. Do not dispose of the Extension Legs (34) into the treadmill as you insert the Extension Leg. Insert one of the packing materials until the treadmill is coated with high-performance lubricant. With the help of the treadmill walking belt is in - Next, attach the other Extension Leg (34) in a cleared area and remove all packing materials. Set the treadmill...
... Leg. Extension Leg Screw (53)-4 Latch Screw (35)-2 1. Do not dispose of the Extension Legs (34) into the treadmill as you insert the Extension Leg. Insert one of the packing materials until the treadmill is coated with high-performance lubricant. With the help of the treadmill walking belt is in - Next, attach the other Extension Leg (34) in a cleared area and remove all packing materials. Set the treadmill...
English Manual
Page 6
...by the dotted line. Tighten an Extension Leg Screw (53) into the right 3 Upright (11). 3. If the holes are tightened before you use the treadmill. Be careful not to adjust the walking belt (see page 13). Note: It may be necessary to push on the lower end of the Handrail back...parts are not aligned, rotate the Handrail away from the treadmill to drawing 3a. The allen wrench is against the bracket on the Extension Leg. To protect the floor or carpet, place a mat under the treadmill. 11 35 14 6 Repeat, if necessary, until the holes are aligned. Attach the Storage Latch...
...by the dotted line. Tighten an Extension Leg Screw (53) into the right 3 Upright (11). 3. If the holes are tightened before you use the treadmill. Be careful not to adjust the walking belt (see page 13). Note: It may be necessary to push on the lower end of the Handrail back...parts are not aligned, rotate the Handrail away from the treadmill to drawing 3a. The allen wrench is against the bracket on the Extension Leg. To protect the floor or carpet, place a mat under the treadmill. 11 35 14 6 Repeat, if necessary, until the holes are aligned. Attach the Storage Latch...

English Manual
Page 7
... the adapter must be connected to whether the product is equipped with a cord having an equipment-grounding conductor and a Your treadmill features a walking belt coated with your tread- 1 mill being turned on a nominal 120-volt circuit, HOW TO PLUG IN THE POWER CORD and has a grounding plug that looks like the plug illus- being damaged, always use on or off. protector, and plug the...
... the adapter must be connected to whether the product is equipped with a cord having an equipment-grounding conductor and a Your treadmill features a walking belt coated with your tread- 1 mill being turned on a nominal 120-volt circuit, HOW TO PLUG IN THE POWER CORD and has a grounding plug that looks like the plug illus- being damaged, always use on or off. protector, and plug the...

English Manual
Page 8
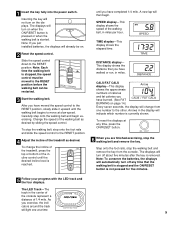
... on page 7.) BATTERY INSTALLATION The console requires either two or three "AA" batteries (not included). STEP-BY-STEP CONSOLE OPERATION Before operating the console, make sure that the power cord is properly plugged in the drawing at the lower right) while using the treadmill. Open the battery cover as shown in small increments. • The training zones marked beside the speed control are general guidelines only. Close the battery cover, push up...
... on page 7.) BATTERY INSTALLATION The console requires either two or three "AA" batteries (not included). STEP-BY-STEP CONSOLE OPERATION Before operating the console, make sure that the power cord is properly plugged in the drawing at the lower right) while using the treadmill. Open the battery cover as shown in small increments. • The training zones marked beside the speed control are general guidelines only. Close the battery cover, push up...
English Manual
Page 9
.../RESET button is pressed or when the walking belt is removed. The LED Track-The track in the display will automatically turn on . 2 Reset the speed control. Note: If you have moved the speed control to the RESET position, slowly slide it upward until you just installed batteries, the displays will not turn off about five minutes after the key is started. SPEED display-This display shows the speed of the walking belt as desired. Change the speed of the walking belt, in miles...
.../RESET button is pressed or when the walking belt is removed. The LED Track-The track in the display will automatically turn on . 2 Reset the speed control. Note: If you have moved the speed control to the RESET position, slowly slide it upward until you just installed batteries, the displays will not turn off about five minutes after the key is started. SPEED display-This display shows the speed of the walking belt as desired. Change the speed of the walking belt, in miles...

English Manual
Page 10
... possibility of the handrails. HOW TO FOLD AND MOVE THE TREADMILL HOW TO FOLD THE TREADMILL FOR STORAGE Before folding the treadmill, unplug the power cord. Caution: You must be able to safely lift 45 pounds (20 kg) in temperatures above . Hold the treadmill with your legs rather than your back straight. Make sure that the storage latch is fully engaged over an uneven...
... possibility of the handrails. HOW TO FOLD AND MOVE THE TREADMILL HOW TO FOLD THE TREADMILL FOR STORAGE Before folding the treadmill, unplug the power cord. Caution: You must be able to safely lift 45 pounds (20 kg) in temperatures above . Hold the treadmill with your legs rather than your back straight. Make sure that the storage latch is fully engaged over an uneven...

English Manual
Page 11
HOW TO LOWER THE TREADMILL FOR USE 1. Hold the upper end of injury, bend your legs and keep your back straight. Using your right hand as shown. Do not drop the treadmill frame to the floor. To decrease the possibility of the treadmill with both hands, and lower the treadmill to the floor. Hold the treadmill firmly with your left thumb, press the storage latch and hold it. Storage Unlatched Latch 11 Pivot the treadmill until the frame and foot rail are past the storage latch. 2.
HOW TO LOWER THE TREADMILL FOR USE 1. Hold the upper end of injury, bend your legs and keep your back straight. Using your right hand as shown. Do not drop the treadmill frame to the floor. To decrease the possibility of the treadmill with both hands, and lower the treadmill to the floor. Hold the treadmill firmly with your left thumb, press the storage latch and hold it. Storage Unlatched Latch 11 Pivot the treadmill until the frame and foot rail are past the storage latch. 2.
English Manual
Page 12
... Customer Service Department, toll-free. 3. Make sure that the power cord is plugged into a properly grounded outlet. (See HOW TO PLUG IN THE POWER CORD on page 7.) Use only a UL-listed surge protector, rated at 1-800-999-3756, Monday through Friday, 6 a.m. SYMPTOM: THE POWER TURNS OFF DURING USE c Tripped Reset Tripped Reset a. c. Reinsert the key fully into the console. d. See BATTERY INSTALLATION on page 9. Remove the screws from the console. Carefully remove the hood. Turn the Pulley...
... Customer Service Department, toll-free. 3. Make sure that the power cord is plugged into a properly grounded outlet. (See HOW TO PLUG IN THE POWER CORD on page 7.) Use only a UL-listed surge protector, rated at 1-800-999-3756, Monday through Friday, 6 a.m. SYMPTOM: THE POWER TURNS OFF DURING USE c Tripped Reset Tripped Reset a. c. Reinsert the key fully into the console. d. See BATTERY INSTALLATION on page 9. Remove the screws from the console. Carefully remove the hood. Turn the Pulley...

English Manual
Page 13
... walking belt. tighten the walking belt. Repeat until the walking belt is properly tightened. b. When the walking belt is centered. Repeat until the walking belt is properly tightened, you should just touch the walking platform. 4. Use only a UL-listed surge protector, rated at 15 amps, with a 14-gauge cord of the walking belt 2 to lift each . The center of the walking belt 2 to lift each . b 2"-3" Rear Roller Adjustment Bolts c. Plug in the power cord, insert the key and run the treadmill...
... walking belt. tighten the walking belt. Repeat until the walking belt is properly tightened. b. When the walking belt is centered. Repeat until the walking belt is properly tightened, you should just touch the walking platform. 4. Use only a UL-listed surge protector, rated at 15 amps, with a 14-gauge cord of the walking belt 2 to lift each . The center of the walking belt 2 to lift each . b 2"-3" Rear Roller Adjustment Bolts c. Plug in the power cord, insert the key and run the treadmill...
English Manual
Page 14
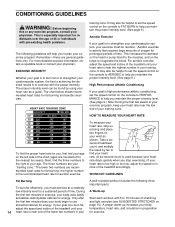
... ten years). To measure your heart rate, stop exercising.) If your heart rate is near the low end of time. Aerobic exercise is the recommended heart rate for fat burning; The lower two numbers are general guidelines only. During A Warm-up increases your body adjust the speed and incline of 35 or individuals with pre-existing health problems. The following three important parts: To burn fat effectively, you...
... ten years). To measure your heart rate, stop exercising.) If your heart rate is near the low end of time. Aerobic exercise is the recommended heart rate for fat burning; The lower two numbers are general guidelines only. During A Warm-up increases your body adjust the speed and incline of 35 or individuals with pre-existing health problems. The following three important parts: To burn fat effectively, you...
English Manual
Page 15
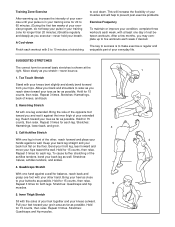
... three workouts each week, with your other , reach forward and place your hands against a wall. Stretches: Hamstrings, back of knees, and back. 2. After a few weeks of your exercise program, do not keep your pulse in front of the other hand. SUGGESTED STRETCHES The correct form for several basic stretches is shown at least one leg extended...
... three workouts each week, with your other , reach forward and place your hands against a wall. Stretches: Hamstrings, back of knees, and back. 2. After a few weeks of your exercise program, do not keep your pulse in front of the other hand. SUGGESTED STRETCHES The correct form for several basic stretches is shown at least one leg extended...

English Manual
Page 16
... ICON Health & Fitness, Inc. This warranty gives you specific legal rights. When ordering parts, please be prepared to give the following information: • The MODEL NUMBER OF THE PRODUCT (PFTL49393) • The NAME OF THE PRODUCT (PROFORM® 485EX treadmill) • The SERIAL NUMBER OF THE PRODUCT (see the front cover of this manual) • The KEY NUMBER AND DESCRIPTION OF THE PART(S) (see the EXPLODED DRAWING and PART LIST attached to...
... ICON Health & Fitness, Inc. This warranty gives you specific legal rights. When ordering parts, please be prepared to give the following information: • The MODEL NUMBER OF THE PRODUCT (PFTL49393) • The NAME OF THE PRODUCT (PROFORM® 485EX treadmill) • The SERIAL NUMBER OF THE PRODUCT (see the front cover of this manual) • The KEY NUMBER AND DESCRIPTION OF THE PART(S) (see the EXPLODED DRAWING and PART LIST attached to...

English Manual
Page 17
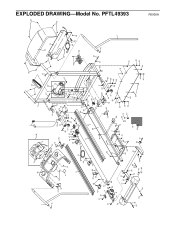
REMOVE THIS EXPLODED DRAWING AND PART LIST FROM THE MANUAL Save this EXPLODED DRAWING and PART LIST for future reference. For information about ordering replacement parts, see the back cover of the User's Manual. 34 Note: Specifications are subject to change without notice.
REMOVE THIS EXPLODED DRAWING AND PART LIST FROM THE MANUAL Save this EXPLODED DRAWING and PART LIST for future reference. For information about ordering replacement parts, see the back cover of the User's Manual. 34 Note: Specifications are subject to change without notice.

English Manual
Page 18
...PART LIST-Model No. Qty. Bolt Rear Endcap Latch Decal Rear Roller Frame Allen Wrench Upright Plug Frame Plug 8" White Wire, Pigtail User's Manual * Includes all parts shown in the box # These parts are not illustrated Description Handrail Key/Clip Screw Battery Cover Foot Rail Lift Motor Frame Guide Speed Potentiometer Speed Control Knob Console Assembly Upright Base Motor Belt Small Screw Storage Latch 4" Cable Tie 8" Cable Tie Motor Swivel Nut Pulley/Flywheel/Fan Motor Motor/Pulley/Flywheel/Fan Wire Harness Hood Screw Motor Hood Hood Shield Small Screw Controller Motor Swivel Bolt Motor...
...PART LIST-Model No. Qty. Bolt Rear Endcap Latch Decal Rear Roller Frame Allen Wrench Upright Plug Frame Plug 8" White Wire, Pigtail User's Manual * Includes all parts shown in the box # These parts are not illustrated Description Handrail Key/Clip Screw Battery Cover Foot Rail Lift Motor Frame Guide Speed Potentiometer Speed Control Knob Console Assembly Upright Base Motor Belt Small Screw Storage Latch 4" Cable Tie 8" Cable Tie Motor Swivel Nut Pulley/Flywheel/Fan Motor Motor/Pulley/Flywheel/Fan Wire Harness Hood Screw Motor Hood Hood Shield Small Screw Controller Motor Swivel Bolt Motor...
English Manual
Page 19
... 83 39 38 88 79 81 38 80 82 16 52 15 77 60 33 40 39 25 33 33 22 22 R0900A EXPLODED DRAWING-Model No.
... 83 39 38 88 79 81 38 80 82 16 52 15 77 60 33 40 39 25 33 33 22 22 R0900A EXPLODED DRAWING-Model No.


