

English Manual
Page 1
Keep this equipment. Write the serial number in this manual before using this manual for reference. Serial Number Decal •• Assembly •• Operation •• Maintenance •• Part List and Drawing ELLIPTICAL EXERCISER User’'s Manual Sears, Roebuck and Co. Model No. 831.23935.0 Serial No. Hoffman Estates, IL 60179 CAUTION Read all precautions and instructions in the space above for future reference.
Keep this equipment. Write the serial number in this manual before using this manual for reference. Serial Number Decal •• Assembly •• Operation •• Maintenance •• Part List and Drawing ELLIPTICAL EXERCISER User’'s Manual Sears, Roebuck and Co. Model No. 831.23935.0 Serial No. Hoffman Estates, IL 60179 CAUTION Read all precautions and instructions in the space above for future reference.
English Manual
Page 2
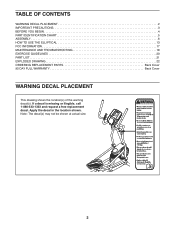
...-1333 and request a free replacement decal. TABLE OF CONTENTS WARNING DECAL PLACEMENT 2 IMPORTANT PRECAUTIONS 3 BEFORE YOU BEGIN 4 PART IDENTIFICATION CHART 5 ASSEMBLY 6 HOW TO USE THE ELLIPTICAL 13 FCC INFORMATION 17 MAINTENANCE AND TROUBLESHOOTING 18 EXERCISE GUIDELINES 20 PART LIST 21 EXPLODED DRAWING 22 ORDERING REPLACEMENT PARTS Back Cover 90 DAY FULL...
...-1333 and request a free replacement decal. TABLE OF CONTENTS WARNING DECAL PLACEMENT 2 IMPORTANT PRECAUTIONS 3 BEFORE YOU BEGIN 4 PART IDENTIFICATION CHART 5 ASSEMBLY 6 HOW TO USE THE ELLIPTICAL 13 FCC INFORMATION 17 MAINTENANCE AND TROUBLESHOOTING 18 EXERCISE GUIDELINES 20 PART LIST 21 EXPLODED DRAWING 22 ORDERING REPLACEMENT PARTS Back Cover 90 DAY FULL...

English Manual
Page 3
...cool down. 3 The heart rate monitor is intended only as described in the front and rear of the elliptical and 2 ft. (0.6 m) on your elliptical before using your elliptical. Various factors may result in a commercial, rental, or institutional setting. 5. do not wear loose clothes ...that all users of the elliptical are adequately informed of all precautions. 2. Place the elliptical on the elliptical. Use the elliptical only as an exercise aid in determining heart rate trends in this product. 1. Always wear...
...cool down. 3 The heart rate monitor is intended only as described in the front and rear of the elliptical and 2 ft. (0.6 m) on your elliptical before using your elliptical. Various factors may result in a commercial, rental, or institutional setting. 5. do not wear loose clothes ...that all users of the elliptical are adequately informed of all precautions. 2. Place the elliptical on the elliptical. Use the elliptical only as an exercise aid in determining heart rate trends in this product. 1. Always wear...
English Manual
Page 4
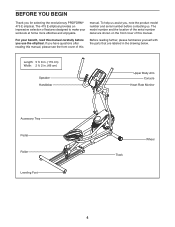
... Foot Track Wheel 4 To help us . Length: 5 ft. 8 in. (173 cm) Width: 2 ft. 2 in the drawing below. The 475 E elliptical provides an impressive selection of features designed to make your benefit, read this manual. For your workouts at home more effective and enjoyable. If you... for selecting the revolutionary PROFORM® 475 E elliptical. BEFORE YOU BEGIN Thank you have questions after reading this manual, please see the front cover of this Before reading further, ...
... Foot Track Wheel 4 To help us . Length: 5 ft. 8 in. (173 cm) Width: 2 ft. 2 in the drawing below. The 475 E elliptical provides an impressive selection of features designed to make your benefit, read this manual. For your workouts at home more effective and enjoyable. If you... for selecting the revolutionary PROFORM® 475 E elliptical. BEFORE YOU BEGIN Thank you have questions after reading this manual, please see the front cover of this Before reading further, ...
English Manual
Page 12
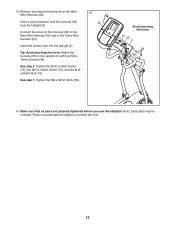
... the M8 x 38mm Bolts (59). 13 30 Avoid pinching the wires 31 32 2 56 14. Note: Extra parts may be included. Place a mat beneath the elliptical to the Pulse Wire Harness (31). Connect the wires on the Main Wire Harness (32). Tighten the M10 x 53mm Screw (73), the M10 x 20mm Screw... the Main Wire Harness (32) and to protect the floor. 12 See step 7. Make sure that all parts are properly tightened before you use the elliptical. Attach the Console (30) to the Upright (2) with four M4 x 16mm Screws (56).
... the M8 x 38mm Bolts (59). 13 30 Avoid pinching the wires 31 32 2 56 14. Note: Extra parts may be included. Place a mat beneath the elliptical to the Pulse Wire Harness (31). Connect the wires on the Main Wire Harness (32). Tighten the M10 x 53mm Screw (73), the M10 x 20mm Screw... the Main Wire Harness (32) and to protect the floor. 12 See step 7. Make sure that all parts are properly tightened before you use the elliptical. Attach the Console (30) to the Upright (2) with four M4 x 16mm Screws (56).
English Manual
Page 13
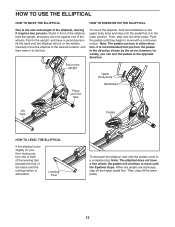
...direction. When the pedals are stationary, step off the lower pedal. 13 Note: The pedals can turn one of the wheels. To mount the elliptical, hold the upright, and place one foot against one or both of the leveling feet beneath the rear of the frame until the flywheel stops...; Carefully move with a continuous motion. Push the pedals until the pedals come to a complete stop. Leveling Feet To dismount the elliptical, wait until they begin to move the elliptical to the desired location, and then lower it requires two persons. Pull on the wheels. Then, step onto the other pedal. ...
...direction. When the pedals are stationary, step off the lower pedal. 13 Note: The pedals can turn one of the wheels. To mount the elliptical, hold the upright, and place one foot against one or both of the leveling feet beneath the rear of the frame until the flywheel stops...; Carefully move with a continuous motion. Push the pedals until the pedals come to a complete stop. Leveling Feet To dismount the elliptical, wait until they begin to move the elliptical to the desired location, and then lower it requires two persons. Pull on the wheels. Then, step onto the other pedal. ...
English Manual
Page 18
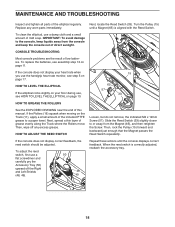
.... IMPORTANT: To avoid damage to the console, keep liquids away from the Magnet (65), and then retighten the Screw. HOW TO LEVEL THE ELLIPTICAL If the elliptical rocks slightly on your heart rate when you use , see assembly step 12 on the Track (11), apply a small amount of the included ... passes the Reed Switch repeatedly. CONSOLE TROUBLESHOOTING Most console problems are the result of direct sunlight. To replace the batteries, see HOW TO LEVEL THE ELLIPTICAL on page 17. Then, wipe off the Right and Left Shields (48, 49). 50 48 49 Repeat these actions until a Magnet (65) is...
.... IMPORTANT: To avoid damage to the console, keep liquids away from the Magnet (65), and then retighten the Screw. HOW TO LEVEL THE ELLIPTICAL If the elliptical rocks slightly on your heart rate when you use , see assembly step 12 on the Track (11), apply a small amount of the included ... passes the Reed Switch repeatedly. CONSOLE TROUBLESHOOTING Most console problems are the result of direct sunlight. To replace the batteries, see HOW TO LEVEL THE ELLIPTICAL on page 17. Then, wipe off the Right and Left Shields (48, 49). 50 48 49 Repeat these actions until a Magnet (65) is...

English Manual
Page 24
The frame is used commercially or for rental purposes. This warranty does not apply when the Elliptical Exerciser is warranted for free repair (or replacement if repair proves impossible). 90 DAY FULL WARRANTY If this Sears Elliptical Exerciser fails due to a defect in China © 2013 ICON IP, Inc. This warranty gives you...
The frame is used commercially or for rental purposes. This warranty does not apply when the Elliptical Exerciser is warranted for free repair (or replacement if repair proves impossible). 90 DAY FULL WARRANTY If this Sears Elliptical Exerciser fails due to a defect in China © 2013 ICON IP, Inc. This warranty gives you...


