

User Manual
Page 2
TABLE OF CONTENTS IMPORTANT PRECAUTIONS 3 BEFORE YOU BEGIN 4 ASSEMBLY 5 HOW TO USE THE ELLIPTICAL TRAINER 9 MAINTENANCE AND TROUBLE-SHOOTING 11 CONDITIONING GUIDELINES 12 PART LIST 14 EXPLODED DRAWING 15 HOW TO ORDER REPLACEMENT PARTS Back Cover LIMITED WARRANTY Back Cover PROFORM is a registered trademark of ICON Health & Fitness, Inc. 2
TABLE OF CONTENTS IMPORTANT PRECAUTIONS 3 BEFORE YOU BEGIN 4 ASSEMBLY 5 HOW TO USE THE ELLIPTICAL TRAINER 9 MAINTENANCE AND TROUBLE-SHOOTING 11 CONDITIONING GUIDELINES 12 PART LIST 14 EXPLODED DRAWING 15 HOW TO ORDER REPLACEMENT PARTS Back Cover LIMITED WARRANTY Back Cover PROFORM is a registered trademark of ICON Health & Fitness, Inc. 2

User Manual
Page 3
...immediately. 6. When mounting or dismounting the elliptical trainer, always hold the handlebars and step onto and off the pedal that all times. 7. WARNING: Before beginning this manual before using the PROFORM® 465S elliptical trainer. 1. ICON assumes no responsibility for ...persons over the age of 35 or persons with a mat beneath it to a complete stop before using the elliptical trainer. tions before using . Do not use only. Place the elliptical trainer on the elliptical trainer,...
...immediately. 6. When mounting or dismounting the elliptical trainer, always hold the handlebars and step onto and off the pedal that all times. 7. WARNING: Before beginning this manual before using the PROFORM® 465S elliptical trainer. 1. ICON assumes no responsibility for ...persons over the age of 35 or persons with a mat beneath it to a complete stop before using the elliptical trainer. tions before using . Do not use only. Place the elliptical trainer on the elliptical trainer,...
User Manual
Page 4
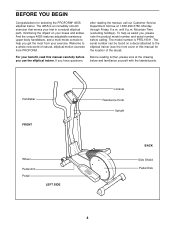
...holidays). The model number is an incredibly smooth exerciser that moves your feet in a natural elliptical path, minimizing the impact on a decal attached to the elliptical trainer (see the front cover of this manual carefully before calling. Handlebar FRONT Wheel Pedal Arm ...until 6 p.m. The serial number can be found on your benefit, read this manual for selecting the PROFORM® 465S elliptical trainer. For your knees and ankles. The 465S is PFEL19011. And the unique 465S features adjustable resistance, upper-body handlebars, and a multi-mode console to a whole new world of...
...holidays). The model number is an incredibly smooth exerciser that moves your feet in a natural elliptical path, minimizing the impact on a decal attached to the elliptical trainer (see the front cover of this manual carefully before calling. Handlebar FRONT Wheel Pedal Arm ...until 6 p.m. The serial number can be found on your benefit, read this manual for selecting the PROFORM® 465S elliptical trainer. For your knees and ankles. The 465S is PFEL19011. And the unique 465S features adjustable resistance, upper-body handlebars, and a multi-mode console to a whole new world of...
User Manual
Page 5
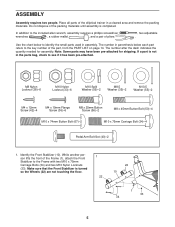
... refers to see if it has been pre-attached. Place all parts of the packing materials until assembly is completed. Do not dispose of the elliptical trainer in parenthesis below to identify the small parts used in the parts bag, check to the key number of pliers , two adjustable . In addition to...
... refers to see if it has been pre-attached. Place all parts of the packing materials until assembly is completed. Do not dispose of the elliptical trainer in parenthesis below to identify the small parts used in the parts bag, check to the key number of pliers , two adjustable . In addition to...
User Manual
Page 8
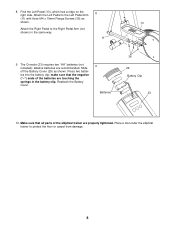
... Battery Cover (29) as shown. 13 Attach the Right Pedal to the Right Pedal Arm (not shown) in the battery clip. Place a mat under the elliptical trainer to the Left Pedal Arm 8 (11) with three M4 x 19mm Flange Screws (36) as shown. alkaline batteries are properly tightened. Attach the Left Pedal to...
... Battery Cover (29) as shown. 13 Attach the Right Pedal to the Right Pedal Arm (not shown) in the battery clip. Place a mat under the elliptical trainer to the Left Pedal Arm 8 (11) with three M4 x 19mm Flange Screws (36) as shown. alkaline batteries are properly tightened. Attach the Left Pedal to...
User Manual
Page 9
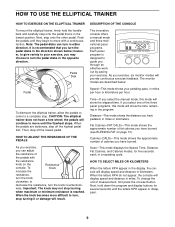
Pedal Disk Pedal To dismount the elliptical trainer, allow the pedals to come to decrease the resistance, turn , stop turning it or damage will display speed and distance in miles. to a complete stop ... they begin to guide you through an effective workout by pacing your exercise, you have a free wheel; HOW TO USE THE ELLIPTICAL TRAINER HOW TO EXERCISE ON THE ELLIPTICAL TRAINER To mount the elliptical trainer, firmly hold down the program and display buttons for five seconds each, in a repeating cycle. Note: The pedal disks can adjust...
Pedal Disk Pedal To dismount the elliptical trainer, allow the pedals to come to decrease the resistance, turn , stop turning it or damage will display speed and distance in miles. to a complete stop ... they begin to guide you through an effective workout by pacing your exercise, you have a free wheel; HOW TO USE THE ELLIPTICAL TRAINER HOW TO EXERCISE ON THE ELLIPTICAL TRAINER To mount the elliptical trainer, firmly hold down the program and display buttons for five seconds each, in a repeating cycle. Note: The pedal disks can adjust...
User Manual
Page 11
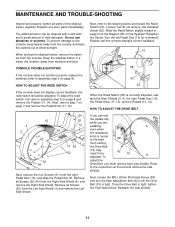
...Side Shield (3) and remove the Left Side Shield. Remove all Screws (52, 64) from the console and keep the console out of the elliptical trainer regularly. Next, refer to assembly step 8 on the flywheel. Retighten the Screw. MAINTENANCE AND TROUBLE-SHOOTING Inspect and properly tighten all parts ...Reed Switch (53). Loosen, but do not remove, the indicated Screw (52). Turn the left and remove the side shields. The elliptical trainer can feel the pedals slip while you must remove both side shields. CONSOLE TROUBLE-SHOOTING If the console does not function properly, replace the...
...Side Shield (3) and remove the Left Side Shield. Remove all Screws (52, 64) from the console and keep the console out of the elliptical trainer regularly. Next, refer to assembly step 8 on the flywheel. Retighten the Screw. MAINTENANCE AND TROUBLE-SHOOTING Inspect and properly tighten all parts ...Reed Switch (53). Loosen, but do not remove, the indicated Screw (52). Turn the left and remove the side shields. The elliptical trainer can feel the pedals slip while you must remove both side shields. CONSOLE TROUBLE-SHOOTING If the console does not function properly, replace the...

User Manual
Page 16
... to be prepared to give the following information when calling: • The MODEL NUMBER of the product (PFEL19011) • The NAME of the product (PROFORM® 465S elliptical trainer) • The SERIAL NUMBER of the product (see page 14). You may also have other warranty beyond that specifically set forth herein. LIMITED WARRANTY ICON...
... to be prepared to give the following information when calling: • The MODEL NUMBER of the product (PFEL19011) • The NAME of the product (PROFORM® 465S elliptical trainer) • The SERIAL NUMBER of the product (see page 14). You may also have other warranty beyond that specifically set forth herein. LIMITED WARRANTY ICON...


