
User Manual
Page 1
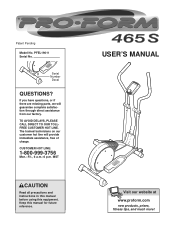
... will guarantee complete satisfaction through direct assistance from our factory. Serial Number Decal QUESTIONS? CUSTOMER HOT LINE: 1-800-999-3756 Mon.-Fri., 6 a.m.-6 p.m. Patent Pending Model No. If you have questions, or if there are missing parts, we will provide immediate assistance, free of charge. Keep this equipment. USER'S MANUAL Visit our website at www.proform.com new products, prizes...
... will guarantee complete satisfaction through direct assistance from our factory. Serial Number Decal QUESTIONS? CUSTOMER HOT LINE: 1-800-999-3756 Mon.-Fri., 6 a.m.-6 p.m. Patent Pending Model No. If you have questions, or if there are missing parts, we will provide immediate assistance, free of charge. Keep this equipment. USER'S MANUAL Visit our website at www.proform.com new products, prizes...

User Manual
Page 2
TABLE OF CONTENTS IMPORTANT PRECAUTIONS 3 BEFORE YOU BEGIN 4 ASSEMBLY 5 HOW TO USE THE ELLIPTICAL TRAINER 9 MAINTENANCE AND TROUBLE-SHOOTING 11 CONDITIONING GUIDELINES 12 PART LIST 14 EXPLODED DRAWING 15 HOW TO ORDER REPLACEMENT PARTS Back Cover LIMITED WARRANTY Back Cover PROFORM is a registered trademark of ICON Health & Fitness, Inc. 2
TABLE OF CONTENTS IMPORTANT PRECAUTIONS 3 BEFORE YOU BEGIN 4 ASSEMBLY 5 HOW TO USE THE ELLIPTICAL TRAINER 9 MAINTENANCE AND TROUBLE-SHOOTING 11 CONDITIONING GUIDELINES 12 PART LIST 14 EXPLODED DRAWING 15 HOW TO ORDER REPLACEMENT PARTS Back Cover LIMITED WARRANTY Back Cover PROFORM is a registered trademark of ICON Health & Fitness, Inc. 2

User Manual
Page 3
... users of the elliptical trainer are adequately informed of all precautions. 3. ICON assumes no responsibility for foot protection. 9. Use the elliptical trainer only as described in the lowest position. 10. The elliptical trainer should not be used by or through the use the elliptical trainer in a commercial, rental, or institutional setting. 4. If you stop exercising on a level surface, with pre-existing health problems. Read all instructions in -home use only. Read all instructions...
... users of the elliptical trainer are adequately informed of all precautions. 3. ICON assumes no responsibility for foot protection. 9. Use the elliptical trainer only as described in the lowest position. 10. The elliptical trainer should not be used by or through the use the elliptical trainer in a commercial, rental, or institutional setting. 4. If you stop exercising on a level surface, with pre-existing health problems. Read all instructions in -home use only. Read all instructions...
User Manual
Page 4
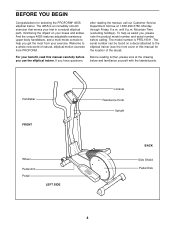
... adjustable resistance, upper-body handlebars, and a multi-mode console to help us assist you, please note the product model number and serial number before you use the elliptical trainer. For your feet in a natural elliptical path, minimizing the impact on a decal attached to a whole new world of the decal). until 6 p.m. The model number is an incredibly smooth exerciser that moves your benefit, read this manual for selecting the PROFORM® 465S elliptical trainer...
... adjustable resistance, upper-body handlebars, and a multi-mode console to help us assist you, please note the product model number and serial number before you use the elliptical trainer. For your feet in a natural elliptical path, minimizing the impact on a decal attached to a whole new world of the decal). until 6 p.m. The model number is an incredibly smooth exerciser that moves your benefit, read this manual for selecting the PROFORM® 465S elliptical trainer...
User Manual
Page 5
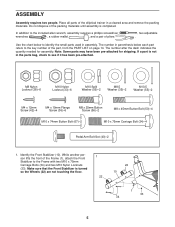
... Button Screw (56)-2 M8 x 45mm Button Bolt (50)-4 M10 x 74mm Button Bolt (67)-2 M10 x 75mm Carriage Bolt (34)-4 Pedal Arm Bolt Set (40)-2 1. Use the chart below each part refers to the Frame with two M10 x 75mm Carriage Bolts (34) and two M10 Nylon Locknuts (33). Note: Some parts may have been pre-attached for assembly. Place all parts of the Frame (1), attach the Front Stabilizer to the key number of the part...
... Button Screw (56)-2 M8 x 45mm Button Bolt (50)-4 M10 x 74mm Button Bolt (67)-2 M10 x 75mm Carriage Bolt (34)-4 Pedal Arm Bolt Set (40)-2 1. Use the chart below each part refers to the Frame with two M10 x 75mm Carriage Bolts (34) and two M10 Nylon Locknuts (33). Note: Some parts may have been pre-attached for assembly. Place all parts of the Frame (1), attach the Front Stabilizer to the key number of the part...

User Manual
Page 6
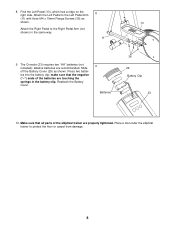
... Resistance Cable (45) and slide it into the wire clip on the Lower Resistance Cable (65) as shown, connect the Upper Wire (44) to drawing C. While another person holds the Upright (2) near the Frame (1) as shown. • Refer to the Reed Switch Wire (53). While another person lifts the back of the Frame (1) slightly, attach the Rear Stabilizer (9) to drawing B. Do not tighten the Button Bolts yet. 4. Connect...
... Resistance Cable (45) and slide it into the wire clip on the Lower Resistance Cable (65) as shown, connect the Upper Wire (44) to drawing C. While another person holds the Upright (2) near the Frame (1) as shown. • Refer to the Reed Switch Wire (53). While another person lifts the back of the Frame (1) slightly, attach the Rear Stabilizer (9) to drawing B. Do not tighten the Button Bolts yet. 4. Connect...
User Manual
Page 7
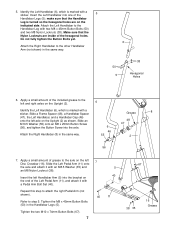
... Button Screw (56), and tighten the Button Screw into the bracket on the Upright (2) as shown. Repeat this step to attach the right Pedal Arm (not shown). 40 Refer to the axle on the Upright (2). 6 Identify the Left Handlebar (6), which is turned so the hexagonal holes are inside of grease to step 5. Insert the Left Handlebar into one of the included grease to the Handlebar Leg...
... Button Screw (56), and tighten the Button Screw into the bracket on the Upright (2) as shown. Repeat this step to attach the right Pedal Arm (not shown). 40 Refer to the axle on the Upright (2). 6 Identify the Left Handlebar (6), which is turned so the hexagonal holes are inside of grease to step 5. Insert the Left Handlebar into one of the included grease to the Handlebar Leg...
User Manual
Page 8
Press two batteries into the battery clip; Attach the Left Pedal to the Left Pedal Arm 8 (11) with three M4 x 19mm Flange Screws (36) as shown. make sure that all parts of the batteries are touching the springs in the same way. 11 9. Reattach the Battery Cover. 9 Batteries 36 29 Battery Clip 23 10. Make sure that the negative ("-") ends of the elliptical trainer are recommended. Find...
Press two batteries into the battery clip; Attach the Left Pedal to the Left Pedal Arm 8 (11) with three M4 x 19mm Flange Screws (36) as shown. make sure that all parts of the batteries are touching the springs in the same way. 11 9. Reattach the Battery Cover. 9 Batteries 36 29 Battery Clip 23 10. Make sure that the negative ("-") ends of the elliptical trainer are recommended. Find...
User Manual
Page 9
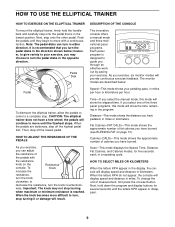
...)-This mode shows the approximate number of calories you exercise, six monitor modes will display speed and distance in kilometers. HOW TO USE THE ELLIPTICAL TRAINER HOW TO EXERCISE ON THE ELLIPTICAL TRAINER To mount the elliptical trainer, firmly hold down the program and display buttons for five seconds each, in a repeating cycle. Important: The knob may choose to decrease the resistance, turn in either direction. Then, step off the highest pedal first. Next, step onto...
...)-This mode shows the approximate number of calories you exercise, six monitor modes will display speed and distance in kilometers. HOW TO USE THE ELLIPTICAL TRAINER HOW TO EXERCISE ON THE ELLIPTICAL TRAINER To mount the elliptical trainer, firmly hold down the program and display buttons for five seconds each, in a repeating cycle. Important: The knob may choose to decrease the resistance, turn in either direction. Then, step off the highest pedal first. Next, step onto...
User Manual
Page 10
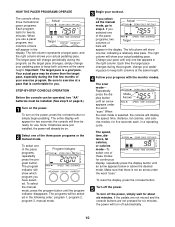
... continuous display, repeatedly press the display button until only one of the pacer Program Indicator programs, repeatedly press the pro- the console will change periodically during the program; If you . The left column represents a target pace, and the right column shows your pedal- The speed, time, distance, fat calories, or calories mode-To select one bar, indicating a relatively slow pace. Note: If batteries were just installed, the power will...
... continuous display, repeatedly press the display button until only one of the pacer Program Indicator programs, repeatedly press the pro- the console will change periodically during the program; If you . The left column represents a target pace, and the right column shows your pedal- The speed, time, distance, fat calories, or calories mode-To select one bar, indicating a relatively slow pace. Note: If batteries were just installed, the power will...
User Manual
Page 11
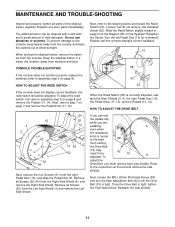
... the console. To adjust the reed switch, first refer to the drawing below and locate the Reed Switch (53). Next, refer to assembly step 8 on page 8). HOW TO ADJUST THE DRIVE BELT If you can be cleaned with a soft cloth and a small amount of direct sunlight. MAINTENANCE AND TROUBLE-SHOOTING Inspect and properly tighten all parts of the elliptical trainer regularly. Next, refer to be adjusted. Turn the left and remove the...
... the console. To adjust the reed switch, first refer to the drawing below and locate the Reed Switch (53). Next, refer to assembly step 8 on page 8). HOW TO ADJUST THE DRIVE BELT If you can be cleaned with a soft cloth and a small amount of direct sunlight. MAINTENANCE AND TROUBLE-SHOOTING Inspect and properly tighten all parts of the elliptical trainer regularly. Next, refer to be adjusted. Turn the left and remove the...
User Manual
Page 12
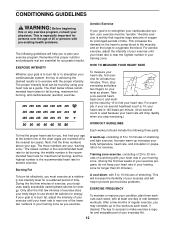
.... This is to oxygenate the blood. The chart below shows recommended heart rates for aerobic exercise. Training zone exercise, consisting of 20 to strengthen your body uses easily accessible carbohydrate calories for persons over the age of exercise does your exercise program. Aerobic Exercise If your goal is especially important for energy. Then, stop exercising.) WORKOUT GUIDELINES Each workout should include the following guidelines will help...
.... This is to oxygenate the blood. The chart below shows recommended heart rates for aerobic exercise. Training zone exercise, consisting of 20 to strengthen your body uses easily accessible carbohydrate calories for persons over the age of exercise does your exercise program. Aerobic Exercise If your goal is especially important for energy. Then, stop exercising.) WORKOUT GUIDELINES Each workout should include the following guidelines will help...

User Manual
Page 13
...leg, lean forward and move your back leg... as you reach down toward your hips. Stretches: Calves, achilles tendons and ankles. 4. Hold for several basic stretches is shown at the right. SUGGESTED STRETCHES The correct form for 15 counts, then relax. Calf/Achilles Stretch With one leg... extended. Quadriceps Stretch With one hand against a wall for balance, reach back and grasp one foot with one leg...leg... Move slowly...leg. Repeat 3 times for 15 counts, then relax. Hold for each leg...
...leg, lean forward and move your back leg... as you reach down toward your hips. Stretches: Calves, achilles tendons and ankles. 4. Hold for several basic stretches is shown at the right. SUGGESTED STRETCHES The correct form for 15 counts, then relax. Calf/Achilles Stretch With one leg... extended. Quadriceps Stretch With one hand against a wall for balance, reach back and grasp one foot with one leg...leg... Move slowly...leg. Repeat 3 times for 15 counts, then relax. Hold for each leg...
User Manual
Page 14
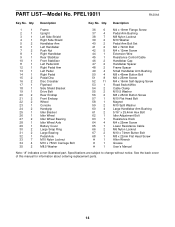
... 59 2 M10 Split Washer 60 4 Large Handlebar Arm Bushing 61 2 5/16" x 25.4mm Hex Bolt 62 1 Idler Adjustment Bolt 63 1 Resistance Knob 64 4 M4 x 25mm Screw 65 1 Lower Resistance Cable 66 2 M6 Nylon Locknut 67 2 M10 x 74mm Button Bolt 68 1 M8 x 22mm Flat Head Screw # 1 Allen Wrench # 1 Grease # 1 User's Manual Note: "#" indicates a non-illustrated part. PART LIST-Model No. Qty. PFEL19011 R1201A Key No. Specifications are subject to change without notice. Description Key No.
... 59 2 M10 Split Washer 60 4 Large Handlebar Arm Bushing 61 2 5/16" x 25.4mm Hex Bolt 62 1 Idler Adjustment Bolt 63 1 Resistance Knob 64 4 M4 x 25mm Screw 65 1 Lower Resistance Cable 66 2 M6 Nylon Locknut 67 2 M10 x 74mm Button Bolt 68 1 M8 x 22mm Flat Head Screw # 1 Allen Wrench # 1 Grease # 1 User's Manual Note: "#" indicates a non-illustrated part. PART LIST-Model No. Qty. PFEL19011 R1201A Key No. Specifications are subject to change without notice. Description Key No.

User Manual
Page 15
PFEL19011 R1201A 24 8 64 52 52 29 23 52 63 4 42 24 42 42 55 45 47 49 56 46 49 50 3 52 42 38 52 52 64 6 44 48 55 46 49 50 56 2 48 38 47 49 59 5 40 33 67 60 65 59 60 17 5 22 60 41 21 22 66 34 41 21 10 52 33 53 54 61 58 57 39 33 33 39 27 26 27 28 68 54 42 7 25 38 31 32 30 31 30 33 1 62 13 51 51 16 33 40 14 40 12 35 38 51 36 16 37 37 36 51 15 61 9 34 51 51 18 52 20 11 51 15 20 19 40 36 37 38 35 36 15 EXPLODED DRAWING-Model No.
PFEL19011 R1201A 24 8 64 52 52 29 23 52 63 4 42 24 42 42 55 45 47 49 56 46 49 50 3 52 42 38 52 52 64 6 44 48 55 46 49 50 56 2 48 38 47 49 59 5 40 33 67 60 65 59 60 17 5 22 60 41 21 22 66 34 41 21 10 52 33 53 54 61 58 57 39 33 33 39 27 26 27 28 68 54 42 7 25 38 31 32 30 31 30 33 1 62 13 51 51 16 33 40 14 40 12 35 38 51 36 16 37 37 36 51 15 61 9 34 51 51 18 52 20 11 51 15 20 19 40 36 37 38 35 36 15 EXPLODED DRAWING-Model No.

User Manual
Page 16
... ICON. Accordingly, the above limitation may not apply to give the following information when calling: • The MODEL NUMBER of the product (PFEL19011) • The NAME of the product (PROFORM® 465S elliptical trainer) • The SERIAL NUMBER of the product (see the front cover of this manual) • The KEY NUMBER and DESCRIPTION of the part(s) (see page 14). until 6 p.m. Mountain Time (excluding holidays). This warranty...
... ICON. Accordingly, the above limitation may not apply to give the following information when calling: • The MODEL NUMBER of the product (PFEL19011) • The NAME of the product (PROFORM® 465S elliptical trainer) • The SERIAL NUMBER of the product (see the front cover of this manual) • The KEY NUMBER and DESCRIPTION of the part(s) (see page 14). until 6 p.m. Mountain Time (excluding holidays). This warranty...

