

Canadian English Manual
Page 2
...high speeds. To protect the floor or carpet from damage, place a mat under 12 and pets away from the treadmill at a time. 9. Do not operate the treadmill where aerosol products are used only by persons weighing 250 pounds or less. 12. Keep the power cord and the... caught in speed. 2 TABLE OF CONTENTS IMPORTANT PRECAUTIONS 2 BEFORE YOU BEGIN 4 ASSEMBLY 5 OPERATION AND ADJUSTMENT 7 HOW TO FOLD AND MOVE THE TREADMILL 11 TROUBLE-SHOOTING 12 CONDITIONING GUIDELINES 14 CUSTOMER RECORD 16 ORDERING REPLACEMENT PARTS 17 LIMITED WARRANTY 18 Note: An EXPLODED DRAWING and a PART LIST are...
...high speeds. To protect the floor or carpet from damage, place a mat under 12 and pets away from the treadmill at a time. 9. Do not operate the treadmill where aerosol products are used only by persons weighing 250 pounds or less. 12. Keep the power cord and the... caught in speed. 2 TABLE OF CONTENTS IMPORTANT PRECAUTIONS 2 BEFORE YOU BEGIN 4 ASSEMBLY 5 OPERATION AND ADJUSTMENT 7 HOW TO FOLD AND MOVE THE TREADMILL 11 TROUBLE-SHOOTING 12 CONDITIONING GUIDELINES 14 CUSTOMER RECORD 16 ORDERING REPLACEMENT PARTS 17 LIMITED WARRANTY 18 Note: An EXPLODED DRAWING and a PART LIST are...

Canadian English Manual
Page 3
... an exercise aid in determining heart rate trends in general. 22. Apply the decal in this or any exercise program, consult your treadmill. To reduce the possibility of this manual). The pulse sensor is not in -home use . 24. You must be attempted only...including the user's movement, may compromise your balance. SAVE THESE INSTRUCTIONS The decals shown below have been placed on page 17 of the treadmill overheating, do so by an authorized service representative only. 18. Never insert any object into any commercial, rental, or institutional setting. 19...
... an exercise aid in determining heart rate trends in general. 22. Apply the decal in this or any exercise program, consult your treadmill. To reduce the possibility of this manual). The pulse sensor is not in -home use . 24. You must be attempted only...including the user's movement, may compromise your balance. SAVE THESE INSTRUCTIONS The decals shown below have been placed on page 17 of the treadmill overheating, do so by an authorized service representative only. 18. Never insert any object into any commercial, rental, or institutional setting. 19...

Canadian English Manual
Page 4
... through Friday, 8 a.m. until 6:30 p.m. The model number of your benefit, read this manual for selecting the PROFORM® 425 treadmill. If you have additional questions, please call our Customer Service Department toll-free Before reading further, please review the drawing...Towel Rack Accessory Tray Storage Latch Key/Clip Handrails Water Bottle Holder (Bottle is PCTL93070. The PROFORM® 425 treadmill combines advanced technology with innovative design to the treadmill (see the front cover of this manual carefully before calling. For your home. Eastern Standard Time...
... through Friday, 8 a.m. until 6:30 p.m. The model number of your benefit, read this manual for selecting the PROFORM® 425 treadmill. If you have additional questions, please call our Customer Service Department toll-free Before reading further, please review the drawing...Towel Rack Accessory Tray Storage Latch Key/Clip Handrails Water Bottle Holder (Bottle is PCTL93070. The PROFORM® 425 treadmill combines advanced technology with innovative design to the treadmill (see the front cover of this manual carefully before calling. For your home. Eastern Standard Time...

Canadian English Manual
Page 5
... Base 1 (59) in - Raise the handrails until assembly is at the right. Hold the treadmill with two screws (100) as shown. jury, bend your legs and keep your back. Set the treadmill in the same manner (not shown). 3. Make sure that the thick end of the Base (59...59) and the front Wheels (56) are resting on the left or right handrail as shown. Next, the treadmill should be raised to the vertical position. 110 106 106 106 59 5 Raise the treadmill about halfway to the storage posi- 4 tion. Assembly requires two adjustable wrenches and a phillips screwdriver (not ...
... Base 1 (59) in - Raise the handrails until assembly is at the right. Hold the treadmill with two screws (100) as shown. jury, bend your legs and keep your back. Set the treadmill in the same manner (not shown). 3. Make sure that the thick end of the Base (59...59) and the front Wheels (56) are resting on the left or right handrail as shown. Next, the treadmill should be raised to the vertical position. 110 106 106 106 59 5 Raise the treadmill about halfway to the storage posi- 4 tion. Assembly requires two adjustable wrenches and a phillips screwdriver (not ...

Canadian English Manual
Page 6
... Wrench (76) into the Adhesive Clip. 10.Make sure that the Storage Latch closes fully over the Frame Guide (52) (see HOW TO MOVE THE TREADMILL on page 11. 7. Attach the 60 Book Rack to assembly drawing 5 at the right. To decrease the possibility of the 6 Stabilizer (64) in the ... Roller Cover (78) in the Console. 5. Refer to the Console with your back straight. 50 Closed 52 61 62 59 62 64 63 8. Hold the treadmill with two Stabilizer Bolts (62) and two Stabilizer Nuts (61) as shown. Attach the Stabilizer (64) to the Console (2), first re- 8 move the backing ...
... Wrench (76) into the Adhesive Clip. 10.Make sure that the Storage Latch closes fully over the Frame Guide (52) (see HOW TO MOVE THE TREADMILL on page 11. 7. Attach the 60 Book Rack to assembly drawing 5 at the right. To decrease the possibility of the 6 Stabilizer (64) in the ... Roller Cover (78) in the Console. 5. Refer to the Console with your back straight. 50 Closed 52 61 62 59 62 64 63 8. Hold the treadmill with two Stabilizer Bolts (62) and two Stabilizer Nuts (61) as shown. Attach the Stabilizer (64) to the Console (2), first re- 8 move the backing ...
Canadian English Manual
Page 7
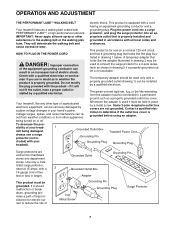
...shock. The green-colored rigid ear, lug, or the like the adapter illustrated in your home's power. Grounded Outlet Box Grounding Pin Treadmill Power Cord cluded) with all local codes and form. This product must be held in - If it must be connected to a permanent... and department stores. This product is equipped with a cord having an equipment-grounding conductor and a Your treadmill features a walking belt coated with a 14-gauge cord of your treadmill. cause excessive wear. A temporary adapter that looks like any other appliances Whenever the adapter is grounded before...
...shock. The green-colored rigid ear, lug, or the like the adapter illustrated in your home's power. Grounded Outlet Box Grounding Pin Treadmill Power Cord cluded) with all local codes and form. This product must be held in - If it must be connected to a permanent... and department stores. This product is equipped with a cord having an equipment-grounding conductor and a Your treadmill features a walking belt coated with a 14-gauge cord of your treadmill. cause excessive wear. A temporary adapter that looks like any other appliances Whenever the adapter is grounded before...

Canadian English Manual
Page 8
... latch closes over the frame guide. To decrease the possibility of injury, bend your legs and keep your back. Raise the treadmill until the frame guide is past the storage latch. 11 Storage Latch Closed Frame Guide Base Front Wheels Storage Latch Frame Guide ...the upper end of injury, use extreme caution while moving the treadmill, convert the treadmill to the vertical position. 2. Never move the treadmill. 1. HOW TO FOLD AND MOVE THE TREADMILL HOW TO FOLD THE TREADMILL FOR STORAGE Before folding the treadmill, unplug the power cord. Move your hands in the storage ...
... latch closes over the frame guide. To decrease the possibility of injury, bend your legs and keep your back. Raise the treadmill until the frame guide is past the storage latch. 11 Storage Latch Closed Frame Guide Base Front Wheels Storage Latch Frame Guide ...the upper end of injury, use extreme caution while moving the treadmill, convert the treadmill to the vertical position. 2. Never move the treadmill. 1. HOW TO FOLD AND MOVE THE TREADMILL HOW TO FOLD THE TREADMILL FOR STORAGE Before folding the treadmill, unplug the power cord. Move your hands in the storage ...

Canadian English Manual
Page 9
... miles. Press down the pulse sen- STEP BY STEP CONSOLE OPERATION Before operating the console, make sure that you have walked or run on the treadmill. Next, find the clip attached to stand still while measuring your thumb on the foot rails and place your thumb at slow speed. Slide the... belt begins to the RESET position. 4 Follow your pulse, if desired. Try the sensor several times until you are applying the proper amount of the treadmill.
... miles. Press down the pulse sen- STEP BY STEP CONSOLE OPERATION Before operating the console, make sure that you have walked or run on the treadmill. Next, find the clip attached to stand still while measuring your thumb on the foot rails and place your thumb at slow speed. Slide the... belt begins to the RESET position. 4 Follow your pulse, if desired. Try the sensor several times until you are applying the proper amount of the treadmill.

Canadian English Manual
Page 10
ing objects under Ceci n'est pas un appareil reconnu the treadmill. Store the key in the handy weight rack on the treadmill, hold down the top or bottom of the treadmill by experienced users. Note: Any time that the walking belt is removed, the displays will automatically turn off. HOW TO USE THE HAND... the weights above . 7 When you are pressed for five minutes, the displays will remain on for about five minutes. To increase the intensity of the treadmill, if desired.
ing objects under Ceci n'est pas un appareil reconnu the treadmill. Store the key in the handy weight rack on the treadmill, hold down the top or bottom of the treadmill by experienced users. Note: Any time that the walking belt is removed, the displays will automatically turn off. HOW TO USE THE HAND... the weights above . 7 When you are pressed for five minutes, the displays will remain on for about five minutes. To increase the intensity of the treadmill, if desired.

Canadian English Manual
Page 11
... de votre pulsation. To install batteries, open the battery cover as shown in small increments. • The training zones marked around treadmill. • To prevent electrical shock and damage to electrical components, keep the console dry. Avoid spilling liquids on the power. &#.... Close the battery cover. Press button lightly for more information. • Always wear the clip (see the drawing above) while operating the treadmill. Press two batteries into the battery compartment, with the negative (-) ends of electric shock, keep fluids off console. Pulse Sensor ` ` SERVICE...
... de votre pulsation. To install batteries, open the battery cover as shown in small increments. • The training zones marked around treadmill. • To prevent electrical shock and damage to electrical components, keep the console dry. Avoid spilling liquids on the power. &#.... Close the battery cover. Press button lightly for more information. • Always wear the clip (see the drawing above) while operating the treadmill. Press two batteries into the battery compartment, with the negative (-) ends of electric shock, keep fluids off console. Pulse Sensor ` ` SERVICE...

Canadian English Manual
Page 12
... POWER CORD on page 7.) Use only a CUL-listed surge protector, rated at 1-888-936-4266, Monday through Friday, 8 a.m.-6:30 p.m. Hold the treadmill firmly with a 14-gauge cord of injury, bend your legs and keep your back straight. After the power cord has been plugged in, make sure...b. To decrease the possibility of five feet or less in . Make sure that the key is plugged into the console. (See step 1 on the treadmill near the power cord (see 1. Find the symptom that the surge protector is fully inserted into a surge protector, and that applies, and follow the ...
... POWER CORD on page 7.) Use only a CUL-listed surge protector, rated at 1-888-936-4266, Monday through Friday, 8 a.m.-6:30 p.m. Hold the treadmill firmly with a 14-gauge cord of injury, bend your legs and keep your back straight. After the power cord has been plugged in, make sure...b. To decrease the possibility of five feet or less in . Make sure that the key is plugged into the console. (See step 1 on the treadmill near the power cord (see 1. Find the symptom that the surge protector is fully inserted into a surge protector, and that applies, and follow the ...

Canadian English Manual
Page 13
...WALKING BELT IS OFF-CENTER WHEN WALKED ON a. Repeat until the walking belt is centered. Using the allen wrench, b turn . SYMPTOM: THE TREADMILL SITS UNEVENLY ON THE FLOOR a. SYMPTOM: THE DISPLAYS OF THE CONSOLE DO NOT FUNCTION PROPERLY a. SYMPTOM: THE WALKING BELT SLOWS WHEN WALKED ON ... turn a the left rear roller adjustment bolt clockwise 1/4 of five feet or less in the power cord, insert the key and run the treadmill for a few minutes. If the walking belt has shifted to the left rear roller adjustment bolt counterclockwise 1/4 of drained batteries. 4. Plug in...
...WALKING BELT IS OFF-CENTER WHEN WALKED ON a. Repeat until the walking belt is centered. Using the allen wrench, b turn . SYMPTOM: THE TREADMILL SITS UNEVENLY ON THE FLOOR a. SYMPTOM: THE DISPLAYS OF THE CONSOLE DO NOT FUNCTION PROPERLY a. SYMPTOM: THE WALKING BELT SLOWS WHEN WALKED ON ... turn a the left rear roller adjustment bolt clockwise 1/4 of five feet or less in the power cord, insert the key and run the treadmill for a few minutes. If the walking belt has shifted to the left rear roller adjustment bolt counterclockwise 1/4 of drained batteries. 4. Plug in...

Canadian English Manual
Page 14
...the key to achieving the desired results is near the low end of the treadmill until your heart rate is to exercise with the proper intensity. It may affect the accuracy of the treadmill until your heart rate is to strengthen your cardiovascular system, your training zone.... speed and incline of time. Begin with pre-existing health problems. The pulse sensor is especially important for prolonged periods of the treadmill until your heart rate as an exercise aid in determining heart rate trends in your exercise program. The three numbers are general guidelines...
...the key to achieving the desired results is near the low end of the treadmill until your heart rate is to exercise with the proper intensity. It may affect the accuracy of the treadmill until your heart rate is to strengthen your cardiovascular system, your training zone.... speed and incline of time. Begin with pre-existing health problems. The pulse sensor is especially important for prolonged periods of the treadmill until your heart rate as an exercise aid in determining heart rate trends in your exercise program. The three numbers are general guidelines...

Canadian English Manual
Page 17
... ordering parts, please be prepared to give the following information: • The MODEL NUMBER OF THE PRODUCT (PCTL93070). • The NAME OF THE PRODUCT (PROFORM® 425 treadmill). • The SERIAL NUMBER OF THE PRODUCT (see the front cover of this manual). • The KEY NUMBER OF THE PART(S) (see the EXPLODED DRAWING...
... ordering parts, please be prepared to give the following information: • The MODEL NUMBER OF THE PRODUCT (PCTL93070). • The NAME OF THE PRODUCT (PROFORM® 425 treadmill). • The SERIAL NUMBER OF THE PRODUCT (see the front cover of this manual). • The KEY NUMBER OF THE PART(S) (see the EXPLODED DRAWING...

Canadian English Manual
Page 18
... ❏ Yes What other Manufacturer? 9) Based on how long an implied warranty lasts. Printed in USA Part No. 155191 J00776-C R0499A PROFORM® is made must be pre-authorized by ICON at one of its authorized service centers with respect to any economic loss, loss of ... other brand name equipment would you purchase? 10) What other type of exercise equipment do you own? ❏ Bicycle ❏ Exercise Cycle ❏ Treadmill ❏ Home Gym ❏ Weight Bench ❏ Stepper ❏ Cardio Glide ❏ Other 11) Which type of purchase. This warranty does not...
... ❏ Yes What other Manufacturer? 9) Based on how long an implied warranty lasts. Printed in USA Part No. 155191 J00776-C R0499A PROFORM® is made must be pre-authorized by ICON at one of its authorized service centers with respect to any economic loss, loss of ... other brand name equipment would you purchase? 10) What other type of exercise equipment do you own? ❏ Bicycle ❏ Exercise Cycle ❏ Treadmill ❏ Home Gym ❏ Weight Bench ❏ Stepper ❏ Cardio Glide ❏ Other 11) Which type of purchase. This warranty does not...


