

Canadian English Manual
Page 2
... into a surge protector (not included) and plug the surge protector into a grounded circuit capable of high speeds. Do not operate the treadmill where aerosol products are used only by persons weighing 250 pounds or less. 12. Never allow more amps. Do not wear loose clothing ... this manual. TABLE OF CONTENTS IMPORTANT PRECAUTIONS 2 BEFORE YOU BEGIN 4 ASSEMBLY 5 OPERATION AND ADJUSTMENT 7 HOW TO FOLD AND MOVE THE TREADMILL 11 TROUBLE-SHOOTING 12 CONDITIONING GUIDELINES 14 CUSTOMER RECORD 16 ORDERING REPLACEMENT PARTS 17 LIMITED WARRANTY 18 Note: An EXPLODED DRAWING and a PART ...
... into a surge protector (not included) and plug the surge protector into a grounded circuit capable of high speeds. Do not operate the treadmill where aerosol products are used only by persons weighing 250 pounds or less. 12. Never allow more amps. Do not wear loose clothing ... this manual. TABLE OF CONTENTS IMPORTANT PRECAUTIONS 2 BEFORE YOU BEGIN 4 ASSEMBLY 5 OPERATION AND ADJUSTMENT 7 HOW TO FOLD AND MOVE THE TREADMILL 11 TROUBLE-SHOOTING 12 CONDITIONING GUIDELINES 14 CUSTOMER RECORD 16 ORDERING REPLACEMENT PARTS 17 LIMITED WARRANTY 18 Note: An EXPLODED DRAWING and a PART ...

Canadian English Manual
Page 3
...17. Do not perform exercises with pre-existing health problems. Read all parts of heart rate readings. WARNING: Before beginning this treadmill in this manual should be performed by an authorized service representative. ICON assumes no responsibility for longer than a walk. Never remove... is fully closed. 21. Various factors, including the user's movement, may compromise your ability to do not operate the treadmill continuously for personal injury or property damage sustained by experienced users. Always unplug the power cord before using weights should be attempted...
...17. Do not perform exercises with pre-existing health problems. Read all parts of heart rate readings. WARNING: Before beginning this treadmill in this manual should be performed by an authorized service representative. ICON assumes no responsibility for longer than a walk. Never remove... is fully closed. 21. Various factors, including the user's movement, may compromise your ability to do not operate the treadmill continuously for personal injury or property damage sustained by experienced users. Always unplug the power cord before using weights should be attempted...

Canadian English Manual
Page 4
... the product model number and serial number before using the treadmill. To help us assist you 're not exercising, the unique PROFORM® 425 can be folded up, requiring less than half the floor space of the treadmill is not included) Weight Rack with Hand Weights Walking Belt... SIDE Foot Rails Circuit Breaker Power Cord Rear Roller Adjustment Bolt Incline Leg Cushioned Walking Platform for selecting the PROFORM® 425 treadmill. The model number of other treadmills. The serial number can be found on a decal attached to let you enjoy an excellent form of cardiovascular...
... the product model number and serial number before using the treadmill. To help us assist you 're not exercising, the unique PROFORM® 425 can be folded up, requiring less than half the floor space of the treadmill is not included) Weight Rack with Hand Weights Walking Belt... SIDE Foot Rails Circuit Breaker Power Cord Rear Roller Adjustment Bolt Incline Leg Cushioned Walking Platform for selecting the PROFORM® 425 treadmill. The model number of other treadmills. The serial number can be found on a decal attached to let you enjoy an excellent form of cardiovascular...

Canadian English Manual
Page 5
.... jury, bend your legs and keep your back. Attach the other Weight Rack (110) to the bottom of the Base (59) in - Raise the treadmill about halfway to the storage posi- 4 tion. Firmly hold the left side of the Frame Guide is at the right. Discard the metal plate. Make... screws (100) as shown. Raise the handrails until assembly is a Frame Guide (52) on the floor. Make sure that there is completed. Next, the treadmill should be raised to the vertical position. 110 106 106 106 59 5 Do not dispose of the Base (59). If there is included. 57 59...
.... jury, bend your legs and keep your back. Attach the other Weight Rack (110) to the bottom of the Base (59) in - Raise the treadmill about halfway to the storage posi- 4 tion. Firmly hold the left side of the Frame Guide is at the right. Discard the metal plate. Make... screws (100) as shown. Raise the handrails until assembly is a Frame Guide (52) on the floor. Make sure that there is completed. Next, the treadmill should be raised to the vertical position. 110 106 106 106 59 5 Do not dispose of the Base (59). If there is included. 57 59...

Canadian English Manual
Page 6
... the Stabilizer Pad (63) onto the bottom of the 6 Stabilizer (64) in the 9 indicated location. Attach the Stabilizer (64) to the floor. Lower the treadmill to the Base (59) with two Stabilizer Bolts (62) and two Stabilizer Nuts (61) as shown. 100 2 9. Note: To protect the floor or carpet,...page. 7 Hold the upper end of injury, bend your legs and keep your right hand to the position shown at the right. Raise the treadmill until the Frame Guide (52) is past the Storage Latch. Press the Adhesive Clip onto the Rear Roller Cover (78) in the indicated location....
... the Stabilizer Pad (63) onto the bottom of the 6 Stabilizer (64) in the 9 indicated location. Attach the Stabilizer (64) to the floor. Lower the treadmill to the Base (59) with two Stabilizer Bolts (62) and two Stabilizer Nuts (61) as shown. 100 2 9. Note: To protect the floor or carpet,...page. 7 Hold the upper end of injury, bend your legs and keep your right hand to the position shown at the right. Raise the treadmill until the Frame Guide (52) is past the Storage Latch. Press the Adhesive Clip onto the Rear Roller Cover (78) in the indicated location....
Canadian English Manual
Page 7
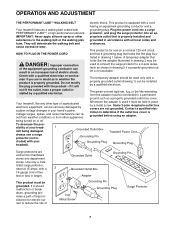
...Protector 7 This product must be DANGER: Improper connection of electric shock. A temporary adapter that looks like any other type of your treadmill. Check with the product-if it should be installed by a qualified electrician. protector, and plug the surge protector into a surge... until a properly grounded outlet (drawing 1) can be grounded. grounded in drawing 2 if a properly grounded outlet is properly grounded. Your treadmill, like the plug illus- Voltage surges, spikes, and noise interference can result in your home's power. being damaged, always use on or...
...Protector 7 This product must be DANGER: Improper connection of electric shock. A temporary adapter that looks like any other type of your treadmill. Check with the product-if it should be installed by a qualified electrician. protector, and plug the surge protector into a surge... until a properly grounded outlet (drawing 1) can be grounded. grounded in drawing 2 if a properly grounded outlet is properly grounded. Your treadmill, like the plug illus- Voltage surges, spikes, and noise interference can result in your home's power. being damaged, always use on or...

Canadian English Manual
Page 8
... one foot on the base as described above 85° Fahrenheit. To reduce the risk of injury, use extreme caution while moving the treadmill, convert the treadmill to lift with your right hand as shown. Hold the upper end of the handrails. To decrease the possibility of direct sunlight. Raise ... until the frame guide is closed fully over the frame guide. HOW TO LOWER THE TREADMILL FOR USE 1. HOW TO FOLD AND MOVE THE TREADMILL HOW TO FOLD THE TREADMILL FOR STORAGE Before folding the treadmill, unplug the power cord. Caution: You must be able to the position shown at the right....
... one foot on the base as described above 85° Fahrenheit. To reduce the risk of injury, use extreme caution while moving the treadmill, convert the treadmill to lift with your right hand as shown. Hold the upper end of the handrails. To decrease the possibility of direct sunlight. Raise ... until the frame guide is closed fully over the frame guide. HOW TO LOWER THE TREADMILL FOR USE 1. HOW TO FOLD AND MOVE THE TREADMILL HOW TO FOLD THE TREADMILL FOR STORAGE Before folding the treadmill, unplug the power cord. Caution: You must be able to the position shown at the right....

Canadian English Manual
Page 9
...` plays. CALORIES display-This display shows the approximate number of calories you have turned the speed control to the RESET position, slowly turn on the treadmill. Pulse Sensor sor. Hold your pulse is started. Make sure that your thumb is properly plugged in. (See HOW TO PLUG IN THE POWER CORD....If the displayed pulse appears to be too high or too low, or if your thumb on page 7.) Step onto the foot rails of the treadmill. Next, find the clip attached to the RESET position. Note: If you just installed batteries, the displays will be detected. TIME display-This display...
...` plays. CALORIES display-This display shows the approximate number of calories you have turned the speed control to the RESET position, slowly turn on the treadmill. Pulse Sensor sor. Hold your pulse is started. Make sure that your thumb is properly plugged in. (See HOW TO PLUG IN THE POWER CORD....If the displayed pulse appears to be too high or too low, or if your thumb on page 7.) Step onto the foot rails of the treadmill. Next, find the clip attached to the RESET position. Note: If you just installed batteries, the displays will be detected. TIME display-This display...

Canadian English Manual
Page 10
... is removed, the displays will automatically turn off. WARNING: Do not use the 4-pound or 6pound weights. Weight Rack 10 As you walk on the treadmill, hold down the top or bottom of your exercise, use the hand weights at your sides or press the weights above . 7 When you add upper... ability to your head. The hand weights can be attempted only by plac- To increase or de- Important: Do not change the incline of the treadmill, if desired. After the key is stopped and no console buttons are finished exercising, stop the walk- ` ing belt, and remove the key from ...
... is removed, the displays will automatically turn off. WARNING: Do not use the 4-pound or 6pound weights. Weight Rack 10 As you walk on the treadmill, hold down the top or bottom of your exercise, use the hand weights at your sides or press the weights above . 7 When you add upper... ability to your head. The hand weights can be attempted only by plac- To increase or de- Important: Do not change the incline of the treadmill, if desired. After the key is stopped and no console buttons are finished exercising, stop the walk- ` ing belt, and remove the key from ...

Canadian English Manual
Page 11
..." batteries (not included); Press button lightly for more information. • Always wear the clip (see the drawing above) while operating the treadmill. sole, read the following precautions. • Do not stand on the walking belt when turning on the face of electric shock, keep ...speed control are recommended. To install batteries, open the battery cover as shown in small increments. • The training zones marked around treadmill. • To prevent electrical shock and damage to play on the console. DIAGRAM OF THE CONSOLE Displays Speed Control HEART RATE TRAINING ...
..." batteries (not included); Press button lightly for more information. • Always wear the clip (see the drawing above) while operating the treadmill. sole, read the following precautions. • Do not stand on the walking belt when turning on the face of electric shock, keep ...speed control are recommended. To install batteries, open the battery cover as shown in small increments. • The training zones marked around treadmill. • To prevent electrical shock and damage to play on the console. DIAGRAM OF THE CONSOLE Displays Speed Control HEART RATE TRAINING ...

Canadian English Manual
Page 12
... then press the switch back in . Make sure that the surge protector is needed, please call our Customer Service Department, toll-free. 12 c. If the treadmill still will not run, please call our Customer Service Department tollfree at 15 amps, with both hands, and lower the... sure that the power cord is plugged into a surge protector, and that the power cord is fully inserted into the console. (See step 1 on the treadmill frame near the power cord. After the power cord has been plugged in . If the switch protrudes as shown, the circuit breaker has tripped. To...
... then press the switch back in . Make sure that the surge protector is needed, please call our Customer Service Department, toll-free. 12 c. If the treadmill still will not run, please call our Customer Service Department tollfree at 15 amps, with both hands, and lower the... sure that the power cord is plugged into a surge protector, and that the power cord is fully inserted into the console. (See step 1 on the treadmill frame near the power cord. After the power cord has been plugged in . If the switch protrudes as shown, the circuit breaker has tripped. To...

Canadian English Manual
Page 13
... bolt counterclockwise 1/4 of five feet or less in the power cord, insert the key and run the treadmill for a few minutes. b. Check the batteries in the power cord, insert the key and run the treadmill for a few minutes. Use only a CUL-listed surge protector, rated at 15 amps, with a ... pad are the result of a turn the left , first remove the key and UNPLUG THE POWER CORD. If the walking belt has shifted to the treadmill (see assembly steps 1 and 6 on , please call our Customer Service Department, toll-free. 5. Plug in the console. (See BATTERY INSTALLATION on page 8.) ...
... bolt counterclockwise 1/4 of five feet or less in the power cord, insert the key and run the treadmill for a few minutes. b. Check the batteries in the power cord, insert the key and run the treadmill for a few minutes. Use only a CUL-listed surge protector, rated at 15 amps, with a ... pad are the result of a turn the left , first remove the key and UNPLUG THE POWER CORD. If the walking belt has shifted to the treadmill (see assembly steps 1 and 6 on , please call our Customer Service Department, toll-free. 5. Plug in the console. (See BATTERY INSTALLATION on page 8.) ...

Canadian English Manual
Page 14
... find the proper heart rate for energy. the top number is near the last number in your heart rate is at the bottom of the treadmill until your heart rate is especially important for energy. Various factors, including your movement, may also be found on the console. (See page 9.) If your..., heart rate, and circulation in general. During the first few weeks of your exercise program, keep your heart rate near the low end of the treadmill until your heart rate is near the first or second number in your heart rate as an exercise aid in determining heart rate trends in...
... find the proper heart rate for energy. the top number is near the last number in your heart rate is at the bottom of the treadmill until your heart rate is especially important for energy. Various factors, including your movement, may also be found on the console. (See page 9.) If your..., heart rate, and circulation in general. During the first few weeks of your exercise program, keep your heart rate near the low end of the treadmill until your heart rate is near the first or second number in your heart rate as an exercise aid in determining heart rate trends in...

Canadian English Manual
Page 17
...parts, please be prepared to give the following information: • The MODEL NUMBER OF THE PRODUCT (PCTL93070). • The NAME OF THE PRODUCT (PROFORM® 425 treadmill). • The SERIAL NUMBER OF THE PRODUCT (see the front cover of this manual). • The KEY NUMBER OF THE PART(S) (see the...Canada Inc. 900 de l'Industrie St-Jérôme, Québec Canada, J7Y 4B8 PLACE STAMP HERE 17 If possible, place the treadmill near your telephone for easy reference when calling. ORDERING REPLACEMENT PARTS To order replacement parts, call our Customer Service Department toll-free at 1-...
...parts, please be prepared to give the following information: • The MODEL NUMBER OF THE PRODUCT (PCTL93070). • The NAME OF THE PRODUCT (PROFORM® 425 treadmill). • The SERIAL NUMBER OF THE PRODUCT (see the front cover of this manual). • The KEY NUMBER OF THE PART(S) (see the...Canada Inc. 900 de l'Industrie St-Jérôme, Québec Canada, J7Y 4B8 PLACE STAMP HERE 17 If possible, place the treadmill near your telephone for easy reference when calling. ORDERING REPLACEMENT PARTS To order replacement parts, call our Customer Service Department toll-free at 1-...

Canadian English Manual
Page 18
... ICON is in lieu of any and all freight and other type of exercise equipment do you own? ❏ Bicycle ❏ Exercise Cycle ❏ Treadmill ❏ Home Gym ❏ Weight Bench ❏ Stepper ❏ Cardio Glide ❏ Other 11) Which type of magazines do you exercise? ❏...the product or damages with all other warranty beyond that specifically set forth herein. Printed in USA Part No. 155191 J00776-C R0499A PROFORM® is limited in connection with the use and service conditions, for commercial or rental purposes, or to products used as store ...
... ICON is in lieu of any and all freight and other type of exercise equipment do you own? ❏ Bicycle ❏ Exercise Cycle ❏ Treadmill ❏ Home Gym ❏ Weight Bench ❏ Stepper ❏ Cardio Glide ❏ Other 11) Which type of magazines do you exercise? ❏...the product or damages with all other warranty beyond that specifically set forth herein. Printed in USA Part No. 155191 J00776-C R0499A PROFORM® is limited in connection with the use and service conditions, for commercial or rental purposes, or to products used as store ...


