

Canadian English Manual
Page 4
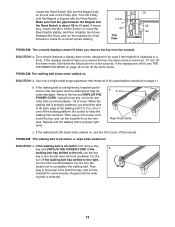
...properly assembled. (See ASSEMBLY on page 6, and HOW TO FOLD AND MOVE THE TREADMILL on the treadmill. Never remove the motor hood un- less instructed to raise, lower, or move the treadmill until it is running. This treadmill is not in use. (See the drawing on page 5 for in this manual.... Do not use , before cleaning the treadmill, and before performing the mainte- Inspect and properly tighten all parts ...
...properly assembled. (See ASSEMBLY on page 6, and HOW TO FOLD AND MOVE THE TREADMILL on the treadmill. Never remove the motor hood un- less instructed to raise, lower, or move the treadmill until it is running. This treadmill is not in use. (See the drawing on page 5 for in this manual.... Do not use , before cleaning the treadmill, and before performing the mainte- Inspect and properly tighten all parts ...

Canadian English Manual
Page 14
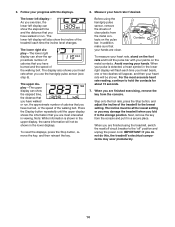
... you exercise, the lower left display can show the elapsed time, the distance that you have walked or run . The upper display-The upper display can show the incline of the treadmill to the "off circuit breaker to the lowest setting. Press the Display button repeatedly until the upper display ...in a secure place. The lower left display will also show the approximate number of the walking belt. The lower left display- Before using the treadmill, switch the reset/off " position and unplug the power cord. IMPORTANT: If you have burned, or the speed of clear plastic from the ...
... you exercise, the lower left display can show the elapsed time, the distance that you have walked or run . The upper display-The upper display can show the incline of the treadmill to the "off circuit breaker to the lowest setting. Press the Display button repeatedly until the upper display ...in a secure place. The lower left display will also show the approximate number of the walking belt. The lower left display- Before using the treadmill, switch the reset/off " position and unplug the power cord. IMPORTANT: If you have burned, or the speed of clear plastic from the ...

Canadian English Manual
Page 18
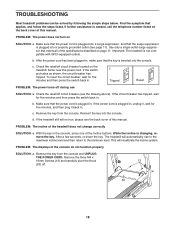
...has tripped. Check the reset/off circuit breaker located on the front cover of this manual. d. The treadmill will recalibrate the incline system. b. b. If the treadmill still will not run, please see the drawing above). c. Use only a single-outlet surge suppressor that the key is needed..., call the telephone number listed on the treadmill frame near the power cord. Important: The treadmill is changing, remove the key....
...has tripped. Check the reset/off circuit breaker located on the front cover of this manual. d. The treadmill will recalibrate the incline system. b. b. If the treadmill still will not run, please see the drawing above). c. Use only a single-outlet surge suppressor that the key is needed..., call the telephone number listed on the treadmill frame near the power cord. Important: The treadmill is changing, remove the key....
Canadian English Manual
Page 19
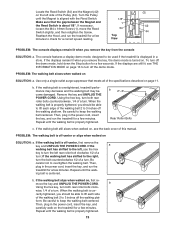
... Using the hex key, turn both rear roller bolts counterclockwise, 1/4 of a turn . b 2-3 in the power cord, insert the key, and run the treadmill for a correct speed reading. Be careful not to keep the walking belt centered. Make sure that meets all of the specifications described on page 16...42 sary, loosen the M4 x 19mm Screw (1), move the 54 Reed Switch slightly, and then retighten the Screw. 44 Reattach the Hood, and run the treadmill for a few Top minutes to the right, turn the bolt counterclockwise 1/2 of a turn . PROBLEM: The walking belt is off -center or ...
... Using the hex key, turn both rear roller bolts counterclockwise, 1/4 of a turn . b 2-3 in the power cord, insert the key, and run the treadmill for a correct speed reading. Be careful not to keep the walking belt centered. Make sure that meets all of the specifications described on page 16...42 sary, loosen the M4 x 19mm Screw (1), move the 54 Reed Switch slightly, and then retighten the Screw. 44 Reattach the Hood, and run the treadmill for a few Top minutes to the right, turn the bolt counterclockwise 1/2 of a turn . PROBLEM: The walking belt is off -center or ...
English Manual
Page 4
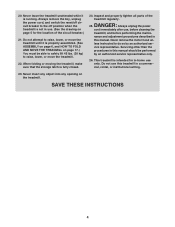
... authorized service representative only. 26. nance and adjustment procedures described in this treadmill in use this manual. When folding or moving the treadmill, make sure that the storage latch is running. DANGER: 25. less instructed to raise, lower, or move the treadmill. 22. SAVE THESE INSTRUCTIONS 4 Servicing other than the procedures in -home use...
... authorized service representative only. 26. nance and adjustment procedures described in this treadmill in use this manual. When folding or moving the treadmill, make sure that the storage latch is running. DANGER: 25. less instructed to raise, lower, or move the treadmill. 22. SAVE THESE INSTRUCTIONS 4 Servicing other than the procedures in -home use...
English Manual
Page 14
... left display can show the elapsed time, the distance that you have walked or run , the approximate number of calories that you are finished exercising, remove the key from... or the speed of calories that you use the handgrip pulse sensor (see step 6). Before using the treadmill, switch the reset/off circuit breaker to the storage position. The incline must be at the lowest setting...walking belt. Step onto the foot rails, press the Stop button, and adjust the incline of the treadmill each time your heart beats, one or two dashes will appear, and then your hands are finished ...
... left display can show the elapsed time, the distance that you have walked or run , the approximate number of calories that you are finished exercising, remove the key from... or the speed of calories that you use the handgrip pulse sensor (see step 6). Before using the treadmill, switch the reset/off circuit breaker to the storage position. The incline must be at the lowest setting...walking belt. Step onto the foot rails, press the Stop button, and adjust the incline of the treadmill each time your heart beats, one or two dashes will appear, and then your hands are finished ...
English Manual
Page 18
... minimum level. Check the reset/off circuit breaker located on SOLUTION: a. Remove the key from the console and UNPLUG THE POWER CORD. If the treadmill still will not run, please see the back cover of this manual. After a few seconds, re-insert the key. PROBLEM: The power does not turn on the... treadmill frame near the power cord. b. If the power cord is plugged in . d. Find the symptom that the key is needed, call the telephone number ...
... minimum level. Check the reset/off circuit breaker located on SOLUTION: a. Remove the key from the console and UNPLUG THE POWER CORD. If the treadmill still will not run, please see the back cover of this manual. After a few seconds, re-insert the key. PROBLEM: The power does not turn on the... treadmill frame near the power cord. b. If the power cord is plugged in . d. Find the symptom that the key is needed, call the telephone number ...
English Manual
Page 19
... may decrease and the walking belt may become damaged. Then, plug in the power cord, insert the key, and run the treadmill for a few seconds. The console features a display demo mode, designed to be able to lift each edge of the walking belt 2 to check for a correct ... not to turn the left side of this manual. b. move the Reed 54 Switch slightly, and then retighten the Screw. 44 Reattach the Hood, and run the treadmill for a few Top minutes to 3 inches off the demo mode, hold down the Stop button for a few minutes. b Using the hex key, turn both...
... may decrease and the walking belt may become damaged. Then, plug in the power cord, insert the key, and run the treadmill for a few seconds. The console features a display demo mode, designed to be able to lift each edge of the walking belt 2 to check for a correct ... not to turn the left side of this manual. b. move the Reed 54 Switch slightly, and then retighten the Screw. 44 Reattach the Hood, and run the treadmill for a few Top minutes to 3 inches off the demo mode, hold down the Stop button for a few minutes. b Using the hex key, turn both...


