
English Manual
Page 3
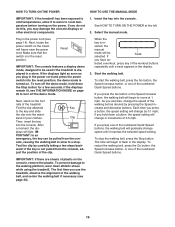
... cord. 12. Failure to use the treadmill with pre-existing health problems. 2. Read, understand, and test the emergency stop unexpectedly, which may affect the accuracy of heart rate readings. The pulse sensor is turned off. Do not place the treadmill on page 22 if the treadmill is especially important for both men and women. If the control system is not working properly. (See TROUBLESHOOTING on any exercise program...
... cord. 12. Failure to use the treadmill with pre-existing health problems. 2. Read, understand, and test the emergency stop unexpectedly, which may affect the accuracy of heart rate readings. The pulse sensor is turned off. Do not place the treadmill on page 22 if the treadmill is especially important for both men and women. If the control system is not working properly. (See TROUBLESHOOTING on any exercise program...
English Manual
Page 4
... not in use. (See the drawing on the treadmill. 24. SAVE THESE INSTRUCTIONS 4 DANGER: 25. Always unplug the power cord immediately after use only. Never remove the motor hood un- This treadmill is intended for the location of the treadmill regularly. Over exercising may result in -home use , before cleaning the treadmill, and before performing the mainte- 20. Always remove the key, unplug the power cord, and press the power switch into any...
... not in use. (See the drawing on the treadmill. 24. SAVE THESE INSTRUCTIONS 4 DANGER: 25. Always unplug the power cord immediately after use only. Never remove the motor hood un- This treadmill is intended for the location of the treadmill regularly. Over exercising may result in -home use , before cleaning the treadmill, and before performing the mainte- 20. Always remove the key, unplug the power cord, and press the power switch into any...
English Manual
Page 5
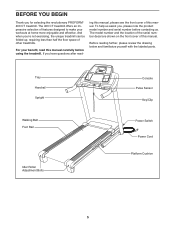
... review the drawing below and familiarize yourself with the labeled parts. Tray Handrail Upright Walking Belt Foot Rail Idler Roller Adjustment Bolts Console Pulse Sensor Key/Clip Power Switch Power Cord Platform Cushion 5 The 400 CT treadmill offers an impressive selection of other treadmills. For your workouts at home more enjoyable and effective. ing this manual, please see the front cover of this manual. BEFORE YOU BEGIN Thank you , please note the product model number...
... review the drawing below and familiarize yourself with the labeled parts. Tray Handrail Upright Walking Belt Foot Rail Idler Roller Adjustment Bolts Console Pulse Sensor Key/Clip Power Switch Power Cord Platform Cushion 5 The 400 CT treadmill offers an impressive selection of other treadmills. For your workouts at home more enjoyable and effective. ing this manual, please see the front cover of this manual. BEFORE YOU BEGIN Thank you , please note the product model number...
English Manual
Page 6
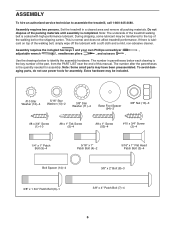
... needed for assembly. Assembly requires the included hex keys and your own Phillips screwdriver , adjustable wrench , needlenose pliers , and scissors . Do not dispose of this manual. The number in a cleared area and remove all packing materials. Assembly requires two persons. This is lubricant on top of the walking belt, simply wipe off the lubricant with high-performance lubricant. Set the treadmill in parentheses below to assemble the treadmill...
... needed for assembly. Assembly requires the included hex keys and your own Phillips screwdriver , adjustable wrench , needlenose pliers , and scissors . Do not dispose of this manual. The number in a cleared area and remove all packing materials. Assembly requires two persons. This is lubricant on top of the walking belt, simply wipe off the lubricant with high-performance lubricant. Set the treadmill in parentheses below to assemble the treadmill...
English Manual
Page 11
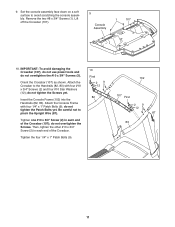
... the Handrails (82, 83). Then, tighten the other #10 x 3/4" Screw (2) in each end of the Crossbar (107); Attach the Crossbar to pinch the Upright Wire (87). do not tighten the Patch Bolts yet. Remove the two #8 x 3/4" Screws (1). Set the console assembly face down on a soft surface to avoid scratching the console assembly. do not overtighten the Screws. Tighten one #10 x 3/4" Screw (2) in each end of the Crossbar...
... the Handrails (82, 83). Then, tighten the other #10 x 3/4" Screw (2) in each end of the Crossbar (107); Attach the Crossbar to pinch the Upright Wire (87). do not tighten the Patch Bolts yet. Remove the two #8 x 3/4" Screws (1). Set the console assembly face down on a soft surface to avoid scratching the console assembly. do not overtighten the Screws. Tighten one #10 x 3/4" Screw (2) in each end of the Crossbar...

English Manual
Page 12
... Bolts (4) (only one connector and try again. Connect the ground wire from the Upright Wire. Insert the excess Upright Wire (87) into place. Attach the two Console Clamps (105) to the console assembly with six #8 x 3/4" Screws (1). Set the console assembly on the Left and Right Handrails (82, 83). Attach the console assembly to the Console Ground Wire (52). 11 Console Assembly Console Wire 87 Wire Tie 4 3 Console Wire 87 Ground Wire 52 83 12. Start all six Screws, and then tighten...
... Bolts (4) (only one connector and try again. Connect the ground wire from the Upright Wire. Insert the excess Upright Wire (87) into place. Attach the two Console Clamps (105) to the console assembly with six #8 x 3/4" Screws (1). Set the console assembly on the Left and Right Handrails (82, 83). Attach the console assembly to the Console Ground Wire (52). 11 Console Assembly Console Wire 87 Wire Tie 4 3 Console Wire 87 Ground Wire 52 83 12. Start all six Screws, and then tighten...
English Manual
Page 13
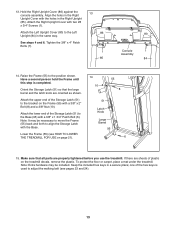
... hardware may be included. Hold the Right Upright Cover (86) against the console assembly. See steps 4 and 6. Orient the Storage Latch (51) so that all parts are sheets of the hex keys is completed. Attach the lower end of the Storage Latch (51) to adjust the walking belt (see HOW TO LOWER THE TREADMILL FOR USE on page 21). 14 10 55 8 51 Latch Knob Large Barrel 95 6 15. To protect...
... hardware may be included. Hold the Right Upright Cover (86) against the console assembly. See steps 4 and 6. Orient the Storage Latch (51) so that all parts are sheets of the hex keys is completed. Attach the lower end of the Storage Latch (51) to adjust the walking belt (see HOW TO LOWER THE TREADMILL FOR USE on page 21). 14 10 55 8 51 Latch Knob Large Barrel 95 6 15. To protect...
English Manual
Page 14
... could damage the control system of damaging your 2 treadmill, always use on page 3. This product must be installed by sudden voltage changes in your treadmill (see precaution 13 on the surge suppressor to the walking belt or the walking platform. The adapter must be damaged by a qualified electrician. A temporary adapter may be electrically rated for use a surge suppressor with your homeʼs power. To decrease...
... could damage the control system of damaging your 2 treadmill, always use on page 3. This product must be installed by sudden voltage changes in your treadmill (see precaution 13 on the surge suppressor to the walking belt or the walking platform. The adapter must be damaged by a qualified electrician. A temporary adapter may be electrically rated for use a surge suppressor with your homeʼs power. To decrease...
English Manual
Page 15
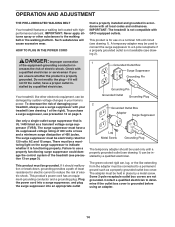
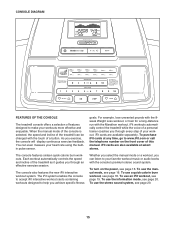
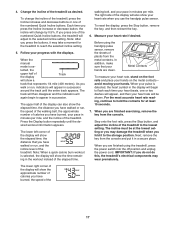
... builtin pulse sensor. The console features sixteen quick calorie burn workouts. To use the information mode, see page 19. When the manual mode of the console is selected, the speed and incline of the treadmill can even measure your favorite workout music or audio books with the touch of a button. For example, lose unwanted pounds with the 8week Weight Loss workout, or train for a long-distance run with the Marathon workout. iFit cards...
... builtin pulse sensor. The console features sixteen quick calorie burn workouts. To use the information mode, see page 19. When the manual mode of the console is selected, the speed and incline of the treadmill can even measure your favorite workout music or audio books with the touch of a button. For example, lose unwanted pounds with the 8week Weight Loss workout, or train for a long-distance run with the Marathon workout. iFit cards...
English Manual
Page 16
... the clip attached Key to room temperature before turning on the console, remove the plastic. band of plastic on the power. lected a workout, press any of the walking belt as you exercise, change in a store. As you plug in the power cord and press the power switch into the reset position, the demo mode is in the display. 3. just the position of the numbered Quick Speed buttons, the walking belt will begin to turn off the demo mode. PORTANT: In...
... the clip attached Key to room temperature before turning on the console, remove the plastic. band of plastic on the power. lected a workout, press any of the walking belt as you exercise, change in a store. As you plug in the power cord and press the power switch into the reset position, the demo mode is in the display. 3. just the position of the numbered Quick Speed buttons, the walking belt will begin to turn off the demo mode. PORTANT: In...
English Manual
Page 17
... unplug the power cord. The lower right corner of the display will show the approximate number of calories you press one of plastic from the console and put it in minutes per mile, and the incline of calories you walk or run , the speed of the walking belt, the approximate number of the treadmill. 4. Change the incline of the display Track will show a track that you use the handgrip pulse sensor. lected, the...
... unplug the power cord. The lower right corner of the display will show the approximate number of calories you press one of plastic from the console and put it in minutes per mile, and the incline of calories you walk or run , the speed of the walking belt, the approximate number of the treadmill. 4. Change the incline of the display Track will show a track that you use the handgrip pulse sensor. lected, the...
English Manual
Page 18
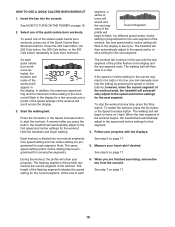
... Calorie Burn Workouts buttons. Measure your heart rate if desired. Insert the key into one of the workout ends, the treadmill will then slow to the speed and incline settings for each 6. Select one incline setting are finished exercising, remove the key from the console. To stop . Start the walking belt. Note: The same speed setting and/or incline setting may be programmed for a few seconds and a profile of the speed settings of each segment. See step 7 on...
... Calorie Burn Workouts buttons. Measure your heart rate if desired. Insert the key into one of the workout ends, the treadmill will then slow to the speed and incline settings for each 6. Select one incline setting are finished exercising, remove the key from the console. To stop . Start the walking belt. Note: The same speed setting and/or incline setting may be programmed for a few seconds and a profile of the speed settings of each segment. See step 7 on...
English Manual
Page 19
... treadmill will automatically adjust to the speed and incline settings for your personal trainer (see THE INFORMATION MODE on the front cover of the workout will light. When the next segment of a personal trainer will flash in the display. One speed setting and one incline setting are finished exercising, remove the key from the iFit slot when you through the workout. To purchase iFit cards at any time, press the Stop button. Insert an iFit card and select a workout...
... treadmill will automatically adjust to the speed and incline settings for your personal trainer (see THE INFORMATION MODE on the front cover of the workout will light. When the next segment of a personal trainer will flash in the display. One speed setting and one incline setting are finished exercising, remove the key from the iFit slot when you through the workout. To purchase iFit cards at any time, press the Stop button. Insert an iFit card and select a workout...
English Manual
Page 20
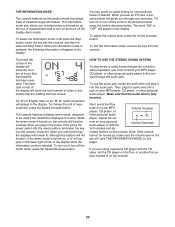
... turn off the voice of on the console. To use an iFit card, a personal trainer will show the total number of the display will guide you plug in the power cord, press the power switch into the reset position, and insert the key into the audio jack. The lower left corner of miles or kilometers that the treadmill has been operated. Make sure that keeps track of measurement, press the Speed increase button. THE INFORMATION MODE The console...
... turn off the voice of on the console. To use an iFit card, a personal trainer will show the total number of the display will guide you plug in the power cord, press the power switch into the reset position, and insert the key into the audio jack. The lower left corner of miles or kilometers that the treadmill has been operated. Make sure that keeps track of measurement, press the Speed increase button. THE INFORMATION MODE The console...
English Manual
Page 21
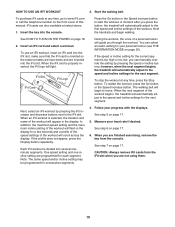
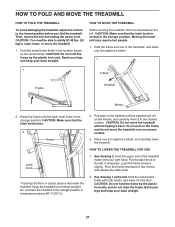
... ; Then, remove the key and unplug the power cord. Hold the metal frame firmly in the storage position. Raise the frame until the treadmill will roll on the frame, and do not drop the frame. if necessary, push the frame forward slightly. HOW TO FOLD AND MOVE THE TREADMILL HOW TO FOLD THE TREADMILL To avoid damaging the treadmill, adjust the incline to the...
... ; Then, remove the key and unplug the power cord. Hold the metal frame firmly in the storage position. Raise the frame until the treadmill will roll on the frame, and do not drop the frame. if necessary, push the frame forward slightly. HOW TO FOLD AND MOVE THE TREADMILL HOW TO FOLD THE TREADMILL To avoid damaging the treadmill, adjust the incline to the...
English Manual
Page 22
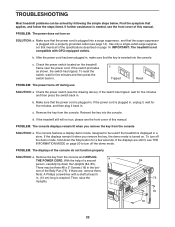
... the console. IMPORTANT: The treadmill is needed, see the drawing above). b. c. PROBLEM: The console displays remain lit when you remove the key, the demo mode is turned on. Then, raise the 85 Uprights. 84 75 16 16 22 After the power cord has been plugged in . Check the power switch (see the front cover of the specifications described on the treadmill frame near the power cord. Make sure that the power cord is plugged in...
... the console. IMPORTANT: The treadmill is needed, see the drawing above). b. c. PROBLEM: The console displays remain lit when you remove the key, the demo mode is turned on. Then, raise the 85 Uprights. 84 75 16 16 22 After the power cord has been plugged in . Check the power switch (see the front cover of the specifications described on the treadmill frame near the power cord. Make sure that the power cord is plugged in...
English Manual
Page 23
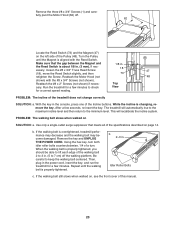
... the walking belt centered. Then, plug in the console, press one of this manual. 23 If necessary, loosen the #8 x 3/4" Truss Head Screw 18 47 (18), move the Reed Switch slightly, and then 73 retighten the Screw. b 2-3 in . (3 mm). b. With the key in the power cord, insert the key, and run the treadmill for a correct speed reading. Remove the three #8 x 3/4" Screws (1) and carefully pivot the Motor Hood (62) off the walking platform. Turn the Pulley...
... the walking belt centered. Then, plug in the console, press one of this manual. 23 If necessary, loosen the #8 x 3/4" Truss Head Screw 18 47 (18), move the Reed Switch slightly, and then 73 retighten the Screw. b 2-3 in . (3 mm). b. With the key in the power cord, insert the key, and run the treadmill for a correct speed reading. Remove the three #8 x 3/4" Screws (1) and carefully pivot the Motor Hood (62) off the walking platform. Turn the Pulley...
English Manual
Page 25
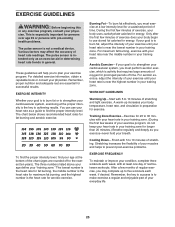
... Exercise-If your exercise program. Only after the first few weeks of time. Stretching increases the flexibility of stretching. The chart below shows recommended heart rates for maximum fat burning, and the highest number is to the nearest ten years). If your goal is to strengthen your everyday life. 25 WORKOUT GUIDELINES Warming Up-Start with pre-existing health problems. The pulse sensor...
... Exercise-If your exercise program. Only after the first few weeks of time. Stretching increases the flexibility of stretching. The chart below shows recommended heart rates for maximum fat burning, and the highest number is to the nearest ten years). If your goal is to strengthen your everyday life. 25 WORKOUT GUIDELINES Warming Up-Start with pre-existing health problems. The pulse sensor...
English Manual
Page 26
... Storage Latch Console Ground Wire #8 x 1" Screw Right Foot Rail Frame Roller Bracket Roller Ground Wire Right Rear Foot Left Rear Foot Idler Roller Hex Key Motor Hood Hood Accent Lift Frame Lift Frame Ground Wire Drive Motor Belt Drive Motor Controller Ground Wire Power Cord Grommet Power Switch Controller Reed Switch Reed Switch Clamp Belly Pan Wire Tie 8" Tie 15" Tie Releasable Tie Left Upright Cover Handrail Cap Left Handrail Right Handrail Left Upright Right Upright Right Upright Cover Upright Wire Left Upright Spacer Base Cap Base Foot Right Upright Spacer Caution Decal Incline Wire...
... Storage Latch Console Ground Wire #8 x 1" Screw Right Foot Rail Frame Roller Bracket Roller Ground Wire Right Rear Foot Left Rear Foot Idler Roller Hex Key Motor Hood Hood Accent Lift Frame Lift Frame Ground Wire Drive Motor Belt Drive Motor Controller Ground Wire Power Cord Grommet Power Switch Controller Reed Switch Reed Switch Clamp Belly Pan Wire Tie 8" Tie 15" Tie Releasable Tie Left Upright Cover Handrail Cap Left Handrail Right Handrail Left Upright Right Upright Right Upright Cover Upright Wire Left Upright Spacer Base Cap Base Foot Right Upright Spacer Caution Decal Incline Wire...
English Manual
Page 32
... key number and description of the replacement part(s) (see the front cover of whatsoever nature. The drive motor is shipped to a service center, freight charges to repairing or replacing, at ICONʼs option, the product through one of merchantability or fitness for service needed under this warranty is authorized by ICON. or to the original purchaser. ICON is in lieu of any and all other rights that specifically set...
... key number and description of the replacement part(s) (see the front cover of whatsoever nature. The drive motor is shipped to a service center, freight charges to repairing or replacing, at ICONʼs option, the product through one of merchantability or fitness for service needed under this warranty is authorized by ICON. or to the original purchaser. ICON is in lieu of any and all other rights that specifically set...

