
User Manual
Page 2
IMPORTANT PRECAUTIONS WARNING: To reduce the risk of carrying 15 or more than one person on page 8. It is the responsibility of this manual. Never allow more amps. Do not wear loose clothes that all warnings and precautions. 2. Never use an extension cord. 11. To purchase a surge...feet on the walking belt. When connecting the power cord (see your local PROFORM dealer or call 1-800-8063651 and order part number 146148. 12. Do not use the treadmill with at least eight feet of this treadmill are used only by persons weighing 250 pounds or less. 8. TABLE OF ...
IMPORTANT PRECAUTIONS WARNING: To reduce the risk of carrying 15 or more than one person on page 8. It is the responsibility of this manual. Never allow more amps. Do not wear loose clothes that all warnings and precautions. 2. Never use an extension cord. 11. To purchase a surge...feet on the walking belt. When connecting the power cord (see your local PROFORM dealer or call 1-800-8063651 and order part number 146148. 12. Do not use the treadmill with at least eight feet of this treadmill are used only by persons weighing 250 pounds or less. 8. TABLE OF ...
User Manual
Page 3
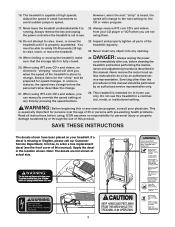
...THESE INSTRUCTIONS The decals shown have been placed on your physician. If a decal is properly assembled. The treadmill is about to order a free replacement decal (see the front cover of this manual should be prepared for the "chirp" and be performed by pressing the speed buttons. 23. Always remove... However, when the next "chirp" is heard, the speed will alert you when the speed of the treadmill is capable of this manual. When using them. 18. vice representative. This treadmill is not in small increments to do so by or through the use only. Apply the decal in -home...
...THESE INSTRUCTIONS The decals shown have been placed on your physician. If a decal is properly assembled. The treadmill is about to order a free replacement decal (see the front cover of this manual should be prepared for the "chirp" and be performed by pressing the speed buttons. 23. Always remove... However, when the next "chirp" is heard, the speed will alert you when the speed of the treadmill is capable of this manual. When using them. 18. vice representative. This treadmill is not in small increments to do so by or through the use only. Apply the decal in -home...
User Manual
Page 4
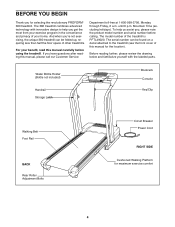
...(excluding holidays). The serial number can be found on a decal attached to help us assist you for selecting the revolutionary PROFORM® 380 treadmill. Water Bottle Holder (Bottle not included) Handrail Storage Latch Bookrack Console Key/Clip Walking Belt Foot Rail BACK Rear Roller .... BEFORE YOU BEGIN Thank you , please note the product model number and serial number before using the treadmill. For your home. And when you have questions after reading this manual, please call our Customer Service Department toll-free at 1-800-999-3756, Monday through Friday, 6 a.m....
...(excluding holidays). The serial number can be found on a decal attached to help us assist you for selecting the revolutionary PROFORM® 380 treadmill. Water Bottle Holder (Bottle not included) Handrail Storage Latch Bookrack Console Key/Clip Walking Belt Foot Rail BACK Rear Roller .... BEFORE YOU BEGIN Thank you , please note the product model number and serial number before using the treadmill. For your home. And when you have questions after reading this manual, please call our Customer Service Department toll-free at 1-800-999-3756, Monday through Friday, 6 a.m....
User Manual
Page 5
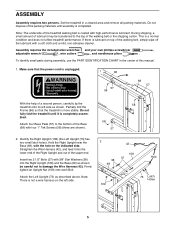
... side. During shipping, a small amount of lubricant may be careful not to damage the Wire Harness (42). Do not fully fold the treadmill until assembly is lubricant on the left side as described above. Firmly tighten an Upright Nut (109) onto each Bolt. Assembly requires the ...allen wrenches and your own phillips screwdriver , adjustable wrench , wire cutters , and needlenose pliers . Attach four Base Pads (57) to the top of this manual. 1. Identify the Right Upright (108) (the Left Upright [73] has two small latch holes). Note: The underside of the Base (69) with ...
... side. During shipping, a small amount of lubricant may be careful not to damage the Wire Harness (42). Do not fully fold the treadmill until assembly is lubricant on the left side as described above. Firmly tighten an Upright Nut (109) onto each Bolt. Assembly requires the ...allen wrenches and your own phillips screwdriver , adjustable wrench , wire cutters , and needlenose pliers . Attach four Base Pads (57) to the top of this manual. 1. Identify the Right Upright (108) (the Left Upright [73] has two small latch holes). Note: The underside of the Base (69) with ...
User Manual
Page 9
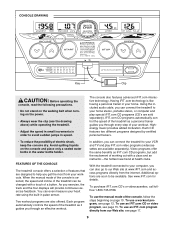
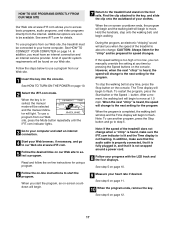
...the hottest new trend at www.iFIT.com and access programs directly from your workout. FEATURES OF THE CONSOLE The treadmill console offers a selection of your workouts. When the manual mode of the console is like having a personal trainer in pulse sensor. To use a workout program, see... page 12. With the treadmill connected to your home. Each program automatically controls the speed of a button. Avoid spilling liquids on...
...the hottest new trend at www.iFIT.com and access programs directly from your workout. FEATURES OF THE CONSOLE The treadmill console offers a selection of your workouts. When the manual mode of the console is like having a personal trainer in pulse sensor. To use a workout program, see... page 12. With the treadmill connected to your home. Each program automatically controls the speed of a button. Avoid spilling liquids on...
User Manual
Page 10
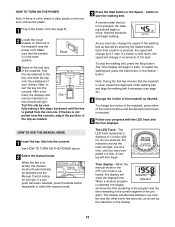
...Reset 3 Stand on the front of the treadmill near the power cord. Next, in the display. 10 When the key is held down, the speed will change in increments of 0.5 mph. If a program has been selected, press the Mode button repeatedly to select the manual mode. 3 Press the Start button or the... segment of 1/4 mile (400 m). See HOW TO TURN ON THE POWER above. 2 Select the manual mode. To stop the walking belt, press the Stop button. The Time display will light. Make sure that the treadmill is pulled from the console, adjust the position of your progress with the LED track and...
...Reset 3 Stand on the front of the treadmill near the power cord. Next, in the display. 10 When the key is held down, the speed will change in increments of 0.5 mph. If a program has been selected, press the Mode button repeatedly to select the manual mode. 3 Press the Start button or the... segment of 1/4 mile (400 m). See HOW TO TURN ON THE POWER above. 2 Select the manual mode. To stop the walking belt, press the Stop button. The Time display will light. Make sure that the treadmill is pulled from the console, adjust the position of your progress with the LED track and...
User Manual
Page 12
...Mode button repeatedly until no time remains in the first period of the program, a series of different lengths. Each program is pressed, the treadmill will automatically adjust to the first speed setting for consecutive periods.) When only three seconds remain in the Time display. One speed setting is ...to change during the workout programs. 3 Press the Start button or the Speed L button to start the program. If the speed of the treadmill can manually override the setting by pressing the Speed buttons on the console. To end the program, press the Stop button, remove the key, and ...
...Mode button repeatedly until no time remains in the first period of the program, a series of different lengths. Each program is pressed, the treadmill will automatically adjust to the first speed setting for consecutive periods.) When only three seconds remain in the Time display. One speed setting is ...to change during the workout programs. 3 Press the Start button or the Speed L button to start the program. If the speed of the treadmill can manually override the setting by pressing the Speed buttons on the console. To end the program, press the Stop button, remove the key, and ...
User Manual
Page 15
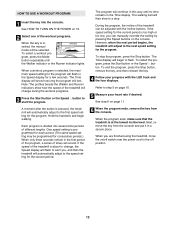
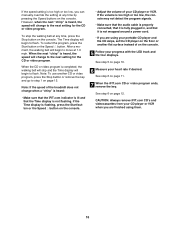
... changes. A ANT. IN VIDEO AUDIO IN CH 34 OUT RF OUT AUDIO OUT RIGHT LEFT Adapter Audio Cable B. Plug one end of the treadmill is inserted, the manual mode will alert you through your workout. Note: If the Time display is being used, see HOW TO CONNECT YOUR HOME STEREO on your... the wire into your CD player. If your VCR is currently plugged into the AUDIO OUT jack on the console. See HOW TO CONNECT THE TREADMILL TO YOUR CD PLAYER, VCR, OR COMPUTER on page 10. 2 Select the iFIT.com mode. Simply follow your personal trainer's instructions. A. Note: To purchase ...
... changes. A ANT. IN VIDEO AUDIO IN CH 34 OUT RF OUT AUDIO OUT RIGHT LEFT Adapter Audio Cable B. Plug one end of the treadmill is inserted, the manual mode will alert you through your workout. Note: If the Time display is being used, see HOW TO CONNECT YOUR HOME STEREO on your... the wire into your CD player. If your VCR is currently plugged into the AUDIO OUT jack on the console. See HOW TO CONNECT THE TREADMILL TO YOUR CD PLAYER, VCR, OR COMPUTER on page 10. 2 Select the iFIT.com mode. Simply follow your personal trainer's instructions. A. Note: To purchase ...
User Manual
Page 16
... video program. However, when the next "chirp" is completed, the walking belt will stop the walking belt at 1.0 mph. Note: If the speed of the treadmill does not change when a "chirp" is heard: • Make sure that the iFIT.com indicator is lit and that it is too high or too... low, you can manually override the setting at any time, press the Stop button on the console. 5 Follow your CD player or VCR. When the next "chirp" is not...
... video program. However, when the next "chirp" is completed, the walking belt will stop the walking belt at 1.0 mph. Note: If the speed of the treadmill does not change when a "chirp" is heard: • Make sure that the iFIT.com indicator is lit and that it is too high or too... low, you can manually override the setting at any time, press the Stop button on the console. 5 Follow your CD player or VCR. When the next "chirp" is not...
User Manual
Page 17
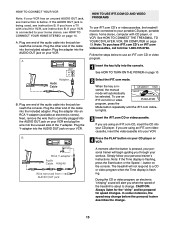
... cord. 8 Follow your progress with the LED track and the four displays. During the program, an electronic "chirping" sound will begin . 7 Return to the treadmill and stand on our Web site to access basic programs, audio programs, and video programs directly from our Web site. 1 Insert the key into the...the console. Find the clip attached to the key, and slide the clip onto the waistband of specific system requirements will be selected and the manual indicator will begin to move at www.iFIT.com allows you to select a program. Hold the handrails, step onto the walking belt, and ...
... cord. 8 Follow your progress with the LED track and the four displays. During the program, an electronic "chirping" sound will begin . 7 Return to the treadmill and stand on our Web site to access basic programs, audio programs, and video programs directly from our Web site. 1 Insert the key into the...the console. Find the clip attached to the key, and slide the clip onto the waistband of specific system requirements will be selected and the manual indicator will begin to move at www.iFIT.com allows you to select a program. Hold the handrails, step onto the walking belt, and ...

User Manual
Page 24
...information: • The MODEL NUMBER OF THE PRODUCT (PFTL49020) • The NAME OF THE PRODUCT (PROFORM® 380 treadmill) • The SERIAL NUMBER OF THE PRODUCT (see the front cover of this manual) • The KEY NUMBER AND DESCRIPTION OF THE PART(S) (see the EXPLODED DRAWING and PART LIST ...attached in the center of this manual) LIMITED WARRANTY ICON Health & Fitness, Inc. (ICON), warrants this ...
...information: • The MODEL NUMBER OF THE PRODUCT (PFTL49020) • The NAME OF THE PRODUCT (PROFORM® 380 treadmill) • The SERIAL NUMBER OF THE PRODUCT (see the front cover of this manual) • The KEY NUMBER AND DESCRIPTION OF THE PART(S) (see the EXPLODED DRAWING and PART LIST ...attached in the center of this manual) LIMITED WARRANTY ICON Health & Fitness, Inc. (ICON), warrants this ...

