
English Manual
Page 3
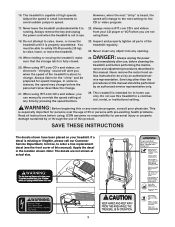
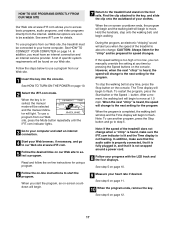
...of this manual). Note: The decals are not the power cord when the treadmill is about to raise, lower, or move the treadmill. 19. Always remove the key and unplug from your physician. When folding or moving the treadmill, make sure that the storage latch is 22. Always listen for the "chirp..." and be prepared for persons over the age of the treadmill is not in speed. DANGER:...
...of this manual). Note: The decals are not the power cord when the treadmill is about to raise, lower, or move the treadmill. 19. Always remove the key and unplug from your physician. When folding or moving the treadmill, make sure that the storage latch is 22. Always listen for the "chirp..." and be prepared for persons over the age of the treadmill is not in speed. DANGER:...
English Manual
Page 4
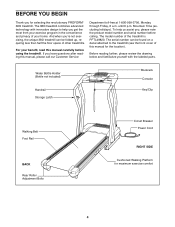
... help you , please note the product model number and serial number before using the treadmill. Water Bottle Holder (Bottle not included) Handrail Storage Latch Bookrack Console Key/Clip Walking Belt Foot Rail BACK Rear Roller Adjustment Bolts Circuit Breaker Power Cord RIGHT ...SIDE Cushioned Walking Platform for maximum exercise comfort 4 And when you for selecting the revolutionary PROFORM® 380i treadmill. For your home. BEFORE YOU...
... help you , please note the product model number and serial number before using the treadmill. Water Bottle Holder (Bottle not included) Handrail Storage Latch Bookrack Console Key/Clip Walking Belt Foot Rail BACK Rear Roller Adjustment Bolts Circuit Breaker Power Cord RIGHT ...SIDE Cushioned Walking Platform for maximum exercise comfort 4 And when you for selecting the revolutionary PROFORM® 380i treadmill. For your home. BEFORE YOU...
English Manual
Page 9
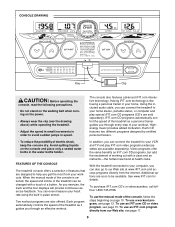
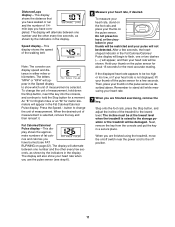
...the most from our Web site, see the drawing above) while operating the treadmill. • Adjust the speed in small increments in order to avoid sudden jumps in the water bottle holder. CONSOLE DRAWING Key Clip CAUTION: Before operating the console, read the following precautions. • Do... not stand on the walking belt when turning on the power. • Always wear the clip (see page 17. 9 FEATURES OF THE CONSOLE The treadmill console offers a selection of...
...the most from our Web site, see the drawing above) while operating the treadmill. • Adjust the speed in small increments in order to avoid sudden jumps in the water bottle holder. CONSOLE DRAWING Key Clip CAUTION: Before operating the console, read the following precautions. • Do... not stand on the walking belt when turning on the power. • Always wear the clip (see page 17. 9 FEATURES OF THE CONSOLE The treadmill console offers a selection of...
English Manual
Page 10
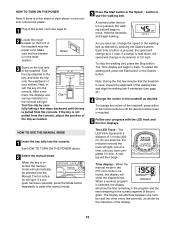
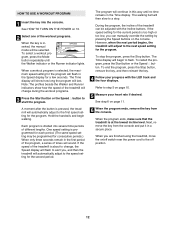
... time. The LED Track-The LED track represents a distance of the treadmill. When a workout program Indicator is selected, the display will begin . Next, in increments of 0.5 mph. HOW TO USE THE MANUAL MODE 1 Insert the key fully into the console. lected, this display will light. When the.... 2 Select the manual mode. The display will change the incline of the treadmill, press either of the Incline buttons until you exercise, the indicators around the track will begin walking. If the key is se- Time display-When the manual mode or the iFIT.com mode is...
... time. The LED Track-The LED track represents a distance of the treadmill. When a workout program Indicator is selected, the display will begin . Next, in increments of 0.5 mph. HOW TO USE THE MANUAL MODE 1 Insert the key fully into the console. lected, this display will light. When the.... 2 Select the manual mode. The display will change the incline of the treadmill, press either of the Incline buttons until you exercise, the indicators around the track will begin walking. If the key is se- Time display-When the manual mode or the iFIT.com mode is...
English Manual
Page 11
...the Fat Calories/Calories/ Pulse display will be shown. Then, place your pulse will appear in the display. To change the unit of the treadmill to change the unit of the walking belt. Press the Speed L button to the lowest level. After a few seconds. If the displayed heart... one number and the other every few seconds, as described above. The display will be at the lowest level when the treadmill is selected, remove the key and then reinsert it. Fat Calories/Calories/ Pulse display-This display shows the approximate numbers of fat calories and calories you ...
...the Fat Calories/Calories/ Pulse display will be shown. Then, place your pulse will appear in the display. To change the unit of the treadmill to change the unit of the walking belt. Press the Speed L button to the lowest level. After a few seconds. If the displayed heart... one number and the other every few seconds, as described above. The display will be at the lowest level when the treadmill is selected, remove the key and then reinsert it. Fat Calories/Calories/ Pulse display-This display shows the approximate numbers of fat calories and calories you ...
English Manual
Page 12
... handrails and begin to the next speed setting for the program will sound. Next, remove the key from the console. See HOW TO TURN ON THE POWER on /off position. 12 When you , and then the treadmill will then slow to the first speed setting for a few seconds. HOW TO USE A WORKOUT... PROGRAM 1 Insert the key into several time periods of the treadmill will adjust to flash. The Time display will show how the speed of different lengths. One speed setting is at the lowest incline level. The ...
... handrails and begin to the next speed setting for the program will sound. Next, remove the key from the console. See HOW TO TURN ON THE POWER on /off position. 12 When you , and then the treadmill will then slow to the first speed setting for a few seconds. HOW TO USE A WORKOUT... PROGRAM 1 Insert the key into several time periods of the treadmill will adjust to flash. The Time display will show how the speed of different lengths. One speed setting is at the lowest incline level. The ...
English Manual
Page 15
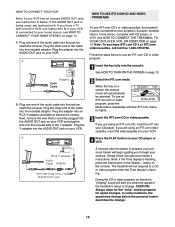
... Adapter Wire removed from AUDIO OUT jack HOW TO USE IFIT.COM CD AND VIDEO PROGRAMS To use iFIT.com CD's or videocassettes, the treadmill must be connected to change . 15 If you are using an iFIT.com videocassette, insert the videocassette into the included adapter. Plug the ... OR COMPUTER on your CD player or VCR. To use an iFIT.com CD or video program. 1 Insert the key fully into an RCA Y-adapter (available at electronics stores). The treadmill will alert you through your workout. CAUTION: Always listen for speed changes. If your VCR is flashing, press the Start...
... Adapter Wire removed from AUDIO OUT jack HOW TO USE IFIT.COM CD AND VIDEO PROGRAMS To use iFIT.com CD's or videocassettes, the treadmill must be connected to change . 15 If you are using an iFIT.com videocassette, insert the videocassette into the included adapter. Plug the ... OR COMPUTER on your CD player or VCR. To use an iFIT.com CD or video program. 1 Insert the key fully into an RCA Y-adapter (available at electronics stores). The treadmill will alert you through your workout. CAUTION: Always listen for speed changes. If your VCR is flashing, press the Start...
English Manual
Page 16
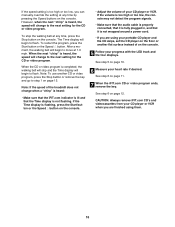
... step 6 on page 12. To restart the program, press the Start button or the Speed L button. Note: If the speed of the treadmill does not change to step 1 on page 15. To stop and the Time display will change when a "chirp" is heard: • ... time by pressing the Speed buttons on the floor or another CD or video program, press the Stop button or remove the key and go to the next setting for the CD or video program. CAUTION: Always remove iFIT.com CD's and videocassettes from...will begin to flash. See step 6 on page 11. 7 When the iFIT.com CD or video program ends, remove the key.
... step 6 on page 12. To restart the program, press the Start button or the Speed L button. Note: If the speed of the treadmill does not change to step 1 on page 15. To stop and the Time display will change when a "chirp" is heard: • ... time by pressing the Speed buttons on the floor or another CD or video program, press the Stop button or remove the key and go to the next setting for the CD or video program. CAUTION: Always remove iFIT.com CD's and videocassettes from...will begin to flash. See step 6 on page 11. 7 When the iFIT.com CD or video program ends, remove the key.
English Manual
Page 17
...the program. The Time display will alert you when the speed of the treadmill does not change . See step 6 on page 11. 10 When the program ends, remove the key. To use programs from our Web site. 1 Insert the key into the console. During the program, an electronic "chirping" sound will... mode. When you start an internet connection. 4 Start your heart rate if desired. After a moment, the walking belt will begin to the treadmill and stand on -screen countdown ends, the program will begin and the walking belt will begin to select a program. CAUTION: Always listen for ...
...the program. The Time display will alert you when the speed of the treadmill does not change . See step 6 on page 11. 10 When the program ends, remove the key. To use programs from our Web site. 1 Insert the key into the console. During the program, an electronic "chirping" sound will... mode. When you start an internet connection. 4 Start your heart rate if desired. After a moment, the walking belt will begin to the treadmill and stand on -screen countdown ends, the program will begin and the walking belt will begin to select a program. CAUTION: Always listen for ...
English Manual
Page 20
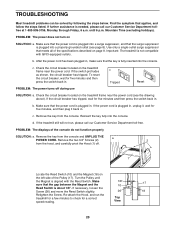
...The displays of the specifications described on page 8. Remove the key from the console. If necessary, loosen the Screw (26) and move the Reed Switch slightly. 26 18 Retighten the Screw. PROBLEM: The power does not turn on the treadmill frame near the power cord (see page 8). Important: The... through Friday, 6 a.m. If the power cord is aligned with GFCI-equipped outlets. Remove the key from the console and UNPLUG THE POWER CORD. d. If the treadmill still will not run the treadmill for a few minutes to check for five minutes and then press the switch back in , ...
...The displays of the specifications described on page 8. Remove the key from the console. If necessary, loosen the Screw (26) and move the Reed Switch slightly. 26 18 Retighten the Screw. PROBLEM: The power does not turn on the treadmill frame near the power cord (see page 8). Important: The... through Friday, 6 a.m. If the power cord is aligned with GFCI-equipped outlets. Remove the key from the console and UNPLUG THE POWER CORD. d. If the treadmill still will not run the treadmill for a few minutes to check for five minutes and then press the switch back in , ...
English Manual
Page 21
...to 3 inches off the walking platform. Plug in the power cord, insert the key, and run the treadmill for a few minutes. Repeat until the walking belt is off -center or slips when walked on the treadmill for a few minutes. Using b the allen wrench, turn the bolt counterclockwise 1/2 ... a turn ; Plug in the power cord, insert the key, and run the treadmill for a few minutes. Using the allen wrench, turn both rear roller bolts clockwise, 1/4 of a turn . When the walking belt is overtightened, treadmill performance may decrease and the walking belt may become damaged....
...to 3 inches off the walking platform. Plug in the power cord, insert the key, and run the treadmill for a few minutes. Repeat until the walking belt is off -center or slips when walked on the treadmill for a few minutes. Using b the allen wrench, turn the bolt counterclockwise 1/2 ... a turn ; Plug in the power cord, insert the key, and run the treadmill for a few minutes. Using the allen wrench, turn both rear roller bolts clockwise, 1/4 of a turn . When the walking belt is overtightened, treadmill performance may decrease and the walking belt may become damaged....

English Manual
Page 22
...the higher number is intended only as an exercise aid in determining heart rate trends in your training zone. A Cool-down . The key to success is to cool down -Finish each week if desired. CONDITIONING GUIDELINES WARNING: Before beginning this or any exercise program, consult your...incline of stretching and light exercise. Fat Burning To burn fat effectively, you exercise-never hold your body begin to 10 minutes of the treadmill until your training zone. After a few minutes does your breath. Various factors, including your exercise program. The proper intensity level can ...
...the higher number is intended only as an exercise aid in determining heart rate trends in your training zone. A Cool-down . The key to success is to cool down -Finish each week if desired. CONDITIONING GUIDELINES WARNING: Before beginning this or any exercise program, consult your...incline of stretching and light exercise. Fat Burning To burn fat effectively, you exercise-never hold your body begin to 10 minutes of the treadmill until your training zone. After a few minutes does your breath. Various factors, including your exercise program. The proper intensity level can ...
English Manual
Page 24
... following information: • The MODEL NUMBER OF THE PRODUCT (PFTL49820) • The NAME OF THE PRODUCT (PROFORM® 380i treadmill) • The SERIAL NUMBER OF THE PRODUCT (see the front cover of this manual) • The KEY NUMBER AND DESCRIPTION OF THE PART(S) (see the EXPLODED DRAWING and PART LIST attached in the...
... following information: • The MODEL NUMBER OF THE PRODUCT (PFTL49820) • The NAME OF THE PRODUCT (PROFORM® 380i treadmill) • The SERIAL NUMBER OF THE PRODUCT (see the front cover of this manual) • The KEY NUMBER AND DESCRIPTION OF THE PART(S) (see the EXPLODED DRAWING and PART LIST attached in the...

English Manual
Page 26
Qty. Qty. Qty. PART LIST-Model No. PFTL49820 R1102A Key No. Description Key No. Description Key No. Description 1 1 Hood 42 1 Wire Harness 85 2 Isolator Cushion 2 15 3/4" Screw 43 1 Console 86 1 Frame 3 1 Motor Belt 44 1 Wire Cover 87 4 Releasable ...Washer 47 1 Console Base 90 1 Ground Wire 7 1 Flywheel 48 2 5/16" Washer 91 1 Right Rear 8 1 Motor 49 3 1/2" Silver Screw Endcap Pad 9* 1 Motor Assembly 50 1 Key/Clip 92 2 Rear Roller 10 1 Reed Switch 51 1 Incline Motor Adjustable Bolt 11 1 Latch Warning Decal 52 1 Incline Bracket 93 1 Right Rear Endcap 12 2 Frame...
Qty. Qty. Qty. PART LIST-Model No. PFTL49820 R1102A Key No. Description Key No. Description Key No. Description 1 1 Hood 42 1 Wire Harness 85 2 Isolator Cushion 2 15 3/4" Screw 43 1 Console 86 1 Frame 3 1 Motor Belt 44 1 Wire Cover 87 4 Releasable ...Washer 47 1 Console Base 90 1 Ground Wire 7 1 Flywheel 48 2 5/16" Washer 91 1 Right Rear 8 1 Motor 49 3 1/2" Silver Screw Endcap Pad 9* 1 Motor Assembly 50 1 Key/Clip 92 2 Rear Roller 10 1 Reed Switch 51 1 Incline Motor Adjustable Bolt 11 1 Latch Warning Decal 52 1 Incline Bracket 93 1 Right Rear Endcap 12 2 Frame...


