

English Manual
Page 1
... DIRECT TO OUR TOLL-FREE CUSTOMER HOT LINE. A CAUTION: Read all precautions and instructions in this manual carefully before using this manual for future reference. --L--driir:W i I -1 OWNER'S MANUAL satisfaction through ssi tance from our-le-Cory. CUSTOMER HOT LINE: 1-800-999-3756 MST Mon.-Fri., 6 a.m.-6 p.m. Serial Number Decal QUESTIONS? If you complete _------ Save this equipment. PRO•FORM • 0 - 8 MPH ' 1.S HP AUTO INCLINE Model...
... DIRECT TO OUR TOLL-FREE CUSTOMER HOT LINE. A CAUTION: Read all precautions and instructions in this manual carefully before using this manual for future reference. --L--driir:W i I -1 OWNER'S MANUAL satisfaction through ssi tance from our-le-Cory. CUSTOMER HOT LINE: 1-800-999-3756 MST Mon.-Fri., 6 a.m.-6 p.m. Serial Number Decal QUESTIONS? If you complete _------ Save this equipment. PRO•FORM • 0 - 8 MPH ' 1.S HP AUTO INCLINE Model...

English Manual
Page 2
... STATES DO NOT ALLOW LIMITATIONS ON HOW LONG AN IMPLIED WARRANTY LASTS. LIMITED WARRANTY ICON Health & Fitness, Inc. (ICON"), warrants this warranty is limited to freight damage, abuse, misuse, improper or abnormal usage or repairs not provided by an ICON authorized service center or for products used for commercial or rental purposes. This warranty extends only to the original purchaser. This warranty gives you specific legal rights.
... STATES DO NOT ALLOW LIMITATIONS ON HOW LONG AN IMPLIED WARRANTY LASTS. LIMITED WARRANTY ICON Health & Fitness, Inc. (ICON"), warrants this warranty is limited to freight damage, abuse, misuse, improper or abnormal usage or repairs not provided by an ICON authorized service center or for products used for commercial or rental purposes. This warranty extends only to the original purchaser. This warranty gives you specific legal rights.

English Manual
Page 3
... damage sustained by or through the use of 35 or persons with pre-existing health problems. Read all instructions before using. PRO•FORM e vos...**24 0-8 MPH wY 1.5 HP ' AUTO INCLINE TABLE OF CONTENTS IMPORTANT PRECAUTIONS BEFORE YOU BEGIN ASSEMBLY OPERATION AND ADJUSTMENT TROUBLE-SHOOTING AND STORAGE CONDITIONING GUIDELINES PART LIST EXPLODED DRAWING ORDERING REPLACEMENT PARTS 4 5 6 7 10 12 14 15 Back Cover A WARNING . Before beginning this product...
... damage sustained by or through the use of 35 or persons with pre-existing health problems. Read all instructions before using. PRO•FORM e vos...**24 0-8 MPH wY 1.5 HP ' AUTO INCLINE TABLE OF CONTENTS IMPORTANT PRECAUTIONS BEFORE YOU BEGIN ASSEMBLY OPERATION AND ADJUSTMENT TROUBLE-SHOOTING AND STORAGE CONDITIONING GUIDELINES PART LIST EXPLODED DRAWING ORDERING REPLACEMENT PARTS 4 5 6 7 10 12 14 15 Back Cover A WARNING . Before beginning this product...

English Manual
Page 4
... power cord (see PLUGGING iN THE POWER CORD on the walking belt. Never move the walking belt while the power is not a medical device. The pulse earclip is turned off when the treadmill is intended only as described in this manual. 14. The treadmill should not be on a level surface, with at all times. 9. Always turn the power off . Never remove the safety cover unless instructed to avoid sudden jumps in speed...
... power cord (see PLUGGING iN THE POWER CORD on the walking belt. Never move the walking belt while the power is not a medical device. The pulse earclip is turned off when the treadmill is intended only as described in this manual. 14. The treadmill should not be on a level surface, with at all times. 9. Always turn the power off . Never remove the safety cover unless instructed to avoid sudden jumps in speed...

English Manual
Page 5
... model number and serial number before using the treadmill. Before reading further, please review the drawing below and familiarize yourself with innovative design to the treadmill (see the front cover of the treadmill is PFTL08040. Console Pulse Earclip '12 Handrail Speed Control Knob 1°v IWWI Safety Key/Clip Foot Incline Knob Foot Rails Walking Belt BACK Rear Roller Adjustment Bolts Cushion Foot Uprights FRONT Power Cord (4111111110, Circuit Breaker RIGHT SIDE 5 until 6 p.m. Mountain Time (excluding holidays). The PROFORM 365 treadmill...
... model number and serial number before using the treadmill. Before reading further, please review the drawing below and familiarize yourself with innovative design to the treadmill (see the front cover of the treadmill is PFTL08040. Console Pulse Earclip '12 Handrail Speed Control Knob 1°v IWWI Safety Key/Clip Foot Incline Knob Foot Rails Walking Belt BACK Rear Roller Adjustment Bolts Cushion Foot Uprights FRONT Power Cord (4111111110, Circuit Breaker RIGHT SIDE 5 until 6 p.m. Mountain Time (excluding holidays). The PROFORM 365 treadmill...

English Manual
Page 6
... 3 Wrench Clip onto the Frame (37) in the indicated location. Set the treadmill in a cleared area and remove all parts are tightened before using the treadmill. TOOLS REQUIRED FOR ASSEMBLY: The Included 7/32" alien wrench , and your own adjustable wrench v :; :::7) 1. ASSEMBLY The help of a second person is explained in the MOTIVATIONAL FITNESS MONITOR section on the left side in the same manner (not...
... 3 Wrench Clip onto the Frame (37) in the indicated location. Set the treadmill in a cleared area and remove all parts are tightened before using the treadmill. TOOLS REQUIRED FOR ASSEMBLY: The Included 7/32" alien wrench , and your own adjustable wrench v :; :::7) 1. ASSEMBLY The help of a second person is explained in the MOTIVATIONAL FITNESS MONITOR section on the left side in the same manner (not...

English Manual
Page 7
... the treadmill is used to connect this plug to a 2pole receptacle as a properly grounded outlet box cover. Plug the power cord into an appropriate outlet that looks like the adapter illustrated in Drawing 2 may be used it must be held in a risk of the walking belt and spray lubricant generously onto the indicated area. DANGER: Improper connection of the equipment-grounding conductor can be installed...
... the treadmill is used to connect this plug to a 2pole receptacle as a properly grounded outlet box cover. Plug the power cord into an appropriate outlet that looks like the adapter illustrated in Drawing 2 may be used it must be held in a risk of the walking belt and spray lubricant generously onto the indicated area. DANGER: Improper connection of the equipment-grounding conductor can be installed...
English Manual
Page 8
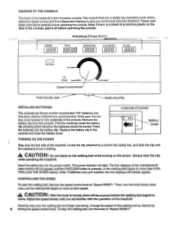
...the markings inside the battery clip showing which direction the batteries should be turned. The console features a safety key-operated power switch, electronic speed control and five independent displays to give you continuous exercise feedback. Remove the battery clip from the console. Underside of Console Speed • 0 POWER Sp...I RESET • Speed Control Knob • Max. Speed Pulse Earclip Jack Safety Key/Clip INSTALLING BATTERIES The motivational fitness monitor requires two "AA" batteries (not included); Slide open the battery cover located on the face of...
...the markings inside the battery clip showing which direction the batteries should be turned. The console features a safety key-operated power switch, electronic speed control and five independent displays to give you continuous exercise feedback. Remove the battery clip from the console. Underside of Console Speed • 0 POWER Sp...I RESET • Speed Control Knob • Max. Speed Pulse Earclip Jack Safety Key/Clip INSTALLING BATTERIES The motivational fitness monitor requires two "AA" batteries (not included); Slide open the battery cover located on the face of...

English Manual
Page 9
... using the foot incline knob on . DISTANCE-This display shows the total distance that you have burned. Slide the metal clothes clip on the console, and attach the earclip to stand still while measuring your heart rate. Using your left foot towards the front of the motivational fitness monitor provide continuous exercise feedback. Foot Incline Knob To increase the incline, stand with your heart rate. Plug the pulse earclip into a pause mode...
... using the foot incline knob on . DISTANCE-This display shows the total distance that you have burned. Slide the metal clothes clip on the console, and attach the earclip to stand still while measuring your heart rate. Using your left foot towards the front of the motivational fitness monitor provide continuous exercise feedback. Foot Incline Knob To increase the incline, stand with your heart rate. Plug the pulse earclip into a pause mode...
English Manual
Page 10
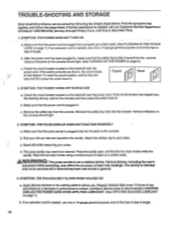
... breaker located on page 7.) b. If the switch protrudes as an exercise aid in determining heart rate trends in , make sure that the pulse earclip is fully inserted into a properly grounded outlet. (See PLUGGING IN THE POWER CORD on the treadmill near the power cord. Remove the safety key from the console. Make sure that the safety key is plugged fully into the console. Rub your pulse. The earclip is needed , use...
... breaker located on page 7.) b. If the switch protrudes as an exercise aid in determining heart rate trends in , make sure that the pulse earclip is fully inserted into a properly grounded outlet. (See PLUGGING IN THE POWER CORD on the treadmill near the power cord. Remove the safety key from the console. Make sure that the safety key is plugged fully into the console. Rub your pulse. The earclip is needed , use...

English Manual
Page 11
..., first remove the safety key and UNPLUG THE POWER CORD. Carefully lower the uprights. walking belt centered. If the walking belt is properly tightened. Plug in the power cord, insert the safety key and run the treadmill for a few minutes. Be careful not to overtighten the walking belt. Using the allen wrench, turn both rear roller adjustment bolts clockwise, 1/4 of the walking belt 3-4 inches off the walking platform. Plug in the power cord, insert the safety key and run the treadmill for...
..., first remove the safety key and UNPLUG THE POWER CORD. Carefully lower the uprights. walking belt centered. If the walking belt is properly tightened. Plug in the power cord, insert the safety key and run the treadmill for a few minutes. Be careful not to overtighten the walking belt. Using the allen wrench, turn both rear roller adjustment bolts clockwise, 1/4 of the walking belt 3-4 inches off the walking platform. Plug in the power cord, insert the safety key and run the treadmill for...

English Manual
Page 12
... individuals with pre-existing health problems. EXERCISE INTENSITY To maximize the benefits of exercising, it is too low, increase the intensity of your exercise to raise your heart rate to your training zone for exercise by using the pulse mode of your exercise. The proper intensity level can measure your heart rate using your heart rate as a guide. This will help to 30 minutes. The key to success is important...
... individuals with pre-existing health problems. EXERCISE INTENSITY To maximize the benefits of exercising, it is too low, increase the intensity of your exercise to raise your heart rate to your training zone for exercise by using the pulse mode of your exercise. The proper intensity level can measure your heart rate using your heart rate as a guide. This will help to 30 minutes. The key to success is important...
English Manual
Page 13
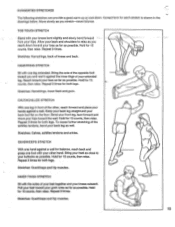
...Move slowly as possible. Hold for both legs. Stretches: Hamstrings, lower back and groin. Repeat 3 times for 15 counts, then relax. Vio INNER THIGH STRETCH Sit with your knees bent slightly and slowly bend forward from your hips. Repeat 3 times. Stretches: Quadriceps and hip muscles. 13 Stretches: Hamstrings, back of your extended leg...leg straight and your hips toward the wall. To cause further stretching of the achilles tendons, bend your back leg...one foot with one leg in the drawings below...leg, lean forward and move your back foot flat on the floor. CALF/ACHILLES STRETCH ...
...Move slowly as possible. Hold for both legs. Stretches: Hamstrings, lower back and groin. Repeat 3 times for 15 counts, then relax. Vio INNER THIGH STRETCH Sit with your knees bent slightly and slowly bend forward from your hips. Repeat 3 times. Stretches: Quadriceps and hip muscles. 13 Stretches: Hamstrings, back of your extended leg...leg straight and your hips toward the wall. To cause further stretching of the achilles tendons, bend your back leg...one foot with one leg in the drawings below...leg, lean forward and move your back foot flat on the floor. CALF/ACHILLES STRETCH ...

English Manual
Page 14
... Front Roller/Pulley Right Upright Front Roller Adjustment Bolt Roller Adjustment Washer Front Right Endcap Right Foot Rail Black Flat Washer Upright Washer 3/8' x 3 1/4" Bolt Small Screw Motor Bolt Electronics Bracket Screw Belt Guide 12" Cable Loom Motor Belt Flat Washer Safety Cover Screw Front Safety Cover Rear Safety Cover Walking Belt Incline Knob Sleeve Frame Pulley/Flywheel/Fan Reed Switch/Sensor Wire Reed Switch Extension Wire Incline Leg Long Wire Clip Wheel Nut/Cushion Foot Nut Controller Short Wire Clip Grommet Circuit Breaker Horse Shoe Wire Clip Power Cord Front Wheel Bolt Front...
... Front Roller/Pulley Right Upright Front Roller Adjustment Bolt Roller Adjustment Washer Front Right Endcap Right Foot Rail Black Flat Washer Upright Washer 3/8' x 3 1/4" Bolt Small Screw Motor Bolt Electronics Bracket Screw Belt Guide 12" Cable Loom Motor Belt Flat Washer Safety Cover Screw Front Safety Cover Rear Safety Cover Walking Belt Incline Knob Sleeve Frame Pulley/Flywheel/Fan Reed Switch/Sensor Wire Reed Switch Extension Wire Incline Leg Long Wire Clip Wheel Nut/Cushion Foot Nut Controller Short Wire Clip Grommet Circuit Breaker Horse Shoe Wire Clip Power Cord Front Wheel Bolt Front...
English Manual
Page 16
... to give the following information: • The MODEL NUMBER of this manual). Part No. 120671 R395A Printed in USA 1995 ICON Health & Fitness, Inc. The NAME of the product (PROFORM® 365 treadrhill). • The SERIAL NUMBER of the product (see the front cover of this manual). • The KEY NUMBER of the part(s) (see page 14 of this manual). • The DESCRIPTION of the part(s) (see page 14...
... to give the following information: • The MODEL NUMBER of this manual). Part No. 120671 R395A Printed in USA 1995 ICON Health & Fitness, Inc. The NAME of the product (PROFORM® 365 treadrhill). • The SERIAL NUMBER of the product (see the front cover of this manual). • The KEY NUMBER of the part(s) (see page 14 of this manual). • The DESCRIPTION of the part(s) (see page 14...

