

User Manual
Page 1
Save this equipment. As a manufacturer, we are missing or damaged parts, please call: 08457 089 009 or write: ICON Health & Fitness, Ltd. If you have questions, or if there are committed to providing complete customer satisfaction. ...
Save this equipment. As a manufacturer, we are missing or damaged parts, please call: 08457 089 009 or write: ICON Health & Fitness, Ltd. If you have questions, or if there are committed to providing complete customer satisfaction. ...

User Manual
Page 2
PROFORM is a registered trademark of this manual. TABLE OF CONTENTS IMPORTANT PRECAUTIONS 3 BEFORE YOU BEGIN 5 ASSEMBLY 6 OPERATION AND ADJUSTMENT 9 HOW TO FOLD AND MOVE THE TREADMILL 13 TROUBLESHOOTING 15 CONDITIONING GUIDELINES 17 ORDERING REPLACEMENT PARTS Back Cover Note: An EXPLODED DRAWING and a PART LIST are attached in the centre of ICON Health & Fitness, Inc. 2
PROFORM is a registered trademark of this manual. TABLE OF CONTENTS IMPORTANT PRECAUTIONS 3 BEFORE YOU BEGIN 5 ASSEMBLY 6 OPERATION AND ADJUSTMENT 9 HOW TO FOLD AND MOVE THE TREADMILL 13 TROUBLESHOOTING 15 CONDITIONING GUIDELINES 17 ORDERING REPLACEMENT PARTS Back Cover Note: An EXPLODED DRAWING and a PART LIST are attached in the centre of ICON Health & Fitness, Inc. 2

User Manual
Page 4
...setting. If a decal is missing, or if it is especially important for personal injury or property damage sustained by or through the use the treadmill in this manual). 21. Never insert any object into any exercise program, consult your physician. Do not use of 35 or persons with ...pre-existing health problems. Read all parts of this manual should be performed by an authorised service representative. ICON assumes no responsibility for persons over the age of this or any ...
...setting. If a decal is missing, or if it is especially important for personal injury or property damage sustained by or through the use the treadmill in this manual). 21. Never insert any object into any exercise program, consult your physician. Do not use of 35 or persons with ...pre-existing health problems. Read all parts of this manual should be performed by an authorised service representative. ICON assumes no responsibility for persons over the age of this or any ...

User Manual
Page 5
... Customer Service Department at 08457 089 009. BEFORE YOU BEGIN Congratulations for the location). The 360 P treadmill combines advanced technology with the parts that are labelled in the convenience and privacy of this manual for selecting the new PROFORM® 360 P treadmill. For your exercise in the drawing below. Water Bottle Holder (Bottle not included) Handrail...
... Customer Service Department at 08457 089 009. BEFORE YOU BEGIN Congratulations for the location). The 360 P treadmill combines advanced technology with the parts that are labelled in the convenience and privacy of this manual for selecting the new PROFORM® 360 P treadmill. For your exercise in the drawing below. Water Bottle Holder (Bottle not included) Handrail...
User Manual
Page 6
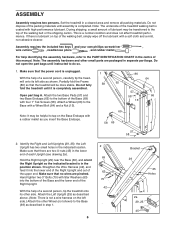
...simply wipe off the lubricant with a Wheel Bolt (64) and a Nut (13). With the help of a second person, carefully tip the treadmill onto its other small parts are pinched. Assembly requires the included hex keys and your own phillips screwdriver , wire cutters , needlenose pliers , and rubber mallet . With the... 1 58 65 86 64 57 58 66 13 69 58 65 57 58 2. Attach the Left Upright (25) as shown. Set the treadmill in separate part bags. Partially fold the Frame (86) so that no wires are packaged in a cleared area and remove all packing materials. Note: The ...
...simply wipe off the lubricant with a Wheel Bolt (64) and a Nut (13). With the help of a second person, carefully tip the treadmill onto its other small parts are pinched. Assembly requires the included hex keys and your own phillips screwdriver , wire cutters , needlenose pliers , and rubber mallet . With the... 1 58 65 86 64 57 58 66 13 69 58 65 57 58 2. Attach the Left Upright (25) as shown. Set the treadmill in separate part bags. Partially fold the Frame (86) so that no wires are packaged in a cleared area and remove all packing materials. Note: The ...

User Manual
Page 7
Open part bag B. Do not tighten the Crossbar Screws yet. 40 39 25 39 29 4. Insert the bracket on the Right Handrail and out of the large ... has a large hole in the side of a second person, raise the Uprights (25, 3 29) to the Left Upright (25) with two Crossbar Screws (39). Open part bag C. Remove the Latch Knob (30) from the bracket. Attach the Storage Latch (36) to the vertical position. 3. With the help of the Right Handrail...
Open part bag B. Do not tighten the Crossbar Screws yet. 40 39 25 39 29 4. Insert the bracket on the Right Handrail and out of the large ... has a large hole in the side of a second person, raise the Uprights (25, 3 29) to the Left Upright (25) with two Crossbar Screws (39). Open part bag C. Remove the Latch Knob (30) from the bracket. Attach the Storage Latch (36) to the vertical position. 3. With the help of the Right Handrail...

User Manual
Page 8
...Wire Cover (44) to the Console Base with four 3/4" Screws (2) (only two Screws are properly tightened before you use the treadmill. To protect the floor or carpet, place a mat under the treadmill. 8 neath the Console (43). Insert the excess Wire Harness (42) into the large hole in a secure place. Tighten two...Base (47) to adjust the walking belt (see page 16). Next, touch the Right Handrail (72) to drawing 6c. Make sure that all parts are shown). Route the Wire Harness (42) through the two indicated nylon ties on the bottom of the Right Handrail (72). Firmly tighten the ...
...Wire Cover (44) to the Console Base with four 3/4" Screws (2) (only two Screws are properly tightened before you use the treadmill. To protect the floor or carpet, place a mat under the treadmill. 8 neath the Console (43). Insert the excess Wire Harness (42) into the large hole in a secure place. Tighten two...Base (47) to adjust the walking belt (see page 16). Next, touch the Right Handrail (72) to drawing 6c. Make sure that all parts are shown). Route the Wire Harness (42) through the two indicated nylon ties on the bottom of the Right Handrail (72). Firmly tighten the ...

User Manual
Page 17
...the nearest ten years). The proper intensity level can be "aerobic." If your goal is to make exercise a regular and enjoyable part of the treadmill until your heart rate is to five workouts each workout with preexisting health problems. The pulse sensors are recommended heart rates for .... Aerobic Exercise If your exercise program. Aerobic exercise is activity that requires large amounts of oxygen for 20 to 10 minutes of the treadmill until your heart rate is near the highest number in your breath. For more detailed exercise information, obtain a reputable book or consult...
...the nearest ten years). The proper intensity level can be "aerobic." If your goal is to make exercise a regular and enjoyable part of the treadmill until your heart rate is to five workouts each workout with preexisting health problems. The pulse sensors are recommended heart rates for .... Aerobic Exercise If your exercise program. Aerobic exercise is activity that requires large amounts of oxygen for 20 to 10 minutes of the treadmill until your heart rate is near the highest number in your breath. For more detailed exercise information, obtain a reputable book or consult...

User Manual
Page 20
ORDERING REPLACEMENT PARTS To order replacement parts, contact the ICON Health & Fitness, Ltd. office, or write: ICON Health & Fitness, Ltd. Customer Service Department Unit 4, Revie Road Industrial Estate Revie Road Beeston Leeds, ... the following information: • The MODEL NUMBER of the product (PETL30130) • The NAME of the product (PROFORM® 360 P treadmill) • The SERIAL NUMBER of the product (see the front cover of this manual) Part No. 199796 R0304B Printed in the centre of this manual) • The KEY NUMBER and DESCRIPTION of the...
ORDERING REPLACEMENT PARTS To order replacement parts, contact the ICON Health & Fitness, Ltd. office, or write: ICON Health & Fitness, Ltd. Customer Service Department Unit 4, Revie Road Industrial Estate Revie Road Beeston Leeds, ... the following information: • The MODEL NUMBER of the product (PETL30130) • The NAME of the product (PROFORM® 360 P treadmill) • The SERIAL NUMBER of the product (see the front cover of this manual) Part No. 199796 R0304B Printed in the centre of this manual) • The KEY NUMBER and DESCRIPTION of the...

User Manual
Page 21
PART IDENTIFICATION CHART Remove this chart and the EXPLODED DRAWING/PART LIST for future reference. 1" Tek Screw (58)-4 Crossbar Screw (39)-2 Silver Ground Screw (75)-1 3/4" Screw (2)-8 1" Bolt (37)-6 2" Bolt (64)-2 1/2" Silver Screw (48)-1 Washer (38)-4 Star Washer (63)-4 3" Bolt (70)-4 Wheel Nut (13)-2 Save this chart and use it to identify small parts during assembly.
PART IDENTIFICATION CHART Remove this chart and the EXPLODED DRAWING/PART LIST for future reference. 1" Tek Screw (58)-4 Crossbar Screw (39)-2 Silver Ground Screw (75)-1 3/4" Screw (2)-8 1" Bolt (37)-6 2" Bolt (64)-2 1/2" Silver Screw (48)-1 Washer (38)-4 Star Washer (63)-4 3" Bolt (70)-4 Wheel Nut (13)-2 Save this chart and use it to identify small parts during assembly.

User Manual
Page 22
... Latch Pin Clip Latch Pin Storage Latch 1" Bolt Washer Crossbar Screw Crossbar Choke Bracket Wire Harness Console Wire Cover U-nut Bookrack Console Base Key No. PART LIST-Model No. PETL30130 R0304B Key No. Qty. Description 93 1 94 1 95 1 96 1 97 1 98 1 99 1 100 1 101 2 102 6 103 1 104 1 105 4 106 1 107 1 108... 4" Blue Wire, 2F 4" Black Wire, 2F 4" Black Wire, M/F 4" White Wire, M/F 8" White Wire, 2F 8" Green Wire, 2 Ring 8" Green Wire, F/Ring 6 " Red Wire, M/F User's Manual *Includes all parts shown in the box #These...
... Latch Pin Clip Latch Pin Storage Latch 1" Bolt Washer Crossbar Screw Crossbar Choke Bracket Wire Harness Console Wire Cover U-nut Bookrack Console Base Key No. PART LIST-Model No. PETL30130 R0304B Key No. Qty. Description 93 1 94 1 95 1 96 1 97 1 98 1 99 1 100 1 101 2 102 6 103 1 104 1 105 4 106 1 107 1 108... 4" Blue Wire, 2F 4" Black Wire, 2F 4" Black Wire, M/F 4" White Wire, M/F 8" White Wire, 2F 8" Green Wire, 2 Ring 8" Green Wire, F/Ring 6 " Red Wire, M/F User's Manual *Includes all parts shown in the box #These...


