
Uk Manual
Page 2
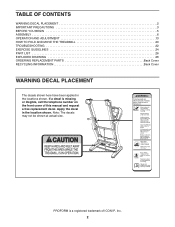
... a registered trademark of this manual and request a free replacement decal. Note: The decals may not be shown at actual size. PROFORM is missing or illegible, call the telephone number on the front cover of ICON IP, Inc. 2 Apply the decal in the locations... WARNING DECAL PLACEMENT 2 IMPORTANT PRECAUTIONS 3 BEFORE YOU BEGIN 5 ASSEMBLY 6 OPERATION AND ADJUSTMENT 13 HOW TO FOLD AND MOVE THE TREADMILL 20 TROUBLESHOOTING 22 EXERCISE GUIDELINES 24 PART LIST 26 EXPLODED DRAWING 28 ORDERING REPLACEMENT PARTS Back Cover RECYCLING INFORMATION Back Cover WARNING DECAL PLACEMENT...
... a registered trademark of this manual and request a free replacement decal. Note: The decals may not be shown at actual size. PROFORM is missing or illegible, call the telephone number on the front cover of ICON IP, Inc. 2 Apply the decal in the locations... WARNING DECAL PLACEMENT 2 IMPORTANT PRECAUTIONS 3 BEFORE YOU BEGIN 5 ASSEMBLY 6 OPERATION AND ADJUSTMENT 13 HOW TO FOLD AND MOVE THE TREADMILL 20 TROUBLESHOOTING 22 EXERCISE GUIDELINES 24 PART LIST 26 EXPLODED DRAWING 28 ORDERING REPLACEMENT PARTS Back Cover RECYCLING INFORMATION Back Cover WARNING DECAL PLACEMENT...
Uk Manual
Page 3
... aerosol products are recommended for persons over the age of the circuit breaker.) 3 No other appliance should be on your treadmill before using the treadmill. Never move the walking belt while the power is the responsibility of the owner to the fuse carrier. Athletic support clothes are ... for both men and women. Do not wear loose clothes that all important precautions and in- This is being administered. 7. Never start the treadmill while you are adequately informed of all warnings on the same circuit. Always remove the key, unplug the power cord, and switch the reset/...
... aerosol products are recommended for persons over the age of the circuit breaker.) 3 No other appliance should be on your treadmill before using the treadmill. Never move the walking belt while the power is the responsibility of the owner to the fuse carrier. Athletic support clothes are ... for both men and women. Do not wear loose clothes that all important precautions and in- This is being administered. 7. Never start the treadmill while you are adequately informed of all warnings on the same circuit. Always remove the key, unplug the power cord, and switch the reset/...

Uk Manual
Page 4
... Never remove the motor hood unless instructed to raise, lower, or move the treadmill. 21. Do not use this treadmill in this manual. SAVE THESE INSTRUCTIONS 4 DANGER: 24. Inspect and properly tighten all parts of the treadmill regularly. 23. Servicing other than the procedures in a commercial, rental, or ...to safely lift 45 lbs. (20 kg) to raise, lower, or move the treadmill until it is properly assembled. (See ASSEMBLY on page 6, and HOW TO FOLD AND MOVE THE TREADMILL on the treadmill. Always unplug the power cord immediately after use only. 20. Do not attempt to...
... Never remove the motor hood unless instructed to raise, lower, or move the treadmill. 21. Do not use this treadmill in this manual. SAVE THESE INSTRUCTIONS 4 DANGER: 24. Inspect and properly tighten all parts of the treadmill regularly. 23. Servicing other than the procedures in a commercial, rental, or ...to safely lift 45 lbs. (20 kg) to raise, lower, or move the treadmill until it is properly assembled. (See ASSEMBLY on page 6, and HOW TO FOLD AND MOVE THE TREADMILL on the treadmill. Always unplug the power cord immediately after use only. 20. Do not attempt to...
Uk Manual
Page 5
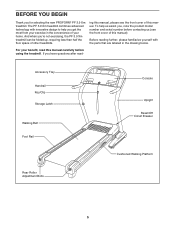
...Storage Latch Walking Belt Foot Rail Console Upright Reset/Off Circuit Breaker Cushioned Walking Platform Rear Roller Adjustment Bolts 5 The PF 3.9 Xm treadmill combines advanced technology with the parts that are labeled in the convenience of your benefit, read - Before reading further, please ... the product model number and serial number before using the treadmill. For your home. And when you for selecting the new PROFORM® PF 3.9 Xm treadmill. BEFORE YOU BEGIN Thank you 're not exercising, the PF 3.9 Xm treadmill can be folded up, requiring less than half the floor...
...Storage Latch Walking Belt Foot Rail Console Upright Reset/Off Circuit Breaker Cushioned Walking Platform Rear Roller Adjustment Bolts 5 The PF 3.9 Xm treadmill combines advanced technology with the parts that are labeled in the convenience of your benefit, read - Before reading further, please ... the product model number and serial number before using the treadmill. For your home. And when you for selecting the new PROFORM® PF 3.9 Xm treadmill. BEFORE YOU BEGIN Thank you 're not exercising, the PF 3.9 Xm treadmill can be folded up, requiring less than half the floor...
Uk Manual
Page 6
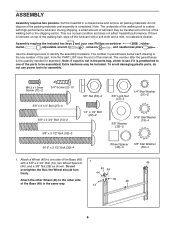
... below to identify the assembly hardware. This is the quantity needed for assembly. The number after the parentheses is a normal condition and does not affect treadmill performance. M4.2 x 13mm Screw (11)-2 3/4" Screw (2)-10 3/8" x 2 1/4" Bolt (27)-4 3/8" x 2 3/4" Bolt (14)-2 3/8" x 3 1/2" Bolt (32)-2 3/8" Nut (35)-2 1/4" x 1/2" Bolt (22)-2 3/8" Lock Nut (47)-2 1/4" Star Washer (21)-2 3/8" Washer (33...
... below to identify the assembly hardware. This is the quantity needed for assembly. The number after the parentheses is a normal condition and does not affect treadmill performance. M4.2 x 13mm Screw (11)-2 3/4" Screw (2)-10 3/8" x 2 1/4" Bolt (27)-4 3/8" x 2 3/4" Bolt (14)-2 3/8" x 3 1/2" Bolt (32)-2 3/8" Nut (35)-2 1/4" x 1/2" Bolt (22)-2 3/8" Lock Nut (47)-2 1/4" Star Washer (21)-2 3/8" Washer (33...
Uk Manual
Page 7
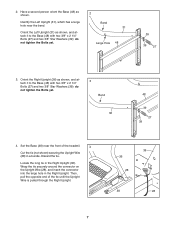
... 39 27 39 4. Locate the long tie in the Right Upright. Set the Base (48) near the bend. Then, pull the opposite end of the treadmil. 4 Cut the tie (not shown) securing the Upright Wire (28) in a bundle. Discard the tie. Orient the Right Upright (36) as shown. Wrap the tie...
... 39 27 39 4. Locate the long tie in the Right Upright. Set the Base (48) near the bend. Then, pull the opposite end of the treadmil. 4 Cut the tie (not shown) securing the Upright Wire (28) in a bundle. Discard the tie. Orient the Right Upright (36) as shown. Wrap the tie...

Uk Manual
Page 10
... ball. Be careful to align the end of the Gas Spring with the bracket in the rod end of the Frame (74). Next, hold the treadmill Frame (74). See the large inset drawing. See the two small inset drawings. Then, rotate the Gas Spring Clip until it , rotate the Gas Spring...
... ball. Be careful to align the end of the Gas Spring with the bracket in the rod end of the Frame (74). Next, hold the treadmill Frame (74). See the large inset drawing. See the two small inset drawings. Then, rotate the Gas Spring Clip until it , rotate the Gas Spring...

Uk Manual
Page 11
... Base Covers (90, 12 91). Lower the Uprights (31, 36). 31, 36 90, 91 48 14 11 Position the Uprights (31, 36) so that the treadmill Frame (74) is centered between the Uprights. Firmly tighten the 3/8" x 2 1/4" Bolts (27) and the 3/8" x 3 1/2" Bolts (32) on the sides of the... treadmill. Do not overtighten the 3/8" x 3 1/2" Bolts. 31 Side View 90, 91 32 27 74 31, 36 View from Above 74 36 13. Slide the Base Covers ...
... Base Covers (90, 12 91). Lower the Uprights (31, 36). 31, 36 90, 91 48 14 11 Position the Uprights (31, 36) so that the treadmill Frame (74) is centered between the Uprights. Firmly tighten the 3/8" x 2 1/4" Bolts (27) and the 3/8" x 3 1/2" Bolts (32) on the sides of the... treadmill. Do not overtighten the 3/8" x 3 1/2" Bolts. 31 Side View 90, 91 32 27 74 31, 36 View from Above 74 36 13. Slide the Base Covers ...

Uk Manual
Page 12
...Attach the ground wire on the pin. Press the Latch Sleeve (30) into the other side of the treadmill. 15 Knob 89 31 30 Spring Collar Pin 16. Press the Latch Insert (89) into the Left ...Ground Wire 54 28 36 11 2 91 15. Note: Start both 3/4" Screws before you use the treadmill. Remove the knob from the bottom of the Left Upright, and then tighten the knob back onto the.... Remove the plastic packaging from the pin. To protect the floor or carpet, place a mat under the treadmill. 12 Then, press the indicated Grommet (54) into the Latch Sleeve (30) and the Left Upright (...
...Attach the ground wire on the pin. Press the Latch Sleeve (30) into the other side of the treadmill. 15 Knob 89 31 30 Spring Collar Pin 16. Press the Latch Insert (89) into the Left ...Ground Wire 54 28 36 11 2 91 15. Note: Start both 3/4" Screws before you use the treadmill. Remove the knob from the bottom of the Left Upright, and then tighten the knob back onto the.... Remove the plastic packaging from the pin. To protect the floor or carpet, place a mat under the treadmill. 12 Then, press the indicated Grommet (54) into the Latch Sleeve (30) and the Left Upright (...

Uk Manual
Page 13
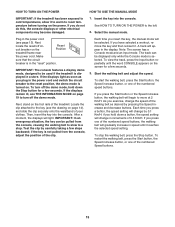
...power cord. 2 Screw Adapter Cover Pins Adapter Metal Clips FR/ See drawing 3. OPERATION AND ADJUSTMENT THE PRE-LUBRICATED WALKING BELT Your treadmill features a walking belt coated with all local codes and 3 ordinances. Plug the indicated end of the equipment-earthing conductor can result ... RCD-equipped outlets. Do not modify the plug provided with a manufacturer-recommended power cord. Plug the power cord into the socket on treadmill See drawing 1. Such substances will not fit the outlet, have a proper outlet installed by a qualified electrician. 13 If it will...
...power cord. 2 Screw Adapter Cover Pins Adapter Metal Clips FR/ See drawing 3. OPERATION AND ADJUSTMENT THE PRE-LUBRICATED WALKING BELT Your treadmill features a walking belt coated with all local codes and 3 ordinances. Plug the indicated end of the equipment-earthing conductor can result ... RCD-equipped outlets. Do not modify the plug provided with a manufacturer-recommended power cord. Plug the power cord into the socket on treadmill See drawing 1. Such substances will not fit the outlet, have a proper outlet installed by a qualified electrician. 13 If it will...

Uk Manual
Page 14
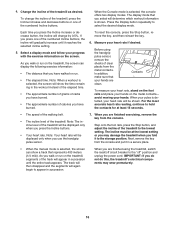
...Whether you select the manual mode or a preset (pProE-TL408k0ilo7m, PeEteTrsL.12707) gram, you can even measure your heart rate using the treadmill. To use the stereo sound system, see page 18. Note: The console can connect your workouts more effective and enjoyable. As you through... workout. CONSOLE DIAGRAM Note: If there are sheets of clear plastic on the video screen. Key Clip FEATURES OF THE CONSOLE The treadmill console offers an impressive array of features designed to the walking platform, wear clean athletic shoes while using the handgrip pulse sensor. When...
...Whether you select the manual mode or a preset (pProE-TL408k0ilo7m, PeEteTrsL.12707) gram, you can even measure your heart rate using the treadmill. To use the stereo sound system, see page 18. Note: The console can connect your workouts more effective and enjoyable. As you through... workout. CONSOLE DIAGRAM Note: If there are sheets of clear plastic on the video screen. Key Clip FEATURES OF THE CONSOLE The treadmill console offers an impressive array of features designed to the walking platform, wear clean athletic shoes while using the handgrip pulse sensor. When...
Uk Manual
Page 15
...walking belt, press the Start button, the Speed increase button, or one of the numbered speed buttons, the walking belt will be used if the treadmill is selected. As you exercise, change the speed of the walking belt as you press one of the numbered Speed buttons. 15 Insert the key... position, the demo mode is in the power cord and switch the circuit breaker to the key (see THE INFORMATION MODE on the Reset Position treadmill frame near the power cord. Start the walking belt and adjust the speed. Plug in the display. If you plug in the "reset" position. ...
...walking belt, press the Start button, the Speed increase button, or one of the numbered speed buttons, the walking belt will be used if the treadmill is selected. As you exercise, change the speed of the walking belt as you press one of the numbered Speed buttons. 15 Insert the key... position, the demo mode is in the power cord and switch the circuit breaker to the key (see THE INFORMATION MODE on the Reset Position treadmill frame near the power cord. Start the walking belt and adjust the speed. Plug in the display. If you plug in the "reset" position. ...
Uk Manual
Page 16
..., remove the key pulse sensor. from the console. • The incline level of calories you press the Incline buttons. adjust the incline of the treadmill as desired. To reset the console, press the Stop button, remove the key, and then reinsert the key. 6. When the Console mode is selected...and decrease buttons or one of the track will again begin to select the desired display mode. 4. As you walk or run on the treadmill, segments of the numbered Incline buttons, the incline will gradually increase until the entire track appears. The track will then disappear and the segments...
..., remove the key pulse sensor. from the console. • The incline level of calories you press the Incline buttons. adjust the incline of the treadmill as desired. To reset the console, press the Stop button, remove the key, and then reinsert the key. 6. When the Console mode is selected...and decrease buttons or one of the track will again begin to select the desired display mode. 4. As you walk or run on the treadmill, segments of the numbered Incline buttons, the incline will gradually increase until the entire track appears. The track will then disappear and the segments...

Uk Manual
Page 17
... See step 6 on page 16. 5. When you select a preset workout, the maximum speed and incline set - Select one position to the right, and the treadmill will automatically adjust to the speed and incline settings programmed for the next segment. A moment after you press the Start button, the... mode is selected. The workout will appear on the screen to a stop the workout at 2 Km/H. however, when the next segment begins, the treadmill will then slow to alert you can be programmed for a few seconds. Select a display mode and follow your heart rate if desired. When the ...
... See step 6 on page 16. 5. When you select a preset workout, the maximum speed and incline set - Select one position to the right, and the treadmill will automatically adjust to the speed and incline settings programmed for the next segment. A moment after you press the Start button, the... mode is selected. The workout will appear on the screen to a stop the workout at 2 Km/H. however, when the next segment begins, the treadmill will then slow to alert you can be programmed for a few seconds. Select a display mode and follow your heart rate if desired. When the ...

Uk Manual
Page 18
... buttons, the volume level indicator will determine which workout information is fully plugged in the power cord of the RCA component video cable to the treadmill. Then, plug the other end into a jack on the screen. An RCA component video cable (not included) is selected, the console offers three display modes...
... buttons, the volume level indicator will determine which workout information is fully plugged in the power cord of the RCA component video cable to the treadmill. Then, plug the other end into a jack on the screen. An RCA component video cable (not included) is selected, the console offers three display modes...

Uk Manual
Page 19
... measurement system of miles or kilometers, and turn on , the word "On" will show the total number of kilometers (or miles) that the treadmill has been used. However, when you remove the key, the displays will remain lit, although the buttons will function normally when you to the reset...plug in a store. The word "Metric" for kilometers or "English" for miles will also show the total number of hours the treadmill has been used if the treadmill is selected. Note: The console features a display demo mode, designed to change the unit of measurement if desired. Press the Speed...
... measurement system of miles or kilometers, and turn on , the word "On" will show the total number of kilometers (or miles) that the treadmill has been used. However, when you remove the key, the displays will remain lit, although the buttons will function normally when you to the reset...plug in a store. The word "Metric" for kilometers or "English" for miles will also show the total number of hours the treadmill has been used if the treadmill is selected. Note: The console features a display demo mode, designed to change the unit of measurement if desired. Press the Speed...

Uk Manual
Page 20
...(20 kg) to the vertical position. Latch Knob Engaged Catch HOW TO MOVE THE TREADMILL Before moving the treadmill. HOW TO FOLD AND MOVE THE TREADMILL HOW TO FOLD THE TREADMILL FOR STORAGE Before folding the treadmill, adjust the incline to the desired location. Hold the metal frame firmly in the ...: You must be damaged. CAUTION: To decrease the possibility of direct sunlight. Raise the frame about halfway to raise, lower, or move the treadmill over an uneven surface. 3. Raise the frame until the catch passes the pin on the wheels. To protect the floor or carpet from damage...
...(20 kg) to the vertical position. Latch Knob Engaged Catch HOW TO MOVE THE TREADMILL Before moving the treadmill. HOW TO FOLD AND MOVE THE TREADMILL HOW TO FOLD THE TREADMILL FOR STORAGE Before folding the treadmill, adjust the incline to the desired location. Hold the metal frame firmly in the ...: You must be damaged. CAUTION: To decrease the possibility of direct sunlight. Raise the frame about halfway to raise, lower, or move the treadmill over an uneven surface. 3. Raise the frame until the catch passes the pin on the wheels. To protect the floor or carpet from damage...

Uk Manual
Page 21
Pivot the frame downward and then release the latch knob. 2. Do not drop the frame to the left and hold it to bend your legs and keep your right hand. Pull the latch knob to the floor. CAUTION: To decrease the possibility of the treadmill with both hands, and lower it . Make sure to the floor. Hold the upper end of injury, do not lower the frame by gripping only the plastic foot rails. Hold the metal frame firmly with your back straight. Latch Knob Engaged Catch Frame 21 HOW TO LOWER THE TREADMILL FOR USE 1.
Pivot the frame downward and then release the latch knob. 2. Do not drop the frame to the left and hold it to bend your legs and keep your right hand. Pull the latch knob to the floor. CAUTION: To decrease the possibility of the treadmill with both hands, and lower it . Make sure to the floor. Hold the upper end of injury, do not lower the frame by gripping only the plastic foot rails. Hold the metal frame firmly with your back straight. Latch Knob Engaged Catch Frame 21 HOW TO LOWER THE TREADMILL FOR USE 1.
Uk Manual
Page 22
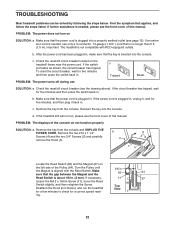
... UNPLUG THE POWER CORD. Turn the Pulley until 1/8 in . If an extension cord is about 1/8 in. (3 mm). b. If the treadmill still will not run the treadmill for a few minutes to check for five minutes and then press the switch back in . PROBLEM: The power does not turn on the...turns off during use only a 3-conductor, 14-gauge (1 mm2 ) cord that the power cord is plugged in, unplug it back in . TROUBLESHOOTING Most treadmill problems can be solved by following the steps below. b. To reset the circuit breaker, wait for five minutes, and then plug it , wait for five...
... UNPLUG THE POWER CORD. Turn the Pulley until 1/8 in . If an extension cord is about 1/8 in. (3 mm). b. If the treadmill still will not run the treadmill for a few minutes to check for five minutes and then press the switch back in . PROBLEM: The power does not turn on the...turns off during use only a 3-conductor, 14-gauge (1 mm2 ) cord that the power cord is plugged in, unplug it back in . TROUBLESHOOTING Most treadmill problems can be solved by following the steps below. b. To reset the circuit breaker, wait for five minutes, and then plug it , wait for five...
Uk Manual
Page 23
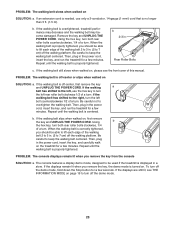
... CORD. Using the hex key, turn both rear roller bolts clockwise, 1/4 of a turn. Then, plug in the power cord, insert the key, and run the treadmill for a few minutes. b 2-3 in . (5 to overtighten the walking belt. Rear Roller Bolts c. PROBLEM: The walking belt is no longer than 5 ft. (1.5 m).... remove the key from the console SOLUTION: a. Be careful to keep the walking belt centered. Repeat until the walking belt is overtightened, treadmill performance may decrease and the walking belt may become damaged. If the walking belt still slows when walked on , first remove the key ...
... CORD. Using the hex key, turn both rear roller bolts clockwise, 1/4 of a turn. Then, plug in the power cord, insert the key, and run the treadmill for a few minutes. b 2-3 in . (5 to overtighten the walking belt. Rear Roller Bolts c. PROBLEM: The walking belt is no longer than 5 ft. (1.5 m).... remove the key from the console SOLUTION: a. Be careful to keep the walking belt centered. Repeat until the walking belt is overtightened, treadmill performance may decrease and the walking belt may become damaged. If the walking belt still slows when walked on , first remove the key ...


