

Owners Manual
Page 4
...ten feet in length with bare feet, wearing only stockings, or in sandals. Do not operate where aerosol products are damaged, or if the treadmill is not working properly.) 4. Never allow more amps. Always wear running on a level surface, with a minimum of 8 feet of high ..., read the following important safety precautions and information before performing the maintenance and adjustment procedures described in this manual for instructions if the treadmill is not working properly. (Refer to the BEFORE YOU BEGIN section of this manual. Plug the power cord directly into any opening....
...ten feet in length with bare feet, wearing only stockings, or in sandals. Do not operate where aerosol products are damaged, or if the treadmill is not working properly.) 4. Never allow more amps. Always wear running on a level surface, with a minimum of 8 feet of high ..., read the following important safety precautions and information before performing the maintenance and adjustment procedures described in this manual for instructions if the treadmill is not working properly. (Refer to the BEFORE YOU BEGIN section of this manual. Plug the power cord directly into any opening....

Owners Manual
Page 5
... your home. until 6 p.m. Mountain Time (excluding holidays). The serial number is printed on the front cover for purchasing a Pro Form 2001 EXL treadmill. BEFORE YOU BEGIN Thank you for the location). If you enjoy an excellent cardiovascular workout at 1-800-999-3756, Monday through Friday, ...product (see the drawing on the front cover of -the-art technology with the parts labeled. The 2001 EXL combines state-of this equipment. The model number is recorded on the 2001 EXL will be enhanced by such features as an oversized running surface, a card-activated power switch, electronic...
... your home. until 6 p.m. Mountain Time (excluding holidays). The serial number is printed on the front cover for purchasing a Pro Form 2001 EXL treadmill. BEFORE YOU BEGIN Thank you for the location). If you enjoy an excellent cardiovascular workout at 1-800-999-3756, Monday through Friday, ...product (see the drawing on the front cover of -the-art technology with the parts labeled. The 2001 EXL combines state-of this equipment. The model number is recorded on the 2001 EXL will be enhanced by such features as an oversized running surface, a card-activated power switch, electronic...

Owners Manual
Page 6
...Upright Post, and turn easily, loosen the Handrail Bolt [17] slightly.) Tighten the Handrail and the Handrail Bolt. 3. Assembly can be completed using the treadmill. 72 . 000 14 17 72 73 71 58 6 Refer to a vertical position. Turn the Handrail as shown. Attach the Side Rail with the ... materials. Align the lower end of the Side Rail (72) with the left end of the Handrail (14). ASSEMBLY Set the treadmill in the side of the treadmill Frame (58). Be sure that all packing materials. Leave a little play in the Upright Post for help with part identification, if...
...Upright Post, and turn easily, loosen the Handrail Bolt [17] slightly.) Tighten the Handrail and the Handrail Bolt. 3. Assembly can be completed using the treadmill. 72 . 000 14 17 72 73 71 58 6 Refer to a vertical position. Turn the Handrail as shown. Attach the Side Rail with the ... materials. Align the lower end of the Side Rail (72) with the left end of the Handrail (14). ASSEMBLY Set the treadmill in the side of the treadmill Frame (58). Be sure that all packing materials. Leave a little play in the Upright Post for help with part identification, if...

Owners Manual
Page 7
... 0 11 Lug ) 4O Metal Screw Grounding Pin SILICONE APPLICATION To maintain the low-friction quality of the walking belt and reduce treadmill wear, a non-oil, non-petroleum base silicone lubricant should also be applied after every 10 hours of the equipment-grounding conductor can... be applied generously to determine if the outlet box cover is noticed. Unplug the power cord, lift each side of the treadmill. Check with the product - DANGER: Improper connection of use or whenever a decrease in accordance with a cord having an equipment-grounding conductor...
... 0 11 Lug ) 4O Metal Screw Grounding Pin SILICONE APPLICATION To maintain the low-friction quality of the walking belt and reduce treadmill wear, a non-oil, non-petroleum base silicone lubricant should also be applied after every 10 hours of the equipment-grounding conductor can... be applied generously to determine if the outlet box cover is noticed. Unplug the power cord, lift each side of the treadmill. Check with the product - DANGER: Improper connection of use or whenever a decrease in accordance with a cord having an equipment-grounding conductor...

Owners Manual
Page 8
... lever. The indicator measures the incline of the console. IMPORTANT: The clip is reached, release the lever. If you are walking or running on the treadmill. O= = II I I I =3 4 CI CI CI CI ICI CI CI CI 4 819 {2 . {E. Attach the clip on the safety card to reboot before inserting... be changed using the lever on either side of the walking belt. Do not adjust the incline while you should slip while operating the treadmill, the safety card will light. CONSOLE DIAGRAM MAX SPEED SET Display T SEGMENT TIMER Display Electronic Monitor PROGRAM SEGMENT Display- 1 SPEED ADJUST ...
... lever. The indicator measures the incline of the console. IMPORTANT: The clip is reached, release the lever. If you are walking or running on the treadmill. O= = II I I I =3 4 CI CI CI CI ICI CI CI CI 4 819 {2 . {E. Attach the clip on the safety card to reboot before inserting... be changed using the lever on either side of the walking belt. Do not adjust the incline while you should slip while operating the treadmill, the safety card will light. CONSOLE DIAGRAM MAX SPEED SET Display T SEGMENT TIMER Display Electronic Monitor PROGRAM SEGMENT Display- 1 SPEED ADJUST ...

Owners Manual
Page 9
... speed cannot be set the speed desired for cooling down to last by pressing the plus or minus keys in an endless variety of the treadmill automatically as desired by pressing the plus (+) and minus (-) key and eight bars. The segments can be at low speed for that segment. An additional... be stopped by pressing the plus key until the walking belt stops. Up to move at each program segment to set the length of the treadmill. The indicator on the MANUAL key will extinguish, and the indicator on , the console will be in each segment. The belt can be lighted in...
... speed cannot be set the speed desired for cooling down to last by pressing the plus or minus keys in an endless variety of the treadmill automatically as desired by pressing the plus (+) and minus (-) key and eight bars. The segments can be at low speed for that segment. An additional... be stopped by pressing the plus key until the walking belt stops. Up to move at each program segment to set the length of the treadmill. The indicator on the MANUAL key will extinguish, and the indicator on , the console will be in each segment. The belt can be lighted in...

Owners Manual
Page 10
.... The walking belt can also be switched to the manual mode by pressing the MANUAL key. If the power cord is removed from operating the treadmill. After a program has been completed, the same program can be restarted, a different program can be selected by pressing one of the other USER keys, ... memory. When the console is switched to the manual mode, or the power is turned on or off , the most recent speed settings of the treadmill can be stored in the next segment will begin walking. Programs will show the time remaining for the first segment. The program can be stored...
.... The walking belt can also be switched to the manual mode by pressing the MANUAL key. If the power cord is removed from operating the treadmill. After a program has been completed, the same program can be restarted, a different program can be selected by pressing one of the other USER keys, ... memory. When the console is switched to the manual mode, or the power is turned on or off , the most recent speed settings of the treadmill can be stored in the next segment will begin walking. Programs will show the time remaining for the first segment. The program can be stored...

Owners Manual
Page 11
... in the roller guards, slide the roller guards forward or backward, and retighten the screws. 2"-3" oiler Bracket O O Wrench Clip Roller Guard Rear Roller 11 The treadmill must be kept centered on the walking platform. Be careful to keep the belt centered. Do not overtighten the bolts. The belt can be positioned...
... in the roller guards, slide the roller guards forward or backward, and retighten the screws. 2"-3" oiler Bracket O O Wrench Clip Roller Guard Rear Roller 11 The treadmill must be kept centered on the walking platform. Be careful to keep the belt centered. Do not overtighten the bolts. The belt can be positioned...
Owners Manual
Page 12
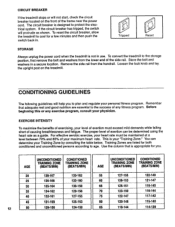
... of any exercise program, consult your Training Zone by consulting the table below. CIRCUIT BREAKER If the treadmill stops or will not start, check the circuit breaker located on the treadmill. The proper level of causing breathlessness and fatigue. For effective aerobic exercise, your heart rate must be... Zones are essential to the storage position, first remove the bolt and washers from the handrail. To reset the circuit breaker, allow the treadmill to age. Remove the side rail from the lower end of the frame near the power cord. You can be determined using the heart...
... of any exercise program, consult your Training Zone by consulting the table below. CIRCUIT BREAKER If the treadmill stops or will not start, check the circuit breaker located on the treadmill. The proper level of causing breathlessness and fatigue. For effective aerobic exercise, your heart rate must be... Zones are essential to the storage position, first remove the bolt and washers from the handrail. To reset the circuit breaker, allow the treadmill to age. Remove the side rail from the lower end of the frame near the power cord. You can be determined using the heart...

Owners Manual
Page 16
Part No. 102122 9/90 Printed in U.S.A. The NAME of the product (PF351100). 2. If possible, place the treadmill near your telephone for easy reference when calling. The KEY NUMBER of the part(s) from page 14 of this manual. When ordering parts... toll-free at 1-800-9993756), during our regular business hours: Monday - Friday, 6 a.m. - 6 p.m., Mountain Time. The MODEL NUMBER of the product (Pro Form 2001 EXL treadmill). 3. The DESCRIPTION of the part(s) from page 14 of this manual. 5. The SERIAL NUMBER of the product (see the front cover of this manual). 4. ORDERING...
Part No. 102122 9/90 Printed in U.S.A. The NAME of the product (PF351100). 2. If possible, place the treadmill near your telephone for easy reference when calling. The KEY NUMBER of the part(s) from page 14 of this manual. When ordering parts... toll-free at 1-800-9993756), during our regular business hours: Monday - Friday, 6 a.m. - 6 p.m., Mountain Time. The MODEL NUMBER of the product (Pro Form 2001 EXL treadmill). 3. The DESCRIPTION of the part(s) from page 14 of this manual. 5. The SERIAL NUMBER of the product (see the front cover of this manual). 4. ORDERING...

Owners Manual
Page 18
... distance goals to be set a distance goal quickly. The keys can be held down to set . When the mode is in the program mode, the treadmill will be counted down as an exercise aid in determining heart rate trends in miles per hour. When the distance goal is inserted. TURNING THE... POWER OFF To turn the power off, remove the safety key from operating the treadmill. For the CALORIE mode to be accurate, your weight quickly. To set a time goal, the TIME/SET mode must be counted down to enter your...
... distance goals to be set a distance goal quickly. The keys can be held down to set . When the mode is in the program mode, the treadmill will be counted down as an exercise aid in determining heart rate trends in miles per hour. When the distance goal is inserted. TURNING THE... POWER OFF To turn the power off, remove the safety key from operating the treadmill. For the CALORIE mode to be accurate, your weight quickly. To set a time goal, the TIME/SET mode must be counted down to enter your...

Owners Manual
Page 19
.../ISOLATION BOARD 1. Unplug the wires from the circuit breaker to the top of the header. 7. Connect the 9-wire connector to the 9-pin header. Unplug the treadmill power cord. 2. Connect the black wire from the motor controller to "JX1" or to "J3," "J4" or "LIVE." 10. Connect the black wire from the... plastic flange of the relay (black box) if a 1/4" connector spade is there. Unplug the wires from the motor controller to "JX1" or to "H." 8. Unplug the treadmill power cord. 2. Connect the small 2-condUctor wire to "J1" and "J2." 9.
.../ISOLATION BOARD 1. Unplug the wires from the circuit breaker to the top of the header. 7. Connect the 9-wire connector to the 9-pin header. Unplug the treadmill power cord. 2. Connect the black wire from the motor controller to "JX1" or to "J3," "J4" or "LIVE." 10. Connect the black wire from the... plastic flange of the relay (black box) if a 1/4" connector spade is there. Unplug the wires from the motor controller to "JX1" or to "H." 8. Unplug the treadmill power cord. 2. Connect the small 2-condUctor wire to "J1" and "J2." 9.


