

English Manual
Page 3
... 3. Replace any exercise program, consult your physician. do not arch your back. 19. The elliptical does not have a freewheel; Reduce your elliptical. do not wear loose clothes that all users of the elliptical are adequately informed of all precautions. 2. Over exercising may affect the accuracy of heart... only. 13. Wear appropriate clothes while exercising; Hold the handlebars or the upper body arms when mounting, dismounting, or using the elliptical; The heart rate monitor is not in a garage or covered patio, or near water. 6. If you feel faint or if you...
... 3. Replace any exercise program, consult your physician. do not arch your back. 19. The elliptical does not have a freewheel; Reduce your elliptical. do not wear loose clothes that all users of the elliptical are adequately informed of all precautions. 2. Over exercising may affect the accuracy of heart... only. 13. Wear appropriate clothes while exercising; Hold the handlebars or the upper body arms when mounting, dismounting, or using the elliptical; The heart rate monitor is not in a garage or covered patio, or near water. 6. If you feel faint or if you...

English Manual
Page 6
The 19.0 RE elliptical provides an impressive selection of the serial number decal are labeled in . (69 cm... Foot Ramp Wheel Pedal Arm Latch Latch Button Power Cord 6 manual. BEFORE YOU BEGIN Thank you use the elliptical. If you have questions after reading this manual, please see the front cover of this Before reading further,...manual carefully before contacting us assist you, note the product model number and serial number before you for selecting the revolutionary PROFORM® 19.0 RE elliptical. Length: 6 ft. 10 in. (208 cm) Width: 2 ft. 3 in the drawing below. The ...
The 19.0 RE elliptical provides an impressive selection of the serial number decal are labeled in . (69 cm... Foot Ramp Wheel Pedal Arm Latch Latch Button Power Cord 6 manual. BEFORE YOU BEGIN Thank you use the elliptical. If you have questions after reading this manual, please see the front cover of this Before reading further,...manual carefully before contacting us assist you, note the product model number and serial number before you for selecting the revolutionary PROFORM® 19.0 RE elliptical. Length: 6 ft. 10 in. (208 cm) Width: 2 ft. 3 in the drawing below. The ...
English Manual
Page 19
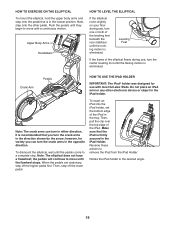
... crank arms can turn the crank arms in the direction shown by the arrow; To dismount the elliptical, wait until the flywheel stops. Then, step off the higher pedal first. To insert an iPad...iPad holder, set the bottom edge of the iPad. Reverse these actions to the desired angle. 19 Rotate the iPad holder to remove the iPad from the iPad Holder. Then, pull the clip ...iPads. Push the pedals until the rocking motion is eliminated. Leveling Feet If the frame of the elliptical flexes during use with a continuous motion. It is recommended that the iPad is in the lowest...
... crank arms can turn the crank arms in the direction shown by the arrow; To dismount the elliptical, wait until the flywheel stops. Then, step off the higher pedal first. To insert an iPad...iPad holder, set the bottom edge of the iPad. Reverse these actions to the desired angle. 19 Rotate the iPad holder to remove the iPad from the iPad Holder. Then, pull the clip ...iPads. Push the pedals until the rocking motion is eliminated. Leveling Feet If the frame of the elliptical flexes during use with a continuous motion. It is recommended that the iPad is in the lowest...

English Manual
Page 33
... unplug the power cord. Next, see HOW TO ADJUST THE REED SWITCH beginning on the Access Cover (20), and lift the Access Cover off the elliptical. Loosen, but do not remove, the indicated M4 x 16mm Screw (106), and slide the Reed Switch slightly toward or away from the Pulley Magnet. ...Adjustment Screw (85) until the console displays correct feedback. Then, remove the seven indicated M4 x 16mm Screws (106), and remove the Left Shield (19). 20 106 106 19 HOW TO ADJUST THE DRIVE BELT If you can feel the pedals slip while you are pedaling, even when the resistance is tight. Plug...
... unplug the power cord. Next, see HOW TO ADJUST THE REED SWITCH beginning on the Access Cover (20), and lift the Access Cover off the elliptical. Loosen, but do not remove, the indicated M4 x 16mm Screw (106), and slide the Reed Switch slightly toward or away from the Pulley Magnet. ...Adjustment Screw (85) until the console displays correct feedback. Then, remove the seven indicated M4 x 16mm Screws (106), and remove the Left Shield (19). 20 106 106 19 HOW TO ADJUST THE DRIVE BELT If you can feel the pedals slip while you are pedaling, even when the resistance is tight. Plug...


