

English Manual
Page 3
ICON assumes no responsibility for foot protection while exercising. 15. Do not use and before using your back. 19. Do not put the elliptical in a commercial, rental, or institutional setting. 5. Keep the power cord away from moisture and dust. Always unplug the power cord .... sentative only. 13. Wear appropriate clothes while exercising; the pedals will continue to ensure that could become caught on your elliptical before cleaning the elliptical. Over exercising may affect the accuracy of this manual should not be performed by or through the use only. This is ...
ICON assumes no responsibility for foot protection while exercising. 15. Do not use and before using your back. 19. Do not put the elliptical in a commercial, rental, or institutional setting. 5. Keep the power cord away from moisture and dust. Always unplug the power cord .... sentative only. 13. Wear appropriate clothes while exercising; the pedals will continue to ensure that could become caught on your elliptical before cleaning the elliptical. Over exercising may affect the accuracy of this manual should not be performed by or through the use only. This is ...

English Manual
Page 6
To help us assist you, note the product model number and serial number before you use the elliptical. The 19.0 RE elliptical provides an impressive selection of features designed to make your benefit, read this manual. The model number and the location of the... Arm Latch Latch Button Power Cord 6 manual. For your workouts at home more effective and enjoyable. If you for selecting the revolutionary PROFORM® 19.0 RE elliptical. BEFORE YOU BEGIN Thank you have questions after reading this manual, please see the front cover of this Before reading further, please familiarize...
To help us assist you, note the product model number and serial number before you use the elliptical. The 19.0 RE elliptical provides an impressive selection of features designed to make your benefit, read this manual. The model number and the location of the... Arm Latch Latch Button Power Cord 6 manual. For your workouts at home more effective and enjoyable. If you for selecting the revolutionary PROFORM® 19.0 RE elliptical. BEFORE YOU BEGIN Thank you have questions after reading this manual, please see the front cover of this Before reading further, please familiarize...
English Manual
Page 19
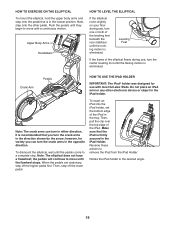
... firmly secured in the direction shown by the arrow; It is recommended that you can turn the crank arms in the tray. Note: The elliptical does not have a freewheel; Rotate the iPad holder to remove the iPad from the iPad Holder. Note: The crank arms can turn in ... flywheel stops. When the pedals are stationary, step off the lower pedal. Reverse these actions to the desired angle. 19 Upper Body Arms Handlebars HOW TO LEVEL THE ELLIPTICAL If the elliptical rocks slightly on your floor during use with a continuous motion. Next, step onto the other electronic device or object...
... firmly secured in the direction shown by the arrow; It is recommended that you can turn the crank arms in the tray. Note: The elliptical does not have a freewheel; Rotate the iPad holder to remove the iPad from the iPad Holder. Note: The crank arms can turn in ... flywheel stops. When the pedals are stationary, step off the lower pedal. Reverse these actions to the desired angle. 19 Upper Body Arms Handlebars HOW TO LEVEL THE ELLIPTICAL If the elliptical rocks slightly on your floor during use with a continuous motion. Next, step onto the other electronic device or object...

English Manual
Page 33
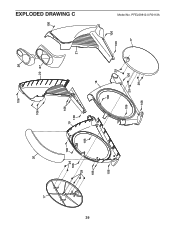
Then, remove the seven indicated M4 x 16mm Screws (106), and remove the Left Shield (19). 20 106 106 19 HOW TO ADJUST THE DRIVE BELT If you can feel the pedals slip while you are pedaling, even when the resistance is aligned with the ... reed switch is tight. Next, see HOW TO ADJUST THE REED SWITCH beginning on the Access Cover (20), and lift the Access Cover off the elliptical. Then, retighten the Screw. 75 106 69 74 97 85 When you are finished, reattach the left shield, the access cover, the left disc, and...
Then, remove the seven indicated M4 x 16mm Screws (106), and remove the Left Shield (19). 20 106 106 19 HOW TO ADJUST THE DRIVE BELT If you can feel the pedals slip while you are pedaling, even when the resistance is aligned with the ... reed switch is tight. Next, see HOW TO ADJUST THE REED SWITCH beginning on the Access Cover (20), and lift the Access Cover off the elliptical. Then, retighten the Screw. 75 106 69 74 97 85 When you are finished, reattach the left shield, the access cover, the left disc, and...
English Manual
Page 35
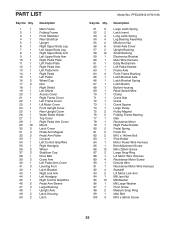
Qty. 1 1 2 1 3 1 4 1 5 1 6 1 7 1 8 1 9 1 10 1 11 1 12 1 13 1 14 1 15 1 16 2 17 2 18 1 19 1 20 1 21 1 22 1 23 1 24 1 25 1 26 1 27 1 28 1 29 18 30 2 31 4 32 2 33 1 34 1 35 1 36 2 37 2 38 1 39 2 40 1 41 3 42 1 43 1 ...
Qty. 1 1 2 1 3 1 4 1 5 1 6 1 7 1 8 1 9 1 10 1 11 1 12 1 13 1 14 1 15 1 16 2 17 2 18 1 19 1 20 1 21 1 22 1 23 1 24 1 25 1 26 1 27 1 28 1 29 18 30 2 31 4 32 2 33 1 34 1 35 1 36 2 37 2 38 1 39 2 40 1 41 3 42 1 43 1 ...
English Manual
Page 39
EXPLODED DRAWING C 20 17 106 26 106 22 27 106 39 29 106 29 106 106 106 106 106 19 106 18 106 29 106 29 106 29 106 21 106 106 17 Model No. PFEL09812.0 R0113A
EXPLODED DRAWING C 20 17 106 26 106 22 27 106 39 29 106 29 106 106 106 106 106 19 106 18 106 29 106 29 106 29 106 21 106 106 17 Model No. PFEL09812.0 R0113A
