

English Manual
Page 1
... number in this manual before contacting Customer Care. IMPORTANT: Please register this product (see the limited warranty on the back cover of this manual) before using this manual for reference. Serial Number Decal (under frame) QUESTIONS? MT Sat. 8 a.m.–-4 p.m. www.proform.com Model No. PFEL18010.6 Serial No.
... number in this manual before contacting Customer Care. IMPORTANT: Please register this product (see the limited warranty on the back cover of this manual) before using this manual for reference. Serial Number Decal (under frame) QUESTIONS? MT Sat. 8 a.m.–-4 p.m. www.proform.com Model No. PFEL18010.6 Serial No.
English Manual
Page 2
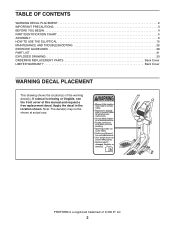
...PLACEMENT 2 IMPORTANT PRECAUTIONS 3 BEFORE YOU BEGIN 4 PART IDENTIFICATION CHART 5 ASSEMBLY 6 HOW TO USE THE ELLIPTICAL 15 MAINTENANCE AND TROUBLESHOOTING 26 EXERCISE GUIDELINES 28 PART LIST 31 EXPLODED DRAWING 33 ORDERING REPLACEMENT ...PARTS Back Cover LIMITED WARRANTY Back Cover WARNING DECAL PLACEMENT This drawing shows the location(s) of this manual and request a free replacement decal. If a decal is a registered trademark of ICON IP, Inc. 2 PROFORM...
...PLACEMENT 2 IMPORTANT PRECAUTIONS 3 BEFORE YOU BEGIN 4 PART IDENTIFICATION CHART 5 ASSEMBLY 6 HOW TO USE THE ELLIPTICAL 15 MAINTENANCE AND TROUBLESHOOTING 26 EXERCISE GUIDELINES 28 PART LIST 31 EXPLODED DRAWING 33 ORDERING REPLACEMENT ...PARTS Back Cover LIMITED WARRANTY Back Cover WARNING DECAL PLACEMENT This drawing shows the location(s) of this manual and request a free replacement decal. If a decal is a registered trademark of ICON IP, Inc. 2 PROFORM...

English Manual
Page 3
... your pedaling speed in a commercial, rental, or institutional setting. 5. do not arch your back straight while using the elliptical. 4. Do not use of serious injury, read all parts regularly. the pedals will continue to ensure that could become caught on each side...tighten all important precautions and instructions in the front and rear of the elliptical and 2 ft. (0.6 m) on the elliptical. The elliptical should not be used by or through the use the elliptical in a controlled way. 14. Always wear athletic shoes for personal injury or property damage sustained by...
... your pedaling speed in a commercial, rental, or institutional setting. 5. do not arch your back straight while using the elliptical. 4. Do not use of serious injury, read all parts regularly. the pedals will continue to ensure that could become caught on each side...tighten all important precautions and instructions in the front and rear of the elliptical and 2 ft. (0.6 m) on the elliptical. The elliptical should not be used by or through the use the elliptical in a controlled way. 14. Always wear athletic shoes for personal injury or property damage sustained by...
English Manual
Page 4
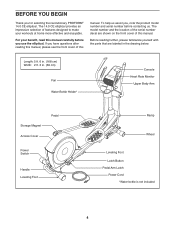
... cover of this manual carefully before contacting us. The 14.0 CE elliptical provides an impressive selection of this manual. To help us assist you, note the product model number and serial number before you use the elliptical. The model number and the location of the serial number...4 Length: 5 ft. 6 in. (168 cm) Width: 2 ft. 3 in the drawing below. If you for selecting the revolutionary PROFORM® 14.0 CE elliptical. Before reading further, please familiarize yourself with the parts that are shown on the front cover of features designed to make your benefit, read this...
... cover of this manual carefully before contacting us. The 14.0 CE elliptical provides an impressive selection of this manual. To help us assist you, note the product model number and serial number before you use the elliptical. The model number and the location of the serial number...4 Length: 5 ft. 6 in. (168 cm) Width: 2 ft. 3 in the drawing below. If you for selecting the revolutionary PROFORM® 14.0 CE elliptical. Before reading further, please familiarize yourself with the parts that are shown on the front cover of features designed to make your benefit, read this...
English Manual
Page 5
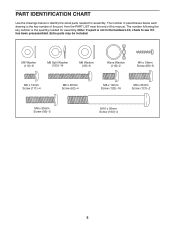
... assembly. Note: If a part is not in parentheses below to see if it has been preassembled. M6 Washer (112)–-8 M8 Split Washer (103)–-14 M8 Washer (95)–-6 Wave Washer (118)–-2 M4 x 19mm Screw (80)–-8 M6 x 12mm Screw (111)–-4 M6 x 50mm Screw (62)–-4 M8 x 16mm... Screw (102)–-16 M8 x 25mm Screw (121)–-2 M8 x 35mm Screw (92)–-2 M10 x 95mm Screw (100)–-4 5 PART IDENTIFICATION CHART Use the drawings below each drawing is the key number of the part, from the PART LIST near the end of this manual. The number in...
... assembly. Note: If a part is not in parentheses below to see if it has been preassembled. M6 Washer (112)–-8 M8 Split Washer (103)–-14 M8 Washer (95)–-6 Wave Washer (118)–-2 M4 x 19mm Screw (80)–-8 M6 x 12mm Screw (111)–-4 M6 x 50mm Screw (62)–-4 M8 x 16mm... Screw (102)–-16 M8 x 25mm Screw (121)–-2 M8 x 35mm Screw (92)–-2 M10 x 95mm Screw (100)–-4 5 PART IDENTIFICATION CHART Use the drawings below each drawing is the key number of the part, from the PART LIST near the end of this manual. The number in...
English Manual
Page 6
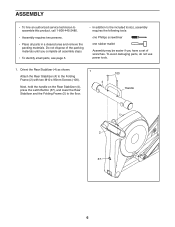
To avoid damaging parts, do not use power tools. 1. Orient the Rear Stabilizer (4) as shown. 1 Attach the Rear Stabilizer (4) to the Folding Frame (2) with two M10 x 95mm Screws (100). 4 Next, hold the ...
To avoid damaging parts, do not use power tools. 1. Orient the Rear Stabilizer (4) as shown. 1 Attach the Rear Stabilizer (4) to the Folding Frame (2) with two M10 x 95mm Screws (100). 4 Next, hold the ...
English Manual
Page 8
... of the Upright Axle (48) at the same time. 5 102 95 7 60 Avoid damaging the 118 Wire Harness (60) 5 Grease 48 Grease 118 102 95 6 8 Using a small plastic bag to two Wave Washers (118). Next, identify the Right and Left Upper Body Legs (6, 7), which are marked with four M8 x 16mm Screws...
... of the Upright Axle (48) at the same time. 5 102 95 7 60 Avoid damaging the 118 Wire Harness (60) 5 Grease 48 Grease 118 102 95 6 8 Using a small plastic bag to two Wave Washers (118). Next, identify the Right and Left Upper Body Legs (6, 7), which are marked with four M8 x 16mm Screws...

English Manual
Page 11
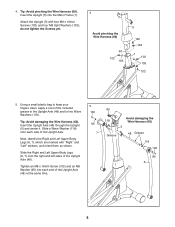
... of the Link Arm Axle (114). Insert a hex key into the Right Upper Body Leg (6) and the Right Link Arm (43) from the side shown. Using a second hex key, tighten another M8 x 35mm Screw (92), a Small Axle Cover (56), and an M8 Washer (95) into the Ramp (130). 131 5 130 10.... Tip: Avoid damaging the Small Axle Cover when tightening the Screw. Press the tabs on the other end of the elliptical. 92 Grease 114 6 95 56 92 43 11 9.
... of the Link Arm Axle (114). Insert a hex key into the Right Upper Body Leg (6) and the Right Link Arm (43) from the side shown. Using a second hex key, tighten another M8 x 35mm Screw (92), a Small Axle Cover (56), and an M8 Washer (95) into the Ramp (130). 131 5 130 10.... Tip: Avoid damaging the Small Axle Cover when tightening the Screw. Press the tabs on the other end of the elliptical. 92 Grease 114 6 95 56 92 43 11 9.
English Manual
Page 15
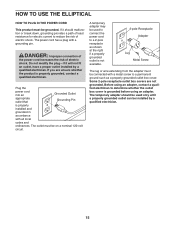
... must be on a nominal 120-volt circuit. If it will not fit an outlet, have a proper outlet installed by a qualified electrician. 15 HOW TO USE THE ELLIPTICAL HOW TO PLUG IN THE POWER CORD This product must be installed by a qualified electrician. Do not modify the plug—-if it should be...
... must be on a nominal 120-volt circuit. If it will not fit an outlet, have a proper outlet installed by a qualified electrician. 15 HOW TO USE THE ELLIPTICAL HOW TO PLUG IN THE POWER CORD This product must be installed by a qualified electrician. Do not modify the plug—-if it should be...
English Manual
Page 16
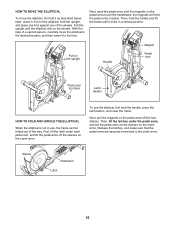
... sleeves on the pedal arms off the handlebars. Pull on the pedal arms touch the handlebars; Next, raise the pedal arms until it locks in use the elliptical, first hold the upright, and place one foot against one of the way. the magnets will hold the handle and lift the frame until... magnets on the upright Handle Magnet Pedal Arm Place your foot here Latch Button HOW TO FOLD AND UNFOLD THE ELLIPTICAL When the elliptical is not in a vertical position. Next, pull the magnets on the crank arms. To use , the frame can be folded out of the wheels. With the help of the...
... sleeves on the pedal arms off the handlebars. Pull on the pedal arms touch the handlebars; Next, raise the pedal arms until it locks in use the elliptical, first hold the upright, and place one foot against one of the way. the magnets will hold the handle and lift the frame until... magnets on the upright Handle Magnet Pedal Arm Place your foot here Latch Button HOW TO FOLD AND UNFOLD THE ELLIPTICAL When the elliptical is not in a vertical position. Next, pull the magnets on the crank arms. To use , the frame can be folded out of the wheels. With the help of the...

English Manual
Page 17
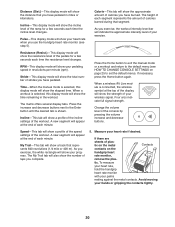
...Feet If the frame of the leveling feet beneath the rear stabilizer until the rocking motion is eliminated. HOW TO EXERCISE ON THE ELLIPTICAL To mount the elliptical, hold the upper body arms and step onto the pedal that you can turn the crank arms in the direction shown by ... until they begin to move until the pedals come to move with a continuous motion. Upper Body Arms Handlebars Pedals HOW TO LEVEL THE ELLIPTICAL If the elliptical rocks slightly on your floor during use, turn one or both of the elliptical flexes during use, turn the crank arms in the lowest position.
...Feet If the frame of the leveling feet beneath the rear stabilizer until the rocking motion is eliminated. HOW TO EXERCISE ON THE ELLIPTICAL To mount the elliptical, hold the upper body arms and step onto the pedal that you can turn the crank arms in the direction shown by ... until they begin to move until the pedals come to move with a continuous motion. Upper Body Arms Handlebars Pedals HOW TO LEVEL THE ELLIPTICAL If the elliptical rocks slightly on your floor during use, turn one or both of the elliptical flexes during use, turn the crank arms in the lowest position.

English Manual
Page 18
... an iFit Live module at any time, go to www.iFit.com or call the telephone number on the display, remove the plastic. 18 To use an iFit Live workout, see page 22. CONSOLE DIAGRAM FEATURES OF THE CONSOLE The advanced console offers an array of the ramp and prompts you... or CD player to the console sound system and listen to your favorite music or audio books while you can also measure your heart rate using the handgrip heart rate monitor. The console also features an iFit Live mode that enables the console to make your wireless network through an effective...
... an iFit Live module at any time, go to www.iFit.com or call the telephone number on the display, remove the plastic. 18 To use an iFit Live workout, see page 22. CONSOLE DIAGRAM FEATURES OF THE CONSOLE The advanced console offers an array of the ramp and prompts you... or CD player to the console sound system and listen to your favorite music or audio books while you can also measure your heart rate using the handgrip heart rate monitor. The console also features an iFit Live mode that enables the console to make your wireless network through an effective...
English Manual
Page 19
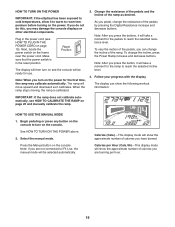
HOW TO TURN ON THE POWER IMPORTANT: If the elliptical has been exposed to cold temperatures, allow it calibrates. Make sure that the power switch...press the buttons, it will be ready for the pedals to iFit Live, the manual mode will take a moment for use. See HOW TO TURN ON THE POWER above. 2. Calories (Cals.)—-This display mode will show the following workout... Note: After you turn on the power for the ramp to room temperature before turning on the console. HOW TO USE THE MANUAL MODE 1. Select the manual mode. Plug in the reset position. Note: When you press the button, ...
HOW TO TURN ON THE POWER IMPORTANT: If the elliptical has been exposed to cold temperatures, allow it calibrates. Make sure that the power switch...press the buttons, it will be ready for the pedals to iFit Live, the manual mode will take a moment for use. See HOW TO TURN ON THE POWER above. 2. Calories (Cals.)—-This display mode will show the following workout... Note: After you turn on the power for the ramp to room temperature before turning on the console. HOW TO USE THE MANUAL MODE 1. Select the manual mode. Plug in the reset position. Note: When you press the button, ...
English Manual
Page 20
...—-When the manual mode is connected, the wireless symbol at the end of each segment represents the amount of calories burned during that you use the handgrip heart rate monitor (see HOW TO CHANGE CONSOLE SETTINGS on the handgrip heart rate monitor, remove the plas- The My Trail tab will...
...—-When the manual mode is connected, the wireless symbol at the end of each segment represents the amount of calories burned during that you use the handgrip heart rate monitor (see HOW TO CHANGE CONSOLE SETTINGS on the handgrip heart rate monitor, remove the plas- The My Trail tab will...
English Manual
Page 21
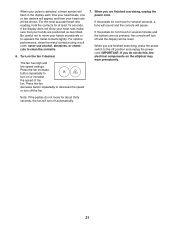
... not show your heart rate, make sure that your hands are finished exercising, unplug the power cord. never use alcohol, abrasives, or chemicals to turn off and the display will be shown. If the pedals do not ... pressed, the console will turn off position and unplug the power cord. For optimal performance, clean the metal contacts using a soft cloth; Press the fan increase button repeatedly to clean the contacts. 6. The fan has high and low...power switch to move for at least 15 seconds. Turn on the elliptical may wear prematurely. Be careful not to the off automatically. 21
... not show your heart rate, make sure that your hands are finished exercising, unplug the power cord. never use alcohol, abrasives, or chemicals to turn off and the display will be shown. If the pedals do not ... pressed, the console will turn off position and unplug the power cord. For optimal performance, clean the metal contacts using a soft cloth; Press the fan increase button repeatedly to clean the contacts. 6. The fan has high and low...power switch to move for at least 15 seconds. Turn on the elliptical may wear prematurely. Be careful not to the off automatically. 21
English Manual
Page 22
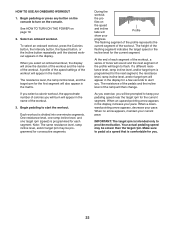
... pace. If you select a calorie workout, the approximate number of the workout. One resistance level, one ramp incline level, and one -minute segments. HOW TO USE AN ONBOARD WORKOUT 1. During the workout, the pro-
... pace. If you select a calorie workout, the approximate number of the workout. One resistance level, one ramp incline level, and one -minute segments. HOW TO USE AN ONBOARD WORKOUT 1. During the workout, the pro-

English Manual
Page 24
... Compete button to www.iFit.com or call the telephone number on the front cover of the iFit Live buttons. HOW TO USE AN IFIT LIVE WORKOUT Note: To use an iFit Live workout, you must have previously scheduled. In addition, you must have access to the beginning of the race. 7. See...
... Compete button to www.iFit.com or call the telephone number on the front cover of the iFit Live buttons. HOW TO USE AN IFIT LIVE WORKOUT Note: To use an iFit Live workout, you must have previously scheduled. In addition, you must have access to the beginning of the race. 7. See...

English Manual
Page 25
...display. To change the unit of measurement, press the Enter button repeatedly to view the audio setting for the voice of hours that the elliptical has been used. The display will appear in the display. Adjust the contrast level of measurement if desired. To exit this display, press and hold ...player or CD player. 5. Press the Power Ramp increase and decrease buttons to exit the information mode. 25 HOW TO USE THE SOUND SYSTEM To play button on the elliptical. 3. make sure that allows you turn the voice of the iFit Live module if desired. Press the Enter button repeatedly...
...display. To change the unit of measurement, press the Enter button repeatedly to view the audio setting for the voice of hours that the elliptical has been used. The display will appear in the display. Adjust the contrast level of measurement if desired. To exit this display, press and hold ...player or CD player. 5. Press the Power Ramp increase and decrease buttons to exit the information mode. 25 HOW TO USE THE SOUND SYSTEM To play button on the elliptical. 3. make sure that allows you turn the voice of the iFit Live module if desired. Press the Enter button repeatedly...
English Manual
Page 26
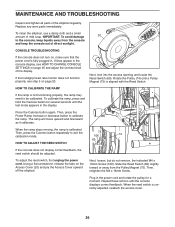
... the ramp stops moving, the ramp is aligned with the Reed Switch. Using a flat screwdriver, release the tabs on page 20. Plug in . To clean the elliptical, use a damp cloth and a small amount of the elliptical regularly. If lines appear in the display. Next, look into the access opening and locate the Reed Switch...
... the ramp stops moving, the ramp is aligned with the Reed Switch. Using a flat screwdriver, release the tabs on page 20. Plug in . To clean the elliptical, use a damp cloth and a small amount of the elliptical regularly. If lines appear in the display. Next, look into the access opening and locate the Reed Switch...

English Manual
Page 27
... the Access Cover upward off the left pedal arm, and reattach the access cover. Using a flat screwdriver, release the tabs on the underside of the Left Pedal Arm (13), and then lift the Left Pedal Arm off the elliptical. Then, plug in the power cord. Loosen the Pivot Screw (97). Then, remove...
... the Access Cover upward off the left pedal arm, and reattach the access cover. Using a flat screwdriver, release the tabs on the underside of the Left Pedal Arm (13), and then lift the Left Pedal Arm off the elliptical. Then, plug in the power cord. Loosen the Pivot Screw (97). Then, remove...

